Christmas Stollen, 2.0….Even Better!

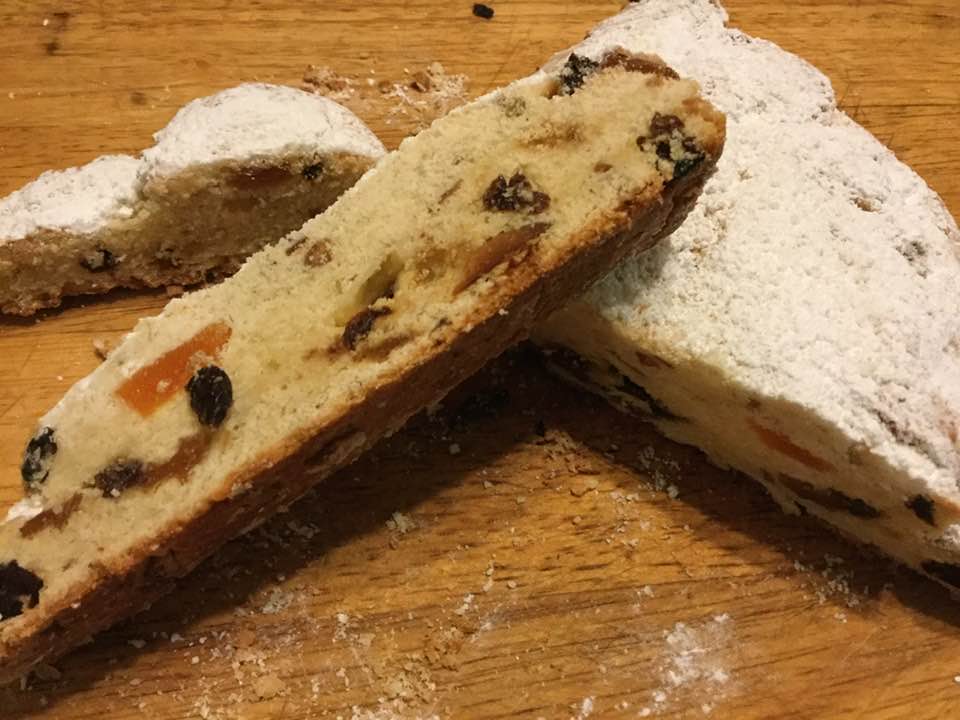
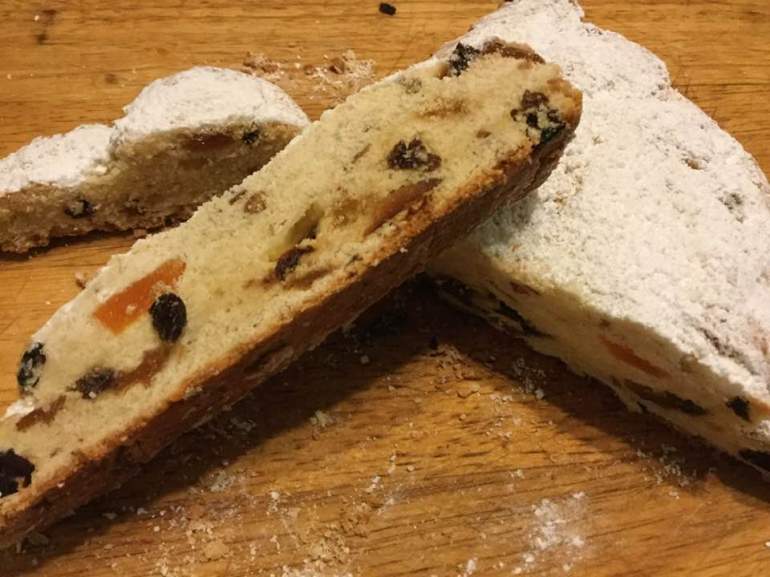
Gluten-Free Holiday Stollen Yield: two 10″ loaves

The classic Christmas stollen bread is made with yeast. Shush, don’t tell your gluten eating friends that this quicker, easier gluten-free version, made with baking powder as the rising agent, is even tastier in my humble opinion. Filled with dried fruit and toasted almonds and covered with a layer of melted butter and powdered sugar, this is more like pastry and is delicious with a cup of coffee or tea. Great choice for when company is coming as it isn’t that much work or time needed to create this masterpiece. Everyone will think you slaved all day to bake it. No need to tell them how easy it is! Its origins are Germanic but it isn’t heavy or dry; flaky and tender, pastry perfection. If you are searching for the perfect gluten free holiday treat; look no further. I cannot say enough good things about this treat. It is loved by all, and that second loaf makes a wonderful gift. I am looking forward to enjoying stollen this afternoon; in the oven baking right now!

I first made it 3 years ago, lost the recipe; had to get it again from the King Arthur Flour’s web site customer service center as they had removed it from their recipe rotation. They said it needed some tweaking. I disagree, it is just delectable although shaping it can be rather messy. It is far easier made without yeast which adds steps and can be finicky. I frankly don’t miss the yeast like I once thought I would. This dough is very tender and flavorful, I have been known to eat leftover tidbits raw it is that tasty. My family adores this pastry treat and will do nefarious things to get more stollen at Christmastime.

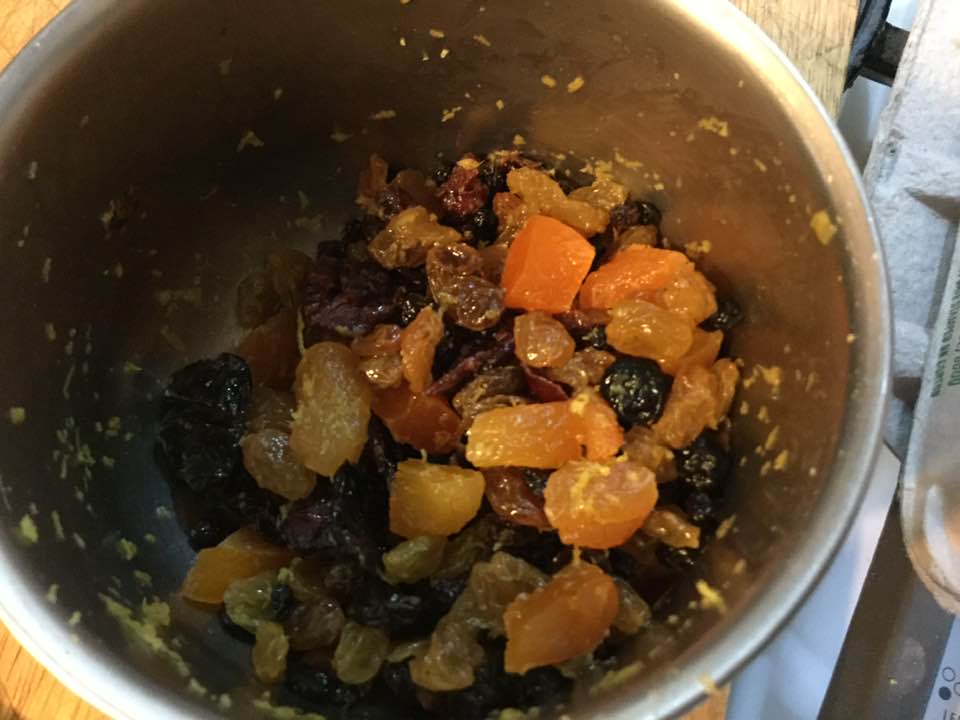
Notes: You could use orange rind instead of lemon rind and the dried fruit selection is entirely up to your tastes or your pantry. If you dislike the raisins substitute more dried fruit. One more good thing; it doesn’t require aging like a fruit cake. As soon as it cools you can cut a fat piece and enjoy a slice of heaven on earth!

Adding the butter
Butter is now integrated into dough using pastry cutter

Dough

2 1/4 cups King Arthur basic blend Gluten-Free Flour

1/2 cup granulated sugar

1 1/2 teaspoons baking powder

1/2 teaspoon salt*

3/4 teaspoon xanthan gum

1/2 cup (8 tablespoons) cold butter

3/4 cup ricotta cheese, part-skim milk type, let warm a bit to get it close to room temp. Can use whole milk ricotta if that is what you have.

2 large eggs, room temp

1 teaspoon vanilla extract

Grated rind of 1 small lemon; or 1/4 teaspoon lemon oil, or 1/4 teaspoon lemon extract

1/2 cup golden raisins

1/2 cup of your favorite dried fruits, chopped to 1/2″ pieces Yes, dried, not fresh. (I do apricots, cherries, currents, raisins or peaches/pears)

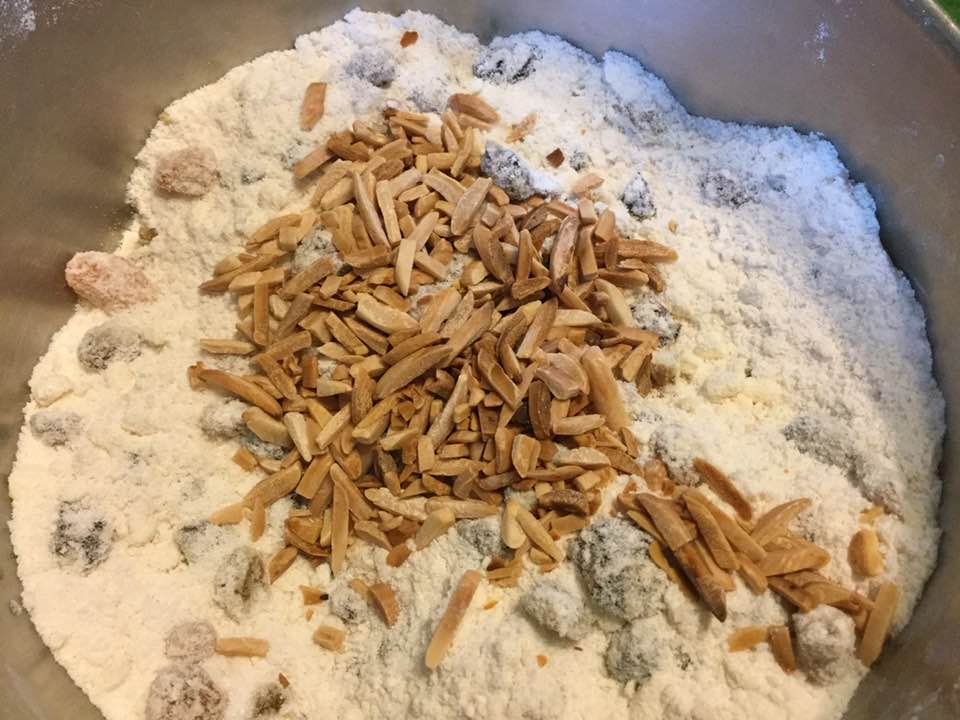
1/3 cup slivered almonds, toasted and cooled

—————

*Reduce the salt to 1/4 teaspoon if you use salted butter.

dried fruit and citrus zest

Topping

the dried fruit is mixed in!

Adding the toasted almonds
Adding the wet mixture into the dry dough
formed stollen ready to bake
baked and powdered
More powdered sugar sprinkled on using a sieve

4 tablespoons butter, melted

2/3 cup confectioners’ sugar

Directions

1. Preheat your oven to 325°F. Lightly grease a baking sheet, or line it with

parchment.

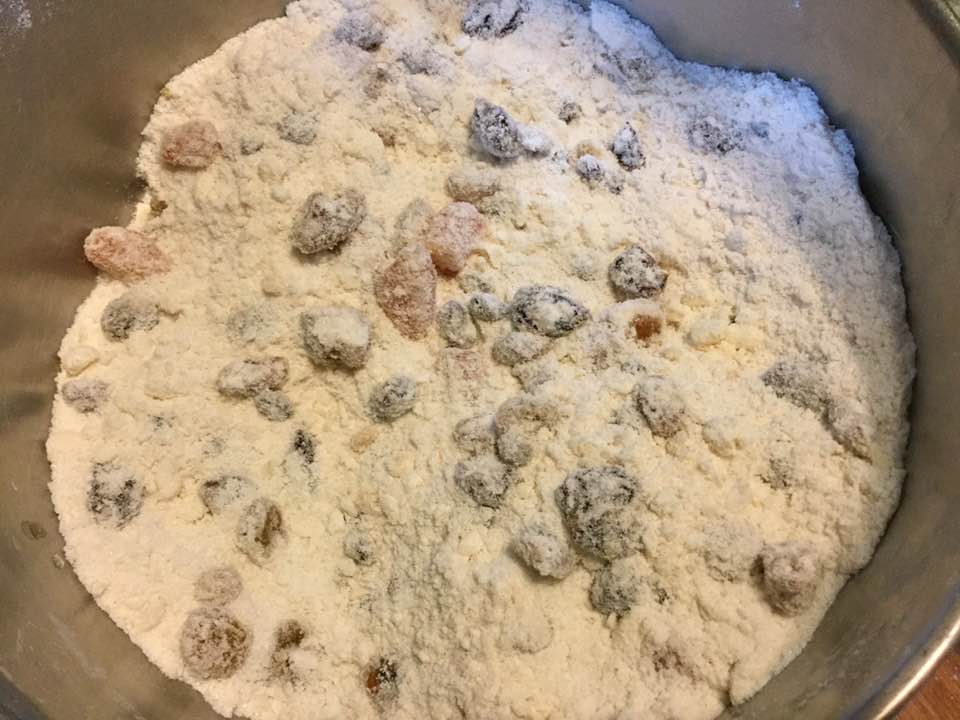
2. Whisk together the flour, sugar, baking powder, salt, and xanthan gum in a mixing bowl.

3. Cut the cold butter into small chunks, then blend it into the flour mixture to form uneven crumbs.

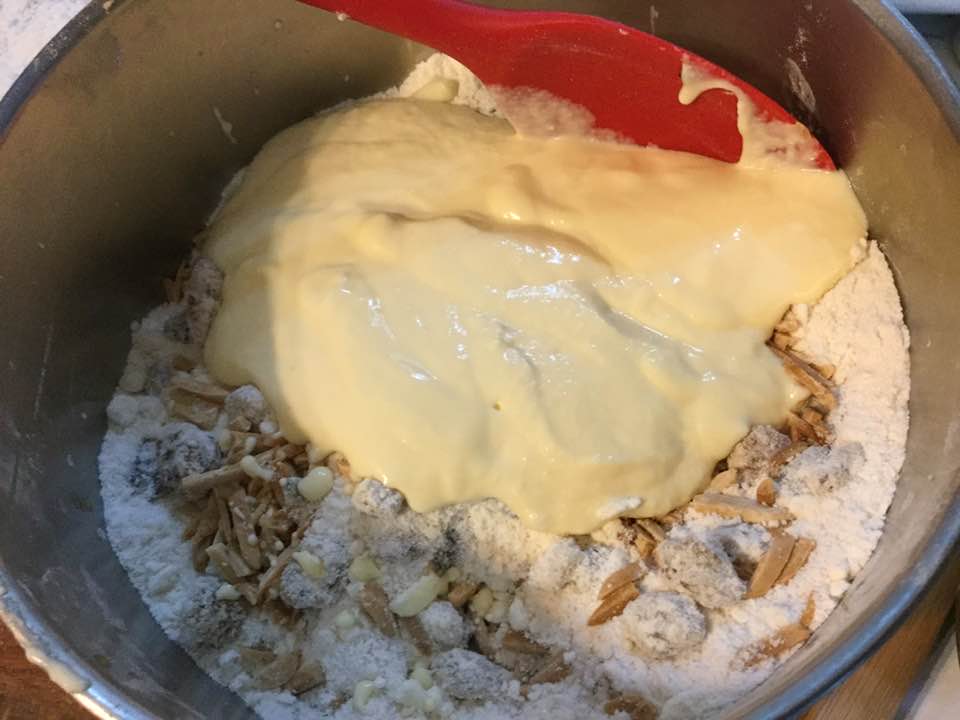
4. In a separate bowl, mix together the cheese, eggs, vanilla, and flavors.

5. Toss the fruit and almonds with the flour mixture until evenly distributed. Then combine the wet and dry ingredients, mixing until most of the flour is

moistened.

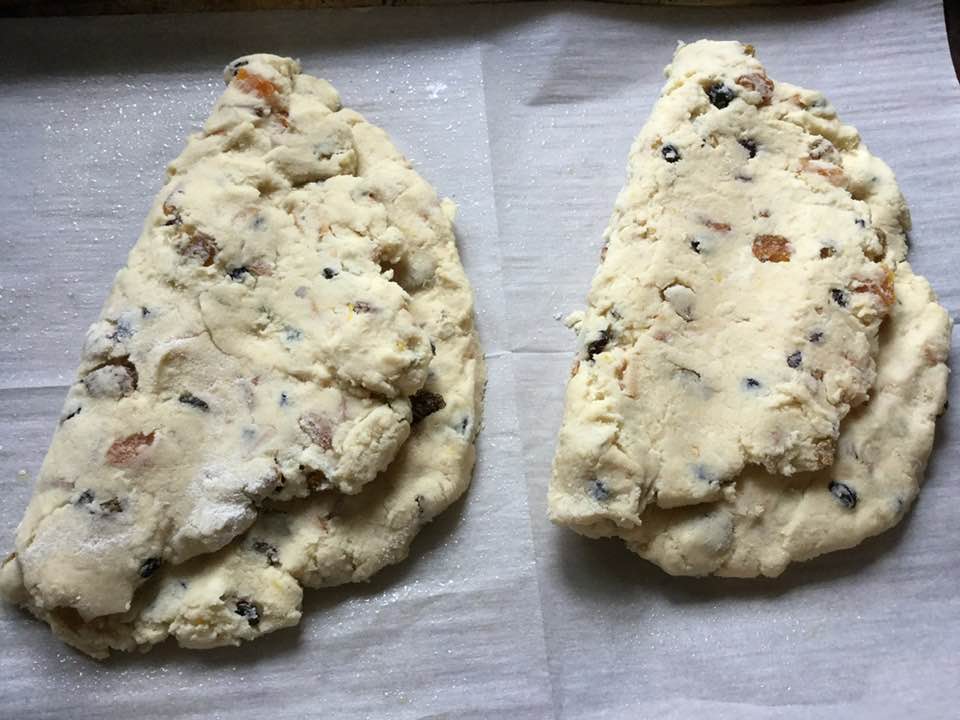
6. Turn the dough out onto a lightly floured work surface, and knead it two or three times, until it holds together. Divide it in half.

7. Pat each piece of dough into an 8″ x 7″ oval about 1/2″ thick.

8. Fold each piece of dough roughly in half, leaving the edge of the top half about 1/2″ short of the edge of the bottom half. Should you fold the long way, or the short way? The long way will give you a longer, narrower stollen, with shorter slices; folding the short way will give you a wider, fatter stollen, with longer slices.  I do the long way, your choice.

9. Use the edge of your hand to press the dough to seal about 1″ in back of the open edge; this will make the traditional stollen shape. It’s also the familiar Parker House roll shape, if you’ve ever made them. The dough will probably crack; that’s OK, just smooth it out as best you can.

10. Carefully place the shaped stollen on the prepared baking sheet.

11. Bake the stollen until they’re very lightly browned around the edges and on top, about 40 minutes. A cake tester inserted into the center should come out clean.

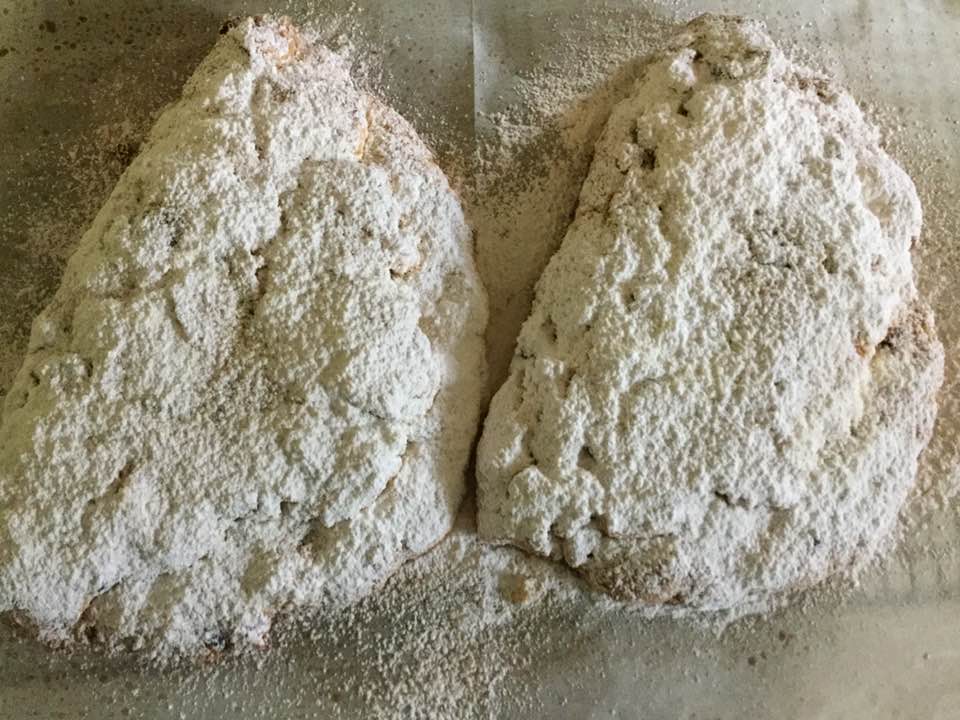
12. Remove the stollen from the oven, and transfer them to a rack. Brush them each with 2 tablespoons melted butter. Sprinkle heavily with confectioners’ sugar.

13. Allow the stollen to cool, then brush with butter again, and sprinkle with sugar again. Wrap in plastic wrap until ready to serve; serve within a week. If desired, sprinkle with additional sugar just before serving.

14. Yield: two 1-pound stollen loaves. I like to freeze one for another occasion if I am not gifting it right away. Enjoy!

Sugar Cookies… My Best Ever Effort!

I thought I had posted a sugar cookie recipe in a past year; nope. I have to say that sugar cookies are difficult to make out of gf flour; they have to be sturdy enough when rolled out that you can handle them and get them to the baking sheet. I can’t say that I have loved any I have made in past years; not terrible but just not the best. Yesterday I tried a totally different tack; I used my favorite Betty Croker cookie cookbook recipe that is normally made with all purpose flour and just subbed in 1 for 1 GF flour; I used Bob’s RedMill. Exact same amount. They were a bit fragile in the cut out process but I was able to do it and the flavor and texture is superior in my opinion.

Notes: I added lemon extract to give a bit more flavor and I sprinkled them with colored sugar. Do suggest you sprinkle as you make and not get the baking sheet coated in colored sugar as it burns and can have a negative flavor impact as well as causing cookie edges to burn. Let them cool on the cookie sheet for about 3 minutes so they are a bit firmed up and be gentle in that moving process to the cooling rack.

I kinda got these too brown; there was a lot of stray colored sugar on the baking sheet and I think 400 degrees was just too hot; I tend to generally lower the oven 20-30 degrees to keep things from over baking.

Angie’s GF Sugar Cookies

Ingredients:

3/4 cup butter or other solid butter substitute at room temp but not squishy

1 cup granulated sugar

2 room temp eggs, large

1/4 tsp. vanilla extract

1/4-1/2 tsp. lemon extract (or orange or more vanilla)

2 1/2 cups 1 for 1 GF flour mixture (I used Bob’s Redmill)

1 tsp. baking powder

1 tsp. salt

Directions: Put butter and sugar in stand mixer bowl, Beat until very smooth and light. You might want to stop a couple of times to scrape the bowl sides to help it blend. Add eggs one at a time, beating until blended in. Add extracts. Mix the flour and dry ingredients in a small pour spout bowl. Add to dough mixture in bowl, at slowest speed. Blend until smooth. Chill 1-3 hours. Use 1/4 of the dough at a time to roll out on lightly floured bread board. Roll to 1/8-1/4 inch thick. Use more flour to help it to not stick to rolling pin. I actually used a thin flat metal pancake turner/spatula to shove under th dough edges to release the dough from the board as it kept sticking. Too much flour will make them tough so the pancake turner helped keep me from excessive flouring. Cut with your favorite cookie cutters. Use that same turner to move them to the baking sheet. I strongly urge that you decorate before placing on ungreased cookie sheet. Our favorites are green and red decorating sugar for much of the cookies, a blue for stars, and some tiny colored decorating balls on the Christmas trees. We love christmas pigs and small fish as well as the traditional trees and stars. Don’t try any super fancy cutouts; this dough is not so good for fancy shapes.

As you are cutting them out get the oven ready. Put oven shelves on two middle racks. Heat oven to 380 degrees (the 400 degrees of the original recipe seems too hot). Leave 1 to 1.5 inches between cookies. Bake 6-9 inches. I like to put all the small cutouts on one sheet and the bigger ones on its own baking sheet as the small ones will bake a bit faster. Pull out when the edges are light brown. let stand on sheet for 3-5 minutes. Gently move each cookie to a cooling rack. Best when they are fully cooled; warm they don’t have the correct texture.

I did only make a half recipe; with 6 tbsp. of butter. as I just didn’t have the audience to eat a whole batch of them. I have half the dough wrapped tightly and stored in the fridge for making fresh next week. I save all the scraps and roll them out as the last roll out of dough. More than 2 roll outs will make that dough tough and dry so some scraps end up in the trash as they get too reworked. Enjoy these cookies; they are definitely worth the effort and are a blast from my Christmases before my diagnosis of celiac disease.

Chocolate Chip Cookies To Love This Christmas!

Years ago I searched for the holy grail of GF baking: home made chocolate chip cookies.  Bet you thought I was going to say some sort of bread!  That’s another post entirely.  Anyway, when I went GF almost 9 years ago I made a batch of chocolate chippers that were gf. They were rather sweet and didn’t taste all that great.  I keep looking for something that would approximate the real deal cookies I loved all my life.  Recipes I came across seemed to require that I buy weird vegetable shortenings or use Crisco. I draw the line at Crisco. Or they used odd flour blends and I feel it’s just not worth it to me to add another flour mixture just for one cookie recipe.  So I had not made chippers in years.  Missed them….desperately.  Store ones I tried were small, hard, drab in flavor and incredibly pricey. Until I went to King Arthur’s website and looked in their cookie recipes.  There it was: cookies made with the same flour blend I use and made with butter, one of my few chosen shortenings.  Glowing reviews and advice; said to make them and refrigerate a day or better yet, freeze them formed and ready to bake in a few minutes.  Comments about how much they are like Tollhouse cookies, great texture and flavor.  Bingo, this seemed so hopeful. So…Less than a week later I made up a batch; Goal scored; perfect brown sugar nutty flavor and texture; not too hard or too soft. I am a happy chocolate chip cookie lover at last! Lots of you probably bake chocolate chip cookies for Christmas so I decided to reblog this cookie so you could easily make a batch.

spicy-tomato-jam-005

When I first made them I put some in my cookie jar, closed it tightly and 4 days later those cookies (what remains) were still delicious. That is pretty long for a gluten free baked good. By the fifth afternoon my last cookie in there was getting soft so suggest not holding them for more than 4 days in a jar. A big bonus I love isthat they can be frozen ready to bake in like 12 minutes.

<img

This is my go to basic chocolate chip cookie recipe; none other will do. I love that I can freeze them ready to bake and in 12 minutes I have warm fresh gooey cookies!

So, if you are still looking for a great gf chocolate chip cookie look no further:

http://www.kingarthurflour.com/recipes/gluten-free-chocolate-chip-cookies-recipe.  Enjoy!

Originally published in 2016. Minor text changes.

Russian Teacakes – A Christmas Classic

These miniature snowball cookies were the foundation of the Christmas cookie baking season when I was a kid.  They were always made every year, sometimes a second batch had to be baked as we had eaten them all before the big day!  You can use pecans but I rarely do; walnuts are cheaper and I sort of prefer their flavor for this cookie.  Some people call them Mexican Wedding Cookies but we generally called them Russian Teacakes… For me it is not Christmas without these cookies so I was extremely pleased to find a great gf recipe. My sisters think they are better tasting than the old regular recipe!

They are easy to make with not too many ingredients.  Be careful lifting them off the pan as they are delicate until fully cooled. The texture and subtle flavor of this GF version is actually superior to the wheat flour recipe of my childhood. When you bite into one it shatters into a delicious mouthful of sweet cookie. They are delightful with a cup of tea or coffee.  My family clamors for a few to take home!

If you like them really sweet sprinkle on extra powdered sugar, less of it makes them perfect for those who are not used to too much sweetness. No one will ever know they are GF and you will get complements on their flavor and texture.  This recipe is from Annalise Roberts’ fabulous Gluten-Free Baking Classics with some minor changes by me. Enjoy: they are rather addictive cookies!

xmas cookies 006

Russian Teacakes

1 cup unsalted butter, room temperature

6 tbsp. powdered (confectioners) sugar

2 tsp. vanilla extract

2 cups brown rice mix (recipe below)

1 tsp xanthan gum

1 cup walnuts or pecans chopped fine

Confectioner’s sugar for sprinkling

Directions: beat butter and powdered sugar in large bowl of stand mixer until light and creamy.  Add vanilla, beat in.  Add flour and gum, mix in until well blended, stir in walnuts until distributed.  Chill dough for an hour.

Heat oven to 350 degrees.  Form dough into 1 inch balls. Roll in powdered sugar if you like.  Place on cookie sheet lightly sprayed with Pam (not the baker’s version that has flour).  Place about 1 ½ inches apart.  Bake 13 to 15 minutes until lightly browned on top and bottom.  Cool on pan for 5 min and then sprinkle with lots of powdered sugar before placing on wire rack to cool. I like to sift it onto the cookies so the coating is even.  You could put a sheet of wax paper under the wire rack to catch the excess sugar.  Store well wrapped: in airtight container, in fridge for a week or freezer for up to 30 days.  You could store unbaked dough in fridge for a few days.

Brown Rice Flour Mix base mix  (same as King Arthur gf blend)
2 c brown rice flour

2/3 c potato starch *not potato flour

1/3 c tapioca flour


Note: First posted December 2014 on my blog.  Minor revisions have been made since then.

Thumb Print Cookies 2.0 GF and Fabulous!

As children we each had our favorite cookies to make, this was traditionally my next older brothers’ to bake but once grown up I began to make them ‘cause they are addictively tasty.  I love it made with apricot jam, you can used chopped slivered almonds instead of walnuts for that version.  But, any flavor good quality jam will work, pick what you like.  I am planning two flavors this time; homemade raspberry jam and some store bought but excellently flavored cherry jam. Like getting two cookies out of one batch of dough.

xmas cookies 003
xmas cookies 002

A few  Christmases ago a dear friend gave me a new cookbook “Gluten-Free Christmas Cookies” by Ellen Brown.  I have tried several recipes and all were fantastic including this one, I swapped the candied red and green cherries for jam, but you can go old school and use those freaky candied cherries. It is made with cornstarch and white rice flour; not a flour blend but you should be able to find rice flour in a gf flour department or in a Chinese grocery store. Every grocery store has cornstarch. I am actually going to swap out some of the white rice flour for brown rice flour to make the flavor even more similar to gluten based flour. I will let you know how that goes; baking it this coming week. Use the jam you like to put on your toast! That is better than using something you are not particularly fond of.

Jam Thumbprint Cookies

Ingredients:

1 ½ cup white rice flour (or a 50/50 blend of white rice and brown rice flours)

1 cup sifted confectioner’s sugar

½ cup cornstarch

1 tsp. xanthan gum

1 tsp. cream of tartar

Pinch of salt

2 sticks unsalted butter sliced into thin slices

1 lg egg

1 Tbsp. whole milk

1 tsp. vanilla extract

1 cup finely chopped walnuts

½ cup jam; raspberry, peach, strawberry

INSTRUCTIONS: Combine dry ingredients in a large bowl food processor, steel blade, blend briefly.  Add butter to work bowl and process off and on until it resembles coarse meal.

Combine egg, milk and vanilla in a small bowl; whisk. Drizzle into the work bowl, pulse about 10-12 times until it forms a stiff dough.  If it doesn’t come together, add more milk a tsp. at a time. I added a tsp. more of milk to get the dough to form up.

Chill the dough for 15 to 20 minutes.

Heat oven to 350 degrees. Put racks in the middle of the oven. Place chopped walnuts in a wide shallow bowl and roll 1 1/2 inch balls of dough.  Roll them in the chopped walnuts, place on a parchment paper lined baking sheet.  Press an indent in with a finger and fill with about ½ tsp. jam.  Bake 14-15 minutes, until just firm but not browned.  They will be very delicate to the touch.  Let cool 2-3 minutes on sheet before carefully moving them to a cooling rack using a metal pancake turner. I bumped a couple and they just fell apart on the sheet; very fragile while hot.  They will solidify once they cool.  I store mine in cookie tins or Tupperware containers.  They won’t last as long as wheat flour based cookies but they get snapped up fast so that shouldn’t be a problem.  I supposed you could freeze them for a week or two if necessary.

They are not too sweet and so delicate, great with a cup of tea or coffee.  As good, if not better, then when I made them with all purpose wheat flour years ago before I had to go gluten free.  Your family will be amazed that they are gf, no one you serve them to will ever guess.  Totally tasty and fun to make with your kids! Enjoy.

This is a reposting of the same recipe I posted back in 2016. Minor text changes.