Yellow Pear Tomato Jam…Yeap That’s A Real Jam

When I was a kid my mom used to make this jam out of yellow pear tomatoes.  Those are small and yellow; about the size of a large grape tomato, and yes, they are shaped like a pear.  Just really tiny.  They grow in a viney mess of a plant and are definitely old school tomatoes but you can still buy the seeds from superseeds.com. yellow-pear-tomato-jam-001

It had a cinnamon flavoring cooked deep into the conserve. It is sweet as any fruit jam generally is, so get that flavor of traditional tomato sauce totally out of your head!  Yes, sweet cinnamony tomato jam.  It can be done and is amazingly yummy.

Mom made this jam for my father every late summer when the yellow pear tomatoes were loaded with ripe fruit. He loved chowing down on it smeared thickly on a big slab of homemade white bread coated with fresh butter. I couldn’t find a recipe anywhere online so I have been experimenting for a couple of years.  Finally, I think I have perfected my version replicating Mom’s delicious conserve.  I think the secrets are to cook it long and slow until it is truly jammy in texture and the spices are enough but not overwhelming the tomatoes. We will be enjoying it this winter…on gluten free bread, of course!  You could also eat it on top of cream cheese spread on a cracker. Or use it in a recipe to add flavor; maybe a broiled fish dish?  I am going to experiment a bit with it to find more ways to enjoy my tomato jam.


Daddy’s Yellow Pear Tomato Jam
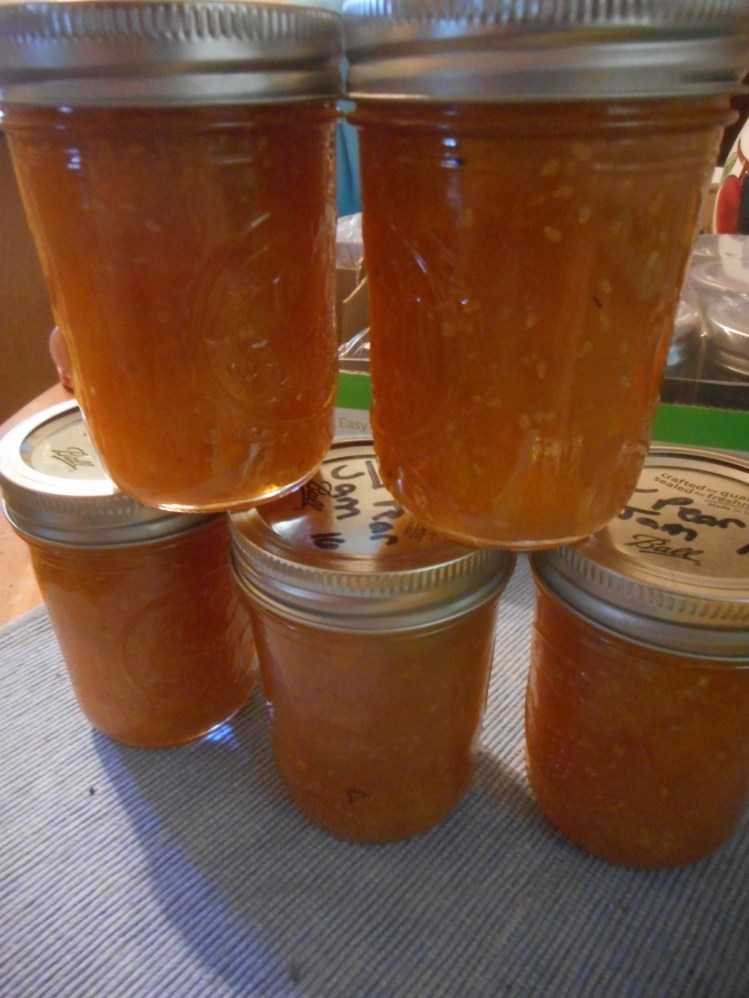
Yield: five 8-ounce jars

Ingredients
1 lemon
3 1/2 pounds yellow pear tomatoes
2 cups sugar
3 small cinnamon sticks
4 or 5 whole cloves
4 tsp pectin mixed with 2 tsp. sugar

Directions

Wash the yellow pear tomatoes,  chop up somewhat; halve the larger ones.  Then put in heavy wide sauce pan, add the sugar. Turn on low and let the sugar melt, once sugar is melted turn up some, stir frequently. Using a zester, remove the zest from the lemon in wide strips, leaving the bitter white pith behind. Cut the lemon in half and squeeze the lemon juice through a strainer into a dish. Add the lemon zest, lemon juice, cinnamon sticks, and cloves to the cooking tomatoes. Cook over medium-high heat, stirring occasionally, until the tomatoes are juicy and the sugar dissolves, 15 to 20 minutes.  Add the pectin and sugar mixture. Continue to cook, stirring occasionally, until the tomatoes are dark and syrupy and a candy or deep-fry thermometer registers 220 degrees F, 40 to 50 minutes (the timing may vary depending on the juiciness of the tomatoes). Reduce the heat if the mixture starts to scorch. I didn’t really use the thermometer this last time; just stirred it often and waited for it to reduce down to a thick jammy consistency.  That consistency is key

Discard the cinnamon sticks and cloves.  They have done their part in flavoring the jam and you sure wouldn’t want to bite down on a clove hiding on your jammed up toast! Sometimes I wash up the cinnamon sticks, let them dry and put them in a small dish as a room potpourri, waste not want not! They still have a lot of cinnamon flavor left in them….

Meanwhile, sterilize five 8-ounce canning jars and lids in boiling water.  I think 15 minutes in bubbling water for jars, and 5-6 for lids is fine.

Fill the jars with the tomato jam mixture, leaving 1/4 inch headspace, then seal and process ten minutes in a hot water bath.  Cool and store in a dry, cool, non sunny location.  I always label my jam; sometimes we forget and it is just safer to write a label of what it is and when it was canned so you will know 10 months later just what you have in that jar…  Enjoy!

Kombucha Tea for Great Health


A few months ago I tried some kombucha tea.  I heard it was pretty good for your gut/tummy and thought that as a celiac, it might help…so why not give it a try. I bought a 16 ounce bottle of berry flavor.  It was pretty tasty, great zing to it. Tried another flavor, ginger…loving how my tummy felt after drinking half a bottle.  So I did some research on kombucha tea.  Sounds mysterious but it turns out to be an ancient Chinese beverage, around for thousands of years with many claims to promoting improved health. Made of sweetened black tea that is fermented to create this fizzy liquid probiotics elixir which many credit their good health to.  The yeast in the scoby which is like a vinegar mother feed off of the sugar in the tea.  When it is finished brewing the tea doesn’t taste like tea and the sugar is all gone.  Magical!

This is one of the sites I went to; lots of easy to understand information and pictures of this product and the process of making it. http://www.thekitchn.com/how-to-make-kombucha-tea-at-home-cooking-lessons-from-the-kitchn-173858.  Here is a quote from that site about the benefits of kombucha tea: “Kombucha is indisputably full of probiotics and other happy things that our intestines love and that help boost our overall health.”  kombucha tea

A bottle of kombucha tea is about $3.50 to $4.  That can add up fast when you drink a half bottle pretty much every day. So I did some more research and decided to learn how to make my own. Finding that kombucha tea is simple was a relief but I had some trouble finding the kombucha scoby which is like a vinegar mother; it is a miraculous probiotics factory in the shape of a flat white/beige rubbery mushroom like object.  It is sort of weird looking.  It floats on the surface of the tea during fermentation.  It covers the entire surface of the tea in its bottle and many think it protects the tea from air and contaminants. It is made of cellulose plus many helpful yeasts and those probiotics we should to have in our tummies working overtime for a happy belly. Since I couldn’t find anyone selling it locally I did yet more research and discovered I could create my own scoby.  All it took was a bottle of original unflavored and unpasteurized raw kombucha tea, some sweetened black tea, a big glass jar, and some patience.

It is quite simple; put the store bought kombucha tea in the big, well-washed jar, add the room temperature sweetened home made black tea and cover the lid with a paper towel fastened on with a rubber band.  Put in a dark place where direct sun doesn’t hit it and wait.  Wait 2 weeks; wait up to another 2 weeks. Over that time, the scoby miraculously forms on the surface of the black tea/kombucha mixture. It starts as a bubble film that grows thicker and more opaque over time.  Bingo, you got a scoby. With it you can make your own kombucha tea week after week.  Here is a link to the site I got my information on; very comprehensive I think. http://www.thekitchn.com/how-to-make-your-own-kombucha-scoby-cooking-lessons-from-the-kitchn-202596

shepherds pie leek pasta 004

My kombucha scoby resting on a plate while I wash out it’s big bottle, kinda creepy looking I know but think of it as a home probiotic factory!

I make a half gallon at a time, saving one cup for my next batch.  It takes about 7 to 10 days for the tea to complete the fermentation process. Once you have a scoby the process is very similar but shorter than growing a scoby. I put a cup of kombucha tea in my big gallon jar containing the scoby; add room temperature sweetened black tea.  Put it in your non-sunny location, about 70 degrees is the perfect temperature. Let it stand so the yeast in the scoby can digest all of that sugar in the black tea. Taste and see if it is to your liking and then decant and start a new batch. I put mine in clean pint jars and put them in the same semi-dark location for a day to get fizzy.  Then in the fridge they go to chill. I normally drink the entire bottled batch by the time a new batch is ready. No leftovers!

shepherds pie leek pasta 005

Kombucha tea freshly bottled

I find it a refreshing light taste, a bit like cider vinegar but more flavorful and not as sour. I love the taste of it and how wonderful it makes my tummy feel. Great if you have celiac, leaky gut, Crohns, stomach ulcers, or any other digestive problem. Some folks claim it helps arthritis and depression, which may or may not be so. The best part of choosing kombucha tea is that the probiotics in this ancient brew stay in your system rather than flushing daily as the probiotics in yogurt or pills do.  It is a natural way to promote a healthy gut.  And who doesn’t want one of those!

kombuch tea 001

Here is my kombucha scoby doing it’s job; nearly ready to bottle.

I know the whole process seems weird – to use a scoby to make kombucha tea and if that throws you, I suggest you just buy the tea at the store and enjoy without the make it yourself experience.  But if you are like me and love DIY projects, this is an easy one to give a try.  Have some kombucha tea and have a happy tummy!

PS: You might want to strain the tea right before you drink it; can be some little blobbies which are baby scobies trying to form. Ick I know but that tells you that your kombucha is healthy. I strain it into my drinking glass.

FYI: I do sell the scobies on craigs list as mine gets thick and needs to be split so I sell extra scobies which makes my kombucha tea basically free.  Great deal.  Great tasting beverage. Great for your gut.

Homemade Sauerkraut for 2016

In the Lehigh Valley and many other places in the USA there is a tradition of pork and sauerkraut for New Years Day dinner for good luck in the new year. I don’t know about that although I am making just that for lunch on Friday. But what I do now know is how to make my own kraut. A few post ago I wrote about kefir which is full of fantastic probiotics. A promise was made to give you a post about another food full of probiotics.

Well…this is it! How to make homemade sauerkraut. Guessing that you are cringing at the very thought of it but honestly it is quite a simple project and the taste is strangely addictive. I like to eat a couple forkfuls every day for increased gut health, a concern for those of us with celiac disease. In the past I was not a huge fan of store sauerkraut but homemade is a different animal. It is zingy on the tongue and I really just enjoy it. Knowing it is so good for me is the icing on the cake. You may say why bother but the truth is that store kraut is pasteurized and all the good probiotics are cooked right out of it. Buying raw kraut is a bit hard to find and quite pricy. Being a DIY sort of gal I enjoy that sort of fun and wanted to give it a try. Call me hooked!

christmas baking 2015 019

chicken with dates and olives 038

Ready to eat!

Angie’s Sauerkraut.

1 large head of cabbage
3 tbsp. fine sea salt (Mortons will do as well I imagine)

Directions: remove the outer layer of leaves and cut in half. Use your coarse blade on a food processor or a slicer and chop it up. Not too fine. In my first batch I did half by hand and half in my Kitchen Aid shredder. I found the machine chopped cabbage was too fine although quite edible. Better to have it a tad coarse is my feeling but entirely up to you. I use a big sharp chef’s knife and hand chop quarters of cabbage into thin shreds and cut again once or twice across to shorten the strands. Do remember to cut out the core; too hard for making into kraut.

As you get a pile chopped load it into a big wide mouth jar. I have a tall glass canister I use for kraut production. You need a glass or ceramic jar. No metal. I wouldn’t suggest plastic either. You can buy a special sauerkraut maker jar with a fancy lid that vents the jar. Or you can go low tech and put a layer of olive oil on top the loaded jar to keep the air off the kraut. As you load it sprinkle each big clump with the salt. Fill it to the top using up the salt. I press down after adding each clump of shreds. The salt will cause the cabbage to release water. Fill the jar as full as possible. I like to use an empty glass canning jar to press down the cabbage.  In a few hours it will have released enough liquid to cover the cabbage. You can’t allow the cabbage to be above the liquid. Put a lid on top to keep dust out. Do not refrigerate; the process won’t work well if it is chilled before four weeks passes.

Now comes the hard part. The waiting…30 whole days, it should be edible after about 20 but it tastes more krauty after 30, actually I like it best by about 40 days. So be strong and wait until the thirty days is up. It will be a touch sour and take some getting used to but I really love the crunchy flavor which is missing in that pasteurized stuff you buy in the grocery store.

I include a link to a webpage on how to make kraut: http://www.vegetable-gardening-online.com/making-sauerkraut.html

And just for extra help: a webpage to use in trouble shooting your kraut and to reassure you that you are doing it right as well as giving some great ideas for how to make sauerkraut at home. http://www.foodrenegade.com/3-biggest-fermenting-mistakes-youre-already-making/

If you are a DIY sort, this will be a fun winter project. It is too close to New Years Day so if you want sauerkraut with your pork you should toddle off to the grocery store and buy a bag or a can. I am doing that because I don’t have enough kraut on hand for the making of that time honored New Years Day recipe. Enjoy and Happy New Years to all my readers.