Green Summer Soup – Kermit Would Approve!

I have been enjoying a cook book called “Feel Good Food” by Giada de Laurentiis of Food Network fame.  This soup recipe just jumped out at me; my fridge or garden contained all the veggies in it, it sounded interesting and so I had to try it.   Here is a picture I took of a bowl of it.  Doesn’t do it justice at all; it is brighter in color and lighter on the palate.  Refreshing when cold too!Image

My mom loves soup so I took her some and it disappeared rapidly.  Simple to make, healthy, tasty and my mom liked it! Home run.

I used loose leaf garden lettuce in my version.  Great way to use up an excess of garden lettuce before it can bolt!  The original uses a head of Bibb lettuce.  I wouldn’t suggest iceberg or romaine but any soft lettuce should work.  I skipped the topping of fennel fronds she suggests; up to you on that issue.  An alternative topping might be a few sprigs of finely chopped garden lettuce.  And if you are a vegetarian I am sure you can easily substitute veggie broth for the chicken broth. It is tasty both warm and cold which I like.   Image

A note on shallots.  They are excellent in many recipes; more subtle than onions so I suggest you try it with shallots if at all possible. I get them fairly cheap at Valley Farm Markets in Bethlehem. I am positive Wegmans carries them too.  Image

Green Pea, Fennel and Lettuce Soup


3 tbsp butter

1 medium fennel bulb chopped; about 2 cups

2 large shallots

1 medium head Bibb or Boston Lettuce, chopped (about 4 cups)

1 ten ounce bag petite peas, frozen (I weighted that out from a pound bag of peas)

1 ½ cup chicken broth

¾ tsp. fennel seeds

½ tsp kosher salt

½ tsp. fresh ground black pepper

Melt butter in a big heavy bottomed sauce pan.  Add fennel and shallots.  Cover and cook, stirring occasionally until they soften 6-7 minutes.  Add he lettuce and stir until wilted; 1-2 minutes. Mix in broth, peas and a cup of water, bring to point of boiling, lower heat, cover and simmer for 6 minutes.  Let cool partially.  Image

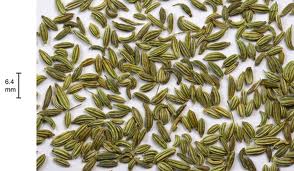
Puree in blender in 3 batches adding ¼ tsp fennel seeds to each batch.  Place in bowl and return all soup to sauce pan, add salt and pepper, reheat and serve warm but not hot.  Might need to thin with water.  Also yummy chilled.

This is naturally gluten free and will keep in your fridge for a few days, if it lasts that long.  I call it “green soup” for short and it is nourishing and tasty for lunch on a hot summer day.  This recipe is a keeper for me and I hope the same is true for you.

Bittersweet Chocolate Tart….Best Chocolate Tart Ever!

Two years ago I made this dark chocolate tart and we ate it around a bonfire. Someone had the bright idea of putting toasted marshmallows on their slice.  Last Saturday I made the same tart but gluten free and we made sure to have plenty of marshmallows to toast and top our slices with.  Most of us had seconds, but I was able to save a tiny sliver for my mom to enjoy.  It was a big hit with all of the chocoholics there so here is the recipe.

Bittersweet Chocolate Tart

Crust

1 cup gf flour (recipe below)

¼ cup sugar

1 tsp xanthan gum

¼ tsp salt

½ tsp cinnamon

5 tbsp. butter cut into 5 pieces

1 tsp. vanilla extract

1 tsp. water

Mix all the dry ingredients in the bowl of a stand mixer.  Add the butter pieces and blend until they are tiny crumbs.  Then add the vanilla and 1 to 2 tsp. water and blend.  It should be thick crumbs.

Spray a 9 inch tart pan with a removable bottom with cooking oil and then sprinkle with some gf flour; shake to coat.  Dump the crumbs of the crust evenly all over the tart pan bottom and press in with your fingers to make a fairly even crust, be sure to push some up the short sides of the pan so it is to the top of the metal and not too thick near the edges.

Bake at 350 for 11 or 12 minutes.  Let cool while you make the filling.

Image

Filling Ingredients

¾ cup heavy cream

1/3 cup whole milk

7 ounces bittersweet chocolate, I like Ghirardelli.  Break into small squares/pieces.

1 large egg slightly beaten

Put the milk, heavy cream and chocolate in a heavy bottomed sauce pan and heat on low to moderate heat; stir often until chocolate is melted.  Remove from heat and cool a few minutes.

Add the beaten egg, blend well.  Pour into the tart pan and bake at 375 for 15 minutes. 

Brown Rice Flour Recipe

Ingredients

–         1 c brown rice flour –

–         1/3 c potato starch (not potato flour-

–          3 tbsp tapioca flour

Directions

Mix all the flours in a big jar or bag

 Image

This tart is best eaten warm with two or three toasted marshmallows pressed onto the top.  Whipped cream or vanilla ice cream is also yummy.  This picture was taken in total darkness with an i-phone and the owner of this slice of tart was ticked off that her marshmallows cooled while the shot was made so she toasted up two more marshmallows and had all four on her slice of tart.  This dessert is seriously delicious and really easy to make. If you love dark chocolate this is a must recipe for your repertoire.  It can easily be made by you wheat eaters; just use your favorite cookie tart crust recipe.  The filling will be the same.  Now, go get some good chocolate and make your own tart and don’t eat the whole thing yourself; share it with someone you love!

Fabulous Fish Fry

Somethings we celiac sufferers crave are just the simple meals that most of you take for granted.  Like some crispy fried fish.  All the fish that is in the freezer case all battered up is, of course, made with flour that contains wheat/gluten.  And, of course, totally unsafe for people like me.  I have been dreaming of crunchy breaded fish fillets for months now.  The dream was about to be realized!

My mom was craving real fried fish, she lives in an assisted living facility and complains that nothing is ever crisp or fried.  I like to take her supper every Sunday so I looked around and decided to modify a recipe I saw on foodnetwork.com. It was for gf fried chicken and with minor changes it became my fried fish meal. Crispy crunchy and flavorful and not that difficult to create. 

I know fried fish does not have the glamour appeal of a chocolate cream pie or a cake but this recipe turned out very tasty and quite simple to throw together.  I used buttermilk as the original chicken recipe asked for; it is thick and clings to the fillets and the short marinade period can do nothing but improve the fish flavor.  I used cod but you can use any boneless fish fillet you prefer.  I didn’t have any onion powder so I left it out; up to you!  The smoked paprika adds a lot of flavor, don’t use too much or it will overwhelm the delicate flavor of this dish.     Image  My  photo just doesn’t do this fish justice.  You have to taste the seasoning and crunch of it to know how delicious it is! Yes, that is the Three Continent pilaf I made to go with it.

Gluten Free Fried Fish

Ingredients
1 cup buttermilk
1/2 tsp paprika
1/2 tsp garlic powder
½ tsp.  onion powder
Kosher salt and cracked black pepper
½ cup all-purpose gluten-free flour mix
½ tsp. smoked paprika
1 lb fish fillets

2-3 tbsp canola oil

 Image

  1. Making the batter: Whisk together the buttermilk, paprika, garlic power, and onion powder. Add a pinch of salt and pepper and stir.  Put fish fillets in mixture for 10-30 minutes in the fridge.  I used a Ziploc bag for this step, easy clean up; throw away when done.  I had cut up the one big fillet into several as there was a variety of thickness and this way I could leave the thicker chunks to cook longer and take out the thin ones when they were perfectly fried. 
  2. Making the flour:  Whisk together a pinch each of salt and pepper, flour mix, and smoked paprika.
  3. Dipping the fish: Set a large cast-iron or Teflon skillet on medium-high heat. As the pan is heating, line up the fish, and the spiced flour. Pour the oil into the hot pan.
  4. Frying the fish: When the oil is fairly hot, shake off any excess liquid from a fillet, dip the fish in the seasoned flour and coat it entirely. Place the fish in the hot oil. Repeat with all the pieces of fish.  Don’t overcrowd the pan. You can always do this in two batches.  Flip the fish pieces when the bottoms are nicely browned, 3-6 minutes  a side depending on thickness. When both sides are browned and fish appears done remove from pan, place on plate covered with a couple paper towels.   Image

I served my fish fry with seasoned rice pilaf and a green salad.  I used Nature’s Earthly Choice “Three Continent Blend” made up of red and gold quinoa, amaranth, brown rice and wild rice.  No sodium, no sugar, no saturated fat and 5 grams of protein per serving.  Tasty too….I put a tiny bit of vegetable bouillon cube  (1/4th of one), a tsp. of dried parsley and it cooked up delicious.  You could make some gf oven potato fries or brown rice or potato salad.  Or totally skip a starch if that is your preference.

Easy to make and pretty healthy for a fried meal.  Did I mention how yummy this meal was?

Brownie Meets Cheesecake and Love Ensues!

I never thought I would want another brownie recipe after I made the gluten free version that is so easy to make and so tasty.  Then I met this recipe.  It is from a book of Gluten Free Christmas cookies, by Ellen Brown that my best friend gave me for Christmas.  I made some very minor changes.  It is like a brownie and a cheesecake meet, fall in love and this is their baby!  A bit more work than my other brownies but just totally nummy good! And I am not a big cheesecake lover.  This is an exception to that rule.

Image

Marble Brownies

Ingredients:

4 ounces semi-sweet chocolate, chopped

1 stick unsalted butter

3 large eggs

1 cup sugar, split

½ c brown rice flour

¼ tsp. xanthan gum

Pinch of salt

1 8 oz pkg light cream cheese, softened

½ tsp. vanilla extract

Directions:

Make sure the cream cheese is room temperature.  Do not use fat free cream – it is dreadful in baking!  I get the best quality chocolate I can find. Frankly I often use regular salted butter in my baking. It is what I normally have in my kitchen so I tend to just use it.

Melt chocolate and butter in a heavy saucepan, stirring frequently.  Take off heat, cool for 5 minutes.

Grease an 8×8 pan and dust with rice flour.

Combine 2 eggs and ¾ c. sugar in mixing bowl, beat with electric mixer for 2 minutes until light and fluffy.  Add cooled chocolate mixture and beat one minute.  Add dry ingredients and beat at low speed just til mixed.

In a separate bowl combine cream cheese, remaining ¼ c sugar, other egg and vanilla.  Beat with electric beater for 2 minutes.

Spread chocolate mixture into pan, Top with cream cheese mixture, swirl together with spatula.

Bake at 350 degrees for 35 minutes, until top is springy. Cool in pan on wire rack until completely cooled before cutting into 16 to 20 squares.

Store in airtight container between wax paper sheets for up to 5 days, room temp.  Can freeze for up to a month.

Mine weren’t too swirly but the cream cheese mixture mellowed the chocolate into a creamy dreamy delight.  There were very few leftover squares. I took this photo of the last brownie square the next morning!  I know this recipe is a lot more work than the other one I had blogged some time ago but if you like cheesecake you will love it and it makes a nice change of pace or a great snack to take to a party.

Get Charmed by Chia Green Tea

A few weeks ago I was eating lunch at an elementary school and sitting next to the building sub.  She was drinking something pale green and there were things floating in the liquid! I asked what the heck it was and learned that every morning she makes green tea and puts a spoonful of chia seeds in it.  I was struck by the fact that she did it every day.  To my mind that meant that there was good reason for this drink. So I felt I would investigate it myself regardless of my memories of weird chia pets that were advertised on TV decades ago.  Image

So I googled chia seeds and found this paragraph in Wikipedia:          “According to the USDA, a one ounce (28 gram) serving of chia seeds contains 9 grams of fat, 5 milligrams of sodium, 11 grams of dietary fiber, 4 grams of protein, 18% of the recommended daily intake of calcium, 27% phosphorus and 30%manganese.[7] These nutrient values are similar to other edible seeds, such as flax or sesame.”   That is a whole lot of nutrition.  I also read that ancient Mexicans like the Aztecs cultivated it as a major staple food.

WebMd had some kind words for chia seeds, mentioning their Omega 3  fatty acids, carbohydrates, protein, fiber, antioxidants, and calcium.  It suggested they can be sprinkled on foods, put in breads, and used in beverages.  The focus of the WebMd article was whether they help with weight loss.  It concluded that more study is required before such claims can be verified.

Nuts.com had a list of seven benefits to eating chia seeds.  I would be happy to have 3 or 4 of those benefits!  So chia seeds in my tea? Maybe yes!  Image

I personally have always felt green tea was rather blah in flavor.  I drank it occasionally but not with any enthusiasm. The addition of chia seeds to tea might be fun I thought.  I tried them a week ago and I think I am hooked!

Here is my simple recipe.  I make a large mug of green tea using one tea bag, be sure to let your boiling water cool a minute before adding the tea bag.  I brew for 3 minutes.  Then I add ½ a teaspoon of local honey.  Bechdolts is my source for great honey. The typical honey in  your supermarket is somewhat suspect as to quality.  Best to get it as close to the bees as possible!  Many people think there are health benefits for allergies to local honey.  Maybe, I just think it tastes much better and is not adulterated as I fear much commercial honey is these days.  I digress.

Anyway, I put a tsp of chia seeds in a small dish, add about ¼ cup of filtered water and let it stand as the tea cools.  In about 15 or 20 minutes I add the chia seeds which have swollen with water to the tea.  Stir well. I like to put a couple ice cubes in a glass and add the chia tea.  Sometimes I put it in my water bottle and take it to where ever I am going.    Image

You can use any type of tea.  I have several flavored green teas and chia seeds are great in all of them.  It works fantastically in plain green tea.  I love the addition of these slightly weird slippery balls of chia seeds spinning around in my tea.  They make it much more interesting to drink.  I like to stir it up or swirl it around so I get a few slithery seeds in each sip.  I am positive it will work great for your favorite herbal tea or black tea.  So use what ever tea you prefer and have a silly iced chia tea time!

Some recipes put as much as a tablespoon of chia seeds in each cup.  I suggest you start with a teaspoon and see how you like it before considering increasing the amount.  And many recipes just put the chia seeds right in the hot tea without soaking them; feel free to do that if it makes life easier!

My healthy green tea is much more playful and nutritionally improved by this small addition.  I get nutrients and fiber and fun! I find myself drinking more green tea, maybe 3 or 4 times as much as I used to.  This hydrates my body in this hot weather which is a real benefit.  It is cheaper and considerably healthier than commercial ice teas which can be laden with sugar and a variety of not so healthy additives.  Goes without saying that it is gluten free too!

Try it and you will be happily hooked on chia tea too.