Chunky Mushroom Soup


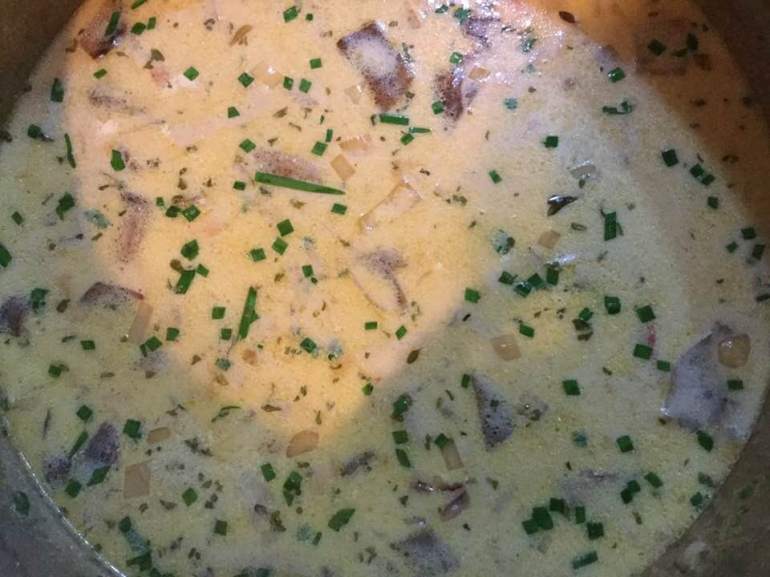
Cream of mushroom soup.  Sounds kinda dull. Everyday.  Nothin special… but when you make it from scratch and you use wild mushrooms it becomes extraordinary and quite memorable. I have made this soup before but this time I had several kinds of wild shrooms to use which amped up the flavor quotient.  I posted a picture on a facebook mushroom id group and got a lot of likes and a request for the recipe so I thought it could be my next post; why type it up just for that one or two folks who asked it; better to share it on my blog for my peeps!

My amounts are somewhat flexible; can use less or more cream, can use store mushrooms. What ever you want. My local farmer’s market has a vendor who sells wild mushrooms; another good source for your ingredients.  Just be sure you know the variety of mushrooms and that every shroom is safe and edible! Use what ever dairy you like. I have used a range of choices in the past.  This time I went with half and half and whole milk.  If you want to chop the mushrooms finer; go for it; you can even puree it but I much prefer it a bit chunky.

We ate outside by candlelight last night and I didn’t bother with a picture of it in the soup bowl due to the light conditions; tonight I will update this post with one of those shots taken in the kitchen! PS: I found most of the shrooms we picked; I am good at it! Joe is much better at identifying; I am a beginner and he is pretty expert at it. It is fun to do together.

Chunky Wild Mushroom Soup

Makes almost 2 quarts.

Ingredients:

  • 15-16 ounces assorted wild mushrooms, chopped coarsely

1 cup yellow onion, chopped

4 Tbsp. butter, divided

1 Tbsp. olive oil

1 carrot chopped in small cubes

1 large shallot chopped small cubes (about 1/2 cup)

2 Tbsp. white rice flour

6-8 stems fresh thyme

1 cup dry white wine (I used a dry Riesling)

1.5 tsp. sea salt and ¼ tsp. freshly ground black pepper or white pepper

1 cup chicken broth

2 cups vegetable broth (or more chicken broth)

1 cup half and half or light cream

½ cup whole milk

1-2 Tbsp. chopped garlic or regular chives

Sprinkle of fresh parsley (I used dried as my parsley plant has bit the dust)

Directions; chop the ingredients so everything is ready. I like my mushrooms chunky but cut them how you like to eat them. Heat the olive oil and half the butter in a large heavy bottomed sauce pan; mine is copper; about 4 quarts. Add the onion, sauté on medium for 4-5 minutes until softened, add the shallots and stir for a minute. Add the flour; stir and cook for a minute. Add the wine, stir and cook a minute. Add the mushrooms and stir for 5-7 minutes until they soften, then add fresh thyme, broths and a tsp of sea salt and some fresh ground pepper. Cook 15-20 minutes on medium.  You want all the veggies to be soft and fully cooked but not mushy. Add the cream and milk, stir well; heat; do Not boil.  While it heats add the finely chopped chives, I used garlic ones and add parsley. I have a five tined scissors for herbs; it chops them perfectly right into the soup. Taste and add more salt if needed.  mushrooms soup

Notes; if you are not gluten free use all purpose flour. If it is too thick add more milk.  It does thicken on standing. I used a blend of honey brown mushrooms, hen of the woods, chicken of the woods and just a speck of chanterelle in my soup this time. A mixture really is nice for a full flavor. Use whatever mushrooms you like. If you want it richer use heavy cream instead of half and half. You can add more butter if you like but I find it quite rich just like I make it.  I pluck out the stems of the thyme when it is cooked; the tiny leaves fall off into the stew; you can remove the leaves from the stems before cooking if you prefer to do that.  You can replace the shallot with leek if you prefer.

This is a rough adaptation from a recipe from Food Network, by Ina Garten – I simplified it quite a bit. And I cut back on the butter, flour and dairy.  I used different mushrooms and made it gluten free as that is my life these days! Enjoy!


Pear Cranberry Rustic Tart

A friend gifted me some homegrown pears. What delish dessert to make? How about a rustic tart? I was time limited so no time for a raft of cute little tartlets that had to have their crust rolled out one at a time and fitted into the 4 tartlet pan. Good plan. Then, I added some frozen cranberries to zing it up. Plus a touch of cinnamon and allspice. And a sprinkle of glittery sugar to fancy it up.  Just delish!

I used some small Moonglow pears, another good choice would be bosc pears, just make sure they are within that narrow  ripe pear window; not under ripe and not squishy.  The holy grail of pears; that moment of ripe before they go bad.  That. They need to be peeled, cored and then chopped, in that order. Especially bosc pears; their skin is not tasty but the are great for baking with.

pear cranberry tartPear Cranberry Rustic  Tart

First, make the crust and chill it a bit while you peel, core and slice the pears

GF Pie Crust:

1 c plus 2 tbsp brown rice flour mix (at bottom of recipe)

2 Tbsp sweet rice flour

1 Tbsp granulated sugar

½ tsp xanthan gum

¼ tsp salt

6 Tbsp cold butter cut into 6 chunks

1 lg egg, room temperature

2 tsp fresh orange or lemon juice

Mix dry ingredients in bowl of stand electric mixer.  Add butter and mix until crumbly and resembling coarse meal.  Add egg and juice.  Mix until it comes together into big chunks.  Shape into a flat fat disc with your hands. Put it in a pie bag, on a large piece of sturdy plastic or on a crust sized piece of wax paper (14 x 14 inches more or less), put another piece of wax paper on top and chill it all in your fridge 15 minutes

Filling;

3 -4 cups peeled and chopped pears

2/3 cup frozen or fresh cranberries

1/4 cup sugar

1 Tbsp. granulated tapioca

1/2 tsp cinnamon

1/8 tsp. allspice

a sprinkle salt

Mix dry ingredients; add to the fruit in a bowl, stir and let sit while you roll out the crust.

Directions: Roll out the somewhat  chilled crust between the two sheets of wax paper into a disc; maybe 14 inches, try to get the thickness even, no thick middle! I use my pie bag as it works great. Peel off one side of paper and place on pan, centered.  Remove other slice of wax paper or plastic.

Using a big spoon place your filling carefully on the crust but leave a 1 ½ inch border of crust untouched all around the fruit. Fold that excess crust up to make walls around the fruit filling. Sprinkle with 1-2 tsp. chunky sugar.

Bake at 375 degrees for 35 minutes; golden brown crust and a bubbling, cooked looking filling.  Cool at least an hour before cutting. Great with a scoop of vanilla ice cream!

pear tart slice

Took this by candlelight outside on my back porch just before taking a bite! MMMMM


Eggplant and Potato Curry

Lots of September eggplants mean I am looking for great recipes to enjoy them to the fullest. This happens to be one of my favorite ways to do just that.  It is a vegetable curry, now don’t be put off by that; no long list of spices: only a couple and some fresh ginger in it and it isn’t too spicy or wild tasting. I have simplified it a bit and as a bonus I give you my best eggplant frying tip. Yeap, it is vegetarian but that can be a nice change of pace from all that meat. I serve it over brown rice and it is very satisfying. You can feel virtuous enjoying this savory entree and use all that fresh fall produce.

This recipe came from my favorite Indian cookbook Indian Cooking for Pleasure by Charmaine Solomon.  This 70’s bible for Indian cookery is out of print and very pricey to buy on line. I have used literally dozens of recipes from it. She knows her spices and chooses great recipes that always work.

You can use big fat eggplants as I did this time or smaller ones; you will just need more of them. These days there are many interesting smaller eggplant varieties; any will work here; just cube, no need to peel.

Eggplant and Potato Curry

1 medium eggplant

2 large potatoes

2 decent sized tomatoes or most of a can of chopped tomatoes

1 large onion diced

1 small red pepper and 1 poblano pepper, seeded and diced.

1 bunch spinach or a big handful of roughly chopped kale

3-4 Tbsp. mild olive oil

1 ½ tsp. grated ginger, I freeze mine and just grate it frozen

½ tsp. cumin seeds, crushed in a pestle

½ tsp. ground turmeric; I did a rounded measurement; a tad more than level

1 tsp. sea salt

1 tsp. brown sugar

Directions: Slice eggplants into ½ inch rounds and cut into cubes. Peel and dice the potatoes into a bit less than ½ inch rounds. Chop the tomatoes. Chop the onion. Seed and chop the peppers (you can use any level of spicy pepper you like; the original recipe said green chilies). Wash and chop the spinach or kale (I used kale this time; subs in great)

Heat 3 Tbsp. mild oil in a large frying pan. Fry the cubed potatoes until golden; you will need to turn them a few times. Remove from pan. Add the eggplant and fry until cooked; once the oil is soaked in I wait a half minute and add a couple tablespoons of water to the pan; let the water steam off and the eggplant should be done; if you have to do that again; go ahead. This trick saves adding a lot more oil to keep the eggplant from sticking/burning. When mostly done remove from pan.  It will cook more later so it is okay if edges and bits are not fully done.

Note: you could fry the eggplant at the same time in a separate pan to save a few minutes if you are in a hurry; might take a touch more oil that way; worked for me.

Then, add a touch more oil to the same (now empty) pan and pour in the chopped onion and fry until soft and turning golden. Add the cumin, turmeric and grated ginger. Fry for a minute, stirring. Add the chilies, tomatoes and salt, stir well and add back the eggplant and potatoes. Tip: when I make this in a wide 12 inch frying pan I don’t have a big enough lid; I use an upside down metal pizza pan and it makes a great lid.

Top with the spinach or kale. Stir after a minute, cover and cook on low heat for a few minutes until the spinach is soft, adding up to ½ cup water to keep it from sticking/burning. Add the brown sugar and cook the curry uncovered until it is thick; no more than 8-9 minutes. Serve with Indian bread or brown rice. As I haven’t really found time re-create my favorite Indian breads I served mine over brown rice.  eggplant curry on plante

Chocolate Chip Banana Muffins With a Surprise Inside!

A few years ago I combined my chocolate chip muffins with my classic banana nut muffins to create a lovely sweet snack.  When I made a batch of them yesterday I decided to move the streusel from the top to the insides of each muffin because so often bits of the topping can come off especially after they have been frozen. I thought that this way it is safely trapped inside the muffin for a sweet surprise.

Success: they are perfect in texture, moisture and totally yummy with that bit of streusel filling that goes so well with the chocolate chips.  I left out my usual half cup of chopped walnuts; add some if you like…I was out of walnuts and wanted to keep it a bit simpler.


I don’t include a picture of the inside of a muffin as it really doesn’t photograph the filling very much; just bite into one and you will know it is there.

muffins, stuffed big pix

Chocolate Chip Banana Muffins

2 cups brown rice flour mix (see below)

2/3 c granulated sugar or coconut palm sugar

1 tbsp. baking powder

1 tsp. baking soda

¾ tsp xanthan gum

¼ tsp salt

1 tsp cinnamon

3/4 to 1 c packed ripe mashed banana

¼ cup mini chocolate chips and ¼ cup dark chocolate chips (or any combo of chips that adds up to 1/2 cup total)

2 lg eggs beaten

½ c milk plus 2 tbsp extra if you use coconut sugar, 1 or 2 percent

½ c canola oil

————————————-

Filling

½ cup old fashioned oats

¼ cup brown sugar

2 tbsp. hemp hearts or almond flour (I used hemp hearts this time; awesome!)

½ tsp. cinnamon

2 tbsp. butter

Mix filling dry ingredients, rub butter in with your fingertips.

——————————–

Muffin directions:

Heat oven to 350 degrees, placing the rack in middle of oven.  Spray muffin pans with cooking spray.  One batch makes about 14 or 15 muffins.

Mix all dry ingredients in bowl of stand mixer or big bowl.

Add bananas; stir to coat them with dry mix, then add the chocolate and stir briefly.

Combine milk and oil.  Add liquids and the two eggs to bowl. Stir on low until well blended.

Fill muffin pans 1/3 full.  Sprinkle with filling and top with another glop of batter to fill the pan about 2/3 to 3/4 full.  It doesn’t have to look perfect; the batter will rise and swallow up the streusel into the heart of the muffin.  I had a bit of filling left over so I sprinkled it on top of half the muffins. That looked great too!

Bake 20-22 min until golden brown. Do not overbake or they get dry.  Remove from oven and let cool 5-6 min before gently turning them out from the pans to cool on a rack. I use a butter knife to release them by running it around the edge once before tipping them out. They freeze well for up to 3 weeks.  They keep in my ceramic muffin/cookie jar for a few days.   muffins, stuffed, baked

Brown Rice Flour Mix   *same as King Arthur’s GF flour blend
2 c brown rice flour

2/3 c potato starch

1/3 c tapioca flour

Note: This muffin recipe is my third generation version of the banana muffins from Annalise Roberts’s wonderful cookbook: Gluten Free Baking Classics.

Bittersweet Chocolate Tart….Crazy Good


Six years ago I made this dark chocolate tart and we ate it around a bonfire. Someone had the bright idea of putting toasted marshmallows on their slice.   This Friday I made the same tart but gluten free and we tried something different to top our slices with; amazing local made blackberry ice cream, delish vanilla ice cream and fresh organic homegrown raspberries.  My slice of tart was silky smooth, very dark and gone far too fast. We all had seconds, but I was able to save some for Joe and I to enjoy Saturday.  It was a big hit with all of the chocoholics there so here is the recipe.

Notes: I did run short on the 60% bittersweet Ghirardelli and used one ounce of semi-sweet to get the correct amount; it worked perfectly. Just take your time melting the mixture; I used the lowest heat possible and stirred it frequently. This is a keeper if you love dark chocolate. I am guessing it could be made with semi-sweet chocolate.  Drop me a note if you try that! I’m always interested to hear how a recipe works out.

Bittersweet Chocolate Tart

Crust

1 cup gf flour (recipe below)

¼ cup sugar

1 tsp xanthan gum

¼ tsp salt

½ tsp cinnamon

5 tbsp. butter cut into 5 pieces

1 tsp. vanilla extract

1 tsp. water

Mix all the dry ingredients in the bowl of a stand mixer.  Add the butter pieces and blend until they are tiny crumbs.  Then add the vanilla and 1 to 2 tsp. water and blend.  It should be thick crumbs.

Spray a 9 inch tart pan with a removable bottom with cooking oil and then sprinkle with some gf flour; shake to coat.  Dump the crumbs of the crust evenly all over the tart pan bottom and press in with your fingers to make a fairly even crust, be sure to push some up the short sides of the pan so it is to the top of the metal and not too thick near the edges.

Bake at 350 for 11 or 12 minutes.  I did 12 minutes. Let cool while you make the filling.

Image

Filling Ingredients

¾ cup heavy cream

1/3 cup whole milk

7 ounces bittersweet chocolate, I like Ghirardelli.  Break into small squares/pieces.

1 large egg slightly beaten

Put the milk, heavy cream and chocolate in a heavy bottomed sauce pan and heat on low to heat; stir often until chocolate is melted.  Remove from heat, whisk well to fully blend and cool a few minutes.

Add the beaten egg, blend well.  Pour into the tart pan and bake at 375 for 15 minutes.  Yeap; 15 minutes; no more than 16 tops. It is a thin chocolate custard and you want it barely solid. It will continue to cook for a number of minutes so stop worrying it is underdone; trust me it isn’t!  Serve at room temperature topped with toasted marshmallows or ice cream. The contrast between the vanilla ice cream highlights the smooth dark delish of the tart. SO memorable.  I had some cold the next day; nice but honestly it is incredible when it is room temperature; the texture is perfection. Enjoy! slice choco tart with icecream

Brown Rice Flour Recipe (same as King Arthur Basic GF Flour)

Ingredients

–         1 c brown rice flour –

–         1/3 c potato starch (not potato flour)-

–          3 tbsp tapioca flour

Directions

Mix all the flours in a jar or bag

Image

This tart is best eaten warm with two or three toasted marshmallows pressed onto the top.  Whipped cream or vanilla ice cream is also yummy.  This picture was taken in total darkness with an i-phone and the owner of this slice of tart was ticked off that her marshmallows cooled while the shot was made so she toasted up two more marshmallows and had all four on her slice of tart.  This dessert is seriously delicious and really easy to make. If you love dark chocolate this is a must recipe for your repertoire.  It can easily be made by you wheat eaters; just use your favorite cookie tart crust recipe.  The filling will be the same.  Now, go get some good chocolate and make your own tart and don’t eat the whole thing yourself; share it with someone you love!

Originally posted in 2014. Silly of me not to repost sooner as it is AMAZING!