Apple Cranberry Holiday Pie

I had a few last apples from our fall orchard expedition and a bag of fresh cranberries in my fridge bin.  Needed a tasty and different holiday pie, saw this recipe and knew it was just the ticket.  I revised some: simplified and made my version gf (of course!)  It is a much brighter in flavor and color than an apple pie but you can definitely taste those apples.

This is my mixture of a couple of recipes. I know it has several steps but each one is easy. Note that I cook the fruit briefly so it smushes down a bit and you don’t have crust issues due to fruit settlement.

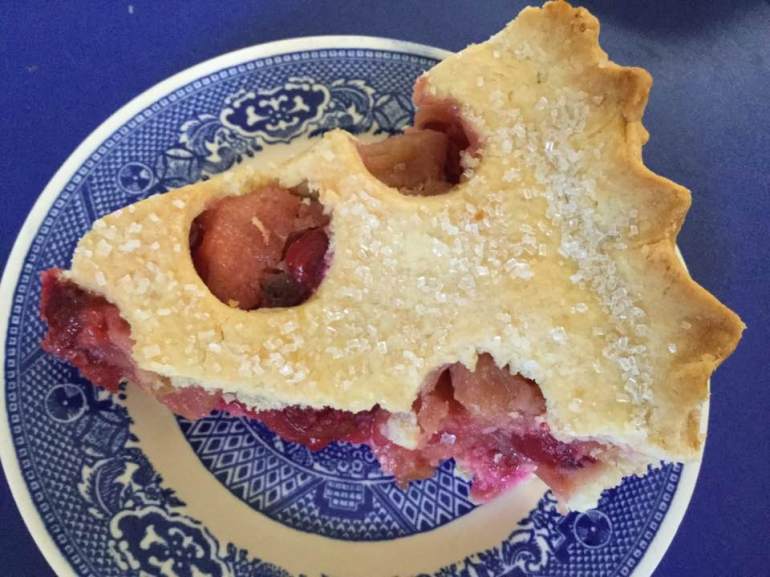
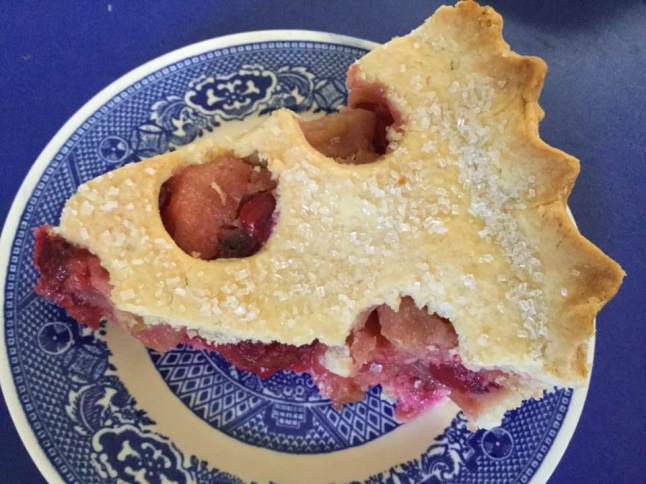
I call this top crust my cherry cheater crust as I love it for a cherry pie so you can see the bright red filling. But, because making a woven lattice gf crust is a lot of work, I just cut out circles on the rolled out dough using a small round jar lid and use a butter knife to pull out the marked circles.  Then, flip it onto the fruit filing and there you go…almost as fancy as a lattice crust! Just crimp the edges and sprinkle it with sparkly sugar for a very pretty look.  One last great tasting pie to round out 2016, “My Year of the Pie!”

apple-cranberry-pie

Angie’s GF Apple Cranberry Pie

Double Crust:

2 ¼ c brown rice flour mix (at bottom of recipe)

¼ cup sweet rice flour

2 Tbsp. granulated sugar

1 tsp xanthan gum

1/2 tsp salt

12 Tbsp. cold butter cut into 6 chunks

2 large eggs

4 tsp fresh orange or lemon juice

Spray 9 or 10 inch metal pie pan with cooking spray, dust with white rice flour. Or not; I forget to do it most of the time, hah!

Mix dry ingredients in bowl of stand electric mixer.  Add butter and mix until crumbly and resembling coarse meal.  Add egg and juice.  Mix until it comes together into big chunks.  Shape into two equal balls with your hands. Put each on a crust sized piece of wax paper (14 x 14 inches more or less), flatten the crust balls some; put on top of it another piece of wax paper and chill it all in your fridge 15-20 minutes while you make the filling.

Filling:

4-5 cups sliced fresh baking apples

1/2 tp 2/3 c sugar (use the higher amount if you like it sweeter)

2 cups fresh or frozen cranberries

1/4 tsp cinnamon

1 tsp. fresh orange rind

½ tsp. grated fresh ginger

2 tbsp. butter at room temp

1 large egg (optional)

1 tbsp. rice flour

Raw or big/fancy crystal sugar to sprinkle on top

Directions: Mix the fruit, spices and sugar in a large bowl, add the butter to a large sauce pan and melt; dump in the fruit mixture, cook about 6-8 minutes until apples soften and the cranberries are bursting. Then add the rice flour, stir.  Let cool a few minutes and then add egg (if you want but I made it without myself) which you first beat up a bit. Cool filling to room temperature.

Heat oven to 375 degrees.

Roll out one pie crust between the two sheets of wax paper; try to get the thickness even, no fat middle! Peel off one side of paper and place in pie pan, centered.  Remove other slice of wax paper.  I have a plastic pie bag to roll my crust in and love it.  It is sturdier than wax paper.  Parchment paper works well I am thinking….

Pour cooled filling into pie shell, top with crust; I like to cut circles out of the top crust using a jar lid; about 1 ¼ inch diameter. So the filling peeps out but no need to weave pie crust strips which is pretty tricky for gf crust. Center it on the fruit and crimp the edges.  Use your fingers for this or maybe a fork to create a nice look that seals the top edge completely to the bottom crust.

Place on baking sheet to catch drips (I have a pie drip pan I love!)  Bake for 50-60 min until crust is golden and you can see the filling bubbling.  I put aluminum foil strips around the edges for last 15 minutes to keep them from getting too dark. Cool on rack for at least 1-2 hours before serving.

I made a couple yummy hand pies with all that leftover crust due to the cutouts.  Bonus!

Brown Rice Flour Mix
2 c brown rice flour

2/3 c potato starch

1/3 c tapioca flour


This recipe is a blending of one I found on foodnetwork.com and the crust by Annalise Roberts as well as my own touches to the filling. http://www.foodnetwork.com/recipes/food-network-kitchens/apple-cranberry-pie.html

Beautiful Bread and Butter Pickles

I got a gift of someone’s extra pickling cucumbers so I created something yummy; I made pickles last week.  Old fashioned bread and butter pickles which are tangy and sweet slices of yummy pickly goodness.  I think the name may come from the Depression era; from poor folk eating them often like you might enjoy bread and butter for a cheap meal.

This recipe comes out of an old Rodale cookbook, Stocking Up.  I did swap honey for sugar; not enough honey around here this week and I will have to try that next summer.  Otherwise pretty close translation.  FYI: they need to have sugar, turmeric, mustard and onions to be called bread and butter pickles.

They have to sit a few weeks so I am trying to be patient.  Want pickles now.  Oh well, I guess store pickles will have to do at present. (Addition in 2016: these pickles are rocking good; been enjoying them all year since I made them last summer; pickle perfection!)

If you get a few pickling cukes; they are kinda cute; all bumpy and gray green, try this recipe and impress your family.  Fun to make and gluten free, of course!

Bread and Butter Pickles

6 decent sized pickling cucumbers

2 medium sized onions

2 tsp. sea salt.

2 ¼ cups white vinegar

1 1/3 cup sugar

¾ tsp. celery seed

¾ tsp. ground ginger

¼ tsp turmeric

¾ tsp. mustard seed

Rinse off your cukes, peel the onions, slice cucumbers and onions, sprinkle with salt. Let stand an hour. Drain well.  Make a vinegar mix with the rest of the ingredients; put in a pot and bring to a boil.  Add the cukes and onions, bring back to boil.  Back in sterilized pint jars, leaving ¼ inch head space.  Put on brand new lids and rings (which can be used) – tighten, process ten minutes in a boiling water bath. Make sure the water is an inch above the top of the pots.  Let cool, store a few weeks before opening.

Makes 4 pints.

Originally posted in September 2015.  Minor revisions to text made. Recipe remains the same.

Pickles Without the Heat

Some of us adore pickles and some dislike them.  If you are a pickle fan read on.  If not, read anyway as these are far better than the tired flabby canned pickles found at the grocery store.  A good gardening friend gave me this recipe.  It is really easy and rather fun to construct.  Even better is that you can pickle most any veggies. I have tried zucchini, carrots, cauliflower, green peppers, cabbage and red peppers.  Of course, cucumbers are in there too!  Debating beets….hummm. Plus there is no heating up the kitchen with canning equipment which has real appeal in this endless heat wave. sausage and beans, beets 006.JPG

You do need a couple grape leaves.  You might be able to find a neighbor with a grape vine.  I am sure you could use wild grape leaves from a state park or along a country road.   They really add to the authenticity of it so snag a few from somewhere.

Also needed are 3 dill heads (the flowers of a dill plant).  This might be more problematic but if you know a real gardener, aka someone like me, you can beg the dill heads as frankly they are not used much for cooking and I was happy to give some to the friend who gave me this recipe.  Grow your own dill for next summer; it is so easy to do and it does reseed and come back year after year.  Dill is lovely in potato salad and in other salads like my stuffed tomatoes, see that blog post… pickle jar

Refrigerator Pickles

2 cups white vinegar

¼ cup salt, I used kosher salt in mine

4 cups water (I used 3)

¾ cup sugar

3 garlic cloves cut up

3 dill heads

2 grape leaves

Bring the first four ingredients to a boil in a sauce pan and let cool fully.  Put the other three ingredients in the bottom of a gallon jar.  Cut up your veggies and pile in the jar.  Top with the vinegar mixture. Put on the lid. Put in the fridge and let marinate for 3 days before trying it.

I have pickled cucumbers, short zucchini spears, broken up cauliflower heads, thin slices of white turnip, peppers, broccoli spears, and celery chunks.

My grandson Aiden who is almost five clamors for the pickle jar to come out when he eats meals here.  I say, eat your food and you can have some pickles! He gobbles up his food and waits expectantly for me to fish out a pickle or two.

I like how fresh they are and how crunchy the pieces still are. Plus they have no additives or preservatives.  You can keep adding veggies as you use them up.  I think the tough part is fishing them out of the jar.  The other day I lost a fork in there but luckily it didn’t go to the bottom of the jar; a cuke round stopped its descent! Now, go pickle fresh veggies and have some fun with it….

Originally posted by me late last summer 2014.

Dilly Pickle Project: Delightful!

Something I have never made – dill pickles canned in jars.  They seemed too complicated and I didn’t know if what I created would taste as good as store pickles.  My mom made them when I was a kid.  I remember that if a jar got forgotten in the basement, say in the very back of a dark shelf, for like a year… the big pickles would get hollow in the middle and slimy and off flavored.  Kinda off putting.  I love to make jam, jelly, and marmalade but somehow I haven’t ever attempted the authentic dill pickle. I have made raw refrigerator pickles but that recipe does not require canning or much of a recipe; a brine you keep adding veggies to and munching them down. I re-ran that recipe recently but knew it was only  a warm up for this particular project. And it had to be gluten free for me; this is naturally gluten free. Yay!

Well, a good friend had some pickling cukes to spare from her garden and I decided to screw up my courage and make a run at replicating dill pickles. No one I knew had a recipe they could recommend.  So, I searched on the food network website for a fairly simple dill pickle, chose a basic recipe; made a few small changes and went for it. After waiting about 4-5 days while the flavor mysteriously ripened I opened a chilled jar and found the pickle slices to be fantastic in flavor and crunch.  Eureka!  I ate enough slices to almost give myself a sour stomach; note to self: stop after 6-7 slices.

I feel like a tricky topic has been made easy; the pickle has been conquered. I am ready for my next burger with the perfect pickle slices to heighten the flavor experience. You too can do the pickle successfully. I promise!

First get all the supplies: beg, borrow or buy some pint canning jars, an equal number of the rings that tighten the lids and brand new canning lids (they must be brand new to seal properly)  You will also need a deep pot to put the jars in. I have a jar lifter someone gave me and it is very helpful in removing hot jars of pickles or jam out of boiling water. A canning funnel is also pretty much needed; so you can easily pour in jam, top the pickles with brine or otherwise fill the jars with your food product. I use a pair of tongs for picking up boiling hot lids or rings and for getting a hot jar out of the water to fill with my latest canning experiment.

cuke 010

The cukes: I got 4 big fat pickling cucumbers from a garden; you can buy ones in the store; look for ones labeled for pickling; they are kinda bumpy and rather cute.  No European burpless for this project; only old fashioned cukes, no waxed ones either!

The process: the empty clean jars have to be filled with hot water and heated to a boil, I let them boil for ten minutes generally. The lids and rings need to be heated briefly. Your big pot has to be deep enough to cover the jars with an inch of boiling water.  I process pickles for ten minutes.  Sounds difficult; nope; just let them boil in that pot of water for ten minutes, lift out and let them cool on a kitchen towel until the lids let out a ping that tells you the jar lid is safely vacuum sealed.  Done.  Yeap. That’s all there is to it!

lemon chicken and pickles 002

Spicy Dill Pickles
Yield: 7-8 pickles (can double)

Ingredients

7-8 small cukes or 4 big pickling cucumbers or Kirbies
Pickling Liquid:
1.5 cups water
1 cups white vinegar
2 tbsp. kosher or coarse salt
1 tablespoon granulated sugar
skimpy ½  teaspoon ground cumin
1/2 teaspoon black peppercorns
4 teaspoon turmeric
1 whole cloves
1 small bay leaf
1/2 medium onion, sliced
1/2 stalk celery, sliced
1/2 carrot, peeled and sliced
½ tsp red pepper flakes or 1 jalapeno pepper sliced (I did the flakes)
4 garlic cloves, peeled
3-4 dill flowers (mine were very dried out but still flavorful)

1 small sprig thyme

Directions

Bring a large stockpot water to a boil. Add cucumbers, immediately remove from heat if they are the small ones or leave in there a minute if big fat cukes, and drain in a colander. Rinse with cold water and reserve.

Combine the pickling liquid ingredients as well as salt and sugar in a medium saucepan and bring to a boil. Place whole cucumbers in a large container with remaining vegetables and herbs. Pour hot pickling liquid over cucumber mixture and let cool. Stir it up and tap down all the solids until liquid rises to top. Cover with plastic wrap and let stand at room temperature 1 day.

I then sliced the cucumbers into ¼ inch slices and heated them before canning in pint jars. I  believe it will work equally well if you cut them into spears. If they are not too big you could leave them whole; mine were huge so I had to cut them up. I covered the pickle slices and other veggies with the pickling liquid up to ¼ inch from the rim.  Do stick a knife or chop stick in to stir and break up any bubbles before sealing. Put on the lid, the rim and hand tighten, I often use a thin kitchen towel as the jar is hot and it is difficult to tighten the lid down otherwise. Process ten minutes in a hot water bath.  Or, transfer to a sealed container and refrigerate 3 days before serving.

They are said to store indefinitely but I think they will taste best in the first 3-4 months while they are crisp.  I ate some of mine about 5 days after canning and they were perfect!

Read more at: http://www.foodnetwork.com/recipes/dill-pickles-recipe.print.html?oc=linkback

Pickle Pickle Who’s Got the Pickles?

Some of us adore pickles and some dislike them.  If you are a pickle fan read on.  If not, read anyway as these are far better than the tired flabby canned pickles found at the grocery store.  A good gardening friend gave me this recipe.  It is really easy and rather fun to construct.  Even better is that you can pickle most any veggies. I have tried zucchini, carrots, cauliflower, green peppers and red peppers.  Of course, cucumbers are in there too!

You do need a couple grape leaves.  You might be able to find a neighbor with a grape vine.  I am betting you could use wild grape leaves from a state park or along a country road.   They really add to the authenticity of it so snag a few from somewhere.

Also needed are 3 dill heads (the flowers of a dill plant).  This might be more problematic but if you know a real gardener, aka someone like me, you can beg the dill heads as frankly they are not used much for cooking and I was happy to give some to the friend who gave me this recipe.  Grow your own dill for next summer; it is so easy to do and it does reseed and come back year after year.  Dill is lovely in potato salad and in other salads like my stuffed tomatoes which I plan to blog about later this week!

Refrigerator Pickles

2 cups white vinegar

¼ cup salt, I used kosher salt in mine

4 cups water (I used 3)

¾ cup sugar

3 garlic cloves cut up

3 dill heads

2 grape leaves

Bring the first four ingredients to a boil in a sauce pan and let cool fully.  Put the other three ingredients in the bottom of a gallon jar.  Cut up your veggies and pile in the jar.  Top with the vinegar mixture. Put on the lid. Put in the fridge and let marinate for 3 days before trying it.

I have done pickling cucumbers, short zucchini spears, broken up cauliflower heads, thin slices of white turnip and peppers.  I want to try broccoli next!  Maybe celery?

My grandson Aiden who is almost four clamors for the pickle jar to come out when he eats meals here.  I say, eat your food and you can have some pickles! He gobbles up his food and waits expectantly for me to fish out a pickle or two.

I like how fresh they are and how crunchy the pieces still are. Plus they have no additives or preservatives.  You can keep adding veggies as you use them up.  I think the tough part is fishing them out of the jar.  The other day I lost a fork in there but luckily it didn’t go to the bottom of the jar; a cuke round stopped its descent! Now, go pickle fresh veggies and have some fun with it….

Originally posted by me late last summer 2014.