Peach Cobbler Perfection!

Peaches in late summer: ripe peach chunks on my cereal, peach ice cream, peach pie, peach tartlets and peach cobbler.  Well, this post will be on peach cobbler and it is peachy keen!  I often make cobbler with blueberries and even sliced rhubarb.  I am guessing most any fruit might work; blackberries, raspberries, cherries, plums, nectarines and apricots come to mind.

This recipe is modified from one in Bette Hagman’s book, More from the Gluten-Free Gourmet and is based on a flour mix that will give you 4 cups of the dry ingredients.  One cup is the base for an 8×8 pan of cobbler topping.  I bet two cups dry mix will make a big 9×13 cobbler. Store the dry mix in an airtight container in the freezer to keep it fresh.

I have tried a number of cobbler recipes but nothing has been better than this one so I stick to what works for me.  If you use nectarines there is no peeling involved which makes it easy to throw together.

I always get the fruit cooking before putting the topping together so the fruit is hot and ready for the topping and can go right into the oven

apple muffins 007

Dry Cobbler Mix

2 ¼ cups white rice flour

½ cup potato starch

½ cup tapioca flour

1 tsp. baking soda

4 tsp. baking powder

1 tsp salt

1 tsp. xanthan gum

1/3 cup sugar

Cobbler Topping

1 cup dry baking mix

2 eggs

2 tbsp melted butter or canola oil

1/4 to 1/3 cup milk/buttermilk

½ tsp. vanilla

Mix the wet ingredients and then add to the dry mix in a big bowl.

Fruit Filling

4 cups sliced ripe peeled peaches or nectarines

½ tsp. almond extract

½-2/3 cup sugar depending on how sweet you want it

2-3 tbsp. GF flour like rice flour, tapioca flour (use 3 if juicy)

½ tsp cinnamon

Directions:

Mix the fruit and almond extract in a thick bottomed sauce pan. Stir together the sugar, cinnamon and flour and mix into the fruit.  Cook on the stove top for 4-5 minutes until it is thickened and hot.  Pour into a buttered 8 inch square pan, top with big blops of the cobbler topping. I have used 1/4 cup milk and that is less runny than using 1/3 cup.  Frankly it works either way. Bake immediately: at 350 degrees for 25 minutes.  The top should be light brown and spring back when you poke it with your finger.  If it looks damp or squishy bake it 5 more minutes. This happens if I use more than 4 cups of fruit; slows it down, sometimes even ten extra minutes if you put 5 or so cups of fruit in it.

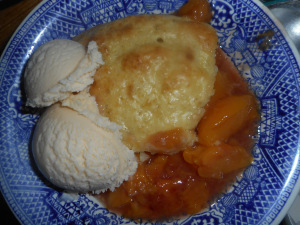
Let cool 7-9 minutes before serving as it will burn your mouth right out of the oven!  Some people love it with a scoop of vanilla ice cream.  Cobbler is perfect just on its own.

Note: if you use oil and almond milk then this cobbler will be dairy free.  Spray the cobbler pan with cooking oil instead of rubbing with butter. I think you can use any sort of milk you can find or even fruit juice.

Originally on my blog in August 2014.

Peach Crumb Pie

It is near the peak of peach season so get some peaches and whip up a delicious gluten free peach pie.   This is an easy pie to create.  Slice and dump together the filling, crumb topping made in unwashed mixer bowl you used for bottom crust. You can store any leftover crumb mixture in a sealed container in the fridge; it keeps a few weeks.  I let my mix spin a few more moments in the stand mixer for extra big crumbs for this pie; love that look. If you prefer a solid crust just double the crust part and top your pie with it.  Be sure to cut some slits for steam escape! And if you don’t have time, buy a ready-made crust but homemade is always best.

Please make every effort to use local fruit; can get peaches at orchards like Bechdolt’s near Springtown, at most farm stands and at farmer’s markets; one on Saturdays in Easton or Sunday’s in Hellertown.  This pie really showcases great tasting peaches. If you use lousy peaches your pie will taste crummy. But, here’s the thing: store peaches can be poor in flavor and texture due to improper chilling so I strongly suggest you buy only locally grown, sweet, ripe peaches to make your pie.  I love when they have a pink blush; it makes the pie so pretty and perhaps even tastier!

peaches      raspberry-jam-014

To peel easily; heat 3 inches of plain water, drop the peaches gently in 4-5 at a time and cook them 2-3 minutes.  Use the lesser time for more ripe peaches. Allow to cool somewhat before peeling.  I like to do that over a bowl to catch the juices as I slice each peach.

Bake and enjoy late summer in a pie in just a few minutes of work.  Don’t eat it hot; it should be cooled to just warm if you like it so or room temperature or even a bit chilled.  You could certainly serve this with vanilla ice cream.  And this pie works perfectly with fresh nectarines, bonus: no peeling required!


Angie’s GF Peach Crumb Pie

Crust:

1 c plus 2 tbsp brown rice flour mix (at bottom of recipe)

2 tbsp sweet rice flour

1 Tbps granulated sugar

½ tsp xanthan gum

¼ tsp salt

6 Tbps cold butter cut into 6 chunks

1 large egg

2 tsp fresh orange or lemon juice

Spray 9 inch metal pie pan with cooking spray, dust with white rice flour.

Mix dry ingredients in bowl of stand electric mixer.  Add butter and mix until crumbly and resembling coarse meal.  Add egg and juice.  Mix until it comes together into big chunks.  Shape into a ball with your hands. Put it on a crust sized piece of wax paper (14 x 14 inches more or less), flatten the crust ball some; put on top of it another piece of wax paper and chill it all in your fridge 15-20 minutes while you prepare the filling.

Filling:

6 cups sliced fresh peaches, peeled and cut in thick slices, place in medium bowl

Mix with:

½ cup sugar

1/4 tsp. cinnamon (optional)

3-4 Tbsp. quick tapioca

Stir in 1 tbsp. fresh lemon juice and ¼ tsp. almond extract

Let stand while you prepare the crust.

Roll out pie crust in a pie bag or between two sheets of wax paper, try to get the thickness even, no thick middle! Peel off one side of paper and place in pie pan, centered.  Remove other slice of wax paper.  Crimp edges all around.  Fill with fruit mixture.

Crumb topping

Put all four ingredients in the same mixing bowl you made the bottom crust in and mix well with mixer paddle until crumbs form. If you let them go extra long you get big fat crumbs if you want that look and I did!

¾ c brown rice flour mix

½ c sugar

½ tsp xanthan gum

1/3 c cold butter cut into six chunks

Sprinkle the top of the pie with crumb mix; use as much as you like.  I like about a heaping cup of the mixture.  Up to your personal taste… It sinks partially into the fruit mixture and adds lots of sweetness and eye appeal.

Bake in a preheated 400 degree oven for 45-50 minutes until bubbly and the crumb crust is light brown.  Cool at least 1 to 4 hours before serving at room temperature.  I think it is best served the same day you make it, or no more then 12 hours after baking for optimal flavor.  The crumbs will get soggy if too much time passes. Mine was still very good the next day; just not as great as when really fresh.

mom's new watch 013

Note: if you find your bottom crust is not browning enough bake it empty at 375 degrees for ten minutes before filling it with the fruit.  I have a bottom heat pizza style oven which gives me perfect pie crust so I don’t ever have pale pie crust.

Brown Rice Flour Mix (Same as King Arthur GF All purpose blend)
2 c brown rice flour (finely ground)

2/3 c potato starch – Not potato flour!

1/3 c tapioca flour

Note: This post was originally blogged by me the late summer of 2015. Minor changes made.

Peach Tartlet Perfection

It is the peak of peach season so get some peaches and whip up a delicious gluten free peach pie. I wanted individual tarts so everyone would feel special; that I baked them a pie; easy to do!  If you don’t have these deep dish pans you can use the flat bottomed tartlet pans; but they probably won’t hold quite as much filling. Plus I think the proportion of fruit to crust is just perfect in a small tartlet.  Try them and see; a delightful summer dessert.

Please make every effort to use local fruit; can get peaches at orchards like Bechdolt’s near Springtown, at most farm stands and at farmer’s markets; one on Saturdays in Easton or Sunday’s in Hellertown.  This pie really showcases great tasting peaches. If you use lousy peaches your result will lack great flavor. But, here’s the thing: store peaches can be poor in flavor and texture due to improper chilling so I strongly suggest you get locally grown, sweet, ripe peaches to make your pie.  I love when they have a pink blush; it makes the pie so pretty and perhaps even tastier.

To peel; heat 3 inches of plain water, drop the peaches gently in 4-5 at a time and blanch them 2-3 minutes, two if very ripe, 3 if less ripe.  Allow to cool somewhat before peeling.  I like to do that over a bowl to catch the juices as I slice each peach.

Don’t eat these tartlets hot; should be cooled to just warm if you like it so or room temperature or even a bit chilled. They were perfect, just like a big pie only tiny and making one individual dessert.  You could certainly serve them with vanilla ice cream.  And this recipe, like all peach desserts, works perfectly with fresh nectarines, bonus: no peeling required!

Angie’s GF Peach Crumb Tartlets: makes 7

Crust:

1 c plus 2 tbsp brown rice flour mix (at bottom of recipe)

2 Tbsp. sweet rice flour

1 Tbsp. granulated sugar

½ tsp xanthan gum

¼ tsp salt

6 Tbsp. cold butter cut into 6 chunks

1 large egg

2 tsp fresh orange or lemon juice

You will need 7 deep dish 4 inch tartlet pans if you make them all at once. I actually froze my dough and made the second batch of 3 a day later. Adjust the filling to the number of tartlets you are baking.

Mix dry ingredients in bowl of stand electric mixer.  Add butter and mix until crumbly and resembling coarse meal.  Add egg and juice.  Mix until it comes together into big chunks.  Shape into a ball with your hands. Put it on a crust sized piece of wax paper (14 x 14 inches more or less), flatten the crust ball some; put on top of it another piece of wax paper and chill it all in your fridge 15-20 minutes while you prepare the filling.

Filling:

6 cups sliced fresh peaches, peeled and cut in thick slices, place in medium bowl

Mix with:

½ cup sugar

1/4 cup quick tapioca

I made it in two parts; used 7-8 smaller peaches for each batch. Adjust the sugar and tapioca accordingly.  Let stand while you prepare the crust. This is important so the tapioca can soften and absorb some juices before baking.

Break dough into 7 small equal balls.

Roll out each tiny crust in a pie bag or between the two sheets of wax paper, try to get the thickness even and somewhat thin, no thick middle! Peel off one side of paper and place in pie pan, centered.  Remove other slice of wax paper.  Crimp edges all around.  Or not; I left mine kinda rough but it worked fine! Place the crust lined pans on a baking sheet with a rim to catch any spills. Fill each tartlet with fruit mixture after you have the crumb topping ready to go.

Crumb topping

¾ c brown rice flour mix

½ c sugar

½ tsp xanthan gum

1/3 c cold butter cut into six chunks

Put all four ingredients in the same mixing bowl you made the bottom crust in and mix well with mixer paddle until crumbs form. If you let them go extra long you get big fat crumbs if you want that look and I did!

Sprinkle the top of each tartlet with crumb mix; use as much as you like.  I didn’t measure; just sprinkled until the fruit was barely visible through the crumbs. Up to your personal taste… It sinks partially into the fruit mixture and adds lots of sweetness and eye appeal.

Bake in a preheated 400 degree oven for 35 minutes until bubbly and the crumb crust is light brown.  Cool at least 1 hour before serving at room temperature.  I think it is best served the same day you make it, or no more then 12 hours after baking for optimal flavor.  The crumbs will get soggy if too much time passes. Mine was still very good the next day; just not as great as when really fresh.

Note: if you find your bottom crust is not browning enough bake it empty at 375 degrees for 7-9 minutes before filling it with the fruit.  I have a bottom heat pizza style oven which gives me perfect pie crust so I don’t ever have pale pie crust. This is a big benefit of having this type of oven; it is a two oven range with a full sized lower oven.

mass upload 8-22-16 562

Brown Rice Flour Mix (Same as King Arthur GF All purpose blend)
2 c brown rice flour (finely ground)

2/3 c potato starch – Not potato flour

1/3 c tapioca flour

Note: the crust and crumb recipe are out of Annalise Roberts cookbook, Gluten Free Baking Classics, Second Edition. Adaptation and filling recipe are mine.

Reposted with minor changes from my blog; September 2016.


Swiss Chard Taco Thursday….

Vegetarian meals don’t generally thrill me like those made with meat.  That said, I have several delightful vegetarian items I make on occasion.  This is a great meal choice: Swiss chard tacos. My sister made these while I was visiting her.  I was skeptical but found them to be delicious and a great way to use up a lot of the swiss chard!  No meat but you won’t miss it in these flavorful and filling tacos. If you are not familiar with swiss chard it has a rib like celery or fennel and greens too.  It comes in white and green, pink and green/white  or a rainbow chard that can be deep red, orange or bright yellow.  The flavor of chard is rather earthy, goes well with bacon, butternut squash, or garlic and olive oil.

I used Mexican cheese but you can use Monterey Jack as that is what the recipe called for.  The recipe is out of an old Home and Garden magazine. I added some ground cumin too for extra spice. Don’t forget the red wine vinegar, really a great finishing touch.

The white corn tortillas (La Bandarita brand) came from Wegmans; they have one up near Boston.  There are three here near me. Enjoy!

swiss chard taco

Not the prettiest taco but I was in a hurry to devour it!!

Karen’s Swiss Chard Tacos

1 lb Swiss chard

½ tsp. cumin seeds

¼ tsp. ground cumin

½ a red onion, chopped

1 red pepper, chopped

1 tbsp. olive oil

1 clove garlic minced

1 Tbsp. red wine vinegar

1 can of black beans, rinsed and well drained

8 tortillas; corn flour

1 cup of Monterey jack cheese or Queso Fresca cheese; grated

1/3 cup sour cream, reduced fat

Directions:

Chop up the chard stems into half inch dice.  Rough chop the rest of the chard and set aside. Heat a large frying pan and add the cumin seeds; cook 1-2 minutes until fragrant.  Add olive oil then chard stems.  Cook 3 minutes until softening.  Add the chard leaves that you have rough chopped, ground cumin, onion, garlic and red pepper.  Cook 3 min, stirring.  Add the red wine vinegar and the black beans.  Stir well, cook 3-4 minutes longer.

Meanwhile; heat oven to 350 degrees.  Lay tortillas out on baking sheet.  Sprinkle grated cheese in the center of each.  Bake 4-5 minutes until cheese melting and tortilla crisp. Watch them closely so they don’t burn. Remove from oven.  Place a generous amount of chard mixture on each tortilla.  Top with a spoonful of sour cream.  Sprinkle cilantro over top if desired.

Notes: I used low fat sour cream.  I do not recommend fat free as it tastes chalky. Mine was made cilantro free but feel free to put it on yours if you like that herb.

Originally posted by me in August 2016. Minor changes made to text.

Caesar Supper Salad Spectacular

Summertime is salad time at my house.  Salads that are full of fresh seasonal veggies and have the crunch factor.  There is a salad I eat only on special occasions but I don’t know why I don’t make it more often.  It is that good. I have it every year for my birthday party entrée. This recipe is a Drake family holiday tradition started by my parents long ago. The Full Caesar. It is a variation on the Caesar salad found in The Joy of Cooking by Rombauer and Becker, page 96, my copy of which is well used…slightly stained with tomato juice and other salad ingredients… A salad that is legendary in how much we each consume. Long ago, my dad used to like to experiment with his recipe and I shudder to think of the weird things he added sometimes. Don’t get me wrong, I love a lot of ingredients in this salad but I draw the line at blue cheese or even worse, cheddar cheese!  Blah!  I am the one who puts it together when we gather and there is never any cheese but real Parmesan cheese in our caesar salad.

Anyway, this salad is a meal in itself. If you are lazy you can buy a Caesar dressing; check for gf on the label. I always make it from scratch but I leave that choice to you.  The coddled eggs blends in with the lemon juice, olive oil and red wine vinegar to make an authentic dressing.  I am not a big anchovy fan but it really adds a special under flavor; you can’t really tell it’s in there but it adds a lot of authenticity to the dressing.  I bake my own French bread and we have a loaf with a meal and the next day the leftover bread becomes the croutons for this salad.  Use any gf white bread you like. Don’t use bought croutons; they are so so much more delicious when you make them fresh.

This is a show stopper salad that is always put together table side when we have it. Some of my siblings make it too and they do it very similarly to this recipe. It is a delightful treasure hunt for the various additions we have grown to love in our Caesar. Manga!


Real Caesar  Salad – for six

½ cup good olive oil

1 clove garlic

2 big heads of romaine lettuce

6 slices bacon

1 Tsp. salt

½ Tsp. dry mustard

½ Tsp. freshly ground pepper (only fresh will do!)

2-3 fillets of anchovy mashed to a paste or 1-2 tsp. anchovy paste

½ Tsp. Worcestershire sauce

3 Tbsp. red wine vinegar

A lemon

3 Tbsp. freshly grated parmesan cheese

7 eggs

2-3 Tbsp. tiny capers

1 14 oz. can hearts of palm

1 14 oz. can artichoke hearts

A pint of cherry tomatoes, halved

Half a loaf of gf French bread

Preparation the night before; put the peeled garlic clove in the olive oil to stand for at least 4 to 12 hours. Boil six of the eggs and chill, in shell.

Salad Day:  chop the bacon into ½ inch chunks and fry until crisp; drain on paper towel.

Peel the hard boiled eggs and slice into about 5-6 rounds each, set aside.  Slice the cherry tomatoes in half. You can use any kind of tomato; the riper the better. Just cut into bite sized pieces. Wash and tear the romaine into 1-2 inch squares; be sure to dry it in the salad spinner.  Put it all in a big bag and chill in the fridge. Slice the hearts of palm into 1/3 inch rounds, cut the artichoke hearts in halves or quarters.

Cut the French bread into cubes, heat 2 tbsp. of the garlicky olive oil in a large frying pan and add the bread cubes, cook on medium heat tossing often until they are browned some and crisp. Set aside until time to assemble the salad.

The Big Assembly:

Put the lettuce in a large salad bowl; even a big stainless steel pot or wok will work.  Add the salt, pepper, dry mustard, Worcestershire sauce and the anchovy paste. Toss.

In a small pot; heat water to boil; add one egg and cook for 90 seconds.  This is the coddled egg, necessary for the dressing.

Start adding in the good stuff; the sliced hard boiled eggs, capers, the hearts of palm, artichoke hearts, tomato halves, fried bacon.  Stir gently.  Add red wine vinegar, the remaining 5-6 tbsp. of olive oil, the coddled egg which you broke in half with a knife and scooped out with a spoon right into the salad. It will totally disappear into the dressing. Squeeze in the juice of one lemon and add the fresh parmesan you just grated as well as the freshly fried croutons. Note: Do NOT use pre-grated cheese!  Heresy…   Stir gently and thoroughly to spread the dressing around well and mix the ingredients. Taste it and add more salt and pepper if needed plus add more vinegar and olive oil if there isn’t enough dressing.  We always discuss whether there is the right amount of dressing and have been known to add more to it tasting to be sure to balance the flavors so it is perfect.

mass upload 8-22-16 066

Serve on a big dinner plate. Enjoy!

I have been known to eat any leftovers the next day for lunch; still delicious even if the croutons get soggy.