Not My Grandma’s Rice Pudding

I always loved rice pudding as a child, creamy custard studded with raisins and topped with a good sprinkle of cinnamon.  But the rice itself was kinda drab.  A few years ago, I found a recipe that caused a rice pudding revolution in my kitchen: it used sweet rice which is a white short grain oriental rice.  You could substitute Arborio rice if you like, what I have used in my most recent batch. I buy sweet rice in oriental grocery stores but I think Wegmans may carry it too.  Each grain absorbs the milk as it cooks and releases a lot of creaminess as well as providing a soft squishier rice that gives the pudding a more blended feel than my mom’s usage of long grain rice that stayed firm and separate from its pudding surrounding.

This recipe is naturally gluten free.  No one eating it will think, “Oh, darn, another of those weird GF recipes!”  They will just think, “I wonder if she will think I am piggy to want seconds of this?

I think in a pinch you could skip the second part where you briefly bake the pudding but I never do, I think it helps the pudding form the best texture.  Do sprinkle the top with cinnamon unless it is something you despise.  I recommend whole milk as it makes pudding taste so good but if you prefer two percent that will work.  I do not recommend skim milk for pudding. Ick on the texture and flavor of such a mutant pudding!  And this recipe is great with chopped dried apricots, dried cherries, golden raisins, or even currents or in it instead of raisins. My original recipe had lemon peel and apricots in it. Recently I put a few long orange peelings in it and a cinnamon stick while it cooked on the stove top which gave it a delicate orange flavor which played well with the raisins. So, you can alter it to suit your mood and your ingredients. I made it last week in the “classic” form; with raisins and sprinkled with cinnamon. So good I didn’t share it with my dude when he was here Saturday; he got my shoo fly pie and was super happy with that.

rice pudding

These cold days make pudding such a treat.  What could be more comforting after a chilly time shoveling or a cold walk with the dog than a bowl of wickedly creamy homemade rice pudding.

Creamy Rice Pudding

Ingredients

¾ cup sweet or Arborio rice

1 quart whole milk

1/3 cup raisins

1/3-1/2 cup granulated sugar, depending on your sweetness needs! I go with 1/2 cup

2 egg yolks

2 whole large eggs

1 tsp pure vanilla

A good sprinkle of cinnamon

Directions:

Rinse the rice in a strainer briefly, (I forgot to do this last week!)  place in a heavy bottomed 1 ½ quart saucepan, pour in the milk (4 cups) and stir frequently as it heats on medium to a bubbly simmer.  Add the raisins and turn down the heat to low, cover and cook 25 minutes.  Be sure to stir it every 5-7 minutes to separate the rice and keep it from scorching on the bottom.  Add the sugar, stir well.  Mix up the egg yolk and whole eggs in a bowl with a whisk and add in some of the hot mixture; maybe 1/3 to ½ cup.  Dump it all back in the pot and stir well.  Turn off the heat and add the vanilla.

Heat your oven to 300 degrees. Butter the bottom and sides of a low ceramic or glass baking dish. I like an oval myself, that shape is what my mom usually used!  Pour in the pudding, removing any lemon or orange peel and the cinnamon stick if you used such and sprinkle it well with cinnamon to dust the surface.  Bake for 20 minutes.  Often,I put it in a hot water bath created with a 9×13 cake pan and some hot tap water. Did this last week.  This method produces a lovely delicate custard, worth the extra fuss.

It is tasty warm and wonderful the next day.  Some people guild the lily with toppings of whipped cream, grated lemon or orange peel or even whipped mascarpone cheese.  Up to you how you dress it up!  I occasionally serve a homemade cookie on the side for added crunch value.  Enjoy!

Originally published in 2015; minor text changes made.

Angie’s Creamed Spinach

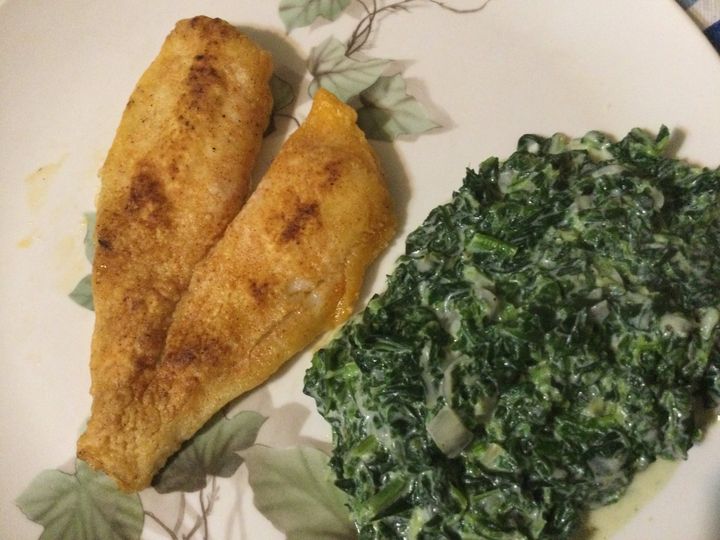
Creamed spinach is such an old-fashioned side dish. Like something your great grandma would concoct for a family dinner. Old school but, there is a reason it is still around. It’s delicious and it is a comforting reminder of olden days. My mom made it. I always loved it but rarely make it. I guess I thought it was just too much work. Tonight, I attempted it using a mixture of recipes and it was delish with my pan-fried flounder. It’s a nourishing side that I know I will make again now that I have it figured out and gluten free, of course!

I think that if you double the cream cheese you could leave out the tablespoon of flour. I used white rice flour in mine. Or use more flour and no cream cheese. I used a box of frozen spinach, convenient and inexpensive. You cook it for a couple of minutes and drain it well. My recipe used a shallot, but onion will certainly work. The cream cheese is a thickener, but it also makes it so creamy. I used whole milk but saw recipes using half and half or even heavy cream; I went with a less rich approach. Up to you and your preferences. It reheats well, add a touch more milk to keep it loose and creamy. Enjoy!

I know; that’s a lot of creamed spinach! It was a small fillet of flounder. First creamed spinach in years so I kinda indulged myself…

Creamed Spinach (for 4)

Ingredients:

1 6×4 inch box of frozen spinach

2 Tbsp butter

1 small shallot or small onion, peeled and diced fine

¼ tsp garlic powder

1 or 2 Tbsp. rice flour

1-2 ounces cream cheese (one of each of rice flour and cream cheese or 2 of either of them)

¾ cup whole milk

1/8 tsp. ground nutmeg

½ tsp. sea salt and freshly ground black pepper if you like – 1/8 tsp of that

1/3-1/2 cup freshly grated parmesan cheese; best quality

Directions:

Heat ½ cup water in a saucepan, add box of frozen spinach (I let mine thaw on countertop for nearly an hour first). Break up the spinach with a fork. Let it cook 2 minutes. Pour into a strainer and let it drain while you start the sauce.

Melt 1 tbsp butter in a 9 inch fry pan or even a wide sauce pan. Add the finely chopped shallots or onion. Cook 3-4 minutes on medium, add flour and stir, add cream cheese (I suggest you first soften it in the microwave) FYI: My stirring device was a flat whisk. Add the milk, whisk until it is well blended and smooth.  Sprinkle with nutmeg and salt/pepper and add that other tablespoon of butter. Stir while it cooks on low for 1-2 minutes. Add 1/3—1/2 cup freshly grated parmesan cheese and stir it gently. Serve immediately.

Cheddar Cheese Biscuits: Guilty Pleasure

I don’t buy redi-made mixes that often, in fact I have never bought a gf biscuit mix except these. From Aldi’s; a fav hangout! Cheddar cheese biscuits in the orange and blue box. This was my fourth or fifth time making them.

You add water, quarter cup oil and a third of a cup of grated cheese, stir and it becomes this slightly weird fluffy white stuff that looks more like cotton batting than anything else. Next, plop big clumps of this fluffy mixture onto a parchment paper lined (or baking oil sprayed) baking sheet and pop them into the hot oven to bake.  After about 16-17 minutes out comes the pan.  Each biscuit gets brushed with a buttery mixture you create with an herb/garlic powder that is blended with fresh melted butter. Super easy to make and definitely popular at my house.

cheddar cheese bisquits

They are nicely browned on the bottom and very tender. The buttery flavor definitely has a garlic vibe going on. We had them with sausage lasagna I made for supper.  My guy took home a container of lasagna and two biscuits. He left happily clutching his treats including those biscuits.   That should tell you they are tasty; Joe does not need to eat gf and he is fairly picky about his bread.  If it passes the Joe test; it is pretty tasty! This time I used colby cheese; mild cheddar and a great choice for them.cheddar cheese bisquit

They were a couple bucks and the add ins are minimal. I made 10 decent sized biscuits. I froze two which were destined for consumption in future weeks of February and March. Totally yummy even if not particularly healthy, white gf flour, sugar, cheese and butter as major components.  Not gonna tell you how many calories are in them, but frankly regular rolls have lots of calories. If it tastes buttery it gonna have calories…. Still, not often I find something this easy to make and this tasty.  I put this in my win win column. Enjoy!

Reposted from 2020 with minor changes.

Almond Flour Chocolate Cake

My guy wanted chocolate cake for Valetine’s Day. With chocolate icing. I don’t care for chocolate icing and was kinda tired of cake after the holidays. This cake has a more distinct crumb due to the almond flour…. the only other flour in it is tapioca starch so it is gluten free which I need. It is easy to make; no tricky process here plus it is dairy free which can be helpful to some folks. I made it but used half peanut butter icing and half chocolate: just made a half batch of each. It was a big it with my man; he took home the chocolate iced portion and I feasted on the peanut butter iced half.

Mine sunk a little in the middle; I think my 4 eggs were all kinda large; there is variation in a dozen eggs; try not to get the 4 largest from the box, live and learn. I did bake it the full time. The center was like fudge; quite yummy if squishy. The peanut butter icing was the bomb!!

Chocolate cake ingredients:

1 1/2 cup almond flour (not almond meal)

1/2 cup tapioca starch

1 1/4 cup sugar

3/4 cup cocoa

1/2 tsp. kosher salt

1/2 tsp baking soda

1/2 cup canola oil

4 large eggs at room temp

2 tsp. vanilla extract

Directions: mix the dry ingredients in a medium bowl; I used a whisk. Spray a 9 inch cake pan and line the bottom with a round of parchment paper. Heat the oven to 350 degrees, shelf for baking set in the middle. In a large mixing bowl beat the eggs until well blended, blend in the oil and vanilla until smoothly blended. Add in the dry ingredients 1/3 of it at a time; blend in and do the next third and then the final third. Pour into the cake pan. Let stand 5 minutes. Bake 30-34 minutes until tester comes out clean. Let cool in the pan for 15-20 minutes before turning out onto a drying rack. Ice when completely dry.

Chocolate icing (this is a half recipe)

1/4 cup room temp butter

2 tbsp. cocoa

1/2 tsp vanilla extract

a pinch of kosher salt (about 1/8 tsp)

1 cup powdered sugar

2 Tbsp. milk (may need another tsp)

Beat the butter with your mixer until fluffy, add the other ingredients and beat until fluffy; add extra milk if too stiff.

Peanut butter icing (half recipe)

1/2 cup creamy peanut btter

2 Tbsp. room temp butter

1/2 tsp vanilla

1 1/4 cup sifted powdered sugar

2 Tbsp. milk (may need another tsp or two)

Beat the peanut butter and butter until fluffy; add the rest of the ingredients and beat until fluffy; add extra milk if too stiff.

Ice half the cake with the chocolate icing and the other half with peanut butter. Enjoy!

Lima Bean Stew…not Quite Your Grandma’s Version!

Lima beans, old school. Not a particularly sexy vegetable. I like them steamed and I buy the baby limas generally. Kinda good when I scorch them but that’s a different recipe folks. This is an older recipe out of my ample reserves of printed out recipes which I changed up a bit because of my personal tastes and what veggies I had on hand. It is chock full of veg and has a light creamy broth. I made homemade chicken broth in my IP for making the stew but you could use a box of broth or even just water if you want vegetarian/vegan.

I grated sharp cheddar over the hot soup in my bowl. Get vegan cheese if that is your thing. Don’t skip the cheese; it really make it so rich and delish. The original recipe had canned corn but I am no fan of that; went with frozen kernels. Worked fine. I used less onion than the recipe and more cabbage. Personal taste preference. Great stew on a cold winter day and it is easy to veganize for those who go that path. Enjoy!

Lima Bean Stew

makes about 2 1/2 quarts

Ingredients:

2 Tbsp butter

1 cup chopped onion

1 cup chopped red pepper

1 cup chopped carrots

1 cup diced potatoes; I left them bigger than diced

12-13 oz frozen lima beans

3 cups broth or water

1 -1 1/2 cups frozen or canned corn

1 cup chopped cabbage

1 tsp salt, 1/4 tsp. black pepper

1 can evaporated milk, preferably not nonfat

8 oz sharp cheddar cheese.

Directions:

Melt butter in a large soup pan; 3 quarts is good. Add onions and pepper; cook about 5 minutes on medium low. Add chopped carrots and cook a minute. Add potatoes and broth; cook 5 minutes, add cabbage, cook 5 minutes, add corn and simmer 5 more minutes or until all the veggies are soft enough for your tastes. Next add seasonings. Stir well and pour in evap. milk. Bring back to hot but not boiling; simmer 2 minutes. Adjust seasonings and add more broth/water if too thick. Do not let it boil. Either grate cheese into bowls before adding stew or add it on top of individual bowls of hot stew. Enjoy!