Mad for Waffles!

Camping is fun for me; I love to cook over an open fire or on the camp stove. Summer is a great time for fresh produce. If you can combine cooking and being in nature that is the best deal for me!

Now this is car camping, you know… where you drive there with a trunk full of sleeping bags, tent, tarps, comfy clothes, cook stove, lanterns, and coolers of food… So I had lots food and I also brought my cast iron waffle maker; an antique from the 1920s that was my sister Margie’s and before that my parents.  It was kinda messed up when she gave it to me but Joe and I worked hard to bake off the crud and now it works fantastically… and corn on the cob, shrimp and swordfish (frozen), half frozen chicken thighs, lamb loin chops and a zillion other food items.   Nothing like traveling light!

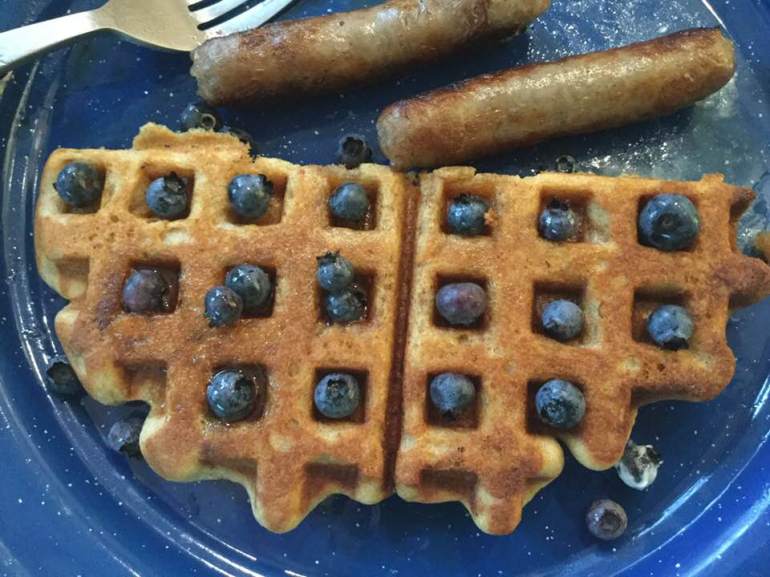
So we enjoyed some good food. For breakfast I made waffles, then  pancakes, and then more waffles the third morning.  The pancakes are lovely; for a year or two I just couldn’t find any pancakes that measured up to what I felt they should taste like.  These are from Elizabeth Hasselbeck’s cookbook. Sometimes I add extra milk if they are too thick. I pour the batter right out of a mixing bowl with a pour spout onto the griddle.

And, again, I forgot to take pix of the waffle iron in action; so here is that recipe (my version; based on a pancake recipe in Gluten-Free Baking Classics by Annalise Roberts. This recipe is great for camping because buttermilk travels better than regular milk and it also uses oil not butter in the waffle; easier to deal with than melting butter on the camp stove…. The other week I was out of buttermilk and used kefir, a fermented milk; worked fantastically.

waffle

Cinnamon Waffles (for 2; double for 4 people)

1 cup brown rice flour mix

1 tbsp. sugar

¼ tsp. salt

1 ¾ tsp. baking powder

½ tsp. baking soda

½ tsp. cinnamon

1 large egg, well beaten

2 tbsp. canola oil or melted butter plus extra for greasing griddle.

2/3 cup buttermilk

½ tsp. vanilla extract

cooking spray (kind with no flour in it)

Directions:  To make it portable; measure the dry ingredients into a zip-lock baggie. I like to write the other ingredients on with a black Sharpie marker and label it waffles…so you don’t use the pancake mix by mistake!  Beat the egg in a large mixing bowl, add the oil, buttermilk and vanilla (optional when camping but I did bring it this summer and they were so yummy). Pour the dry mix into the bowl and whisk briefly until fairly well mixed.

While you are doing that mixing step the waffle iron should be heating.  I use a round cast iron waffle iron; please do spray it with cooking spray before heating and then I melt about 1-2 tsp. of butter into the 4 quarters; I blop the chunk around with a fork so some melts into each part of the iron.  Flip the iron over just before putting in the batter. I use a big spoon to glop it into the waffle iron.  One big glop in each half.  Close the iron and let it bake about 2 minutes. Flip it and bake 1-2 more minutes, or however long your waffle iron takes.  I serve it with real maple syrup; something this good deserves the best.  Before I serve the first waffle I break off a section and eat it hot and plain; you can really taste the cinnamon that way.  Make sure your waffles are crisp not soft. The crisp is Everything!

We had scrambled eggs and maple flavored sausage links; both go fantastically well with waffles.

Brown Rice Flour Mix (it is the same as King Arthur’s gf flour mix)
2 c brown rice flour

2/3 c potato starch

1/3 c tapioca flour

Originally posted in July 2015 and again in 2016  and 2017 with minor text revisions. Recipe the same.

Ratatouille Is Summer on A Plate!

Summer time is the best time to cook with garden produce; makes the most sense, that’s when they are at their peak of quality and variety. I love to make this dish every year in the late summer particularly when I have most of the vegetables growing in my garden.  Ratatouille is a French dish made of eggplant, zucchini, tomatoes, onions, peppers and lots of olive oil and basil. To me it tastes more Italian with all those veggies and the olive oil and basil. It’s a great side dish with grilled meats or fish and I love it inside an omelet or alongside a slice of quiche.  And yes, I know there was a kids movie out in 2007 by the same name.  Disney even came out with their own recipe for ratatouille!

Lots of veggie chopping for this delicious dish and then you should stir it carefully as the mixture cooks in a big pan. I like to make it in a wok or paella dish. I have a Teflon paella dish that I use these days; holds a lot and things don’t stick to it.

Tips: The amounts are somewhat fluid; I don’t really measure the veggies; just use an approximate amount. Be sure to cook the eggplant until it is mostly done before proceeding to the next step or your dish will be less than stellar.  You can use red, orange, yellow or green bell peppers and yellow summer squash works just as good as zucchini. I used a huge pale green bell pepper in my photographed version. Just makes sure all your vegetables are fresh and best quality.


Ratatouille  by Angela, makes about six servings

Ingredients:

2 medium onions

4 tbsp. olive oil divided

1 large eggplant – cut into rounds and then across into ½ in slices (don’t peel)

1 med zucchini  – cut into 1/3 inch rounds and halved

2 large tomatoes, diced

2 garlic cloves – minced

1 large red or green bell pepper- cut into long slices, can half them

1-2 Tbsp. tomato paste

1 tsp. brown sugar, optional

1 Tbsp. dried basil

1 tsp. sea salt (to taste)

Directions:

Put 3 tbsp. of the oil in a large frying pan; 16 inch or wok works well. Add the eggplant slices and toss the slices around to evenly soak up the oil.  Fry turning occasionally; try to get them at least half done and then add the zucchini half moons.  Keep frying until both are just about done.  Turn out into a big bowl.  Add the rest of the olive oil and when it is hot; add the onion bits. Cook about 5-6 min until softening.  Add garlic and cook a minute.  Add the sliced pepper and cook 5-6 minutes until softening.  Add the diced tomato.  Stir well.  Cook about 5-6 minutes and add the tomato paste and sugar, stir well, add back the zuke/eggplants and  until mixture looks mostly done; maybe 10 min.  Add the basil and salt and cook another couple of minutes. spicy tomato jam 006  Great cold the next day; aging in the fridge melds the flavors together.

Originally posted in  September 2016, minor changes in text.

Blueberry Tart 2.0; Cookie Crust


Well, still got a cast on right arm, no can roll out pie dough. So, great option   is a press in cookie crust make in stand mixer. Perfect fit in my blueberry tart, with almond crumble topping.  It was tender and held together well. It was not soggy. Best eaten within 24 hours if humid and hot.  Have to say it was still rather tricky to get out of my oven due to my cast and the inability to lift much with my right hand. I did the almonds but honestly I think next time I’m ditching them, just wanna taste the blueberries! It was delish as made but I want simpler next  tart/pie. I did freeze a slice for Joe who wasn’t around  to enjoy any.

blueberry tart with cookie crust unbaked

Before baking – sorry for rough quality, blame my freaking cast!


Make sure you washthe blueberries and pick out any bad ones, buy top quality, matters always. I really didn’t miss the rolled out crust; this simple press in crumb recipe by Annalise Roberts is the very best crust for one handers! Hah!

blueberry tart baked, cookie crust

Blueberry Tart with Cookie Crust


Ingredients:

CRUST:

1 cup gf flour (King Arthur basic gf blend)

¼ cup sugar

1 tsp. xanthan gum

¼ tsp. cinnamon, optional

5  Tbsp. cold butter

FILLING:

3 1/2 cups blueberries

2 Tbsp. Instant Tapioca

1/3 c sugar

¼ tsp. cinnamon

1 Tbsp. fresh lemon juice

CRUMBLE:

3/4 cup gf flour

5 Tbsp. butter

1/2 cup sugar

¼ tsp. cinnamon

1/3 cup sliced almonds (optional)


DIRECTIONS: Make crust in stand mixer; put dry ingredients in, add butter and mix on medium until crumbly. Spray 9 inch tart pan with cooking spray and press in crust, heat oven to 375 degrees.

Mix filling in medium bowl; dump everything in and let stand while you make crumbs. Standing helps the tapioca dissolve. Pour into tart pan on crust and sprinkle top with crumble to mostly cover fruit;

Mix crumbs: use stand mixer: no need to clean bowl. Dump in flour and sugar and cinnamon, mix, blend in butter and then sprinkle 1 ¼ cups on tart; top with almonds

Bake on lowest shelf in oven, 35-40 minutes until lightly browned and blueberries are bubbling. Remove from oven and cool before serving. Best eaten within 24 hours. Vanilla ice cream is great with blueberries! Enjoy.

blueberry tart, slice , cookie crustNote: I used convection setting; took about 25 minutes to bake.

Peach Pie with Cookie Crust and Almond Crumb Topping

My guy brought over some lovely homegrown peaches. He was hopeful of pie. Problem is I broke my right wrist in July and cannot roll out a regular pie crust. Solution: press in cookie crust make in stand mixer. Perfect fit in my peach pie, with almond crumble topping.  It was tender and held together well. It was not soggy. Best eaten within 24 hours if humid and hot.  Have to say it was somewhat tricky to get out of my oven due to my cast and the inability to lift much with my right hand. Oh and Joe peeled and cut the fruit up for me, peeling is very difficult in a cast.

Make sure you peel the peaches. Fuzz in pie is no fun… Nectarines work just as well, no peeling!

Sorry for lack of photos; blame my broken wrist.

peach pie baked

It looks really brown but the crumbs were perfect

Angie’s Peach Pie with Cookie Crust


Ingredients:

CRUST:

1 cup gf flour

¼ cup sugar

1 tsp. xanthan gum

¼ tsp. cinnamon

5  Tbsp. cold butter

FILLING:

5 cups sliced peeled ripe peaches

2 Tbsp. Instant Tapioca

1/2 c sugar

½ tsp. almond extract (optional)

1 Tbsp. fresh lemon juice

CRUMBLE:

3/4 cup gf flour

5 Tbsp. butter

1/2 cup sugar

¼ tsp. cinnamon

1/3 cup sliced almonds (optional)

DIRECTIONS: Make crust in stand mixer; put dry ingredients in, add butter and mix on medium until crumbly. Spray 9 inch pie pan with cooking spray and press in crust, heat oven to 375 degrees.

Mix crumbs: use stand mixer: no need to clean bowl. Dump in flour and sugar and cinnamon, mix, blend in butter and then almonds.

Mix filling in medium bowl; mix sliced peaches, tapioca, sugar, and lemon juice. Pour into pie pan with pressed in crust and sprinkle top with crumble to mostly cover fruit; probably won’t need it all.

Bake on lowest shelf in oven, 45-50 minutes until lightly browned. Remove from oven and cool before serving. Best eaten within 24 hours especially when humid. Vanilla ice cream is great with peach pie! Enjoy.peach pie w ice cream