Peach Cobbler Perfection!

Peaches in late summer: ripe peach chunks on my cereal, peach ice cream, peach pie, peach tartlets and peach cobbler.  Well, this post will be on peach cobbler and it is peachy keen!  I often make cobbler with blueberries and even sliced rhubarb.  I am guessing most any fruit might work; blackberries, raspberries, cherries, plums, nectarines and apricots come to mind.

This recipe is modified from one in Bette Hagman’s book, More from the Gluten-Free Gourmet and is based on a flour mix that will give you 4 cups of the dry ingredients.  One cup is the base for an 8×8 pan of cobbler topping.  I bet two cups dry mix will make a big 9×13 cobbler. Store the dry mix in an airtight container in the freezer to keep it fresh.

I have tried a number of cobbler recipes but nothing has been better than this one so I stick to what works for me.  If you use nectarines there is no peeling involved which makes it easy to throw together.

I always get the fruit cooking before putting the topping together so the fruit is hot and ready for the topping and can go right into the oven. I cut the eggs down from 2 to 1 and I like the texture of the cobbler topping better.

apple muffins 007

Dry Cobbler Mix

2 ¼ cups white rice flour

½ cup potato starch

½ cup tapioca flour

1 tsp. baking soda

4 tsp. baking powder

1 tsp salt

1 tsp. xanthan gum

1/3 cup sugar

Cobbler Topping

1 cup dry baking mix

1 egg

2 tbsp melted butter or canola oil

1/4 to 1/3 cup milk/buttermilk

½ tsp. vanilla

Mix the wet ingredients and then add to the dry mix in a big bowl.

Fruit Filling

4 cups sliced ripe peeled peaches or nectarines

½ tsp. almond extract

½-2/3 cup sugar depending on how sweet you want it

2-3 tbsp. GF flour like rice flour, tapioca flour (use 3 if juicy)

½ tsp cinnamon

Directions:

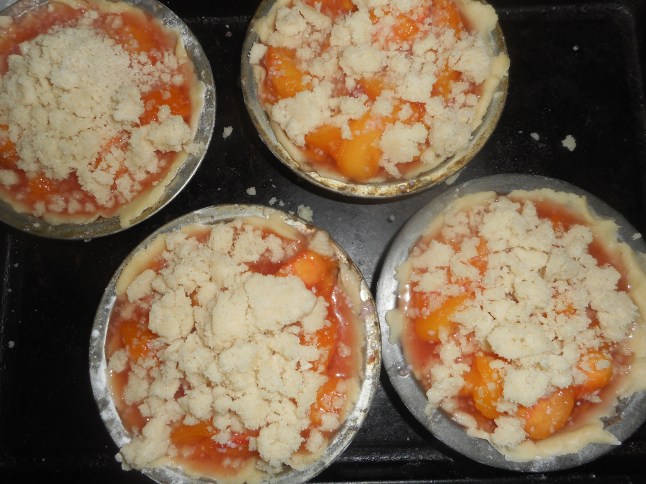
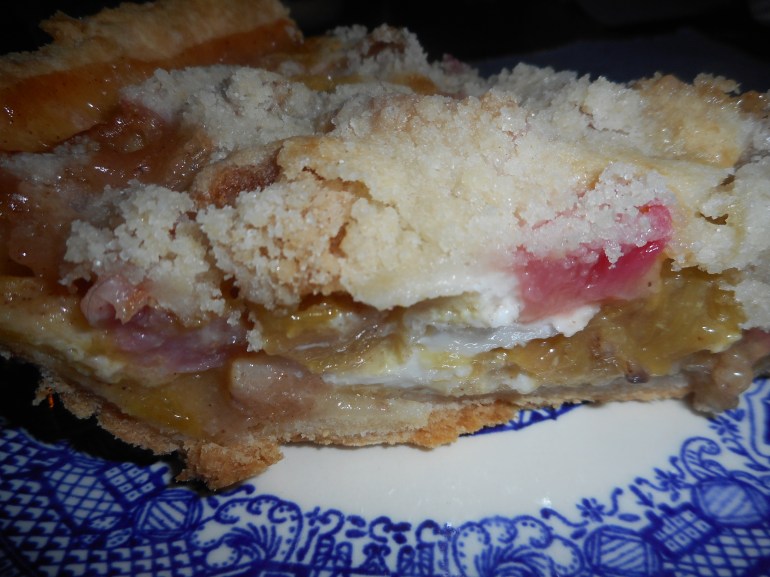
Mix the fruit and almond extract in a thick bottomed sauce pan. Stir together the sugar, cinnamon and flour and mix into the fruit.  Cook on the stove top for 4-5 minutes until it is thickened and hot.  Pour into a buttered 8 inch square pan, top with big blops of the cobbler topping. I have used 1/4 cup milk and that is less runny than using 1/3 cup.  Frankly it works either way. Bake immediately: at 350 degrees for 25 minutes.  The top should be light brown and spring back when you poke it with your finger.  If it looks damp or squishy bake it 5 more minutes. This happens if I use more than 4 cups of fruit; slows it down, sometimes even ten extra minutes if you put 5 or so cups of fruit in it.

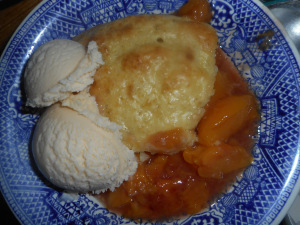
Let cool 7-10 minutes before serving as it will burn your mouth right out of the oven!  Some people love it with a scoop of vanilla ice cream.  Cobbler is perfect just on its own.

Note: if you use oil and almond milk then this cobbler will be dairy free.  Spray the cobbler pan with cooking oil instead of rubbing with butter. I think you can use any sort of milk you can find or even fruit juice.

Originally posted on my blog in August 2014. I made some small changes to the recipe.

Peach Tartlets = Peach Perfect!


It is just past the peak of peach season so get some peaches and whip up delicious gluten free peach tarts. I wanted individual tarts so everyone would feel special; that I baked them their own mini pie; easy to do!  If you don’t have these deep dish pans you can use the flat-bottomed tartlet pans; they won’t hold quite as much filling. mass upload 8-22-16 563

Please make every effort to use local fruit; can get peaches at orchards like Bechdolt’s near Springtown, at most farm stands and at farmer’s markets; one on Saturdays in Easton or Sundays in Hellertown.  This pie really showcases great tasting peaches. If you use lousy peaches your result will lack great flavor. But here’s the thing: store peaches can be poor in flavor and texture due to improper chilling, so I strongly suggest you get locally grown, sweet, ripe peaches to make your pie.  I love when they have a pink blush; it makes the pie so pretty and perhaps even tastier.

To peel; do it old school: heat 3 inches of plain water in a wide pot, drop the peaches gently in 4-5 at a time and blanch them 2-3 minutes, two if very ripe, 3 if less ripe.  Allow to cool somewhat before peeling.  I like to do that over a bowl to catch the juices as I slice each peach. Or just use a potato peeler and slide off the skins. Slice thin and you are ready to use the peaches! If they are quite ripe this works well. Less work, less heat in the kitchen.

Don’t eat these tartlets hot; should be cooled to just warm if you like it so or room temperature or even a bit chilled. They were perfect, just like a big pie only tiny and making one individual dessert.  You could certainly serve them with vanilla ice cream.  And this recipe, like all peach desserts, works perfectly with fresh nectarines, bonus: no peeling required!

Angie’s GF Peach Crumb Tartlets: makes 7

Crust:

1 c plus 2 tbsp King Arthur Basic GF Blend, aka brown rice flour mix (at bottom of recipe)

2 Tbsp. sweet rice flour

1 Tbsp. granulated sugar

½ tsp xanthan gum

¼ tsp salt

6 Tbsp. cold butter cut into 6 chunks

1 large egg

2 tsp fresh orange or lemon juice

———————

You will need 7 deep dish 4-inch tartlet pans if you make them all at once. I actually froze my dough and made the second batch of 3 a day later. Adjust the filling to the number of tartlets you are baking.

Mix dry ingredients in bowl of stand electric mixer.  Add butter and mix until crumbly and resembling coarse meal.  Add egg and juice.  Mix until it comes together into big chunks.  Shape into a ball with your hands. Put it on a crust sized piece of wax paper (14 x 14 inches more or less), flatten the crust ball some; put on top of it another piece of wax paper and chill it all in your fridge 15-20 minutes while you prepare the filling.

Filling:

6-7 cups sliced fresh peaches, peeled and cut in thick slices, place in medium bowl

Mix with:

½ cup sugar

1/4 cup quick tapioca

Notes: I made it in two parts; used 7-8 smaller peaches for each batch. Adjust the sugar and tapioca accordingly.  Let the filling stand while you prepare the crust. This resting time is important so the tapioca can soften and absorb some juices before baking.

Construction: Break dough into 7 small equal balls.  Roll out each tiny crust in a pie bag or between the two sheets of wax paper, try to get the thickness even and somewhat thin, no thick middle! Peel off one side of paper and place in pie pan, centered.  Remove other slice of wax paper.  Crimp edges all around.  Or not; I left mine kinda rough but it worked! Place the crust lined pans on a baking sheet with a rim to catch any spills. Fill each tartlet with fruit mixture after you have the crumb topping ready to go. Fill to a tad less than the top edge of the crust.  Do not overfill; they will bubble and spill if you take the filling right to the top edge.mass upload 8-22-16 560

Crumb topping

Put all four ingredients in the same mixing bowl you made the bottom crust in and mix well with mixer paddle until crumbs form. If you let them go extra-long you get big fat crumbs for when you want that look, they work great!

¾ c brown rice flour mix

½ c sugar

½ tsp xanthan gum

1/3 c cold butter cut into six chunks

Sprinkle the top of each tartlet with crumb mix; use as much as you like.  I didn’t measure; just sprinkled until the fruit was barely visible through the crumbs. Up to your personal taste… It sinks partially into the fruit mixture and adds lots of sweetness and eye appeal.

Bake in a preheated 400-degree oven for 35 minutes until bubbly and the crumb crust is light brown.  Cool at least 1 hour before serving at room temperature.  I think it is best served the same day you make it, or no more then 12 hours after baking for optimal flavor.  The crumbs will get soggy if too much time passes. Mine was still very good the next day; just not as great as when really fresh.

Note: if you find your bottom crust is not browning enough bake it empty at 375 degrees for ten minutes before filling it with the fruit.  I have a bottom heat gas oven which gives me perfect pie crust if I put the pie down on the lowest possible level, so I don’t ever have pale pie crust. I used to have a two-oven range with a full-sized lower oven. and an upper pizza oven that I called the Pie Oven!    I miss it a little, but I am managing just fine to have perfectly browned pie crusts.

mass upload 8-22-16 562

Brown Rice Flour Mix (Same as King Arthur GF All-purpose blend)
2 c brown rice flour (finely ground)

2/3 c potato starch – Not potato flour

1/3 c tapioca flour

Note: the crust and crumb recipe are out of Annalise Roberts cookbook, Gluten Free Baking Classics, Second Edition. Adaptation and filling recipe are mine.

First published in Summer 2016. No changes to recipe in this posting.

Rhubarb Crisp For Dessert…or Breakfast.

It’s still rhubarb season, at least at my house and garden. This dessert is super easy and super yummy. I swear it tasted like there were cherries in there! I never made rhubarb crisp until last spring; I make apple crisp all the time in the fall and winter…so glad I tried it.  I am sharing this tasty quick dessert with you once again.  Makes a yummy breakfast too!

It keeps about 3 days depending on humidity. I have a glass baking dish with a plastic lid for keeping things fresh; works great.

Notes: any gf flour blend will do, I use King Arthur blend.  You can use sliced or slivered almonds. Or no nuts! Tried it with both nuts and I prefer walnuts.  I think the walnuts add a hint of cherry flavor to the result. But great with no nuts too…

Rhubarb Crisp

Ingredients

Fruit layer

4-5 cups rhubarb cut into ½ inch bits (I do 5 cups)

¾ cup sugar (could use up to a cup if you like it sweeter)

¼ cup tapioca starch (or cornstarch if you chose)

3/4 tsp. cinnamon

Topping

½ cup gf flour blend

1 cup gf rolled oats (not quick ones!)

½ cup light brown sugar

½ tsp. cinnamon

¼ cup brown sugar, not packed

¼ cup butter, cold

½ cup walnuts (optional)

DIRECTIONS:

Heat oven to 350 degrees. Spray the inside of 8×12 glass baking dish; any dish roughly that size will do. In a large mixing bowl dump all the dry ingredients; sugar, starch and cinnamon. Mix a bit; add rhubarb, mix well. Dump into baking dish.

Dump all dry ingredients left except nuts into the bowl of a stand mixer, blend briefly. Add butter which you have cut up into about 12 or more tiny bits; a few cuts with a knife do it quick. Blend a minute or so until you can’t see the butter. Add nuts. Pour over the rhubarb. Bake on middle shelf for 35 to 40 minutes; the thicker the layer of fruit is the longer it takes; you want it bubbling and the top lightly browned. Let cool at least 15 or 20 minutes.  Goes great with vanilla ice cream or plain Greek yogurt on top. Store with a tight lid on top. Enjoy! rhubarb crisp in dish

Rhubarb Custard Crumb Pie

This is my favorite rhubarb pie and my go to recipe for a great spring dessert.

This is an easy pie even though it has several steps.  It is different from the usual rhubarb pie because the texture is a bit closer to a crumb cake, no wet, slimy texture and no ultra sour flavor.  I think this version tastes even better than it did when I made it with wheat-based flour.  This GF crust will work for any pie and the GF crumb topping is perfect for any crumb pie topper.  What I am giving you is my mixture of three recipes with some small modifications over time to create one of my favorite GF pie recipes.  I know it has several steps, but each one is easy, and you can use these crust and crumb recipes for other pies.

I like it because it has a great texture, and the flavor is complex but subtly rhubarby.  It isn’t really soft or all that custardy but more cake-like in texture. It is a game changer of a rhubarb pie. I promise you that!

Angie’s GF Rhubarb Custard Pie

Crust:

1 c plus 1 tbsp brown rice flour mix (recipe for blend at bottom of pie recipe)

2 tbsp sweet rice flour

1 Tbsp. granulated sugar

½ tsp xanthan gum

¼ tsp salt

6 Tbsp. cold butter cut into 6 chunks

1 lg egg

2 tsp fresh orange or lemon juice

——————

Spray a 9-inch metal pie pan with cooking spray, dust with white rice flour. I must confess I forget this step a lot of the time and it doesn’t seem to matter much….

Mix dry ingredients in bowl of stand electric mixer.  Add butter and mix until crumbly and resembling coarse meal.  Add egg and juice. Do not leave out the juice; it is critical to the crust texture and structure!  Mix until it comes together into big chunks.  Shape the sticky mess into a ball with your hands. Put it on a crust sized piece of wax paper (14 x 14 inches more or less), flatten the crust ball some; put on top of it another piece of wax paper and chill it all in your fridge 15-20 minutes while you chop the rhubarb into ½ inch chunks.

rhubarb

And make the crumbs while the crust ball chills:

Crumb topping

Put all four ingredients in the same mixing bowl you made the bottom crust in and mix well with mixer paddle until crumbs form.

¾ c brown rice flour mix

½ c sugar

½ tsp xanthan gum

1/3 c cold butter cut into six chunks

Make the fruit Filling:

5 cups cut up fresh rhubarb – place in medium bowl

Mix with dry mix made of

2/3 – 1 c sugar (depends on how sweet you like your pie) I go with 2/3 cup

¼ c brown rice flour mix (see below recipe)

½ tsp nutmeg

Sprinkle cinnamon

Rolling out the bottom crust: My sister bought me one of those pie crust plastic bag thingies; has a zipper around the edge.  By OXO: I love it; it works better than wax paper which can get soft and tear as you roll out the crust.  King Arthur Flour sells an inexpensive one on line. I highly recommend you get the OXO version for making scratch pie crust.  Or maybe improvise with a sheet of heavy duty plastic! Strong enough to work with the rolling pin and better than wax paper.pie crust bag

Roll out pie crust in a pie bag or between the two sheets of wax paper, try to get the thickness even, no thick middle! Peel off one side of paper and place in pie pan, centered.  Remove other slice of wax paper.  Crimp edges all around.  Fill with dry rhubarb mix.  Pour the following wet mix evenly over this mixture: Wet mix: 3 eggs (171 grams) beaten lightly with 1/3 c milk (not skim), and ¼ tsp almond extract.

Sprinkle the top of the pie with the crumb mix; use as much as you like.  I like about 2/3-3/4 of the mixture.  Up to your personal taste… It sinks into the rhubarb and wet mixture to create an almost cake like texture and the crumb crust adds lots of sweetness and eye appeal.

Bake on the bottom shelf in a preheated 375-degree oven for 55-60 minutes until bubbly and the crust is light brown.  Cool at least 2 to 4 hours before serving at room temperature.

Brown Rice Flour Mix (same as King Arthur’s Basic GF Blend) [Not Measure for Measure or baking mix]
2 c brown rice flour

2/3 c potato starch

1/3 c tapioca flour

This post was originally published in the late spring of 2013.  I revised it somewhat since then.  I have made this pie many times in past years to rave reviews.  One of my friends had it for dessert at my house and said it was the best pie she had ever eaten, gluten free or not!  Spring is rhubarb season.  Go forth and make pie!

Peach Crisp with Oat Topping

I rarely make peach crisp and this small pan of crisp I whipped up by lunchtime today made me wonder why that is. It is so peachy flavored and the topping is perfectly crisp; I am just sad that peach season is about over, and I only made it this once. Sigh. Well, I plan to enjoy it even though it is not a huge pan; all the remaining peaches I had after a cobbler and peaches on my cereal every day for a week… Plus, I dislike soggy crisp, so it seemed perfectly sized to be all eaten before any sog sets in. I did poach the peaches 2 minutes in a hot water bath to make the skins slip off easily; I strongly suggest you do the same. Let them cool 5 minutes before you peel and slice them. So much easier than using a peeler and laboriously peeling with it. Plus, now they are nicely warmed from the poaching and ready to make into crisp. Don’t be tempted to use canned peaches; that would be a sad parody of peach crisp. Get fresh ones! There are still peaches at Bechdolt’s Orchard.

Notes: This recipe is a slightly different version of the fruit crisp in Annalise Robert’s Classic GF Baking Cookbook. I like less sugar and I like oats in mine plus I downsized it by approximately one quarter. It is easy to throw together in 15 or so minutes and bakes up golden and sweetly crisp. So peachy I wanted to devour the entire pan full! This hastily taken picture give you some idea of its looks; I was in a hurry to eat some before heading out to an appointment, so my photog skills were somewhat impaired.

Angie’s Small GF Peach Crisp

Fruit filling Ingredients:

3 1/2 cups of skinned, pitted and sliced fresh peaches

1/4 cup of sugar

A heaping 1/4 tsp. of cinnamon

3 Tbsp. tapioca flour

2 Tbsp. fresh lemon juice

Directions:

Heat oven to 375 degrees, put shelf in middle position for baking; I used a 6-cup size glass rectangular baking dish. Next, put sliced peaches in a large mixing bowl, blend the dry ingredients in a separate bowl and pour over the fruit, mix with a spoon and pour into the baking dish that you have sprayed with cooking spray. Sprinkle with the lemon juice. Make the topping next.

Topping:

3/4 cup gf flour (I like King Arthur’s basic GF blend)

1/4 cup packed brown sugar

1/4 scant tsp. sea salt

1/4 tsp. cinnamon

1/4 heaping tsp. of xanthan gum

3.5 Tbsp. butter, melted

1/4 cup old fashioned oats, gf

Directions:

Mix together dry ingredients except oats and pour melted butter over the mixture. Stir briefly and then add the oats and stir until blended and sort of clumping. Spoon over the peaches. Bake 30-35 minutes. Let cool at least 15 minutes before serving it in dessert dishes. I like it plain but some people I know love all things peach with a scoop of vanilla ice cream. Enjoy!