Tomato time is right now. I love a home grown tomato, sliced with vinaigrette, or with a dab of light mayo on it. I love them inn a sandwich, a salad, Italian pasta dishes or as the major component of a tomato soup.
There is a family recipe that is only made in the days of ripe local tomatoes. It is never ever worth making with a winter or green house tomato. Old varieties like Brandywine work great but any ripe tomato freshly picked and not chilled ever will work just fine. Use whatever kind of tomato you like.

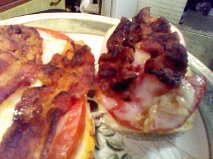
This sandwich is a man pleaser with bacon and cheese in it. We call it the broiled tomato stacker or the BCT (Bacon Cheese and Tomato) You can call it fabulous and addictive! It has the triple whammy of bacon, cheddar cheese, and juicy summer tomatoes. Prepare to dive in and enjoy.
There are only five ingredients. I make it with GF bread but you can use any bread of your choice. Do not use cheap or light cheese; I like Cabot Extra Sharp Cheddar but any good sharp cheddar will work. I never met a bacon lover who didn’t fall instantly for this sandwich.
Angie’s BCT Stacker
This recipe for 2 open face sandwiches as I tend to eat less bread GF and you can really taste the components without that second slice. If you want a top slice just double the bread. I used slices of zucchini yeast bread I made myself, recipe from Nicole Hunn, who authors the very popular Gluten Free on a Shoestring blog. It holds together well and has a great yeasty savory flavor. It is very easy to make and versatile.
Ingredients:
One big fat ripe tomato
2 slices GF bread
2 tsp. light mayonnaise
4 to 6 thin slices of sharp cheddar cheese
2 slices raw bacon cut in half.
Directions:
Fry the bacon until crispy, place on paper towels to drain
Set your broiler to high to heat.
Use a knife to spread the mayo on the two slices of bread. If you want a top slice I would leave that one un-spread and broil it briefly to brown one side. Place the mayo bread slices on a metal broiler sheet.
Slice your tomato into slices that are about 1/3 inch thick with a serrated knife; not thin slices and cover the entire tops of the bread with it. I often cut a tomato in half or quarters to piece it so every centimeter is covered with juicy ripe tomato. Top with 2 slices of cheddar cheese, I cut them about ¼ inch thick. I use 3 slices of cheese if the bread slice is large. You want coverage over most of the tomato. It will spread some when it melts.

Put the broiler pan in the broiler and broil 2-3 minutes until the cheese is melted but not burnt. Try not to overdo it as the cheese can run right off the tomatoes. Remove from oven and place on a plate. Top with the bacon slices. If you broiled a top slice of bread put it on now. Eat while hot but don’t burn your mouth on that melty gooey cheese!
Yes, this recipe is not for a dieter and I imagine it is full of calories but also maximum flavor. I make it a lot during tomato season and reason that I never eat it any other time of the year so I don’t worry about the fat or calories I am chowing down in this flavor feast. Just make one and you will be hooked. I can’t wait to eat one for lunch tomorrow!