Roasty Chicken Soup for Chilly Spring Days

As we seek comfort in our crazy world chicken soup comes to mind as good for body and soul. And if anyone in your house is ill chicken soup is a perfect choice. Sorry you vegans! I am guessing there is a vegan chicken soup recipe out there.

So, if you are sick with a cold or just feeling chilly the situation absolutely seems to require chicken soup. I made mine from scratch, of course! Actually, I made the broth in my Instant Pot and then roasted some veggies in my broiler. My oven has been very difficult in recent weeks. I felt lucky to get the oven to turn on for a bit after I browned the vegetables on a tray in the broiler area of my smaller oven. I believe this is a trendy thing to do for soup and it is also a great way to easily add deep flavor to your soup veggies. I will give you my whole recipe; you can buy some broth or make it however you prefer to. I find it extra easy to do it in my IP!  I was super pleased with how much richer and more flavorful it came out: better than any chicken soup I have ever made. And that pot of homemade chicken broth helped enrich the flavor a lot. Worth the effort and you get all that great cooked chicken.  Super easy to do actually; and well worth it if you want a great start to a homemade soup. It goes without saying that you could put cooked rice in this soup instead of noodles. Enjoy!

Here is my pot of chilled homemade chicken broth.  Pure gold~~

chicken broth

cold homemade chicken broth


Angie’s Roasty Chicken Noodle Soup

Broth Ingredients

1 whole small chicken; 3-4 lbs

1-2 stalks celery broken into large chunks

1 small carrot; broken similarly

1 small-medium onion peeled and sliced into fat wedges

2 big garlic cloves, peeled

1 tsp. kosher salt, ¼ tsp. freshly ground black pepper

1-2 bay leaves

1 tsp. chopped rosemary (optional)

Put the carrot, celery and onion chunks in the IP pot; add the whole chicken to the IP: don’t forget to remove the giblets and all plastic packaging! Add all the rest of the ingredients and add filtered water to barely cover the bird. Put on the lid, set the manual pressure to 35 minutes and let’r rip! Allow it to naturally release for 10-15 minutes before opening.  Let cool; remove bird and cut up; throw out everything but the meat. Strain the broth; throwing out all the worn-out veggies left in your colander. There; amazing broth!

roasty veggies

Veggie Ingredients:

1 large onion, cut into wedges

2 celery stalks; cut into 3-4 inch lengths

2 carrots; cut into sticks

1-2 garlic cloves, unpeeled

1 turnip or rutabaga (optional but I love it’s earthy flavor) cut into wedges; size of onion wedges [you could use mushrooms instead]

Put veggies on a baking tray you sprayed with cooking spray. Pour some EVOL on; 1-2 Tbsp. Stir around to coat. Sprinkle with ½ tsp. sea salt and a bit of black pepper if you like. Broil for 10-20 min; checking frequently. I turned mine over once the top side got well browned. A few blackened bits are okay; they add flavor! But don’t burn the heck out of the veggies or you will have to start over. Once all is browned and tender pull out and let cool.

roasty chicken soup in pot

Ingredients for finishing soup:

¾ cup broken wide gf egg noodles or rice noodles

big sprig of fresh thyme

½ cup frozen peas

2 Tbsp. fresh parsley

1-2 cups chopped cooked chicken

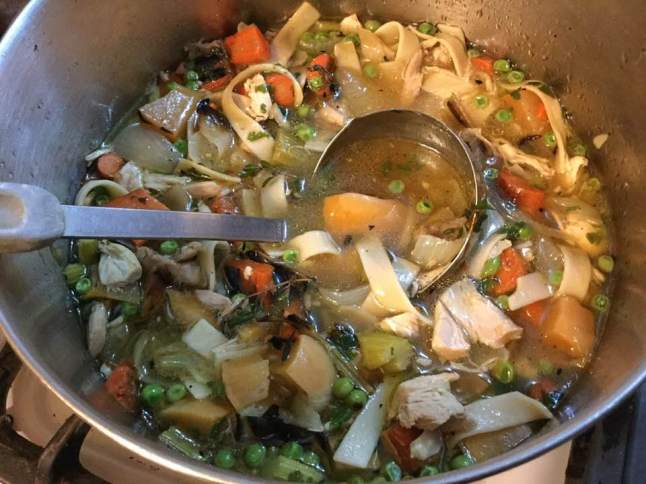
Pour the broth into a large sauce pan. Heat. Chop coarsely the roasted veggies, removing the garlic clove outer skin.  Add them to the soup. Let heat; add about ¾ cup broken wide gf egg noodles or rice noodles. And a big sprig of fresh thyme. Cook as long as the package says. In the last 3 minutes add ½ cup frozen peas and 2 Tbsp. fresh parsley. Taste and add more salt/pepper as you wish. Add 1 cup chopped cooked chicken from the broth making and serve as soon as it is hot. Enjoy! roasty chicken soup

Originally posted in January 2019


Holiday Bread Pudding

What to do with the leftover cookies from Christmas that are kinda starting to get stale.  My preference is to salvage them by making a delicious cookie bread pudding. It varies depending on the cookies you throw in it. I also use holiday bread leftovers like stolen and my favorite Italian fennel and golden raisin bread. The more the merrier!

This is a basic oven baked bread pudding. Nothing tricky or fancy. You don’t have to soak or let it stand a long time.  You can make it with gluten free cookies or wheat based. Store or homemade. I’ve been making it for many years and it works great with gluten free cookies. This time I used delicate meringue filled cookies but a host of cookie varieties will do just as well. I admit it is not a pretty pudding. But it will taste delish and use up those holiday baked goods you have hanging around still!

bread pudding in cup

Angie’s Cookie and Bread Pudding

Approximately 2-3 cups crumbled leftover cookies/bread; not packed in cup I used about 2.5 cups of crumbled cookies

1 Tbsp soft butter

3 eggs

3 cups whole or 2 percent milk ( plus up to a cup more milk if needed)

1/3 cup sugar

1 tsp. real vanilla extract

Pinch salt


Directions: Heat oven to 325 degrees. Butter a 1 quart baking dish; I generally use a medium (7 inch diameter) ceramic souffle pan. Place broken cookies/bread into buttered dish. Do not squash down.

Beat eggs in a mixing bowl until fairly well broken up; add milk. Add sugar, vanilla and salt, stir well to melt the sugar. Pour over the cookies. If the milk mixture does not reach the top of the cookies you might have to add a bit more milk. You don’t want to start off with not enough liquid to form custard. Don’t add more than another cup of milk or it will substantially change the proportions of the custard. Place pan in oven and bake 35-45 minutes until the top is slightly browned and the custard is firm-ish. I wiggle the pan to see if it still is liquid; you want a little bit of wiggle; just not so much that your pudding is under-baked.bread pudding in pan

Cool at least 30 minutes before serving. Goes great with a bit of freshly whipped cream. Enjoy!bread pudding with cream

Christmas Stollen – Even Better

I am very traditional about certain things and stollen for Christmas is one of them. I made it a couple of years ago but wasn’t that impressed with the gf version I chose. This December I made it from a recipe on King Arthur’s website and it was so easy and so very delish I just had to share it right away with you. My mom and I had some together this afternoon and I marveled at how perfect it was, you would never guess it is gluten free. It is made without a mixer, just a whisk, a pastry cutter, a big spoon and a bread board to knead it briefly. The recipe is found at: https://www.kingarthurflour.com/recipes/gluten-free-holiday-stollen-recipe. It uses their basic all purpose blend, does have eggs and butter and some ricotta cheese. No fancy techniques. Sort of almost a quick bread that looks like you were baking all day. Tastes like Christmas should taste!

I made a few changes; I didn’t have the butter flavor additive. I added 1/4 tsp lemon extract to up the lemon flavor that came from the zest of an entire good sized Meyer lemon.  I added 2 more Tbsp. of ricotta cheese. I used full fat and maybe that altered things but it was a bit dry so I added as I mixed it up and kneaded it. I shaped each half into an oval about the size the recipe says and I folded it the short way so it was chubby and appealing; I used to do it the long way; like it much better like this.  Makes  nicer slices and fits on my big sheet pan much easier.

stollen fruit


My dried fruit inside was tuned up by 1 Tbsp. of brandy that soaked right in.  I only did the butter brushing after baking once. Did sift powdered sugar then and after it was mostly cooled.  My dried fruit mix was 1/2 cup golden raisins, and 1/2 cup of currants, chopped dried apricots and a cherry and berry dried blend. I started the oven heating and toasted my almonds as it got hot; put them outside in the cold for 2-3 minutes to cool before adding to the mix.  stollen wet ingreds

I baked this about 8 extra minutes as it just wasn’t brown; don’t be afraid to do that if something looks too pale or underdone; far better to be a tad crunchy than saggy underbaked dough insides. stollen ready to bake

This was easy; no yeast to deal with. The only special tool I recommend is a pastry cutter; it has several blades and cuts the butter into smaller and smaller bits which is what gives this bread pastry its flaky tenderness. You could use a butter knife instead; will just take longer. stollen baked

This is the Christmas bread of my dreams. Don’t be afraid; you can make this my friends! Enjoy the holidays and Merry Christmas! stollen sliced

Lemon Birthday Layer Cake

If you know me you know I love to bake. Pies, cookies, bars, muffins, sweet breads….cakes not so much except angel food cake which I am rather good at if I do say so. But birthday cakes are my kryptonite – I screw them up time after time. I guess it is the pressure….it gets to me. So I was going to make my birthday cake last week and went with a lemon flavored layer cake with a bit of lemon curd between the layers. Sounds kinda ambitious but I was determined to try a new recipe and use some of my wonderful homegrown lemons mailed all the way from Texas.

I had some new Bob’s Red Mill 1-1 baking mix to try out. But it turned out that what I needed was the same flour mix I love and use in the majority of my recipes *King Arthur’s All Purpose blend. Perfect. The new mix will wait….

My sister Karen suggested cream cheese icing after I told her I was not too happy over the super sweet sounding icing that this recipe used. The cake was simple to make; lower fat as it was made with canola oil not butter.  It can also be dairy free but I used the whole milk I had.

I made the layers using my hand held mixer as I have found that the stand mixer is too strong; it over-beats cakes.  Both layers rose well; I used those old school cake strips I have; they help make for level layers that aren’t overbaked on the edges. The cake texture was perfect; not heavy but not light; great crumb and moist.

I had made my own lemon curd the day before; used the Meyer lemons my brother Robert sends every year about now.  The recipe is actually calibrated with Meyer lemons but I am sure you can use standard lemons; will be a bit tarter.  It really added the perfect filling inside this cake; don’t be tempted to use more than half a cup as  your cake will have lemon curd running down the sides….not a good look.

Putting it together was tricky; the curd made the layers slide a touch so I put the whole thing in the freezer to chill and stabilize before I finished the icing. The topping per the recipe was fresh blackberries; got some at Aldi’s and put them around the edge and in the center.  My family gobbled up their slices. Everyone loved it and that is hard to accomplish!  Maybe the birthday cake curse is over…….


lemon cake layer

A few minor defects but it is tall and well baked.

The recipe can be found at glutenfreepalate.com/gluten-free-lemon-cake/

I didn’t use the icing used there; went with something less sweet. My citrus cream cheese icing recipe:

1 stick butter, at room temperature

4 ounces light cream cheese at room temperature

3 cups powdered sugar; sift unless it is a new bag

1/2 tsp. lemon extract

1 tsp. vanilla extract

1  to 2 Tbsp. fresh lemon juice

Grated zest of one lemon, zest of half a navel orange (about a tsp)

Use hand mixer to fluff up butter; ;add cream cheese and blend well. Add powdered sugar 1/3 cup at a time on slow speed. Add extracts, one Tbsp. lemon juice and zest. Blend until fluffy adding more lemon juice if needed to reach a good spreading consistency.

lemon birthday cake

As you can see I am not a great decorator or a fantastic photog but  you get the idea of this rich lemony treat of a birthday cake!

You can buy some lemon curd. I made mine as I am an overachiever and I had all the ingredients; can be pricy stuff plus it tastes even better fresh. THe recipe I used is from the Cake Mix Doctor’s GF Cookbook;  2 large lemons, 3/4 c sugar, 2 large eggs and 6 Tbsp. butter melted and cooled somewhat.

Wash the lemons and dry. Grate the zest onto a plate lined with some wax paper. You need about a Tbsp of zest. I had to use most of a third lemon to get that much zest. Juice the two lemons; you want 1/4 to 1/3 cup juice. Put juice, sugar and eggs in medium sauce pan; heavy bottom and whisk until blended. Then add the melted butter and whisk. Heat pan on medium heat until it comes to a boil; you MUST keep whisking it constantly so it doesn’t burn. Once it reaches a boil I like to boil it up to a minute; stir like a mad woman (or man)! Take off heat; pour into a bowl and chill. You can strain it but I like the zest in mine and my lemon juicer strains off seeds so I don’t see that step as necessary. Chill it well before using; at least 2 hours. I made mine the night before. I had 8 oz leftover and am debating how best to enjoy it! lemon birthday cake slice

I used one small container of blackberries and a few more from a second container. Afterwards I wished I had put them all on there as the flavor of them is just perfect with this lemon cake.  Just thinking about it makes my mouth water! Enjoy!

lemon cake half cropped

Can you see the lemon curd layer? I used my three hole zester to make long strands of Meyer lemon zest to decorate after I put on the blackberries. Not too pretty but pretty darn delish!


Browned Butter Wedding Cake Cookies

These miniature snowball cookies were the foundation of the Christmas cookie baking when I was a kid.  They were always made every year, sometimes a second batch had to be baked as we ate them all before the big day!  You can use pecans but I rarely do; walnuts are cheaper and I sort of prefer their flavor.  Some people call them Mexican Wedding Cookies but we generally called them Russian Teacakes…but today I am giving you a variation I plan to try this Christmas baking season. I am making them with browned butter today! No change in ingredients; one extra step.

For me it is not Christmas without these cookies so I was extremely pleased to find a great gf recipe. My sisters think they are better tasting than the old regular recipe!

They are super easy to make with not too many ingredients.  Be careful lifting them off the pan as they are delicate until fully cooled. The texture and subtle flavor of this GF version is actually superior to the wheat flour recipe of my childhood. When you bite into one it shatters into a delicious mouthful of sweet cookie. They are delightful with a cup of tea or coffee.  My family clamors for a few to take home!

If you like them really sweet sprinkle on extra powdered sugar, less of it makes them perfect for those who are not used to too much sweetness. No one will ever know they are GF and you will get complements on their flavor and texture.  This recipe is from Annalise Roberts’ fabulous Gluten-Free Baking Classics with some minor changes by me and the browned butter idea which comes from Bon Appetit.  Enjoy: they are rather addictive cookies!

xmas cookies 006

Browned Butter Wedding Cake Cookies

1 cup salted butter, room temperature

6 tbsp. powdered (confectioners) sugar

2 tsp. vanilla extract

2 cups brown rice mix (King Arthur basic blend or see recipe below)

1 tsp xanthan gum

1 cup walnuts or pecans chopped fine

Confectioner’s sugar for sprinkling

Directions: Heat butter in a heavy sauce pan; swirl it around and NO NOT walk away! It can go from yellow to dark dark brown in a few seconds so stand there and watch closely until it gets lightly brown and then pull the pan off the heat and immediately pour into  your stand mixing bowl. Let it stand until it is mostly congealed into a solid mass. Then beat butter and powdered sugar in large bowl of stand mixer until light and creamy.  Add vanilla, beat in.  Add flour and gum, mix in until well blended, stir in walnuts until distributed.  Chill dough for an hour.

Heat oven to 350 degrees.  Form dough into 1 inch balls. Roll in powdered sugar if you like.  Place on cookie sheet lightly sprayed with Pam (not the baker’s version that has flour).  Place about 1 ½ inches apart.  Bake 13 to 15 minutes until lightly browned on top and bottom.  Cool on pan for 5 min and then sprinkle with lots of powdered sugar before placing on wire rack to cool. I like to sift it onto the cookies so the coating is even.  You could put a sheet of wax paper under the wire rack to catch the excess sugar.  Store well wrapped: in airtight container, in fridge for a week or freezer for up to 30 days.  You could store unbaked dough in fridge for a few days.

Brown Rice Flour Mix base mix  (same as King Arthur gf blend)
2 c brown rice flour

2/3 c potato starch *not potato flour

1/3 c tapioca flour

Note: This wonderful cookie was first posted December 2014 on my blog.  Minor revisions have been made since then.