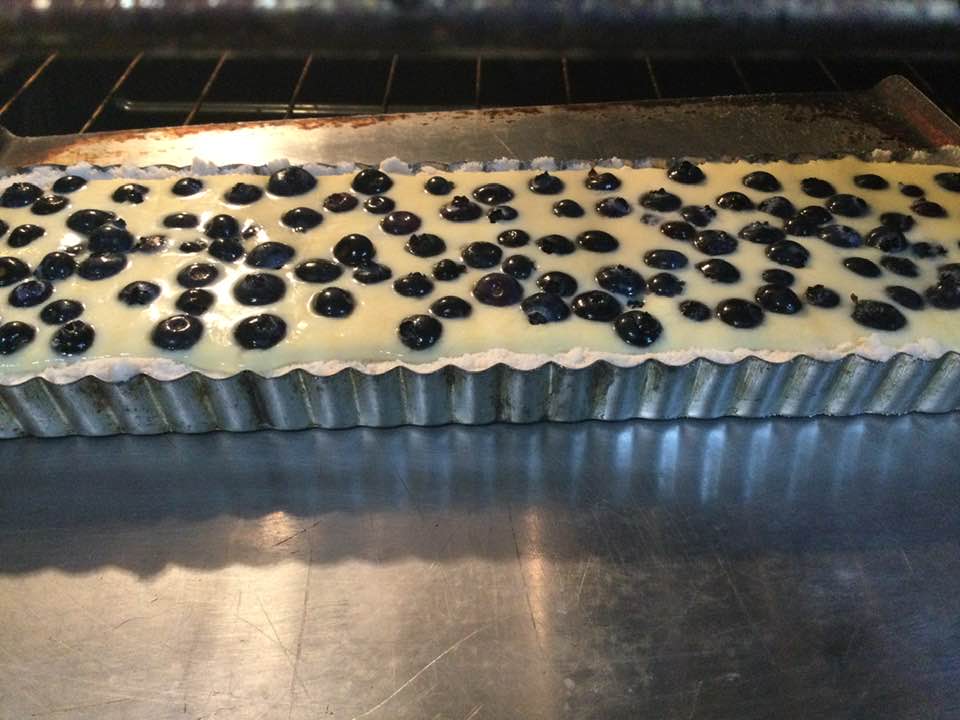
I have made this tart many times. This time I used a simple, sweet, press in, gf pie crust. It adds a bit of sweetness and is super easy; no rolling out the pie dough. In the past I always had leftover filling that I baked in a separate pan. This version endeavors to end that practice; I reduced the volume to make just enough to fill the tart pan, success!
Notes; you can leave out the lemon ingredients if you don’t want that flavor. I use King Arthur’s basic gf flour blend when I make a homemade crust, the one that is just flours, no xanthan in it. I used blueberries but I am sure you could make this with raspberries or a mixture of the two.
The ricotta adds a delicate texture and crumb. These were definitely end of season blueberries but tasty none the less. I used a little of the rind and juice of a lemon but even better is the Meyer lemon which has a delicate flavor compared to regular lemons. Do let the ricotta cheese and eggs warm up to room temp before using them, always good advice with gf baking.
Ricotta Blueberry Tart
Cookie crust:
1 cup brown rice blend; King Arthur Basic GF Blend
1 tsp. xanthan gum
¼ cup sugar
5 Tbsp. cold butter cut into 10 pieces
1 tsp. vanilla extract
Mix the dry ingredients in stand mixer bowl. Add the butter, mix until fine like sand. Add extract. Blend briefly. Spray pan with cooking spray. Sprinkle in the mixture into the pan and spread evenly. Press lightly in with your hands. DO not press too hard or it becomes way too firm.
Or, roll out that premade pie crust and fit into your pan; trim off extra crust. Fill.
Filling:
1 cup ricotta cheese, whole milk is best but any will do.
2 lg eggs
1/2 cup sugar
1/2 tsp. vanilla extract
½ tsp. lemon extract
2 Tbsp. fresh lemon juice
1 tsp. lemon rind grated
1 Tbsp. plus 1 Tsp. tapioca starch or corn starch
Pinch sea salt
1 heaping cup fresh or frozen blueberries
DIRECTIONS:
Heat oven to 350 degrees/ Mix ricotta with eggs in the mixer bowl you just made the crust in and then add the rest of ingredients except the blueberries. Carefully pour into the tart crust. Top with the berries.
Bake tart 40-45 min at 350 degrees. It should be fairly firm in the center. Let cool before slicing. You can sprinkle it with powdered sugar if desired. I am always so eager to try it I totally forget to do this! Enjoy.
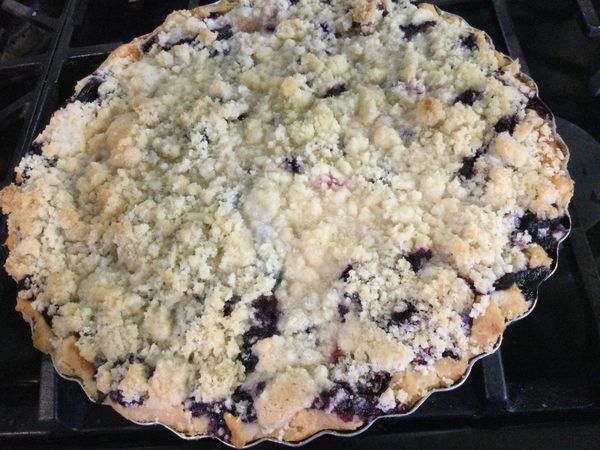
Surprisingly blueberries and rhubarb really do go together so well. Blueberries are delicious: with cereal and milk, in cream or baked in a cobbler or a fruity crisp. Rhubarb is called the pie plant for good reason; it makes a lovely pie from a humble plant stem. But this, this is my current obsession, the two together in a custard pie. Not just any old custard but one made with Greek yogurt and eggs. Easy to throw together, creamy, never runny textured and a lusciously fruity flavor that may make you have to eat a second slice! The blueberries do tend to take over the rhubarb flavor of this pie. Of course, there are more than twice as many blueberries by volume, and they are just a stronger flavor than rhubarb which gives a bit of a tart under taste to this pie. You could play with the proportions of the two fruits; this is the amounts which I used. This pie will be tasty to even the biggest rhubarb dissenter. Really!
WARNING: This pie goes soft in 2 humid days so plan to gobble it down within that time frame or face the soggy crust syndrome. Inevitable with gf crust and a custard filling in hot/humid weather.
I don’t recommend frozen or canned fruit for this pie, simply not good enough and you must use plain, unsweetened Greek yogurt in the filling, plain yogurt is too runny. And no, it can’t be made without the eggs it just wouldn’t work as a custard if there are no eggs. The version with peaches uses 3 yolks in there. I tried it with two whole eggs beaten up: success! And one last warning; applicable to 100 percent of my recipes: Please don’t try it with Measure for Measure gf flour; this is calibrated for using King Arthur’s Basic GF Blend.
I hope you give it a try; super easy and super delicious. Best pie of the summer hands down! Make one Saturday morning…we couldn’t wait for a slice still faintly warm……. I thought I took a picture of a slice; no luck there and it is all gone. Next time! It does look pretty much like the blueberry peach custard pie I posted last summer.
Naked pie! About to go in and bake for 25 minutes and then the crumbs go on top.Just out of the oven….cooling…a molten mass of fruit and custard and sugary crumbs!
Angie’s Blueberry and Rhubarb Custard Crumb Pie
CRUST:
1 c plus 2 tbsp brown rice flour mix (at bottom of recipe)
2 tbsp sweet rice flour
1 Tbps granulated sugar
½ tsp xanthan gum
¼ tsp salt
6 Tbps cold butter cut into 6 chunks
1 large egg
2 tsp fresh orange or lemon juice
Spray 9 or 10 inch metal pie pan with cooking spray, dust with white rice flour.
Mix dry ingredients in bowl of stand electric mixer. Add butter and mix until crumbly and resembling coarse meal. Add egg and juice. Mix until it comes together into big chunks. Shape into a ball with your hands. Put it on a crust sized piece of wax paper (14 x 14 inches more or less), flatten the crust ball some; put on top of it another piece of wax paper and chill it all in your fridge 15-20 minutes while you prepare the filling.
Filling:
2-3 cups sliced fresh rhubarb cut in half inch slices (2 cups if 9 inch pie, 3 cups for 10 inch pie)
4 cups blueberries; rinsed
2/3 cup sugar, sweeter if you like it that way or if peaches are not fully ripe
2 Tbsp. tapioca starch
Mix in a medium bowl the following ingredients:
1 cup plain Greek yogurt, I prefer whole milk, and let it warm up a bit
2 whole large eggs or 3 egg yolks, close to room temp.
1 tsp. pure vanilla extract
2 tbsp. brown rice mixture flour (King Arthur Basic GF blend)
Crumb topping
¾ c brown rice flour mix (King Arthur Basic GF Blend)
½ c sugar
½ tsp xanthan gum
1/2 tsp. cinnamon
1/3 c cold butter cut into six chunks
Put all five ingredients in the same mixing bowl you made the bottom crust in and mix well with mixer paddle until crumbs form.
+++++++++++++++++++++++++++++++++++++
Directions: Turn oven on to 400 degrees. Put the oven rack on the closest to the bottom shelf position. Once the crust is chilled some but not hard, Roll it out and fit into the pie shell. Trim off excess crust. I like to chill those crumbs of crust and roll out to make a jam filled hand pie. Anyway, put the sliced rhubarb and blueberries in a bowl and add the sugar and tapioca. Let stand 5 minutes. Then pour into the pie shell in a fairly even layer, as the filling and crumbs will hide it there is no need for a pretty design. Then pour the filling that you just mixed up over it , tap the pie on the counter sharply 2-3 times to settle in the filling and bake for 25-30 minutes. I turned down my oven to 375 after 15 to 20 minutes. While it bakes those 25-30 minutes make the crumbs. When your timer goes off, carefully remove the pie from the oven and sprinkle the top of the pie with crumb mix; I used about 3/4 of it but you could use a bit less if you don’t want a thick crumb layer or all of it for a really heavy crumb. Bake an additional 15-20 minutes until crumbs are lightly browned. Let stand at least 1 to 11/2 hours before slicing and serving. Enjoy!
First published in 2022, minor revisions to text, recipe the same.
I combined 2 different recipes, both of which I have made and found this new version to be delightful. I also tested it out on reheated white Jasmine rice; chilled for the express purpose of turning the rice starch into resistant starch which is much healthier than freshly cooked rice. Resistant rice can improve gut health, reduce inflammation and help your blood sugar management. As a person with pre-diabetes I was very interested in this concept. I found that the gently reheated rice didn’t seem to spike my blood sugar as it normally would. Only tried it once so far, definitely will do it again. Good for all folks trying to reduce their consumption of “white starches.”
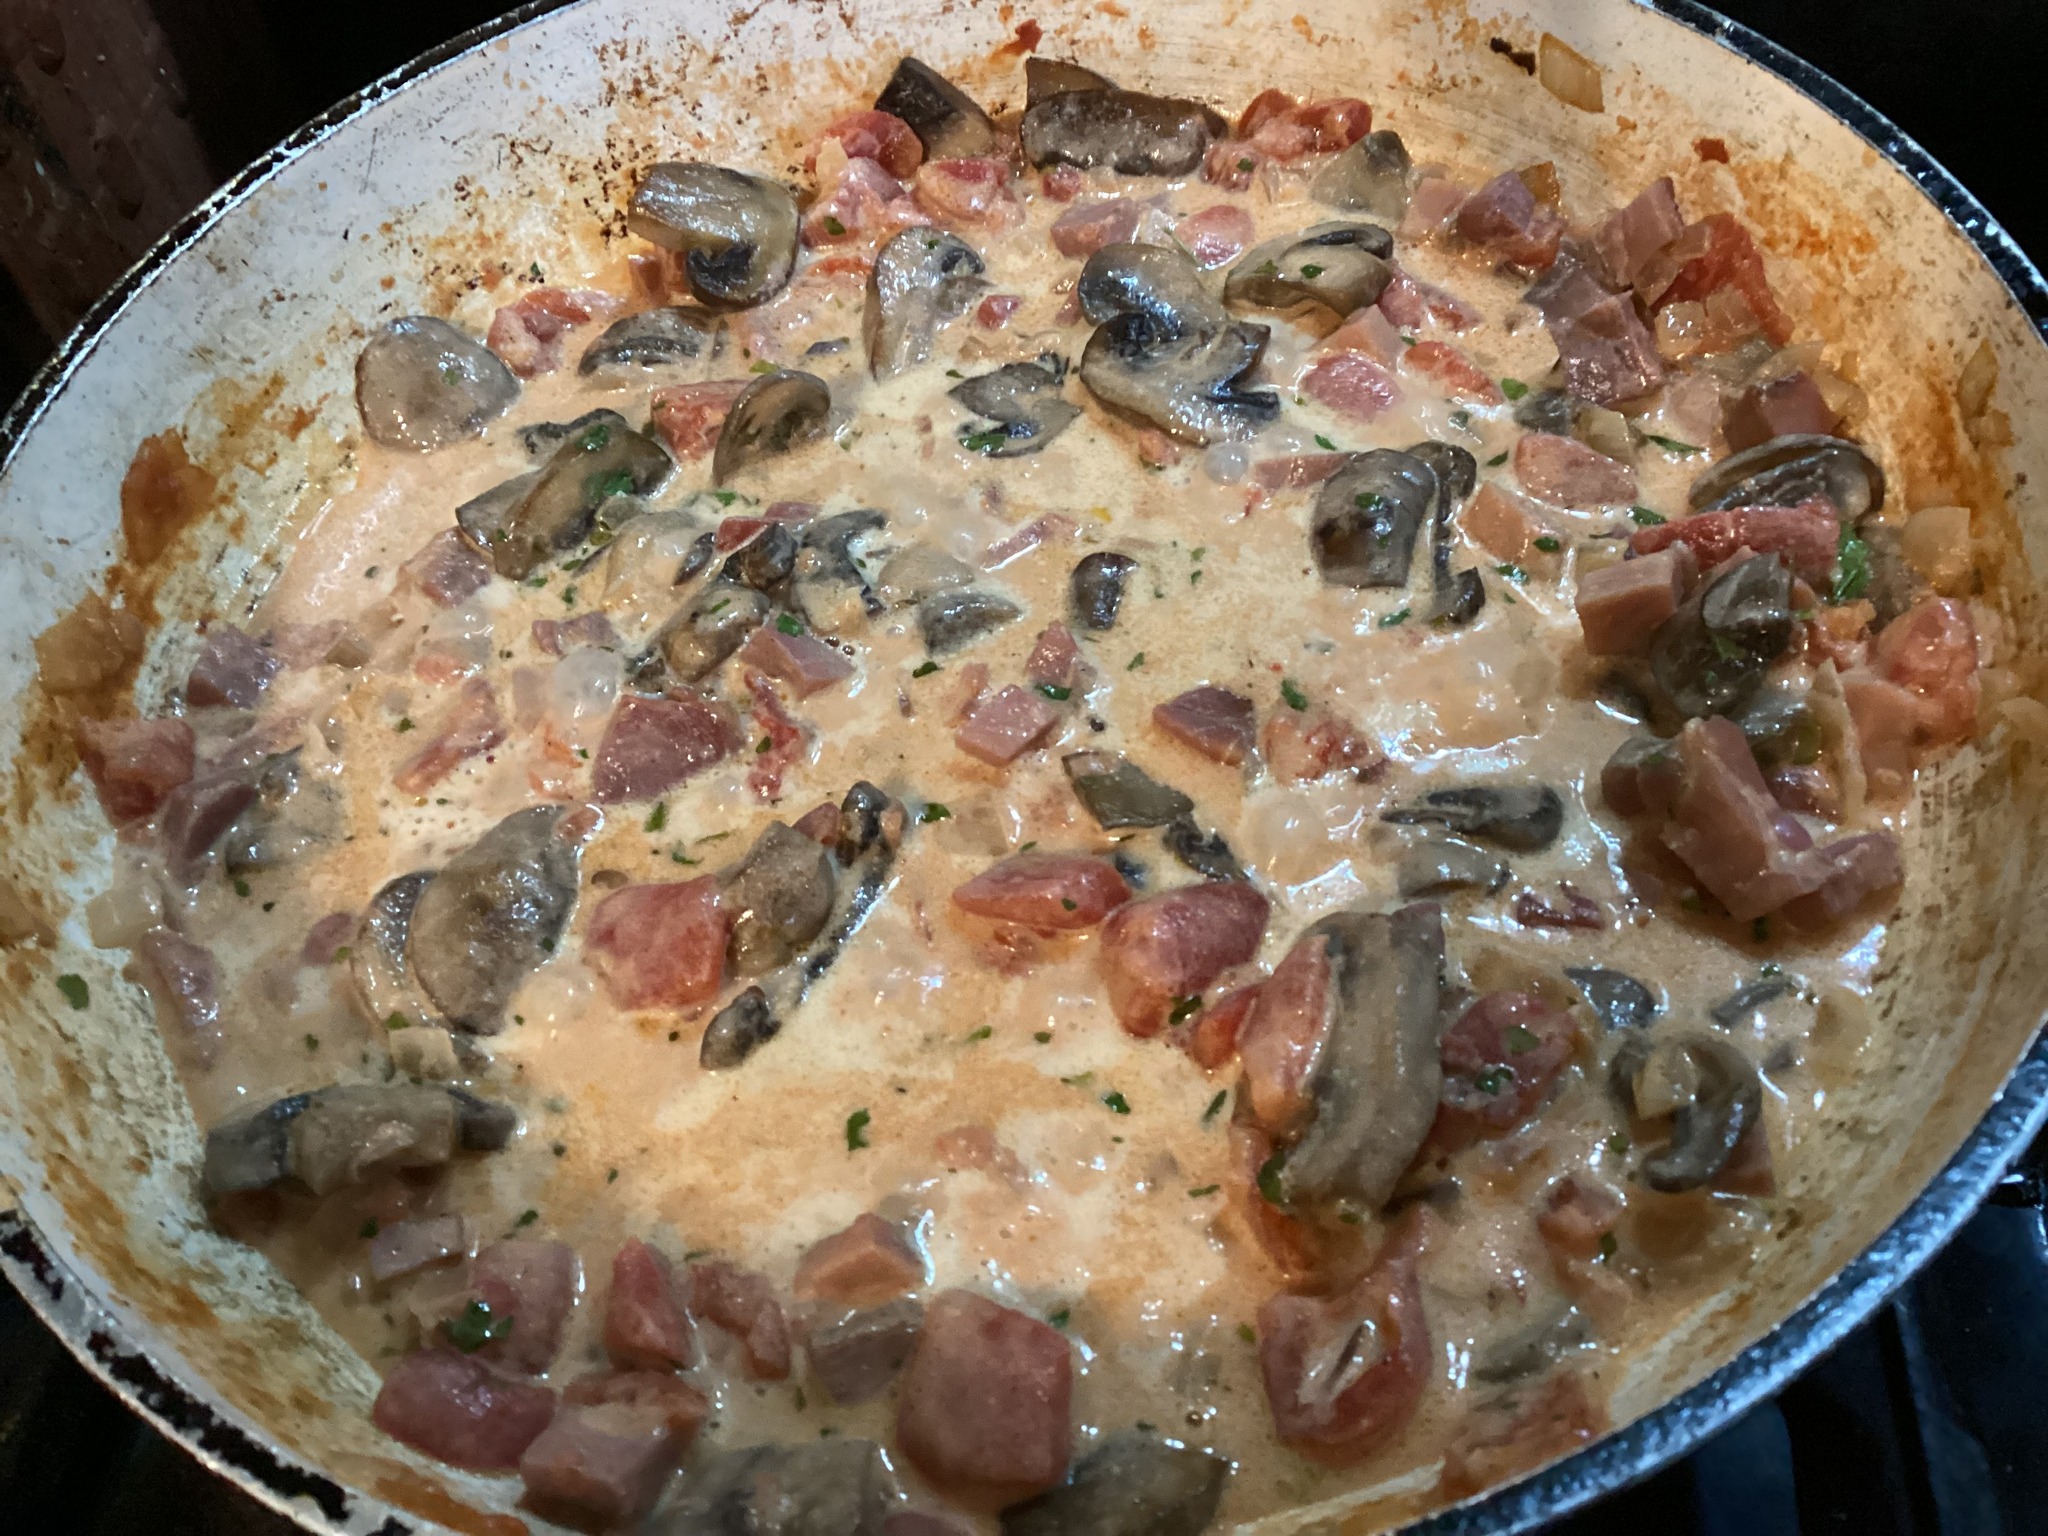
Anyway, try it because it is delicious and easy to make in a short cook, no fancy ingredients other than the Prosciutto. I bought a half inch thick slice of deli prosciutto and chopped it up into 1/3 inch squares. It tasted very authentic, salty and added that classic Italian ham flavor to my sauce. Sometimes you can find it alredy diced which is convenient but you need to make sure it is gf if you have celiac. I do think the whole slice method had a stronger more authentic flavor than the pre-diced ham. Don’t use precut mushrooms; slice them yourself for a fresher flavor. You can use white button mushrooms if that’s all that you can find. Wild mushrooms, carefully sourced would be fantastic. This is definitely my new favorite Italian sauce. My mouth is watering as I type!
Mushroom, Tomato and Prosciutto Sauce
Ingredients:
1/2 lb crimoni mushrooms
1 Tbsp. EVOL
1 Tbsp plus 1 more for the second saute of butter
1/3-1/2 cup finely diced onion
1 good sized garlic clove minced
1 14.5 oz can of diced tomatoes in juice (petite dice is even better if you can find it)
1/2 cup chicken broth (I made it up from jarred concentrate)
1/2 lb prosciutto diced
a couple of grinds of fresh black pepper
1/2 cup heavy cream
1 Tbsp fresh flat leaf parsley or 2 tsp. dried parsley (I had dried some myself and it was great)
Directions:
Melt 1 tbsp. butter with olive oil in a saucepan or mini wok. Add mushrooms you have cleaned and sliced slightly thicker than usual. Sautee 3 minutes, stir several times. Remove to a plate. Add in another tbsp. of butter and once melted add the onion. Cook 3-4 minutes; do not let brown. Add minced garlic, cook 30 seconds. Add tomatoes and let heat. Push the veggies to the edges and fill the center with the diced prosciutto. Give it a minute and add the chicken broth. Turn down to where it bubbles gently. Cook 10 minutes, stir occasionally. Add 1/2 cup heavy cream and cook gently for 2 minutes. Add parsley and stir well, taste and add salt/pepper as needed. Enjoy!
Served over jasmine rice that was made a day or 3 before; reheated before I sauced it
I really don’t like the store-bought gf gingersnaps, pretty sad tasting and pricy too. So, I went looking for a likely recipe. I ended up combining from 2 recipes and I include some notes on best ideas for this recipe.
They are thin and crispy with a delightful ginger flavor. Even people who wrinkle their noses as they say “no, I don’t like gingersnaps” will agree to taste one and then they suddenly are lovers of gingersnaps! I think homemade is always tastier. I hope you will agree.
I bake these to make gingersnap crust but if you want them for said purpose make sure they are very crispy and bake them at least 3-6 days in advance or they will be too fresh. Basically, they melt when baked; into one giant cookie crust which isn’t bad but if you want a traditional cookie crumb crust you should bake long before you make the crust.
Notes: You could dip the raw balls of dough in granulated sugar before baking but honestly most of that sugar disappears. I use Bob’s Redmill GF All Purpose Flour Blend. Last time I made it I was a bit more than a half cup of flour short, so I used a bit of a different flour blend by King Arthur. It led my cookies to spread a bit more than I would like so I plan to get a new bag of the correct flour before my next batch. You will need the xanthan gum if you use this Bob Redmill blend. Warning; the flour does contain bean flour but you will never know that when you bite into one of this crisp beauties!
Angie’s Spicy Ginger Snaps
Ingredients:
3/4 cup butter softened
1 cup sugar
1 lg egg, room temp
1/4 cup molasses
2 cups Bob’s Redmill GF All-Purpose Flour blend
1/2 tsp. xanthan gum unless you use a flour blend with it built in
1/4 tsp. salt
2.5 tsp. baking soda
1 1/4 tsp. ground cinnamon
1 tsp. ground ginger
3/4 tsp. ground cloves
Directions: Put all the dry ingredients in a mixing bowl and whisk until well blended. Start oven preheating to 350 degrees. Line baking sheets with parchment paper. In a mixing bowl, beat the sugar and butter until fairly smooth; add the egg. beat a bit, add the molasses. I used a stand mixer, but a hand mixer could work. Slowly add to the wet ingredient bowl, mixing as you add. When it is fully blended in it is ready to spoon out. Using a tablespoon cookie scoop portion out cookies onto baking sheets. I did 12 cookies a sheet. Bake for 13-14 minutes. If you are using them for a crust bake them the full 14 minutes. They shouldn’t be super dark though. Let cool 4 minutes on sheet before moving to a cooling rack. Store in a cookie jar. I like to freeze some for later; use a freezer Ziplock bag and consume within 3-5 weeks. Enjoy!
This is my favorite rhubarb pie and my go to recipe for a great spring dessert.
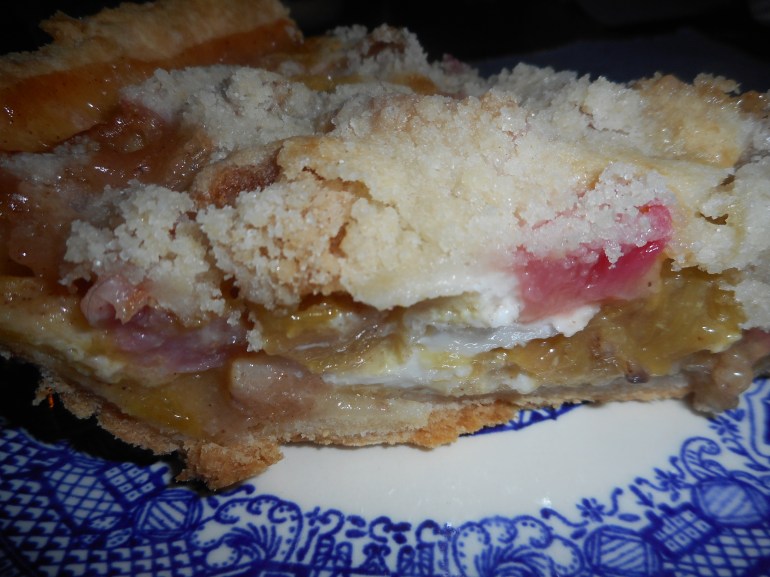
This is an easy pie even though it has several steps. It is different from the usual rhubarb pie because the texture is a bit closer to a crumb cake, no wet, slimy texture and no ultra sour flavor. I think this version tastes even better than it did when I made it with wheat-based flour. This GF crust will work for any pie and the GF crumb topping is perfect for any crumb pie topper. What I am giving you is my mixture of three recipes with some small modifications over time to create one of my favorite GF pie recipes. I know it has several steps, but each one is easy, and you can use these crust and crumb recipes for other pies.
I like it because it has a great texture, and the flavor is complex but subtly rhubarby. It isn’t really soft or all that custardy but more cake-like in texture. It is a game changer of a rhubarb pie. I promise you that!
Angie’s GF Rhubarb Custard Pie
Crust:
1 c plus 1 tbsp brown rice flour mix (recipe for blend at bottom of pie recipe)
2 tbsp sweet rice flour
1 Tbsp. granulated sugar
½ tsp xanthan gum
¼ tsp salt
6 Tbsp. cold butter cut into 6 chunks
1 lg egg
2 tsp fresh orange or lemon juice
——————
Spray a 9-inch metal pie pan with cooking spray, dust with white rice flour. I must confess I forget this step a lot of the time and it doesn’t seem to matter much….
Mix dry ingredients in bowl of stand electric mixer. Add butter and mix until crumbly and resembling coarse meal. Add egg and juice. Do not leave out the juice; it is critical to the crust texture and structure! Mix until it comes together into big chunks. Shape the sticky mess into a ball with your hands. Put it on a crust sized piece of wax paper (14 x 14 inches more or less), flatten the crust ball some; put on top of it another piece of wax paper and chill it all in your fridge 15-20 minutes while you chop the rhubarb into ½ inch chunks.
And make the crumbs while the crust ball chills:
Crumb topping
Put all four ingredients in the same mixing bowl you made the bottom crust in and mix well with mixer paddle until crumbs form.
¾ c brown rice flour mix
½ c sugar
½ tsp xanthan gum
1/3 c cold butter cut into six chunks
Make the fruit Filling:
5 cups cut up fresh rhubarb – place in medium bowl
Mix with dry mix made of
2/3 – 1 c sugar (depends on how sweet you like your pie) I generally go with 2/3 cup
¼ c brown rice flour mix (see below recipe)
½ tsp nutmeg
Sprinkle cinnamon
Rolling out the bottom crust: My sister bought me one of those pie crust plastic bag thingies; has a zipper around the edge. By OXO: I love it; it works better than wax paper which can get soft and tear as you roll out the crust. King Arthur Flour sells an inexpensive one on line. I highly recommend you get the OXO version for making scratch pie crust. Or maybe improvise with a sheet of heavy duty plastic! Strong enough to work with the rolling pin and better than wax paper.
Roll out pie crust in a pie bag or between the two sheets of wax paper, try to get the thickness even, no thick middle! Peel off one side of paper and place in pie pan, centered. Remove other slice of wax paper. Crimp edges all around. Fill with dry rhubarb mix. Pour the following wet mix evenly over this mixture: Wet mix: 3 eggs (171 grams) beaten lightly with 1/3 c milk (not skim), and ¼ tsp almond extract.
Sprinkle the top of the pie with the crumb mix; use as much as you like. I like about 2/3-3/4 of the mixture. Up to your personal taste… It sinks into the rhubarb and wet mixture to create an almost cake like texture and the crumb crust adds lots of sweetness and eye appeal.
Bake on the bottom shelf in a preheated 375-degree oven for 55-60 minutes until bubbly and the crust is light brown. Cool at least 2 to 4 hours before serving at room temperature.
Brown Rice Flour Mix (same as King Arthur’s Basic GF Blend) [Not Measure for Measure or baking mix] 2 c brown rice flour
2/3 c potato starch
1/3 c tapioca flour
This post was originally published in the late spring of 2013. I revised it somewhat since then. I have made this pie many times in past years to rave reviews. One of my friends had it for dessert at my house and said it was the best pie she had ever eaten, gluten free or not! Spring is rhubarb season. Go forth and make pie!