Smashing Summer Squash Saute


It is zucchini season and the deluge of large green baseball bat veggies has begun. I prefer them a bit more tender; picked well before they become gigantic. I like yellow crookneck squash as well, especially home grown and picked very tender.  You can get a yellow zucchini (absolutely there is such a thing!) at Giant Grocery stores and it looks great mixed with slices of green summer squash.  Then there are patty pan squash which are generally pale green and yes, shaped like a flying saucer.  Kinda different you might think but similar flavor to other summer squash.

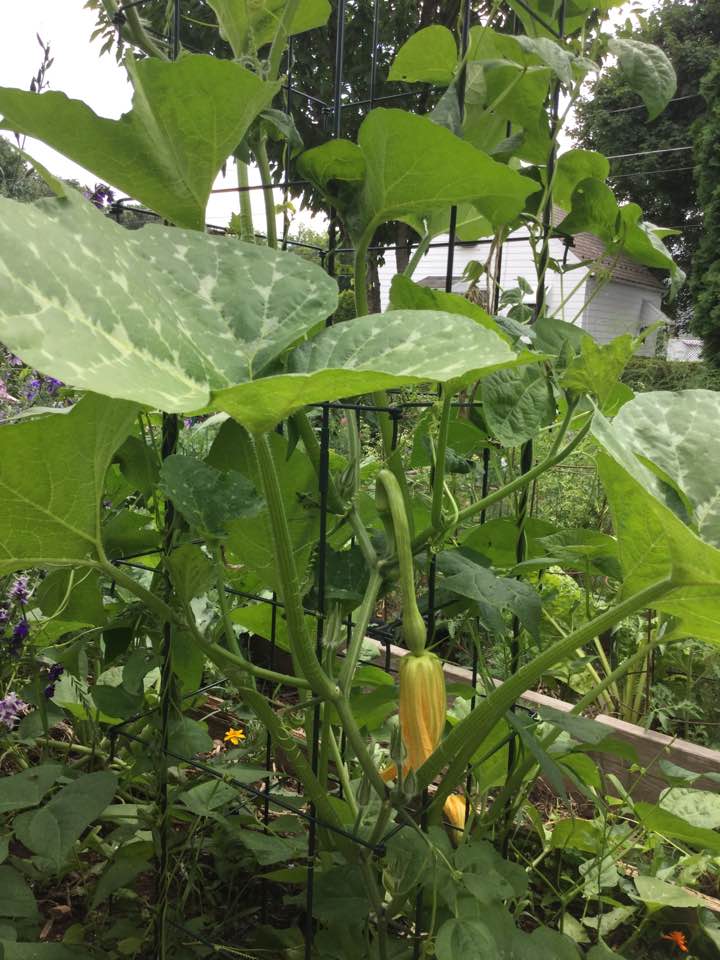
You may think you know summer squash until you come across a tromboncino summer squash which is an Italian heirloom variety. It looks sort of like a zucchini and a gourd had a baby: it is pale green with a swollen end and long curvy stem. My sister grows them and I remember that my college roomie’s parents grew them up strings in their narrow back yard.  They have long vines like a gourd so a trellis works much better than just letting the vines sprawl. So, I bought a packet of the seeds from superseeds.com last winter. I have one vine at my house and one at a church community garden I administer. I picked my first one last weekend. It was 27 inches plus long not counting the curve; more like 30 inches if you ran a tape measure along the whole thing.

What to do with my lovely long squash? Bernie’s mom used to cook it in thin tomato sauce and some garlic. She called it a gourgutza! I call it tasty… I had a just picked Japanese eggplant, fresh basil in the garden and a red onion.  So I went with them as the other major components of my dish. A can of chopped tomatoes was added to create a fresh and un-homogenized sauce.  Finally, I had some red lentil rotini pasta from Aldi’s; been meaning to try it in something special. They all came together in a lovely fresh tasting one pan entree I know I will make again soon. Use what ever summer squash you have but don’t cut it thin; leave it chunky for this dish. If you ever get a tromboncini do give it a try; very tasty.

Angie’s Summer Squash Sauté

2 cups cubed or half round summer squash; cut thick; ½ inch diameter

1 Japanese eggplant

1/3 lb ground chicken or pork

3 tbsp. extra virgin olive oil

2 garlic cloves

1 medium red onion, chopped

1 15 oz can finely chopped tomatoes

8 or 9 fresh large basil leaves chopped fine

2 tbsp. dry white wine

Pinch of red pepper flakes

1 1/3 cup dry rotini pasta; cook it until very al dente

Directions: Cut the eggplant on the diagonal into slices, cut into long strips; put in colander, sprinkle with sea salt, let drip for about 20 minutes, wipe clean with paper towel.

Heat your pan, I used my smaller wok. sauté the ground chicken in 1 tbsp. olive oil; pressing it down to a thin layer, brown and turn, add red onion, brown the meat on other side; chop up; cook about 5-7 minutes total until done; remove from pan and place in a bowl for later use.

Heat the salted water for the pasta and cook it while you are sautéing all the veggies. Reserve at least ½ cup of the cooking water to add back as needed to the final dish.

Add 2 tbsp. olive oil to the same pan, heat until fairly hot, add the eggplant. Cook on both sides, after a couple minutes on each side add ¼ cup water to keep it from sticking. As it cooks after the water goes in add the minced garlic and the summer squash. Cook 3-5 minutes more, while it cooks add the juice from the can of tomatoes. Stir occasionally to cook evenly and after a couple minutes add the can of drained tomatoes, a pinch of red pepper flakes and cover.  Let cook 4 or 5 minutes, add white wine, cook 2 more minutes until squash is barely fork tender. Add cooked pasta, the meat and red onion mixture and then the finely chopped basil, cook one minute, taste and add some freshly ground black pepper and sea salt to your personal taste. If it seems dry add some of the pasta water. Serve immediately.

It was still very tasty the next day. I added a touch more of the pasta cooking water when I put my leftovers away in the refrigerator, to keep things moist. The red lentil pasta did not get crunchy or soggy as many gf pastas do. I don’t know if Aldi’s still carries it as their gf stuff changes constantly.  But if I see it there I am definitely buying more.  Enjoy!

Japanese Eggplants with Ground Chicken or Pork: Delightful!

There is this recipe for chowed eggplant with ground pork that I make often when I can find skinny Japanese eggplants. Chowed means stir fried.  It comes out great every time I make it, slight addiction is my position on this recipe. This latest version uses ground chicken thigh meat instead of ground pork. If you get tired of pork or don’t eat it this is an excellent choice.  I bought it at Valley Farm Markets; their meats can’t be beat for flavor and value! I suppose you can used ground chicken breast too. Anyway, it worked very well.

I added some sticks of fresh zucchini from my garden  and a bit of sliced cabbage.  It was delish for sure. The original recipe is by Jeff Smith, out of his cookbook, The Frugal Gourmet Cooks Three Ancient Cuisines; China, Greece and Rome. It is full of great recipes; where I got my potsticker and other dim sum recipes.  No judging here of Chef Smith; just enjoying great food…

Notes; can change out zucchini and or cabbage, for green beans, carrots, pea pods…but you can’t change out the eggplant.  Ground pork is excellent this way as well. Can use yellow onion rather than green if you prefer; cook a bit longer than scallions if you do.  You could also serve this with rice noodles; the wide kind you let soak in boiling hot water for ten minutes; that’s all the cooking it needs.

Angie’s Eggplant with Ground Chicken

1 lb skinny Japanese eggplant

1 tsp salt

½ tsp. light soy sauce, gf

1 ½ tsp. dry sherry or rice wine

½ tsp. grated fresh ginger

½ lob ground chicken, preferably thigh meat

2 tbsp. mild olive oil or peanut oil

2 cloves of garlic minced

3-4 green onions sliced in 1 to 2 inch lengths and cut in half if white part

1 cup zucchini strips; long rectangle shape

2/3-1 cup sliced green cabbage; not too thin

1 tsp. toasted sesame oil

Pinch sugar

Directions:

Cut unpeeled eggplants into ½ inch thick diagonal slices and cut each in half the long way. Sprinkle with salt, let stand ½ hour draining in a colander.  Pat dry with paper towels.

Mix meat with soy sauce sherry and fresh ginger, let stand 20 to 30 minutes.

Slice or chop veggies.

Heat wok and add 1 tbsp. oil. Add ground meat mixture and flatten a bit; cook until browned lightly; flip over and brown other side; no pink showing; chop up with utensil and set aside.  Add rest of oil and then garlic, cook 30 seconds, add eggplant, cook until it appears more than half done; about 5 minutes; then add zucchini and cabbage, stir for 4-5 minutes, add sesame oil and green onions. Stir a minute, add pinch sugar, wok until cabbage is crisp tender.

eggplant stir fry on plate

Serve with brown or white rice.  I made my brown rice in my handy instant pot pressure cooker.  I did a cup of long grain brown rice, 1 ¼ cup water, 1 tsp. oil, ½ tsp. sea salt; Manual high pressure for 20 or so minutes, ten minutes natural release.  Easy peasy.


Strawberry Shortcake – GF 2.3

Strawberry shortcake is a classic and no one turns down a slice of it at at a family gathering. I am not sure where I got the gf shortcake recipe; maybe my old Bette Hagman Gourmet Cookbook. I used to make shortcake a lot when I could still use all purpose flour but my gf biscuit version is pretty tasty. But there is one thing, you gotta make it with the best freaking strawberries you can find.  None of those ultra firm ones with whitish cores that are shipped in from far away.  You need juicy ripe scented red berries that are served over a gluten free short bread.  Yes, my local season is done but it can be done with other than local produce – the riper the better and it will taste great!

My mom always made a gorgeous version of strawberry shortcake. When I was a kid she would serve it as an entire meal.  I have done that and it is kinda cool.  Pre gluten free I generally made a huge oval biscuit with a smaller topping biscuit that I split off and buttered the split area before topping with berries and the smaller biscuit and topped with more ripe berries and a pillow of softly whipped heavy cream.  Oh berry perfection!  Now I bake it in two separate pans but the construction of the final product is the same otherwise.

Mom’s Strawberry Shortcake, GF2.3

Biscuit dough

1 cup white rice flour

2/3 cup potato starch flour

4 tsp. baking powder

1 tsp. baking soda

2 tbsp. sugar

½ tsp. salt
½ tsp. xanthan gum

6 tbsp cold butter

1 medium egg

2/3 cup buttermilk

2-3 tsp. sugar (optional)

2 tsp. soft butter

Other ingredients:

2 quarts ripe strawberries

½ cup sugar

2-3 tbsp. Karo light syrup

1 cup heavy whipping cream

½ tsp. real vanilla

2 tbs. powdered sugar (if you like your cream sweet)

Directions
Heat oven t0 400 degrees. Mix the dry ingredients in a medium mixing bowl. Cut in the cold butter until it is small pebbles.  Add the egg and most of the buttermilk.  Mix with a spoon; add rest of buttermilk if you need it.  It should be a bit sticky, don’t over mix; just until dry is blended in.  Spray the inside of an eight inch cake pan and a 6 inch cake pan with cooking spray.  If you don’t have a small pan just use two 8 inch ones.  Pat ¾ of the dough into the 8 inch; make it about ¾ to 1 inch thick and try to smooth the top and side edges a bit.  Put the rest of the dough in the smaller pan and do the same smoothing.  Make that one ½ to ¾ inch thick.  Optional: take 2-3 tsp. of granulated sugar and sprinkle it over top of them. I think it gives a great finish to the shortcake. Bake them about 20 to 25 min; the smaller one should be done in 20 minutes; a golden light brown. Set on a cooling rack for a few minutes.

While it bakes, get the berries ready.  Hull 2 quarts of fresh ripe berries.  Place them in a glass mixing bowl; chop through them a few strokes with a sharp knife.  Add ½ cup sugar and about 2-3 tbsp. Karo light corn syrup to the berries.  Stir well and refrigerate until the shortcake is baked.  You could do this berry preparation up to two hours in advance.  No more or they will start to disintegrate.

Place the fairly hot bigger layer on a large platter, one big enough to hold the shortbread and still have room for a generous overflow of strawberries. Butter lightly if you wish.  Top with several big spoonfuls of berries.  Don’t worry if there is juice in the berry bowl; there should be; melted down sugar and karo syrup with berry juice will give you a delish berry liquid.  Top with the second smaller biscuit and then more berries.   Cut into chunks.  Top with freshly whipped cream; beat a cup of heavy whipping cream until it is softly whipped.  Add ½ tsp. vanilla and ¼ cup sugar if you wish it sweet.  Be sure to pour the berry juice over your shortcake; it soaks in and adds to the strawberry experience.  My dad liked to pour unbeaten cream over his shortcake. My mom usually set out the whipped cream, a jug of cream and some whole milk so you could chose how to finish off your personal shortcake.  I might add that I grew up on a farm so this was raw milk from grass pastured cows; fantastic cream equaling a freaking perfect shortcake topper.  We also grew our own berries; no chemical sprayed on them ever.’

shortcake, one serving

If there is any left over it makes a great breakfast the next morning!

Originally published in June 2014.

Tabouli Salad…GF of Course!


I love fresh summer salads on hot days, for parties, for supper alone or with a loved one. They pair well with grilled proteins and dress up a meal that was so so before you got out the chilled bowl of pretty salad.  There are a few salads I had to give up due to ingredients like bulgur wheat, farro, orzo pasta.  Or so I thought. I now use quinoa and make a wonderful tabouli salad; the quinoa replaces the bulgur wheat very nicely.  I particularly like the three color blend of quinoa for this purpose.  You cook it on the stove top, cool it few minutes and it is ready to use.  This quick to make and refreshing salad is very healthy. If you didn’t know it, quinoa comes from Peru and has a fair amount of protein in it; great for vegetarians. I like it’s refreshing flavors.

tabouli salad

Angie’s GF Tabouli Salad

Ingredients

1 cup dry quinoa

2 cups water

½ tsp. salt

——-

1/3 cup finely diced sweet onion

2/3 cup finely diced burpless cucumber

½ cup finely diced raw zucchini

1/3-1/2 finely diced orange bell pepper

1 large ripe tomato, diced

2 tbsp. finely chopped fresh mint

3-4 tbsp. EVOL of excellent quality

2-3 tbsp. red wine vinegar

½ a lemon; juiced and zested

Kosher salt and black pepper to taste

Directions:  Mix the quinoa, water and salt in a medium saucepan, bring to a boil, cover tightly and cook 15 minutes. Uncover and cool.

Dump cooled quinoa in a large mixing bowl.  Add the veggies and drizzle with the olive oil and then sprinkle with the vinegar and lemon juice.  Add kosher salt and freshly ground black pepper to taste.  Chill at least 30 minutes before serving so flavors can blend and it chills. An hour is better.  My amounts for the veggies are approximate and if you don’t like something; don’t use it.  The mint is really what makes it taste perfect so try it before you decide to not use it. If you hate it; use fresh chopped parsley instead of mint.  I also don’t measure the oil and vinegar; taste and add more if you want more. Don’t make a sopping wet salad; shouldn’t be any extra dressing in the bottom of the bowl.  Put it in a nice serving dish before you bring it to the table. Chill the dish if it is a hot day.

Notes: I grate the lemon peel into the salad before I juice it, easiest. It keeps 2-3 days in the fridge; you could make it the day before if you need to.  For that add the tomato and mint the day you are serving it. Try to get a beautiful tomato that is fully ripe and a tender zucchini makes the best quality salad here. Yes, raw zucchini; it doesn’t taste like that much but it adds something to the mix and your company will never know it isn’t cuke if you don’t tell them!  Enjoy this naturally gluten free summer salad.

Sweet Corn on the Cob…My Way


Sweet corn season is here.  In many places really good sweet corn can be had, like farms markets, road side stands and even Wegmans!  I don’t know about you but when I only am making one or two ears it seems silly to fire up a tall pot of water.  I do steam the corn which only takes an inch or so of hot water but still…too much to do.

Three summers ago, on a hot day, I realized there was a quick and easy way to make an ear…or two without that big hot pan of water and steam. I just take a large frying pan, put a quarter inch of water in it, sprinkle of salt and let it heat until bubbling.  I then lay in my ear or two which I have husked and removed all the silk.  Then the pan is topped with a lid or an empty pizza pan if your frying pan is too big for your lids.  Cook it the usual time; depends on how fresh the corn is.  The fresher your corn ears, the less cooking time you need.  The steam in the pan will cook it really fast.  Maybe 6 to 8 minutes.

And the bonus is that if it runs out of water your ear will get a bit of carmelization going which only adds to the flavor.  In fact I hope it gets browned a bit; sometimes I rotate the ear to brown it on another side.  Remove with tongs when your corn reaches the done stage you like.  Sometimes I take a quick bite to test for eating readiness! corn 004

Serve your ear(s) with salt and butter and enjoy fresh corn without heating the kitchen up much.

PS: when I camp I like to try new ways and old ways to cook stuff. We had corn that was fire baked in the ashes made by fruit wood; very tasty and we had corn I griddled/steamed on the camp stove.  The camp stove corn had a foil tent to somewhat keep in moisture.  But I have to say it still dried out more than I like, almost like freeze dried and reconstituted corn. The same thing seems to happen when I cook ears on my charcoal grill.  The fire baked corn is created by getting the ears wet; soaked in a bucket of water and then buried in a small layer of hot ashes for about 20 minutes.  You risk some char but that’s okay. The rest of the ear is just delightful. Maybe I will try foil this next camping trip; with a bit of water in there to help the ears steam.  Will keep you posted on my results.

Revised from a post originally published in 2016.