French Apple Tart….Ooh La La!

Tasty, crisp, ripe apples are pouring into the farmer’s markets and orchard stores right now.  This French apple tart is an old favorite of mine, been making it for years.  I once worked at an office where they would request it whenever we had an office function or party!  I have no idea where I got the original recipe from so I can’t give credit for it, I lost my copy and had to replicate the measurements a number of years ago. Plus, I had to change it a bit in the last time or two to make it gluten free but it tastes just as good as before.  The cinnamon and lemon topping are what makes it so delish.

french apple tart

It should be made with an apple variety that keeps its shape; Granny Smith is the best choice in that regard.  Don’t use one that goes all squishy like Empire or Macintosh.  You only need 3 large apples.

I use my GF tart shell crust which is from Annalise Roberts’ great cookbook; Gluten-Free Baking Classics.  It is very easy; hand pressed into your tart pan.  I would say that this is a cookie crust; sweet and short; very yummy.

It should give you about 6-8 slices of tart. Lesser amount of slices if your family is piggy, the full eight slices if they are not big dessert eaters. I rarely have any of this tart left over for more than 24 hours.  It is very popular with everyone.  I like it for how easy it is to make, how handsome it looks and that I can throw it together quickly with only 3 apples and a lemon.

Crust

1 cup brown rice flour mix; recipe below

¼ cup granulated sugar

1 tsp. xanthan gum

5 tbsp. cold unsalted butter, in 5 chunks

1 tsp. vanilla extract

Mix the dry ingredients in a stand mixer, cut in the butter by mixing it at a med low speed until crumbly.  Add vanilla and mix well.  If it is really dry looking add a tbsp. of water.  Press into the bottom and up the sides of your tart shell as evenly as you can make it.

For this recipe I use a large 10 inch tart pan.  Mine is ceramic so it doesn’t have a removable bottom.   Bake it at 350 degrees for 10 minutes.

Filling

3 large Granny Smith apples; peeled and sliced – not thick or too thin

2 tbsp. sugar

1 tbsp. GF flour

Lay the apple slices in concentric circles in the tart pan over the crust.  Put them really close to each other so there isn’t a lot of space without apples on it.  Mix the sugar and flour and sprinkle over the apples.  Cover loosely with foil and bake 25-30 minutes until the apples are soft if pricked with a fork.  Do not bake until they collapse; the slices should still hold their shape.

While the tart is finishing up its baking time make the topping.

Topping

In a small heavy sauce pan place:

2 tbsp. sugar and 1 tbsp. cornstarch and mix them.

Add all the other ingredients:

¼ cup fresh lemon juice

1 tsp. lemon zest (grate the zest and then juice the lemon)

½ cup water

½ tsp. cinnamon

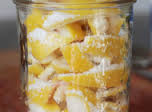
Cook over medium heat, stirring it constantly with a small whisk or a spoon, until it boils and seems thickened and is no longer opaque.  This should take less then five minutes.  Remove from heat and pour the hot gloppy topping carefully over the hot apple tart taking your time so you cover the entire surface of the apples.  If you like lots of cinnamon you could increase that up to a tsp. of cinnamon in the filling.

Let cool to at least lukewarm before serving.

This tart is perfect with a scoop of vanilla ice cream on the side.  Don’t put it on top or it will not look so nice because of the French cinnamon topping won’t like to share its space with the chilly ice cream!

Brown Rice Flour Mix (for the crust)

2 c brown rice flour; be sure it is finely ground

2/3 c potato starch – Not potato flour!

1/3 c tapioca flour

Autumn Plum Tart, Perfectly Tasty!

There is a huge abundance of fruit in August and September.  Still lots of peaches, plums, grapes and nectarines and the early apples and pears are coming in.  What to bake?  Tough decision, still I love juicy ripe plums but seldom bake with them.  This is one of the only recipes I can make gluten free with blue plums; these are those oval small plums, sometimes called prune or Stanley plums that are only available for a few weeks in the early fall.  They are inexpensive, not too sweet and they get soft and purply delish in this simple tart.

purple plum

It is modeled after some German fruit tarts I had enjoyed in my wheat loving past life.  I think it replicates them quite well.

You will use my favorite cobbler mix as the crust base, which makes this recipe really simple.  I will put the mix recipe down at the end of this post.  I keep it in my freezer and one cup makes great cobbler or this tart base. To this particular batch I added a couple teaspoons of dried lemon peel powder.  This ingredient is made of lemon peels rolled in sugar and dried, leftover after make homemade lemoncello liquor.  They become powder after a few moments in my spice blender. The fine powder adds a subtle lemon flavor but its okay, you don’t absolutely need it to make this recipe work.  It is in the original recipe but I never bothered before to make some even though I had the dried lemon peels.  The addition is great and if you can add it you won’t be disappointed.   lemon peel

A few instructions to assist you if you make this tart: I cut up the plums first and sprinkle them with sugar, let them stand while I mix the dry stuff up and then stir up the wet items in a small mixing bowl.

Be sure to use a 10 inch tart pan; it can be made in a 9 inch one but it may well spill over and burn on the bottom of your oven which is never a good thing.

We like it with a small scoop of vanilla ice cream on the side. It is fine all on its own.  Makes a great breakfast too with a cup of coffee or tea.

plum tart

GF Fall Plum Tart

1 cup cobbler dry mix; recipe below

mix with 1/4 cup sugar

—-

2 eggs

3 Tbps. buttermilk

2 Tbps. melted butter

1/2  tsp. vanilla

1/2  tsp. almond extract

1 ½ lbs prune plums (enough to cover the entire tart pan) cut in halves or quarters. Mix them with 2 tbsp sugar

Directions:

Heat oven to 350 degrees. Mix dry ingredients in a small bowl.

Spray a 10 inch deep tart pan or 9 in pie pan with cooking spray

Beat eggs in bowl, add rest of wet ingredients, mix well, add to dry ingredients, stir briefly just to mix up.  Pour into the prepared pan and spread it out with a spatula.  Top with plums, cut side up, push each in slightly into the batter and cover the entire surface of tart base.

Bake 30 min.  Top with mixture of 1 ½ tsp sugar and ½ tsp cinnamon

Bake ten more minutes or until top looks done.

Cool somewhat before slicing/serving.

Dry Cobbler Mix

2 ¼ cups white rice flour

½ cup potato starch

½ cup tapioca flour

1 tsp. baking soda

4 tsp. baking powder

1 tsp salt

1 tsp. xanthan gum

1/3 cup sugar

Bittersweet Chocolate Tart….Best Chocolate Tart Ever!

Two years ago I made this dark chocolate tart and we ate it around a bonfire. Someone had the bright idea of putting toasted marshmallows on their slice.  Last Saturday I made the same tart but gluten free and we made sure to have plenty of marshmallows to toast and top our slices with.  Most of us had seconds, but I was able to save a tiny sliver for my mom to enjoy.  It was a big hit with all of the chocoholics there so here is the recipe.

Bittersweet Chocolate Tart

Crust

1 cup gf flour (recipe below)

¼ cup sugar

1 tsp xanthan gum

¼ tsp salt

½ tsp cinnamon

5 tbsp. butter cut into 5 pieces

1 tsp. vanilla extract

1 tsp. water

Mix all the dry ingredients in the bowl of a stand mixer.  Add the butter pieces and blend until they are tiny crumbs.  Then add the vanilla and 1 to 2 tsp. water and blend.  It should be thick crumbs.

Spray a 9 inch tart pan with a removable bottom with cooking oil and then sprinkle with some gf flour; shake to coat.  Dump the crumbs of the crust evenly all over the tart pan bottom and press in with your fingers to make a fairly even crust, be sure to push some up the short sides of the pan so it is to the top of the metal and not too thick near the edges.

Bake at 350 for 11 or 12 minutes.  Let cool while you make the filling.

Image

Filling Ingredients

¾ cup heavy cream

1/3 cup whole milk

7 ounces bittersweet chocolate, I like Ghirardelli.  Break into small squares/pieces.

1 large egg slightly beaten

Put the milk, heavy cream and chocolate in a heavy bottomed sauce pan and heat on low to moderate heat; stir often until chocolate is melted.  Remove from heat and cool a few minutes.

Add the beaten egg, blend well.  Pour into the tart pan and bake at 375 for 15 minutes. 

Brown Rice Flour Recipe

Ingredients

–         1 c brown rice flour –

–         1/3 c potato starch (not potato flour-

–          3 tbsp tapioca flour

Directions

Mix all the flours in a big jar or bag

 Image

This tart is best eaten warm with two or three toasted marshmallows pressed onto the top.  Whipped cream or vanilla ice cream is also yummy.  This picture was taken in total darkness with an i-phone and the owner of this slice of tart was ticked off that her marshmallows cooled while the shot was made so she toasted up two more marshmallows and had all four on her slice of tart.  This dessert is seriously delicious and really easy to make. If you love dark chocolate this is a must recipe for your repertoire.  It can easily be made by you wheat eaters; just use your favorite cookie tart crust recipe.  The filling will be the same.  Now, go get some good chocolate and make your own tart and don’t eat the whole thing yourself; share it with someone you love!

Brownie Meets Cheesecake and Love Ensues!

I never thought I would want another brownie recipe after I made the gluten free version that is so easy to make and so tasty.  Then I met this recipe.  It is from a book of Gluten Free Christmas cookies, by Ellen Brown that my best friend gave me for Christmas.  I made some very minor changes.  It is like a brownie and a cheesecake meet, fall in love and this is their baby!  A bit more work than my other brownies but just totally nummy good! And I am not a big cheesecake lover.  This is an exception to that rule.

Image

Marble Brownies

Ingredients:

4 ounces semi-sweet chocolate, chopped

1 stick unsalted butter

3 large eggs

1 cup sugar, split

½ c brown rice flour

¼ tsp. xanthan gum

Pinch of salt

1 8 oz pkg light cream cheese, softened

½ tsp. vanilla extract

Directions:

Make sure the cream cheese is room temperature.  Do not use fat free cream – it is dreadful in baking!  I get the best quality chocolate I can find. Frankly I often use regular salted butter in my baking. It is what I normally have in my kitchen so I tend to just use it.

Melt chocolate and butter in a heavy saucepan, stirring frequently.  Take off heat, cool for 5 minutes.

Grease an 8×8 pan and dust with rice flour.

Combine 2 eggs and ¾ c. sugar in mixing bowl, beat with electric mixer for 2 minutes until light and fluffy.  Add cooled chocolate mixture and beat one minute.  Add dry ingredients and beat at low speed just til mixed.

In a separate bowl combine cream cheese, remaining ¼ c sugar, other egg and vanilla.  Beat with electric beater for 2 minutes.

Spread chocolate mixture into pan, Top with cream cheese mixture, swirl together with spatula.

Bake at 350 degrees for 35 minutes, until top is springy. Cool in pan on wire rack until completely cooled before cutting into 16 to 20 squares.

Store in airtight container between wax paper sheets for up to 5 days, room temp.  Can freeze for up to a month.

Mine weren’t too swirly but the cream cheese mixture mellowed the chocolate into a creamy dreamy delight.  There were very few leftover squares. I took this photo of the last brownie square the next morning!  I know this recipe is a lot more work than the other one I had blogged some time ago but if you like cheesecake you will love it and it makes a nice change of pace or a great snack to take to a party.

Gluten Free Dog Treats…Yummy for Him and Safe for Me!

For a long time I have debated about feeding my dog wheat dog treats. I used to occasionally buy them and I used to make several kinds of homemade dog cookies. Chesse loved them all.

But I worried about contaminating my hands and touching my lips which would be not good at all. I also was uncomfortable with baking wheat products in my kitchen. I had to clean up (a lot!) after each time I made wheat based dog cookies last year.

After much thought I decided to change what snacks I fed him as his dog cookies are held in my hand, unlike they dry dog food which I use a scoop to gather the appropriate amount.  Image

Gluten Free Dog Biscuits

Ingredients:
• 2-3/4 to 3 1/2 cups of wheat and gluten free flour (I use a mixture like this: 1 cup sorghum flour, ½ cup cornmeal, 1 cup white or brown rice flour and 2/3 to 1 cup gf old fashioned oatmeal. You can use whatever flours you prefer

1/2 tsp xanthan gum (optional)
• ½ to 3/4 cup of milk, 1-2 percent
• 1/3 to 1/2 cup of mild olive oil or canola oil
• 2 tablespoons of brown sugar (Optional, I have made it both ways)
• 2 gf stock cubes (any flavor you chose) dissolved in
• 3/4 cup of boiling hot water
• 1/2 cup of grated or finely chopped carrots (1 medium carrot)
• 1 egg

Instructions:
1. Preheat the oven to 300 F
2. Combine all dry ingredients and add the rest of the ingredients and mix them well either by hand or in a mixer. If it is really sticky add up to ½ cup more of any gf flours you have.
3. Using a large spoon scoop out cookies; approximately 1-2 tbsp.
4. Place onto non-stick baking sheets, smooth the tops with damp fingers and bake for 30 minutes. This recipe usually fills 3 cookie sheets for a total of 38-40 cookies.  I generally leave them in the oven for 30 minutes more after I turn the oven off and crack the door to release some of the heat.Image

Let cool before storing in an airtight container. I like to freeze most of the cookies; leaving out a 4 day supply. The will otherwise spoil before my doggie can eat them.

Now I can serve dog cookies without worrying I will be contaminated while making or handling them. No preservatives and healthy ingredients for your favorite pooch!