Finding GF AND Gum Free Recipes

This week I discovered an old college friend has suddenly developed an allergy to wheat and to gluten. When his wife tried to bake gluten free using xanthan gum, he hated the after taste he noticed (I personally have never noticed that phenom but it sure could be so!) and guar gum made him break out in a nasty rash. She loves to bake and just was dismayed with a number of recipes she tried. Terrible texture and heavy especially without the gum. Generally disheartening. I decided immediately that I had to help them out. So after some research here are a few of my ideas, resources and general thoughts to help them.

Of course I wanted to help them out; I love a good challenge and to help friends is a true joy. So, I looked in my cookbook collection last night and discovered that my book by Nancy Cain titled “against the grain” is chock full of gluten free recipes that have no xanthan or guar gum in them. I haven’t made many of her recipes but I think they could work well for my friend. Bonus points as she takes a rather natural approach to baking gf and I am all for natural foods.

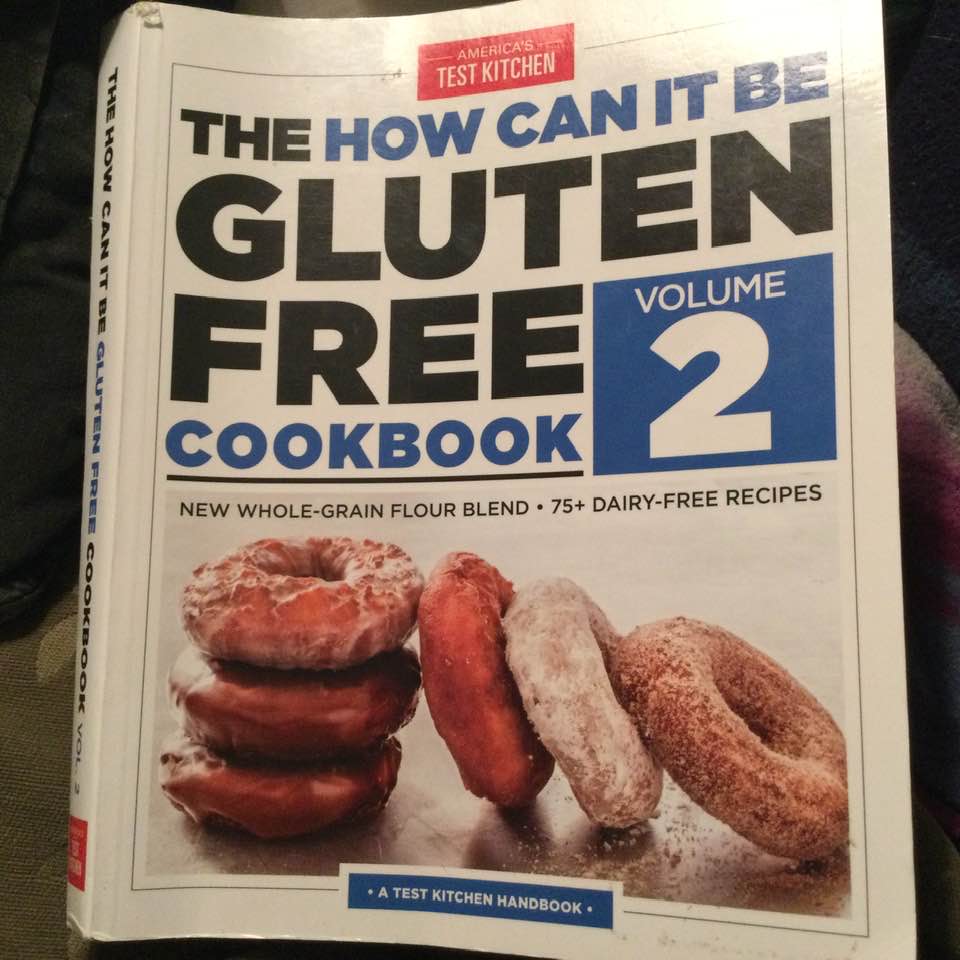
My second cookbook choice is “The How Can It Be Gluten Free Cookbook, Volume 2” by America’s Test Kitchen. This book contains two gf flour blends neither of which has a gum in them. I have made several recipes from it and can say they are tasty and worth making again.  Not all the recipes avoid gums but they mostly use a tiny amount; ¼ of a teaspoon. I feel this could be replaced by several choices.

For that I did a search and found this: bakingkneads.com/substitutes-for-xanthan-gum-in-baking/ by Sarah. This is a wonderful post and I highly recommend you visit it. Here is a brief summary: you can use chia seeds softened in water, egg whites, cornstarch, konjac powder, agar -agar and flax seeds mixed with water (the flax seed “egg”). For cornstarch you use the same amount as a gum. For the flax seed or chia “egg” I believe it is a tablespoon of chia and 2 tablespoons of hot water. Let it stand about 5 minutes. You can grind the seeds up if you want a smooth mixture as whole seeds can definitely add texture or pop to your bread. I can’t wait to try a few of these ideas out. I have used the flax seed egg in the past and it works okay in a cake. I think it would work better in a whole grain bread which would more disguise the seedy texture and flavor.

Another cookbook I like is “Gloriously gluten-free cookbook) by Vanessa Maltin. It focuses on three cuisines: Italian, Asian and Mexican. The red velvet mochi cupcakes with ginger buttercream icing recipe looks amazing and no gum. There are dozens of gorgeous sounding ethnic recipes. I am wondering why I haven’t cooked from it lately!

I constantly use Annalise Robert’s book: “Gluten-Free Baking Classics” I feel  you could use one of those six substitutes I mention and alter her recipes to make them gum free. She uses a simple flour blend of 3 flours but you can buy it too; it is King Arthur’s Basic Gluten Free Flour. There is no xanthan gum in it. I is comprised of brown rice flour, potato starch and tapioca starch. Has a nice “wheaty” taste to the pie crusts she shares. I won’t make any other pie crust. I get a lot of complements on it. A suggestion from fb; add cinnamon to your baked goods to hide the taste of xanthan gum. I actually do that for a number of my recipes; will do it even more now that I am thinking on it.

Two more choices are “Artisanal Gluten Free Cooking” by Kelli and Peter Bronski and “‘The Gluten-Free Table” by Jilly and Jessie Lagasse. Most of the Lagasse sister’s recipes are naturally gf recipes, there is some use of xanthan but now armed with my knowledge of several gum replacements I feel I could make them gum free successfully. Ditto with enthusiasm for the Bronski book. It is chock full of interesting and mouthwatering ideas. Definitely work the look and maybe the buy!

Another suggestion, which I found in my gf support group, but haven’t tried yet is: https://shop.betterbatter.org/products/artisanbakersblend?fbclid=IwAR1iOKMW4jM0C9jUKLk33Tb7RHchdrC4rxXNO-xjmyYL_asnvddUDJUgDMc. The site sells a gf and gum free bread flour. Pretty pricy but definitely an option. This blend’s ingredients are: sorghum flour, tapioca starch, potato starch, psyllium husk, and potato flour. I personally make up a Better Batter knock off flour mix and use it a lot; it does have xanthan gum in it. I am betting you could replace that gum with one of the above six replacements for your baking pleasure!

I just discovered there is a gf baking group on fb that uses more psyllium than gums; you could join that group to get advice and learn some new recipes. https://www.facebook.com/groups/354638545553904/?ref=share

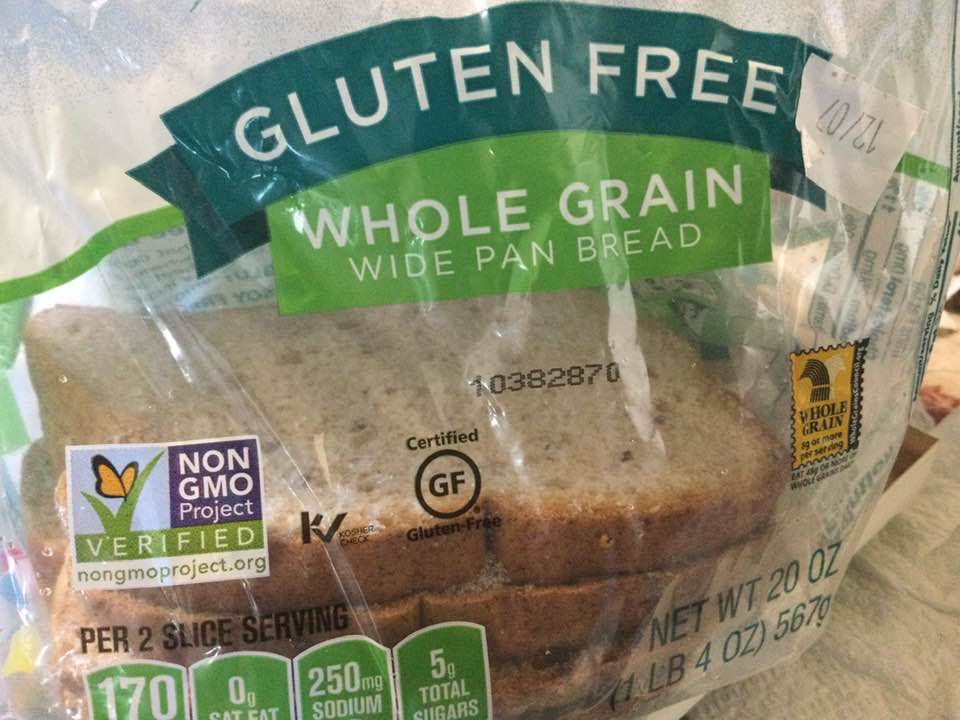
I buy a lot of gf items at Aldi’s and sometimes Trader Joe’s or Wegmans. Aldi’s has a bread that is fairly new; it is a multi grain wide pan loaf. I find it life changing. Makes amazing grilled cheese and ham sandwiches. About to try french toast with it. So tasty and the bigger slices are the best!

Yeah; this is 3/4 gone but look at it’s slilce size and at that lovely grain; no big holes here!

Other advice to newbies; read my original early posts on switching to being gf. Look at my 2014 posts: for most of 2013 I posted on Patch. I do not thing those posts are still available but I reposted most of them in my first few months on my new blog location. Critical to success: new bread pans at 8.5x 4.5 with taller sides, new cake and pie pans unless you scrub the heck out of them. You need to read up on cross contamination as it is a really serious problem. You should invest in a new toaster for only gf breads and bagels. Your cutting boards and rolling pins must be incredibly free of all old flour; maybe if you are going to still have gluten in your house buy a new bread board and rolling pin for gf use only. You will absolutely need a new colander for gf pasta. Mark it so or get one very different in color so you can easily distinguish it. Ditto for wooden spoons. In fact, you need to run everything you plan to use for gf cooking through the dishwasher several times or hand scrub a LOT. I found it too difficult to keep both gluten-based flour and my new gf flours around. I have a few burger buns and a loaf of white bread in my basement freezer for Joe or Aiden. No more do I keep gluten-based pasta or mixes.

In short, eat clean, eat organic when you can, don’t buy packaged gf foods if you can make it yourself and avoid the processed gf treats full of fats, sugar and preservatives. DIY is always healthier if it avoids excesses of those demons especially hydronated fats and all sugars other than coconut palm sugar which is low on the hypoglycemic index and possibly use honey, maple syrup and agave syrup but in moderation. Being gluten free is a journey, an adventure in experimentation and can be surprisingly delicious. GF foods have gotten a bad rap and often folks eating my cookies, brownies, pies, tarts and cakes are shocked at how delicious they actually are. I am generally very happy to be gf. Rarely, on visiting people I find them being insensitive; like baking gluten filled muffins right in front of me and offering me no substitute or alternative. I think that behavior is obnoxious; you knew I was coming. Couldn’t you put off your wheaty muffins a few days and buy a gf mix treat to make while I was there? My pet peeve…. oh well. I survived it and I love to bake gf and we eat darn well around here!

Meyer Lemon Tart – I’m in Love!

I hereby confess to an open fondness for fruit tarts. Free from the tyranny of top crust making and lower in calories by that very lack of an upper crust. They can be as fancy as you wish or humble and rustic when limited time is an issue. Full of ripe berries, nuts and caramel, of custard, of apples, pears or plums. Pretty much anything that can be pied can be tarted. In my house there is a running teasing argument as to pie or tart. I am of the tart persuasion and he is of the pie love affair. So he calls my tarts pies with great delight and I snicker at his silly ways. Either way it is a win win.  Tarts can be useful too when you have limited amounts of filling material; a 9 inch tart doesn’t take that much to fill it to an acceptable level. My old-fashioned 10 inch aluminum pie tins take more than twice that amount to be considered appropriately full. Don’t get me wrong; I adore pie in so many versions it could be considered an obsession but this post is all about the tart. 

This is a Meyer lemon masterpiece of a tart. I bought a bag of 6 Meyer lemons for less then $3 at Lidls and they were lovely looking. For your edification I will advise that a Meyer lemon is like a lemon but also like an orange; in fact, it is a species created from both, sort of. Actually, to be technical it is half mandarin orange (those sort of flat small tangerines) and half citron which is a genetic parent of the common lemon. Meyer lemons were introduced into the US in 1908 and they are sweeter than lemons, slightly deeper yellow and rounder than a lemon.  The juice is a tad darker and the skin is tasty enough to be extremely sought after by many chefs. Okay, enough on the ancestry of my beloved Meyer lemons. Just know that they are no common citrus and that  you can buy them in many grocery stores locally. Please do not attempt this tart with any sort of regular lemon; it must be made with Meyer lemons as the normal lemon’s white pith is way too bitter and even the juice isn’t sweet enough for this treat.

This tart uses every part of the lemon except the seeds. I make a lemon jam that is similar in this respect. So when I made this tart it did remind me of my lemon jam only more roasty yet zingy somehow and the crust’s flaky texture really amplified its charms. I made mine in a 9.5 ceramic tart pan. You could make it in a 9 inch one and make a hand pie or two out of the spare filling.  I saw the recipe on someone’s fb post and made a few changes and threw one together this past weekend since I already had the lemons and was intrigued by how it uses the whole fruit. Definitely a keeper of a tart. You could make it with a regular pie crust and regular flour in filling if you are not gf.  Enjoy!

unbaked filled tart; see how pale it is!

 Meyer Lemon Tart

Ingredients:

One GF tart shell; prebaked about 10 minutes at 375 degrees:

Crust:

1 c plus 2 Tbsp. brown rice flour mix (King Arthur basic gf blend)

2 Tbsp. sweet rice flour

1 Tbsp. granulated sugar

½ tsp xanthan gum

¼ tsp salt

6 Tbsp. cold butter cut into 6 chunks

1 lg egg

2 tsp fresh orange or lemon juice

Directions:

Mix dry crust ingredients in bowl of stand electric mixer.  Add butter and mix until crumbly and resembling coarse meal.  Add egg and lemon juice.  Mix briefly until it comes together into big chunks.  Shape into a ball with your hands. Put it on a crust sized piece of wax paper (14 x 14 inches more or less), flatten the crust ball some; put on top of it another piece of wax paper and chill it all in your fridge 10-15 minutes. Roll out and line a 9.5 tart shell. Prick surface with a form in many places to keep it from puffing up. Bake at 375 for 10 minutes. Let cool at least 10 min before filling.

Filling:

5 Meyer lemons

1 cup sugar plus 2 Tbsp. divided

1 medium to large egg and 1 egg yolk

A pinch of sea salt

2 Tbsp flour (I used my King Arthur Basic GF Mix)

8 Tbsp. butter melted and cooled for 5-10 minutes

Directions: cut up the lemons into halves, quarters then eighths, remove seeds. I got over 5 cups of chunks. Put all the filling ingredients into a large food mixer and pulse until it is a coarsely chopped yet cohesive filling. Just don’t completely puree the lemon chunks; you want a bit of size difference not a puree.  Pour into the tart shell and sprinkle with the 2 Tbsp of sugar. Then bake at 325 for 20 on the bottom shelf of your oven. Turn heat up to 350 and bake another 30 minutes. I think I could have left it in for a few more; the filling should darken a bit and crust will be nicely browned. The filling should be jiggly but will set as it stands. Chill for several hours and serve with whipped cream or vanilla ice cream. Or by itself. Enjoy!

Mom’s Beef Pie

I am feeling the need for comfort food, stews, meat pies, and thick soups. In that vein of wanting, I recently made a beef pie. This was my mom’s recipe and she made it exactly the same every time it was served but I didn’t have her exact recipe. I knew how it should taste and I reconstructed it to the best of my taste buds and skills. I did something a tiny bit crazy; I added carrots for flavor and color. Mom is gone, almost three months as of now. I am not sure but think she would have enjoyed my modern version complete with gluten free crust and carrot slices.

It has potatoes and onions in it plus the big carrot I cut into half rounds. The topping is a flaky pie crust. It is like a meat stew cooked on the stove top and put together with the crust and just baked long enough to make a perfectly browned and delicious top crust. I bought a big sirloin steak and cut it in one-inch strips and then into 1-inch cubes for uniform pieces of meat. You can buy precut stew meat if you like. I have to say I loved how it was more uniform when I cut the cubes myself. Better quality control in my opinion.

Mom’s Beef Pie

Ingredients

1 lb. top sirloin beef cut in 1-inch cubes

1/3 cup white rice flour (if making it for non-celiac just use all purpose flour)

1 Tsp. paprika

½ Tsp. sea salt

¼ Tsp. black pepper, freshly ground

1-2 Tbsp divided mild olive oil or other frying oil

1 large onion chopped coarsely

2 beef bullion cubes (Herb Ox are gf)

1.5 lbs. of russet potatoes cut into ¾ inch dice

1 cup of carrots; cut in ¼ inch half rounds

Directions: Mix the flour and spices on a plate or sheet of wax paper, roll the beef cubes in the flour blend until coated. Heat 1 Tbsp. oil in large frying pan. Add half the cubes spaced out so they will properly brown; turn as the side browns and remove once browned on 3 sides, brown rest of beef cubes same say; add more oil as necessary. Add back all cubes, add ¼ onion bits and enough water to reach the top of the cubes in a single layer. Add beef bullion cubes; cook 30 min on low so the mixture bubbles adding more water as it evaporates, do not let it run really low on water.

Meanwhile, peel and dice the potatoes, cut up a big carrot or 2 medium carrots. Put potatoes in salted cold water. After the beef has cooked in its broth for at least 15-20 minutes start the potatoes in their own saucepan covered with salted water and add the rest of the onion and the carrot pieces to the beef simmering in the pan.  The make the crust and refrigerate it for 5-10 minutes while you wait for the potatoes to be done.

Heat oven to 400 degrees. When potatoes are mostly done (use a fork to test) drain the potatoes, you should save the potato water for adding as needed to thin the gravy or for other cooking. Once the meat is tender and carrots close to cooked add the cooked potatoes to the mixture; taste and salt if needed and add potato water to make the sauce not too thick (or too thin). Roll out the pie crust to fit the top of your casserole. Pour the hot beef mixture into a low oval baking dish or whatever you plan to make your pie in. Add the crust on top, crimping the edges and cutting a few gashes to allow steam to escape. Bake in hot oven, center shelf until the crust is light brown; 20-25 minutes. Don’t let it get really brown; a nice golden brown is perfect. Let rest 5-10 minutes before cutting into it. Enjoy!

Crust:

1 c plus 2 Tbsp. brown rice flour mix (King Arthur basic gf blend)

2 Tbsp. sweet rice flour

1 Tbsp. granulated sugar

½ tsp xanthan gum

¼ tsp salt

6 Tbsp. cold butter cut into 6 chunks

1 lg egg

2 tsp fresh orange or lemon juice

Directions:

Mix dry crust ingredients in bowl of stand electric mixer.  Add butter and mix until crumbly and resembling coarse meal.  Add egg and lemon juice.  Mix briefly until it comes together into big chunks.  Shape into a ball with your hands. Put it on a crust sized piece of wax paper (14 x 14 inches more or less), flatten the crust ball some; put on top of it another piece of wax paper and chill it all in your fridge 10-15 minutes while the beef filling cooks and  you heat the oven. 

Cheddar Cheese Biscuits: Guilty Pleasure

I don’t buy redi-made mixes that often, in fact I have never bought a gf biscuit mix except these. These were from Aldi’s; a fav hangout! Cheddar cheese biscuits in the orange and blue box. This was my third time making them.

You add water, quarter cup oil and a third of a cup of grated cheese, stir and it becomes this slightly weird fluffy white stuff that looks more like cotton batting than anything else. Next, plop big clumps of this fluffy mixture onto a parchment paper lined (or baking oil sprayed) baking sheet and pop them into the hot oven to bake.  After about 16-17 minutes out comes the pan.  Each biscuit gets brushed with a buttery mixture you create with an herb/garlic powder that is blended with fresh melted butter. Super easy to make and definitely popular at my house.

cheddar cheese bisquits

They are browned on the bottom and tender. The flavor is buttery and definitely has a garlic vibe going on. We had them with a big bowl of beef stew I made for supper.  My guy took home a container of stew and two biscuits. He wanted more cheesy rolls than two but I said; “Hey, those are my gf biscuits! Two is enough!” He left happily clutching his treats including those biscuits.   That should tell you they are tasty; Joe does not need to eat gf and he is fairly picky about his bread.  If it passes the Joe test; it is pretty tasty!! cheddar cheese bisquit

They were a couple bucks and the add ins are minimal. I made 10 decent sized biscuits. I froze two which were destined for consumption in January. Totally yummy even if not particularly healthy, white gf flour, sugar,  cheese and butter as major components.  Not gonna tell you how many calories are in them but frankly regular rolls have lots of calories. If it tastes buttery it gonna have calories…. Still, not often I find something this easy to make and this tasty.  I put this in my win win column. Enjoy!

Christmas Stollen, 2.0….Even Better!

Gluten-Free Holiday Stollen Yield: two 10″ loaves

The classic Christmas stollen dough is made with yeast. This quicker, easier gluten-free version, made with baking powder as the rising agent, is even tastier in my humble opinion. Filled with dried fruit and toasted almonds, and covered with a layer of melted butter and powdered sugar, this pastry is delicious with a cup of coffee or tea. Great choice for when company is coming as it isn’t that much work or time needed to create this masterpiece. Everyone will think  you slaved all day to bake it. No need to tell them how easy it is! If you are searching for the perfect gluten free holiday treat; look no further. I cannot say enough good things about this treat. It is loved by all and that second loaf makes a wonderful gift.

I made it 2 years ago, lost the recipe; had to get it again from the King Arthur Flour’s web site customer service center as they have removed it from their recipe rotation. They said it needs some tweaking. I disagree, it is just delectable. My family adores it and will do nefarious things to get more stollen at Christmastime.

It is far easier made without yeast and I frankly don’t miss it like I thought I would. This dough is very tender and flavorful. You could use orange rind instead of lemon rind and the dried fruit selection is entirely up to your tastes or your pantry. I am looking forward to enjoying stollen in a couple of weeks. One more good thing; it doesn’t require aging like a fruit cake. As soon as it cools you can cut a fat piece and enjoy a slice of heaven on earth!

Adding the butter
Butter is now integrated into dough using pastry cutter

Dough

2 1/4 cups King Arthur basic blend Gluten-Free Flour

1/2 cup granulated sugar

1 1/2 teaspoons baking powder

1/2 teaspoon salt*

3/4 teaspoon xanthan gum

1/2 cup (8 tablespoons) cold butter

3/4 cup ricotta cheese, part-skim milk type

2 large eggs

1 teaspoon vanilla extract

Grated rind of 1 small lemon; or 1/4 teaspoon lemon oil, or 1/4 teaspoon lemon extract

1/2 cup golden raisins

1/2 cup of your favorite dried fruits, chopped to 1/2″ pieces (I do apricots, dried cherries, currents, raisins or dried peaches/pears)

1/3 cup slivered almonds, toasted and cooled

—————

*Reduce the salt to 1/4 teaspoon if you use salted butter.

dried fruit and citrus zest

Topping

the dried fruit is mixed in!

Adding the toasted almonds
Adding the wet mixture into the dry dough
formed stollen ready to bake
baked and powdered
More powdered sugar sprinkled on using a sieve

4 tablespoons butter, melted

2/3 cup confectioners’ sugar

Directions

1. Preheat your oven to 325°F. Lightly grease a baking sheet, or line it with

parchment.

2. Whisk together the flour, sugar, baking powder, salt, and xanthan gum in a mixing bowl.

3. Cut the cold butter into small chunks, then blend it into the flour mixture to form uneven crumbs.

4. In a separate bowl, mix together the cheese, eggs, vanilla, and flavors.

5. Toss the fruit and almonds with the flour mixture until evenly distributed. Then combine the wet and dry ingredients, mixing until most of the flour is

moistened.

6. Turn the dough out onto a lightly floured work surface, and knead it two or three times, until it holds together. Divide it in half.

7. Pat each piece of dough into an 8″ x 7″ oval about 1/2″ thick.

8. Fold each piece of dough roughly in half, leaving the edge of the top half about 1/2″ short of the edge of the bottom half. Should you fold the long way, or the short way? The long way will give you a longer, narrower stollen, with shorter slices; folding the short way will give you a wider, fatter stollen, with longer slices.  I do the long way, your choice.

9. Use the edge of your hand to press the dough to seal about 1″ in back of the open edge; this will make the traditional stollen shape. It’s also the familiar Parker House roll shape, if you’ve ever made them. The dough will probably crack; that’s OK, just smooth it out as best you can.

10. Carefully place the shaped stollen on the prepared baking sheet.

11. Bake the stollen until they’re very lightly browned around the edges and on top, about 40 minutes. A cake tester inserted into the center should come out clean.

12. Remove the stollen from the oven, and transfer them to a rack. Brush them each with 2 tablespoons melted butter. Sprinkle heavily with confectioners’ sugar.

13. Allow the stollen to cool, then brush with butter again, and sprinkle with sugar again. Wrap in plastic wrap until ready to serve; serve within a week. If desired, sprinkle with additional sugar just before serving.

14. Yield: two 1-pound stollen loaves. I like to freeze one for another occasion if I am not gifting it right away. Enjoy!