Lemon Meringue Pie

This pie is old school delicious. This is my mom’s bastardized version of a Betty Crocker recipe made gluten free with my favorite crust.  It has no gelatin for you gel haters! I make it with the lesser amount of sugar in the filling, but you can more than double it if you are a sweet freak.  I have never met a man who didn’t love it, well…maybe one. My friend Russel doesn’t care for anything with lemons. But his wife Claire adores lemon so this pie is for her and in loving memory of my mom who passed away in October 2020.

If I have them, I love to use Meyer lemons for this recipe.  Your pie will have a really delicate flavor – so light I sometimes call it lemon cloud pie!  Don’t worry; regular lemons work just fine. It can be difficult to find Meyer lemons and pricey too.

I never got my mom to admit it but I am positive she added extra egg whites to her meringue.  Her pie was towering with the white fluffy stuff unlike my nearly level pie made with just three whites.  It is up to you how impressive you want your dessert to look. But if you have company you might want to go for the big bang of a four- five egg white meringue topping for maximum wow power

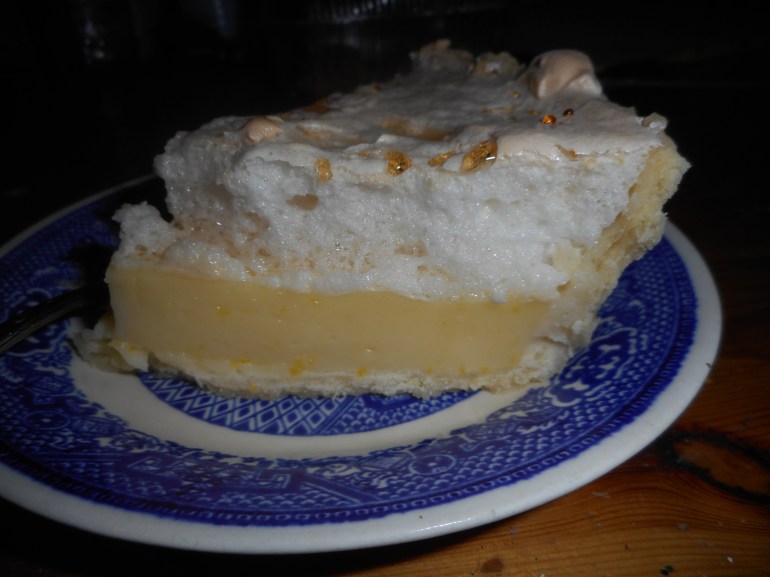
My mom added the touch of corn syrup to replace some of the less sugar and because it makes the texture of this pie creamier and more delicate.  Don’t make this pie on a very humid or rainy day or the meringue will weep and bead on the top.  It will taste fine, but the look will suffer from the humidity. My slice picture shows some of that beading; it started to get humid that day and my pie still tasted fantastic even with the slight beading issue.

Store any leftover pie in the fridge. It doesn’t keep more than two days but frankly none of it ever lasts more than two days.

Mom’s Lemon Meringue Pie

Crust:

1 c plus 2 tbsp brown rice flour mix (at bottom of recipe) [King Arthur Basic GF mix]

2 tbsp sweet rice flour

1 Tbps. granulated sugar

½ tsp xanthan gum

¼ tsp salt

6 Tbps. cold butter cut into 6 chunks

1 lg egg

2 tsp fresh orange or lemon juice

Spray 9 inch metal pie pan with cooking spray, dust with white rice flour.

Mix dry ingredients in bowl of stand electric mixer.  Add butter and mix until crumbly and resembling coarse meal.  Add egg and juice.  Mix until it comes together into big chunks.  Shape into a ball with your hands. Put it on a crust sized piece of wax paper (14 x 14 inches more or less), flatten the crust ball some; put on top of it another piece of wax paper and chill it all in your fridge 15-20 minutes. Then roll it out and line a 9 inch pie pan with it.  Make sure you get the middle nice and thin; this crust can be tough to get the center as thin as the edges. Prick it all over with a fork to keep it from bubbling out and bake the empty crust at 375 for 10-12 minutes until light brown.  Let cool.

Lemon Filling:

Ingredients:

1/3 to ¾ cup sugar

1/3 plus 1 tbsp. corn starch

1 ½ cup water

3 eggs, separated; yolks for filling, save whites for meringue

1-2 tsp. lemon zest

½ cup fresh lemon juice

2-3 tbsp. clear corn syrup

3 tbsp. butter cut in small chunks

Directions:

Start oven heating to 400 degrees for browning the topped pie.

Mix the sugar and corn starch in a heavy bottomed medium sized saucepan.  Add the water, stirring.  Heat until it boils, stirring constantly, boil one minute, take off heat.  Beat yolks briefly in a small mixing bowl, then add the hot stuff slowly to it; half the hot mixture, stirring constantly.  Then dump it all back into the saucepan, bring to a boil, stir like a crazy person so it doesn’t scorch. Boil 1 minute at medium heat.  Remove from heat, stir in the lemon juice and zest and then stir in the butter.  Let it melt as you stir.  Glug in some corn syrup. Pour the hot lemon filling into the pie crust.  Top while still hot with the meringue you just beat up. Make sure you get the meringue all the way across the top and along every single edge. No cracks, no gaps. Bake it 10-11 minutes until light brown. Cool to room temperature and then chill for 2-6 hours.  Slice and serve.

Meringue topping

The three egg whites (or 4-5)

¼ tsp. cream of tarter

6 tbsp. granulated sugar (or 8-10 tbsp.)

Beat the whites and the cream of tarter until it is past the foamy stage, add the sugar half a tbsp. at a time beating on high until the whites are stiff and glossy.  This will take several minutes.

If you add one or two extra egg whites add another ¼ tsp. cream of tarter and add 2 tbsp. sugar for each extra white.

—————–

Brown Rice Flour Mix (Same as King Arthur Basic GF blend)
2 c brown rice flour

2/3 c potato starch

1/3 c tapioca flour

Originally posted March 2015, slightly revised in 2016, unchanged since then.

Coconut Mounds Impossible Pie

Coconut Mounds Impossible Pie

This is my favorite coconut creation. I’ve made 3 different versions and this is my favorite. If I figure out another one to add I will let you know. It’s super easy and requires no fancy equipment or weird ingredients. No crust to fuss with. Probably any brand of gf flour will work. Otherwise it is all naturally gf ingredients. It doesn’t take more than 10 minutes to throw together and into the oven it goes for 43-45 minutes. I suggest that you allow it to set up for at least 4 hours. After two-three hours you could put it in the fridge to get it cold. If you prefer no chocolate just leave it out. I wonder what it would taste like with dark chocolate bits. Next time!

Ingredients:

2/3-3/4 cup sugar

3 large eggs

1/4 cup plus 1 Tbsp. of GF flour blend (I used KA basic gf blend)

1/2 c melted butter or 1/3 c liquid coconut oil

1 tsp. apple cider vinegar

1 tsp. vanilla extract

1 1/2 cup shredded coconut, sweetened version

1/4 c mini chocolate chips

a tsp of soft butter for coating the pie pan or soft coconut oil

Directions: Heat oven to 350 degrees. Butter a 9-inch glass pie pan. Melt the butter in the microwave in a Pyrex measuring cup. Put sugar and eggs into a mixing bowl, I used my stand mixer. I beat it for 3-4 minutes until it was thick and lemon yellow. Stop mixer, add in milk. flour, oil or melted butter, vanilla, and vinegar. Beat briefly to blend well. Fold in coconut. Pour half of this batter into the buttered pie pan, sprinkle with half the chocolate chips. Gently pour in rest of batter. Sprinkle with rest of chips. Put in oven on middle shelf. Bake 43 to 45 minutes until the middle is set and it is golden in color. Let cool fully 3-4 hours. Can eat either at room temperature or slightly chilled. Because of the custard, please store leftovers (if any!) in your fridge. Enjoy!

Carrot Cup Cakes

This is an incredibly moist and decadent cupcake, yet it is gluten free. It gets it richness from olive oil, carrots and plump raisins soaked in a little booze. There is no flour substitution; made entirely with ground almond flour so it is naturally gluten free. It makes 12-18 cupcakes depending on how full you fill each liner and is fairly low in sugar for a cake, and I made a cream cheese icing with less sugar and less cream cheese plus it was a lower fat cream cheese; I just iced the top, you need less icing and save a few calories. This version comes from a cake by Nigella Lawson with a few changes and additions by me. So, all I am thinking right now is why didn’t I make this, years and years ago!

You really need a food scale to weigh and measure properly. Much more exact. For the olive oil I eyeballed the amount in a 1 cup glass measuring cup. Please do not increase the carrots or raisins as that will make the batter too moist and too heavy; the center may not bake fully. They do not rise much due to the relatively heavy batter.

Notes: I didn’t have much rum on hand the first try, so I used some bootleg limoncello I made about 5 years ago to soak my golden raisins in. It really brought the citrus out in this cake. It was equally delicious made with rum the second try. My first version used orange zest; as I was out of lemons, but I had some this time. The three tablespoons of walnuts as no pine nuts around; I toasted them, and they had a smaller flavor impact than pine nuts but better for my budget. Do toast them as it really amps up the nutty flavor.

I wasn’t much thinking about blogging; I was teaching a friend how to make this recipe and so I took only one picture.

Venetian Carrot Cake Cupcakes

Ingredients:

3 Tbsp pine nuts or chopped walnuts

8 oz coarsely shredded carrots (peel first if not organic)

3 oz golden raisins

2 ¼ oz limoncello or rum (I measured the raisins in a glass measuring cup and added limoncello to a touch above halfway up the raisins) About 2 Tbsp. rum

5 oz sugar

4.5 fluid ounces mild olive oil plus a tad more for greasing the pan

3 large eggs at room temperature

1 tsp vanilla extract

9 oz almond flour (not almond meal)

A scant ½ tsp. nutmeg

¼ tsp. cinnamon

The zest of half a good sized lemon or orange plus the juice of said lemon

Frosting

6 oz room temp light cream cheese

2 Tbsp. butter at room temp

2 cups powdered sugar

1 tsp vanilla

Directions:

Prep: Toast the pine nuts (or chopped walnuts) in a dry frying pan stirring or tossing constantly; they will burn if you don’t toss and stir and when they are about done pour them in a small bowl; don’t leave them in the (heat off) frying pan; they will burn on the residual warmth of the pan. Let cool. Put the raisins and limoncello in a small saucepan and heat up; then turn down the heat and simmer for 3 minutes or microwave 30 -60 seconds. Let cool before using.  Next, peel and grate carrots. I did it by hand with my versatile box grater on coarse side, but you can use a food processor, or a shedder attached to your stand mixer.   I grated them onto wax paper and then weighed it; so much more accurate than saying 3 carrots and hoping it is the right amount. Put liners in your muffin tins; if you want tall cupcakes make 12. For short ones do 18 cupcakes. I tried some silicon cupcake liners and loved them. Heat your oven to 350 degrees and make sure your shelf is in the middle.

Cake Directions: Put the almond flour, the two spices in a small bowl and whisk to blend. Put the sugar and olive oil in a large mixing bowl and whisk until it is well blended, light and creamy looking. Add the eggs one at a time mixing well before the next one. Add the vanilla extract, mix briefly. They add the almond flour mix and then carrots and the raisins and liquid clinging to them plus lemon juice. Last, add the pine nuts and lemon or orange zest. Blend briefly. Pour into the prepared pan and bake for approximately 22-24 minutes; mine took the full 24 minutes. They should look slightly risen and a cake testor will come out clean. Let cool 5 minutes, then remove the cupcakes and set them on a cooling rack and cool completely before frosting.

Make the icing; blend the cream cheese (I often soften mine 30 seconds on low in the microwave) and softened butter until fluffy; add the sugar in half cups or less as you blend. Add the vanilla and beat the frosting until it is fluffy. Frost the top of your beautiful cupcakes. Enjoy!

Terrific Pecan Tart!

Something sweet for Valentine’s Day. I have a bag of pecan halves. Perfect. I wanted an impressive whole tart not some small individual tarts like I’ve made in the past, so I used my long rectangular tart, this is the correct amount of filling. A rectangular one is attractive and fun to cut in narrow slices across the width. And a tart is not quite as thick as a pie; I prefer the crust to filling proportions. You can also use a 9-inch round tart pan.

Notes: You have to use dark corn syrup.  Yes, I know corn syrup is an unhealthy item but sometimes you just have to go wicked!  It’s worth it, I promise. Cross my heart. Oh and NO margarine. Butter! Or Earth Balance if you don’t eat real butter. And the filling only uses 2 eggs so that’s helpful these days.

This tart was awesome as is but are also great with some freshly whipped cream or vanilla ice cream which is quite popular at my house.

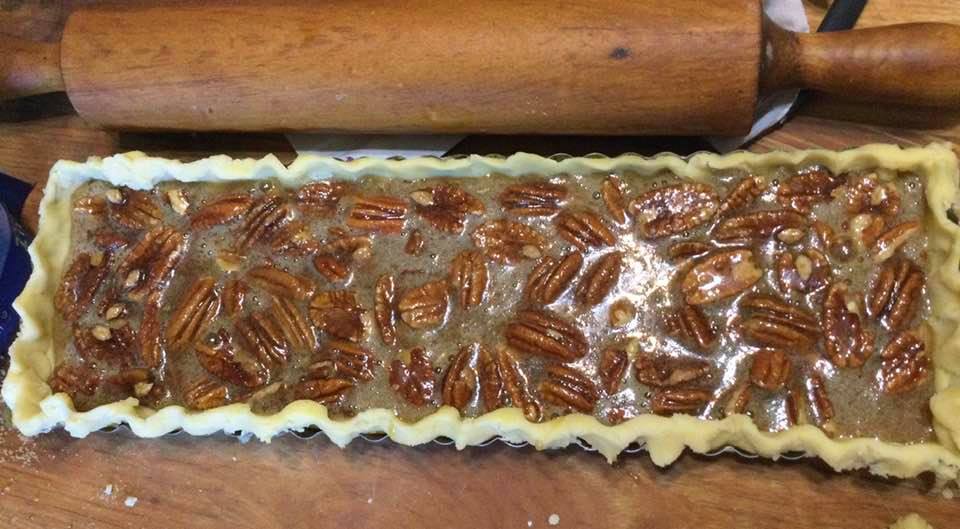
Ready for the oven….

Angie’s GF Pecan Tart

Crust:

1 c plus 2 tbsp brown rice flour mix (at bottom of recipe)

2 Tbsp sweet rice flour

1 Tbsp granulated sugar

½ tsp xanthan gum

¼ tsp salt

6 Tbsp cold butter cut into 6 chunks

1 large egg

2 tsp fresh orange or lemon juice

Crust directions: Mix dry ingredients in bowl of stand electric mixer.  Add butter and mix until crumbly and resembles coarse meal.  Add egg and juice.  Mix until it comes together into big chunks.  Shape into a ball with your hands. Put it on a crust sized piece of wax paper (14 x 14 inches more or less), flatten the crust ball some; put on top of it another piece of wax paper and chill it all in your fridge 15-20 minutes while you get the rest ready.

Filling:

2 large eggs

1/3 c sugar

1/4 tsp sea salt

2 and a half tbsp. melted butter

1/2 cup dark corn syrup

1 cup pecan halves

Sprinkle cinnamon

Filling: Beat eggs, sugar, salt, butter and corn syrup in a bowl until well mixed, can use a hand held mixer.  Stir in pecans and a good sprinkle of cinnamon.

Assembly: Roll out pie crust between the two long sheets of wax paper; try to get the thickness even, no thick middle! Peel off one side of paper and lay in long rectangluar tart shell or a round one if that’s what you got.  Crimp edges all around.   Fill your shell with pecan mix.  Bake in a preheated 375 degree oven on a low shelf for 25 or so minutes until set and crust edges lightly browned.  Cool at least 1/2 hour before serving warm or at room temperature or even slightly chilled. 

Freshly baked long pean tart!
My slice!

Not My Mom’s Rice Pudding, Better!

I always loved rice pudding as a child, creamy custard studded with raisins and topped with a good sprinkle of cinnamon.  But the rice itself was kinda drab, not much flavor and it was not well blended with the rest of the pudding.  A few years ago, I found a recipe that caused a rice pudding revolution in my kitchen: it used sweet rice which is a white short grain oriental rice.  You could substitute Arborio rice if you like, what I have used in my most recent batch. I buy sweet rice in oriental grocery stores but I think Wegmans may carry it too.  Each grain absorbs the milk as it cooks and releases a lot of creaminess as well as providing a soft squishier rice that gives the pudding a more blended feel than my mom’s usage of long grain rice that stayed firm and separate from its pudding surrounding.

This recipe is naturally gluten free.  No one eating it will think, “Oh, darn, another of those weird GF recipes!”  They will just think, “I wonder if she will think I am piggy to want seconds of this?

In a pinch you could skip the second part where you briefly bake the pudding but I rarely do, I think it helps form the best texture.  Do sprinkle the top with cinnamon unless it is something you despise.  I recommend whole milk as it makes pudding taste so good but if you prefer two percent that will work.  I do not recommend skim milk for pudding. Ick on the texture and flavor of such a mutant pudding!  And this recipe is great with chopped dried apricots, dried cherries, golden raisins, or even currents or in it instead of raisins. My original recipe had lemon peel and apricots in it. Recently I put a few long orange peelings in it and a cinnamon stick while it cooked on the stove top which gave it a delicate orange flavor which played well with the raisins. So, you can alter it to suit your mood and your ingredients. I sometimes just use 3 whole eggs rather than end up with two extra egg whites.  Especially with the price of eggs these days. For 3 eggs you get a whole pan of lovely pudding so it is worth it!

I made it this week in the “classic” form; with raisins and sprinkled with cinnamon. I so enjoy a cup of creamy rice pudding.

rice pudding

These cold days make pudding such a treat.  What could be more comforting after a cold walk with the dog than a bowl of wickedly creamy homemade rice pudding.

Creamy Rice Pudding

Ingredients

¾ cup sweet or Arborio rice

1 quart whole milk

1/3 cup raisins

1/3-1/2 cup granulated sugar, depending on your sweetness needs! I go with 1/2 cup

2 egg yolks

2 whole large eggs (or just 3 whole eggs, no extra yolks)

1 tsp pure vanilla

A good sprinkle of cinnamon

Directions:

Rinse the rice in a strainer briefly, (I forgot to do this last week!)  place in a heavy bottomed 1 ½ quart saucepan, pour in the milk (4 cups) and stir frequently as it heats on medium to a bubbly simmer.  Add the raisins and turn down the heat to low, cover and cook 25 minutes.  Be sure to stir it every 5-7 minutes to separate the rice and keep it from scorching on the bottom.  Add the sugar, stir well.  Mix up the egg yolk and whole eggs in a bowl with a whisk and add in some of the hot mixture; maybe 1/3 to ½ cup.  Dump it all back in the pot and stir well.  Turn off the heat and add the vanilla.

Heat your oven to 300 degrees. Butter the bottom and sides of a low ceramic or glass baking dish. I like an oval myself, that shape is what my mom usually used!  Pour in the pudding, removing any lemon or orange peel and the cinnamon stick if you used such and sprinkle it well with cinnamon to dust the surface.  Bake for 20 minutes.  Often,I put it in a hot water bath created with a 9×13 cake pan and some hot tap water. Did this last week.  This method produces a lovely delicate custard, worth the extra fuss.

It is tasty warm and wonderful the next day.  Some people guild the lily with toppings of whipped cream, grated lemon or orange peel or even whipped mascarpone cheese.  Up to you how you dress it up!  I occasionally serve a homemade cookie on the side for added crunch value.  Enjoy!

Originally published in 2015; minor text changes made.