Jam and Almond Tart

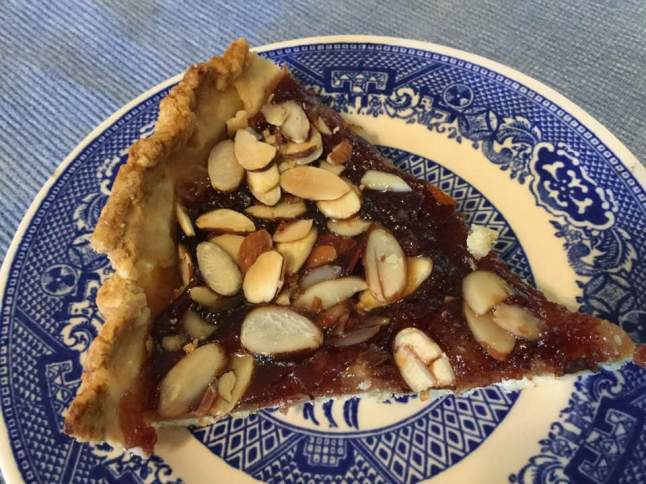
European jam tarts.  Heard of them. Never had a taste of one. Have a lot of jam/jellies so I thought it was the right time to give it a whirl. I also had some almond paste, just a bit but it proved enough to make a touch of frangipane filling.  I think you could leave out the frangipane part but why? It definitely adds to the flavor of the finished tart. Honestly it felt like I got it from a really high-end bakery.  Gluten free too.

Yes, I know of the famous British Bakewell  Tart, this is sort of the reverse of that: with more of a tart and less of a cake result – next time I crave jam I may well try my hand at a Bakewell  Tart.  It is sort of like jam topped with a rich thin cake.  Stay tuned!

There are just a few simple steps to this; if you want the jam or jelly sweeter you can cook it down a bit with a half cup of sugar added. I did do that but honestly, I think it was not really necessary. Once it was thickened I put it in a new bowl and chilled it in my freezer as it was too darn hot! Extra work. Next time, just gonna stir up the jam and go with it.

Angie’s Almond and Jam Tart

Crust:

1 c. and 2 Tbsp. brown rice flour mix (at bottom of recipe)

2 Tbsp. sweet rice flour

1 Tbsp. granulated sugar

½ tsp xanthan gum

¼ tsp salt

6 Tbsp. cold butter cut into 6 chunks

1 egg, room temp

2 tsp. lemon juice

Mix dry ingredients in bowl of stand electric mixer.  Add butter and mix until crumbly and resembling coarse meal. Add the egg and juice; blend until it clumps into a ball. Chill in fridge for 15 minutes.  Roll out  between plastic sheets or wax paper and lay in pan: press onto the sides of a 9 inch tart pan with removable bottom. Set in fridge to cool while you make the filling to 1 1/3 cup fruit jam/jelly; I used homemade red currant jelly

2-3 Tbsp. almond paste

½ cup sugar

¼ cup gf flour

½ tsp. almond extract

2 ¼ ounces sliced almonds


Directions:

Make crust; chill.  Stir up jam/jelly.  Put the almond paste, sugar, extract, and flour in a food processor; mix until well blended. Sprinkle over crust. Glop on the jam and smear around with a large spoon or butter knife. Sprinkle with the sliced almonds.  Bake at 375 degrees for about 40 minutes; until the crust is lightly browned.  Cool at least an hour before slicing. Great  with a dollop of whipped cream or plain yogurt. Stores for about 2 days (tightly covered) – if it lasts that long… Enjoy!

jam tart slice

Brown Rice Flour Mix (same as King Arthur basic gf blend)

2 c brown rice flour

2/3 c potato starch – not potato flour!

1/3 c tapioca flour

The crust recipe is from Annalise Roberts great cookbook, GF Baking Classics, Second Edition.


Rhubarb Frangipane Pie: Almond Sugar Filling to Keep it Sweet

Got another great but uncommon rhubarb pie recipe.  This time I used a simple almond filling; called frangipane. It’s is just a sweet layer under the rhubarb but it’s quick to make and blends in: you won’t really notice the frangipane but its flavor will be delish  when you bite into this luscious pie.  This is easy to make even though it has several steps.  Keeper recipe!

The GF crust will work for any pie you wish and the sugared topping is a great look and a crunchy sweet treat.  This is one of the few two crust pies I do and I have to say the top crust was very flaky and tasty.

rhubarb-frangipani-pie-005

Angie’s GF Rhubarb Frangipane Pie

Crust:

2 ¼ c brown rice flour mix (at bottom of recipe)

¼ cup sweet rice flour

2 Tbsp. granulated sugar

1 tsp xanthan gum

1/2 tsp salt

12 Tbsp. cold butter cut into 6 chunks

2 large eggs

4 tsp fresh orange or lemon juice

Directions: Spray 9 or 10 inch metal pie pan with cooking spray, dust with white rice flour.

Mix dry ingredients in bowl of stand electric mixer.  Add butter and mix until crumbly and resembling coarse meal.  Add egg and juice.  Mix until it comes together into big chunks.  Shape into two equal balls with your hands. Put each on a crust sized piece of wax paper (14 x 14 inches more or less), flatten the crust balls some; put on top of it another piece of wax paper and chill it all in your fridge 15-20 minutes while you chop the rhubarb into ½ inch chunks.  I now use a rectangle of medium thick plastic; fold it in half and roll out the pie dough between the layers; works much better than wax paper.

Frangipane Filling:

2/3 cup almond meal

1/3 c sugar

6 tbsp. butter at room temp

1 large egg

1/2 tsp. almond extract

1 tbsp. rice flour

1/4 tsp cinnamon

Mix the almond meal and sugar in your stand mixer on low, add the butter, cream well, use spatula to make sure the butter gets down and fully integrated into the mixture and then add egg and almond extract, mix and add the flour and cinnamon.

Rhubarb filling:

5 cups cut up fresh rhubarb

3 tbsp. tapioca flour

¼ tsp. salt

Zest of one orange (optional)

2 tbsp. sugar

1 or 2 tsp. of milk to brush on for a glaze

Raw sugar to sprinkle on top

——–

In large bowl: place rhubarb, add tapioca flour, salt, plain sugar and orange zest. Stir with spoon to coat.

Assembling the pie:

Heat oven to 425 degrees.

Roll out one pie crust between the two sheets of wax paper, try to get the thickness even, no thick middle! I use a pie bag my sister gave me; works fantastically with gf crusts. Peel off one side of wax paper and place in pie pan, centered.  Remove other slice of wax paper.  Crimp edges all around.

Spread frangipane filling on the bottom of the crust.  Fill with dry rhubarb mix.  Roll out the other pie crust. Place gently on top of pie, crimp around edges. Cut a few vent slits in the top crust. Brush top crust carefully with milk, sprinkle heavily with raw sugar.

Place on baking sheet to catch drips (I have a pie drip pan I love!)  Bake 20 mi, rotate it half way through so the back and front are the same level of golden. Lower heat to 350 degrees.  Bake for 30-40 min until crust is golden and you can see the filling bubbling.  Cool on rack for at least 1-2 hours before serving.  Enjoy!rhubarb frangipane pie 001

Brown Rice Flour Mix (same as King Arthur Basic Blend)
2 c brown rice flour

2/3 c potato starch

1/3 c tapioca flour

This recipe is a blending of one I found on splendidtable.org with my favorite crust recipe out of Annalise Roberts cookbooks with my own small changes to create a pie to my taste buds happiness.

Originally posted spring of 2016, no changes to recipe, minor updates to text.

Pan Fried Ravioli with Spring Veggies

Sometimes I want a quick light meal; homemade and gf of course. I used some fresh asparagus from my garden, a small carrot, a small shallot, some EVOL and a few frozen ravioli to create this simple meal. No sides, two pans and it is quick to throw together; like 15 minutes tops.  People always want to pour red sauce over their ravs but I think they shine in a simple preparation. I used spinach and cheese ravioli but you can use what ever ravioli or even perogies. Yeap; there are gf perogies.

This recipe is for one serving, use a bigger frying pan and you can easily double this recipe.

Notes: first time I made this I used the capers, no carrots, second time no capers as I was out. Both yummy. If you don’t have shallots use a small onion. Sugar snaps were great; could use snow peas or even frozen peas.

Angie’s Pan Fried Ravioli and Spring Veggies

One serving

Ingredients

4-5 frozen ravioli

1 Tbsp. EVOL

1 small shallot

1 small carrot diced

1 small garlic clove, minced

Handful of pea pods, cut off any hard ends

3-5 spears asparagus cut into 1 to 2 inch lengths

1 Tbsp. dry white wine or vermouth

2-3 Tbsp. chicken broth

1 tsp. fresh thyme leaves off the stems

squeeze of lemon juice; maybe a couple tsp. and some zest if desired

1-2 tsp. capers if desired

2-3 tsp. butter if desired

Directions.

Heat a pot of salted water, cook ravioli according to package; mine said 6-8 minutes so I did 6 minutes. Drain. While that is cooking cut up the carrot and slice the shallot across into ¼ inch thick rounds. Heat the EVOL in a medium frying pan. Add the carrot, stir around, then add the shallot and the peas.  Cook 1-3 minutes; add the garlic, stir, add the vermouth. Cook one minute. Add the drained ravioli.  Cook a couple minutes on each side.  Add the asparagus when you turn the ravs.  They don’t need to brown but that would be yummy! You can add a touch of capers if you like. Add the thyme leaves and lemon juice at the end of the cooking.  Optional; add a Tbsp of butter and let that melt in. Can add a bit of lemon zest; maybe 1/2 to 1 tsp.  Add some of the cooking water instead of broth if you so desire. I did just that but added a tsp. of concentrated chicken broth. Enjoy!  rav with spring vegges plated

Rhubarb Cobbler – Tender and Tasty

My spring mission: to convince you rhubarb haters to try one of these recipes.  This one is delicate in flavor with a fluffy yet satisfying cobbler topping and no sour ickiness as some say rhubarb can be.  It takes a bit less fruit than a pie and goes together in just a few minutes.  And it is gluten free for all of you who must avoid gluten which means wheat, rye or barley flours are a no-no in baking.

This recipe is the same basic one I posted about for peach cobbler in the past; it is modified from a muffin dry mix in Bette Hagman’s book, More from the Gluten-Free Gourmet and uses a flour mix that will give you 4 cups of the dry ingredients.  One cup will make an 8×8 pan of cobbler topping.  I keep the rest of my dry mix in the freezer and a pan of cobbler can be thrown together in less than 10 minutes plus baking time.  What a time saver this mix is! I make all sorts of cobblers with it.

I always get the fruit part cooking before putting the topping together so the fruit is hot and ready for the topping and can go right into the oven.

My mom and I enjoyed this on this past Sunday. She really loved the rhubarb flavor and the cobbler topping.

rhubarb cobbler

Angie’s Rhubarb Cobbler

Dry Cobbler Mix – use one cup for this recipe and freeze the rest

2 ¼ cups white rice flour

½ cup potato starch (not potato flour!)

½ cup tapioca flour

1 tsp. baking soda

4 tsp. baking powder

1 tsp salt

1 tsp. xanthan gum

1/3 cup sugar


Fruit Filling

4 cups sliced rhubarb

½ tsp. almond extract

½-2/3 cup sugar –add more or less depending on how sweet you want it

2 tbsp. GF flour

1/4 tsp cinnamon

Directions:

Mix the fruit and almond extract in a sauce pan. Stir together the sugar, cinnamon and flour and mix into the fruit.  Cook on the stove top for 5-10 minutes until it is thickened and hot.  Pour into a buttered 8 inch square pan, top with big blobs of the cobbler topping.

Cobbler Topping

1 cup dry baking mix

2 eggs

2 tbsp melted butter or canola oil (both work fine)

1/3 cup milk/buttermilk (I skimp a tbsp off to keep it from being runny)

½ tsp. vanilla

Mix the wet ingredients and then add to the dry mix in a big bowl.   Mix briefly: do not over-mix for best texture.  Use a big spoon to plop it right away on the hot fruit.  Bake immediately as baking soda and powder can’t stand around waiting or they lose their umph!

Bake at 350 degrees for 25 minutes.  The top should be light brown and spring back when you poke it with your finger.  If it looks damp or squishy bake it 5 more minutes.

Let cool 5-7 minutes before serving as it will burn your mouth right out of the oven!  Some people love it with a scoop of vanilla ice cream.  This tender rhubarb cobbler is perfect just on its own.

Reposted with minor changes from June 2015.


Squash, Pancetta and Chard Pasta


This colorful pasta dish is pretty healthy and very tasty. Not too tricky either. Have enjoyed it many times in the past 5-7 years. I actually thought it was on my blog; not so. Hence this post. I made it this week and it made 4 lovely servings.

It showcases roasted cubes of butternut squash and tender melt in your mouth swiss chard. My amounts are somewhat approximate. It will keep a few days in the fridge. I used gf fettuccine noodles. Don’t overcook them! You could buy pre-peeled and cubed squash to save time. I used some I grew last fall and honestly it didn’t take long to peel and cube it. I suggest you roast the cubes from a whole squash and use as much as you think works for you. Valley Farms has great fresh swiss chard; that’s where I get mine if I don’t grow it myself.  I have made this recipe with thick cut bacon, if that is what you have; go for it.  I got a package of chopped pancetta at Aldi’s pretty cheaply.


Butternut, Pancetta and Chard Pasta

Ingredients:

1 bunch swiss chard, I like the red stemmed variety, rinsed off

3-4 tbsp. EVOL

1 cup or so of diced red onion; one decent sized one

1 lg garlic clove minced

1 small- medium butternut squash; peeled, seeded and cubed; at least a pound

4 oz pancetta, diced

12 oz dried gf fettucine noodles.

Good quality Parmesan cheese to grate on plated entree

Directions:

Roast the squash; heat the oven to 400 degrees, spray a rimmed baking sheet with olive oil cooking spray; spread the cubed squash, drizzle with 1-2 Tbsp of EVOL and ½ tsp. kosher or sea salt, bake at 400 degrees for 45 to 60 minutes; turn cubes every 15 minutes with a metal spatula to help them cook evenly, a bit of crunch is nice! Start the rest of the recipe as they approach doneness or bake the squash a day before if that works for you. Have done it both ways. Crunchier if made right before serving


Heat a large pot of salted water for the pasta while you make the chard.  Chop it into 1 inch lengths; set the chopped leaves aside separately from the lower stem bits. Heat the EVOL in a large frying pan or smallish wok. Add the stems and cook 2-3 minutes, add garlic, stir, add the onion; cook 3-5 minutes until softening. Add rest of chard in 2-3 handfuls letting it cook down for a minute before stirring and adding the next third. Then push the veggies up the sides or to the edges and add the pancetta. Push the veggies gently back around and over the pancetta. Cook 2-3 minutes until the pancetta is hot and the chard is soft.  Meanwhile you have cooked the pasta to al dente. Add it to the pan with the chard, stir, add the roasted squash cubes. Stir. Serve with freshly grated Parmesan cheese on top; none of that pre-grated crappy cheese please! Enjoy!

swiss chard pasta plated


Not sure where I found this recipe but it is a keeper; we often enjoy it in the fall as chard and squash are fall harvest vegetables.