Daffodil Cake – Delish Spring Dessert

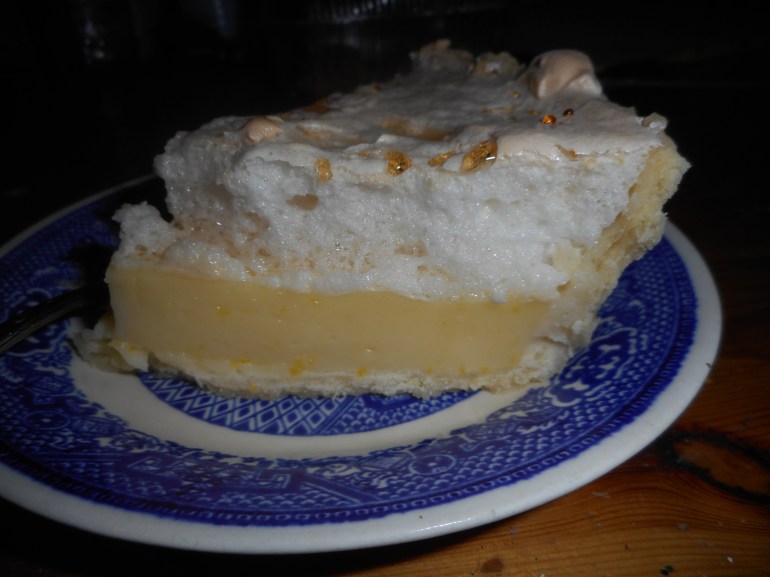
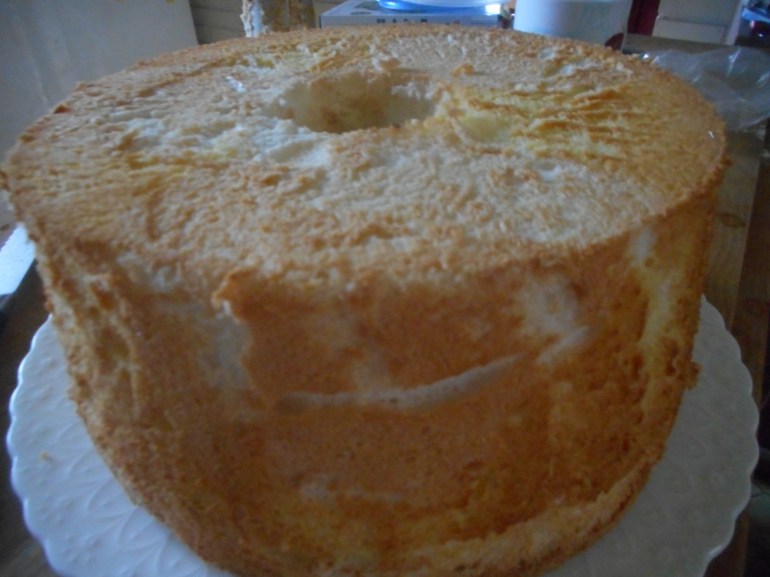
My resolution this year was to eat less sugar and that kinda means less cake and I am doing pretty well at it so far but sometimes it is about using the ingredients you have on hand.  I have some egg whites in the freezer and have to use them up. Defrost and I have everything else in the fridge or pantry: go daffodil cake. Looks like an angel food cake on the surface but it is an old-fashioned confection known as a daffodil cake.  The insides have some white and some yellow cake. I found the recipe in my 1970s Betty Crocker, a great standard cookbook I would never want to be without for reference purposes.  Was making it for many years before my diagnosis with celiac so once I got comfy baking gf I figured I could make it gf and it is perhaps even better than it was with gluten-based flour.

I made them on occasion for my mom who was not sure I am making it gf but it is and is totally delicious.  daffodil cake, french apple tart 014

So, all you gluten free disbelievers, this cake will change your mind. It is tender, moist and delicately flavored, not to mention very pretty and perfect in spring even after Easter.  It is after all; a daffodil cake and spring is the only time in the year they bloom. Make some now folks! It makes a wonderful birthday or party cake; you could put a thin vanilla powdered sugar glaze on top to make it fancy for such an occasion.

Notes: I save egg whites; in a Tupperware container in the freezer, until I have a cup of them.  Then I am ready to put this beauty together. Or just use enough eggs to make a cup of whites. If you don’t have guar gum you can use xanthan gum.

A few words on separating eggs: this can be tricky, and I have learned from bad experiences not to separate directly into the measuring cup full of whites; do it into a small bowl and dump. You can NOT get ANY egg yolk in the whites, or they won’t beat properly.  Best to set any egg that breaks or becomes contaminated with even a speck of yolk aside and make an omelet for supper! I crack each egg on the edge of my counter, split its shell in half and dump it over one cupped hand. The white flows through into the bowl underneath and I drop the yolk into the mixing bowl. Be gentle so the yolk does not break.  Don’t use old, tired eggs or the yolks are more likely to break; fresh is best but they need to come to room temperature before cracking, so the whites beat to a high volume.  FYI: When baking gf all ingredients should be room temperature unless the recipe tells you otherwise.

Put the yolks in the medium mixing bowl and add those six whites in with the other cup of whites: 1 ½ cup total egg whites.  I know, a crazy lot of eggs in this but remember, no fat what-so-ever! Angel food cake is a good choice for your diabetic friends, or so they say. I just think those folks love a good angel food cake. This cake is even better, a masterpiece of delicate melt in your mouth cakey delight.

Angie’s GF Daffodil Cake

1 cup egg whites (room temp)

6 whole large eggs (room temp) separated

1 ¼ cup powdered sugar

1 cup brown rice flour blend (recipe below)

½ tsp guar gum

1 ½ tsp. cream of tarter

¼ tsp salt

1 tsp. pure vanilla extract

½ tsp. almond extract

1 cup granulated sugar

Directions:

Heat oven to 375 degrees.  Put baking rack on second slot from the bottom.  You need a ten-inch tube pan with removable bottom, do not spray.

Mix and sift the powdered sugar, flour, guar gum in a bowl at least once.

Pour the egg whites (should add up to 1 ½ cups) into a stand mixer bowl, add cream of tarter and salt.  Start at medium speed.  Beat until foamy, increase speed until high, wait for soft peaks and add cup of granulated sugar a tbsp or two at a time as it beats.  No bowl scraping or stopping.  Beat at highest speed until you have stiff peaks.  Beat briefly after adding the two flavoring extracts. Set aside.

In small bowl beat the 6 egg yolks about 4 minutes until thick and lemon-yellow colored.

Fold the flour mixture into the egg whites, I do about a quarter cup at a time sprinkled all over the top and I fold it with a spatula or spoonula.  Be gentle and smooth; don’t worry if it isn’t perfectly smoothly mixed.  Put about half of the mixture into a separate large mixing bowl.  Add the beaten egg yolks; gently fold until it is pretty well blended.

Put big glops of the plain mixture into the baking tube pan; I like 3 big ones.  Put three big glops of the yellow blended mix between them. Top with more glops of the mixes, using it all up.  Gently stir through the pan with your spoonula to swirl it a bit and smooth the top with the spoonula.

Put into preheated oven, bake 35 minutes, until when you press gently on the top it springs back.

  • Remove from oven, turn it over and hang on an empty wine bottle neck or a big funnel. Let cool upside-down state before cutting it out of the pan. I use a sharp serrated bread knife, cut around the outside edge and the center tube. Lift it out and then slice under the cake all around.  Place a cake plate over the top and gently flip it. daffodil cake, french apple tart 014

I store it in a plastic cake saver or just in the microwave away from breezes and hungry folks.  You could wrap it in plastic wrap too. It is best eaten within 3 days.  It generally doesn’t last that long around here.

Brown Rice Flour Mix base mix 

(This mix is the same as King Arthur’s basic gf blend)
2 c brown rice flour

2/3 c potato starch

1/3 c tapioca flour

This recipe is my variation on the angel food cake you will find in Annalise Roberts’ Gluten-Free Baking Classics cookbook.   This post was first published in April 2016.

Lemon Meringue Pie

This pie is old school delicious. This is my mom’s bastardized version of a Betty Crocker recipe made gluten free with my favorite crust.  It has no gelatin for you gel haters! I make it with the lesser amount of sugar in the filling, but you can more than double it if you are a sweet freak.  I have never met a man who didn’t love it, well…maybe one. My friend Russel doesn’t care for anything with lemons. But his wife Claire adores lemon so this pie is for her and in loving memory of my mom who passed away in October 2020.

If I have them, I love to use Meyer lemons for this recipe.  Your pie will have a really delicate flavor – so light I sometimes call it lemon cloud pie!  Don’t worry; regular lemons work just fine. It can be difficult to find Meyer lemons and pricey too.

I never got my mom to admit it but I am positive she added extra egg whites to her meringue.  Her pie was towering with the white fluffy stuff unlike my nearly level pie made with just three whites.  It is up to you how impressive you want your dessert to look. But if you have company you might want to go for the big bang of a four- five egg white meringue topping for maximum wow power

My mom added the touch of corn syrup to replace some of the less sugar and because it makes the texture of this pie creamier and more delicate.  Don’t make this pie on a very humid or rainy day or the meringue will weep and bead on the top.  It will taste fine, but the look will suffer from the humidity. My slice picture shows some of that beading; it started to get humid that day and my pie still tasted fantastic even with the slight beading issue.

Store any leftover pie in the fridge. It doesn’t keep more than two days but frankly none of it ever lasts more than two days.

Mom’s Lemon Meringue Pie

Crust:

1 c plus 2 tbsp brown rice flour mix (at bottom of recipe) [King Arthur Basic GF mix]

2 tbsp sweet rice flour

1 Tbps. granulated sugar

½ tsp xanthan gum

¼ tsp salt

6 Tbps. cold butter cut into 6 chunks

1 lg egg

2 tsp fresh orange or lemon juice

Spray 9 inch metal pie pan with cooking spray, dust with white rice flour.

Mix dry ingredients in bowl of stand electric mixer.  Add butter and mix until crumbly and resembling coarse meal.  Add egg and juice.  Mix until it comes together into big chunks.  Shape into a ball with your hands. Put it on a crust sized piece of wax paper (14 x 14 inches more or less), flatten the crust ball some; put on top of it another piece of wax paper and chill it all in your fridge 15-20 minutes. Then roll it out and line a 9 inch pie pan with it.  Make sure you get the middle nice and thin; this crust can be tough to get the center as thin as the edges. Prick it all over with a fork to keep it from bubbling out and bake the empty crust at 375 for 10-12 minutes until light brown.  Let cool.

Lemon Filling:

Ingredients:

1/3 to ¾ cup sugar

1/3 plus 1 tbsp. corn starch

1 ½ cup water

3 eggs, separated; yolks for filling, save whites for meringue

1-2 tsp. lemon zest

½ cup fresh lemon juice

2-3 tbsp. clear corn syrup

3 tbsp. butter cut in small chunks

Directions:

Start oven heating to 400 degrees for browning the topped pie.

Mix the sugar and corn starch in a heavy bottomed medium sized saucepan.  Add the water, stirring.  Heat until it boils, stirring constantly, boil one minute, take off heat.  Beat yolks briefly in a small mixing bowl, then add the hot stuff slowly to it; half the hot mixture, stirring constantly.  Then dump it all back into the saucepan, bring to a boil, stir like a crazy person so it doesn’t scorch. Boil 1 minute at medium heat.  Remove from heat, stir in the lemon juice and zest and then stir in the butter.  Let it melt as you stir.  Glug in some corn syrup. Pour the hot lemon filling into the pie crust.  Top while still hot with the meringue you just beat up. Make sure you get the meringue all the way across the top and along every single edge. No cracks, no gaps. Bake it 10-11 minutes until light brown. Cool to room temperature and then chill for 2-6 hours.  Slice and serve.

Meringue topping

The three egg whites (or 4-5)

¼ tsp. cream of tarter

6 tbsp. granulated sugar (or 8-10 tbsp.)

Beat the whites and the cream of tarter until it is past the foamy stage, add the sugar half a tbsp. at a time beating on high until the whites are stiff and glossy.  This will take several minutes.

If you add one or two extra egg whites add another ¼ tsp. cream of tarter and add 2 tbsp. sugar for each extra white.

—————–

Brown Rice Flour Mix (Same as King Arthur Basic GF blend)
2 c brown rice flour

2/3 c potato starch

1/3 c tapioca flour

Originally posted March 2015, slightly revised in 2016, unchanged since then.

Cherry Sunrise Pie…an Easter Tradition

In a few days it will Easter, the day of baked ham, chocolate candy and dyed or decorated eggs…. For any holiday meal, I want dessert to be special yet not too heavy: an attractive fruit-based pie, but easy to construct and yummy: a tall bill to fill but this cherry sunrise pie checks off all those requirements.  The last time my sisters came for Easter Karen asked me to make it for the big meal and she melted my heart when she said it felt like Easter when we ate that pie! They chow down as they are cherry lovers plus my sisters especially like how light it tastes and how it doesn’t land like a heavy chunker in your tummy.  I share it so you can make it anytime you want an easy company dessert.   You should make it the night before, so it is chilled enough to eat by 1 pm.cherry sunrise pie

It has to have a gluten free crust for me and I have one we bought at Wegmans or if you are making it for the wheat eating public there are redi-made crusts out there that will make this so simple yet so delightful. I usually make gf scratch graham crackers ahead of time, so they set a couple of days before I crush most of them into crumbs for the crust; homemade is pretty easy and cheap and they taste phenomenal compared to store bought gf graham cracker crumbs. Just saying! I love eating the leftover crackers as cookies; so yummy.

Cherry Sunrise Pie

One pie crust: you can make it from an 8 oz box of gluten free graham crackers crushed and mixed with 1/3 cup melted butter and pressed gently into a 9-inch pie pan.  Bake at 375 degrees for 9 or 10 minutes.  Let cool completely before filling. Or buy one; they sell them at holiday times in the gluten free area in my local supermarket and at the local natural food store. Will save time to buy one…

Ingredients for filling

18 or 19 oz can crushed pineapple in own juice

1 21 oz can of cherry pie filling

1 8 oz pkg light cream cheese, room temp.

½ tsp vanilla

1 cup heavy cream

¼ cup powdered sugar

Directions

Drain the pineapple for 20 min; save the juice!  I used my microwave to gently warm the cream cheese; it has a softening setting for cream cheese which works perfectly. I unwrapped it and placed the cold slab on a small plate and warmed it on a very low heat until supple and smooth.  Dump in a mixing bowl, add 2 tbsp pineapple juice, the vanilla, 1/3 cup crushed pineapple, ½ cup cherry pie filling.  If you are smart you will mostly use the goopy stuff and not too many cherries.  Save them for on top! Next, stir this all together really well.

Then whip the chilled heavy cream in a separate bowl with an electric

mixer until soft peaks form, add powdered sugar and mix well with the mixer; be careful not to over beat it.  If it gets clumpy you went too far.  Fold this into the cream cheese mix until it isn’t streaky with white areas.

Gently spoon the filling into the pie shell, spread it out to fill the entire bottom.  I used a spoonula (blend of spoon and spatula) and smooth the top with a flat cake spatula.  I like to leave a sort of tiny ridge on the outer edge to keep the pineapple from spilling out onto the crust.  Then carefully pour the rest of the cherry pie filling in the center spreading it to cover ¾ of the top from the center out.  Finally, use a spoon to put pineapple around the outer rim of the cherry filling.  Chill at least 2 hours, preferably 4.  Cut and slice. No adornments are needed. It has a light fluffy consistency, and it isn’t that sweet.  Great to top off a big meal; not too filling and the fresh fruity taste is a spring treat.  Try it soon and you will be giving the recipe out afterwards! photo 1

I have no pictures of creating this pie; maybe this Easter I will take the time to snap a few and add them to this post at a later date.

This is about the seventh time I have blogged this recipe; first was in 2014. Been making it for like 20 years!

Chicken with Zucchini and Red Onions

This is a new combination of loved ingredients. I love the versatility of boneless chicken thighs. I like red onion for its mild but tasty results when lightly cooked. Zucchini is another versatile ingredient. I added lemon zest and juice, lots of crushed garlic and served it with capellini pasta. It is light but flavorful. Great for a midweek supper. I add a vegetable side or more likely a green salad to complete the meal.

NOTES: don’t make it too soupy: add enough broth to steam the veggies a bit. You could use pasta water for this purpose. Use 4 garlic cloves if you enjoy garlic a lot. If the oil is mostly gone after frying the chicken; add an equal amount more of oil and butter; maybe 2 tsp. more for sautéing the veggies. You can use more zucchini and onions if you want. Chose whatever pasta you enjoy although I like a long skinny pasta for this dish.

Chicken with Zucchini and Red Onions

Ingredients:

3 boneless chicken thighs

1/3 cup white rice flour mixed with 1/2 tsp. fine sea salt

2 Tbsp butter and a Tbsp of mild olive oil

one medium zucchini

a medium red onion or half a big one

3 or 4 garlic cloves

1/2 cup chicken broth

the zest of one lemon and after zesting, juice it

freshly cooked pasta

Veggies cooking

Directions:

I always pound out chicken before sautéing it; tenderizes it and makes it thin so it fries faster. I use 2 pieces of wax paper and a pounding hammer. Do this first; make sure it is no thicker than half an inch. After that do some more prep. I cut the zucchini in half the long way and then across into 1/3-inch-thick half-moons. Peel and slice the onion in half and then cut into thin slices top to bottom and then cut across in half. Try to not get them too thin. Zest the lemon and then juice it. I have an old-fashioned glass lemon/orange juicer.

Heat the butter and oil in a large nonstick frying pan. I have a new ceramic one that is 16 inches in diameter. I still could only fit 2 of them at a time as they get kinda big when you pound them out. Dredge the chicken in flour; add salt too before dredging. Lay two thighs in the hot oil/butter and cook about 3 inches on a side. When you take out the first one add the third thigh. I put the fried chicken into a low oval ceramic baking dish and put it in a 300-degree oven to cook slowly, make sure it reaches 165 degrees. By the time you add the third thigh you can probably turn your oven off. It will still cook on residual heat for a few minutes as you cook the veggies. Add the zucchini to the pan and cook a minute or 2. Add the sliced onion and cook another minute. Add most of the broth. Add the garlic and cook one more minute. The zucchini should be tender but not soggy. Add the zest and the lemon juice. Add the rest of the broth as needed. Add the chicken back to the pan and let cook one more minute. Adjust with salt and pepper as needed. Serve on pasta of choice. Enjoy!

Coconut Mounds Impossible Pie

Coconut Mounds Impossible Pie

This is my favorite coconut creation. I’ve made 3 different versions and this is my favorite. If I figure out another one to add I will let you know. It’s super easy and requires no fancy equipment or weird ingredients. No crust to fuss with. Probably any brand of gf flour will work. Otherwise it is all naturally gf ingredients. It doesn’t take more than 10 minutes to throw together and into the oven it goes for 43-45 minutes. I suggest that you allow it to set up for at least 4 hours. After two-three hours you could put it in the fridge to get it cold. If you prefer no chocolate just leave it out. I wonder what it would taste like with dark chocolate bits. Next time!

Ingredients:

2/3-3/4 cup sugar

3 large eggs

1/4 cup plus 1 Tbsp. of GF flour blend (I used KA basic gf blend)

1/2 c melted butter or 1/3 c liquid coconut oil

1 tsp. apple cider vinegar

1 tsp. vanilla extract

1 1/2 cup shredded coconut, sweetened version

1/4 c mini chocolate chips

a tsp of soft butter for coating the pie pan or soft coconut oil

Directions: Heat oven to 350 degrees. Butter a 9-inch glass pie pan. Melt the butter in the microwave in a Pyrex measuring cup. Put sugar and eggs into a mixing bowl, I used my stand mixer. I beat it for 3-4 minutes until it was thick and lemon yellow. Stop mixer, add in milk. flour, oil or melted butter, vanilla, and vinegar. Beat briefly to blend well. Fold in coconut. Pour half of this batter into the buttered pie pan, sprinkle with half the chocolate chips. Gently pour in rest of batter. Sprinkle with rest of chips. Put in oven on middle shelf. Bake 43 to 45 minutes until the middle is set and it is golden in color. Let cool fully 3-4 hours. Can eat either at room temperature or slightly chilled. Because of the custard, please store leftovers (if any!) in your fridge. Enjoy!