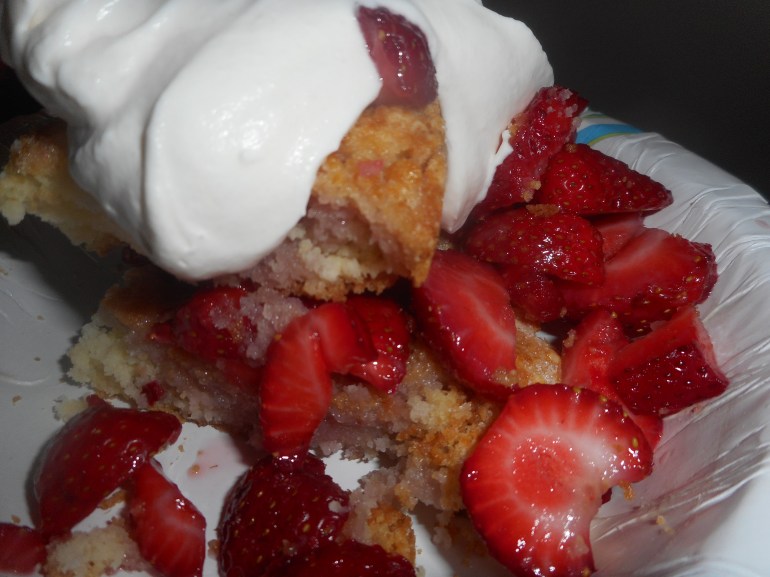
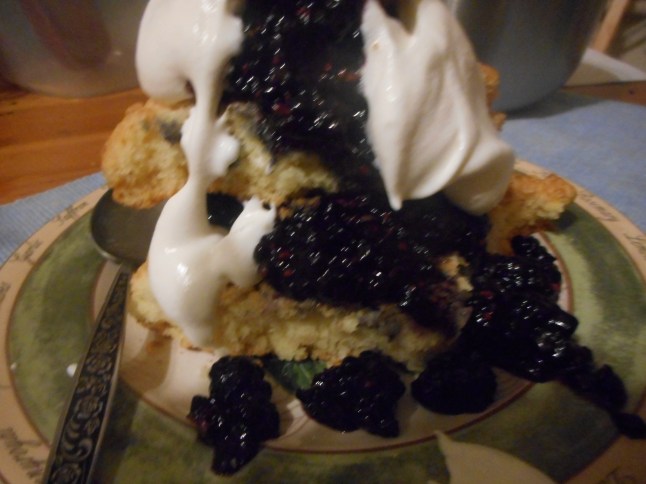
Mom’s Strawberry Shortcake 2.3 Version

I just have to share this recipe with you again.  It is just a classic and no one I know turns down homemade strawberry shortcake. We had it last Sunday.  I am not sure where I got the recipe…. my gf biscuit version is pretty tasty I have to say.

camping 6-16 005

This year’s biscuit was so flaky and tasty I could hardly believe it was gf and I am the one who made it!


But there is one thing, you gotta make it with the best freaking strawberries you can find.  None of those big firm ones with whitish cores that are shipped in from far away.  You need juicy ripe, scented red berries that can be chopped coarsely and mixed with sugar and served over shortbread.  Gluten free shortcake biscuit.  Yes, it can be made with other than local berries and it will taste great but local fruit make it fantastic!

My mom always made a gorgeous version of strawberry shortcake. When I was a kid she would serve it as the meal.  I have done that and it is kinda cool.  For that I made a huge oval biscuit that lay in my turkey platter with a smaller oval topping biscuit that I split off the big biscuit and buttered the split area before topping with berries and the smaller biscuit.  And more ripe berries.  Then a topping of softly whipped heavy cream.  Oh berry perfection.

Now I bake it in two separate pans but the construction of the final product is the same otherwise.  These pictures are from last June; my daughter snapped them as I put the shortcake together at a family gathering.  It is always a hit even with gf shortbread.  The shortbread I made this past Sunday was so good, I swear it could pass for my old shortbread… Feeds six or four piggie eaters.

Mom’s Strawberry Shortcake, GF2.3

Biscuit dough

1 cup white rice flour

2/3 cup potato starch flour

4 tsp. baking powder

1 tsp. baking soda

2 tbsp. sugar

½ tsp. salt
½ tsp. xanthan gum

6 tbsp cold butter

1 medium egg

2/3 cup buttermilk

2-3 tsp. sugar (optional)

2 tsp. soft butter

Other ingredients:

2 quarts ripe strawberries

½ cup sugar

2-3 tbsp. Karo light syrup

1 cup heavy whipping cream

½ tsp. real vanilla

2-4 tbs. powdered sugar (if you like your cream sweet)

Directions
Heat oven t0 400 degrees. Mix the dry ingredients in a medium mixing bowl. Cut in the cold butter until it is small pebbles.  Add the egg and most of the buttermilk.  Mix with a spoon; add rest of buttermilk if you need it.  It should be a bit sticky, don’t over mix; just until dry is blended in.  Spray the inside of an eight inch cake pan and a 6 inch cake pan with cooking spray.  If you don’t have a small pan just use two 8 inch ones.  Pat ¾ of the dough into the 8 inch; make it about ¾ to 1 inch thick and try to smooth the top and side edges a bit.  Put the rest of the dough in the smaller pan and do the same smoothing.  Make that one ½ to ¾ inch thick.  Optional: take 2-3 tsp. of granulated sugar and sprinkle it over top of them. I think it gives a great finish to the shortcake. Bake them about 20 to 25 min; the smaller one should be done in 20 minutes; a golden light brown. Set on a cooling rack for a few minutes.

While it bakes, get the berries ready.  Hull 2 quarts of fresh ripe berries.  Place them in a glass mixing bowl; chop through them a few strokes with a sharp knife.  Add ½ cup sugar and about 2-3 tbsp. Karo light corn syrup to the berries.  Stir well and refrigerate until the shortcake is baked.  You could do this berry preparation up to two hours in advance.  No more or they will start to disintegrate.

Place the fairly hot bigger layer on a large platter, one big enough to hold the shortbread and still have room for a generous overflow of strawberries. Butter lightly if you wish.  Top with several big spoonfuls of berries.  Don’t worry if there is juice in the berry bowl; there should be; melted down sugar and karo syrup with berry juice will give you a delish berry liquid.  Top with the second smaller biscuit and then more berries.   Cut into chunks.  Top with freshly whipped cream; beat a cup of heavy whipping cream until it is softly whipped.  Add ½ tsp. vanilla and ¼ cup sugar if you wish it sweet.  Be sure to pour the berry juice over your shortcake; it soaks in and adds to the strawberry experience.  My dad liked to pour unbeaten cream over his shortcake. My mom usually set out the whipped cream, a jug of cream and some whole milk so you could chose how to finish off your personal shortcake.  I might add that I grew up on a farm so this was raw milk from grass pastured cows; fantastic cream equaling a freaking perfect shortcake topper.  We also grew our own berries; no chemical sprayed on them ever.

camping 6-16 006

Forgive the paper plate: I was at my mom’s assisted living and I do paper to save on clean up time plus her sink is miniscule!

If there is any left over it makes a great breakfast the next morning…

Originally published in June 2014, again last June and now in late June.  I confess I could not find local berries on Sunday, I used organic ones and only used the ripest berries for this cake. So can you, just set aside any underripe ones as they are not great in a shortcake.

I am thinking blackberries might be good with this shortcake biscuit. Going to try them tonight!

Luscious Lemon Tart…A True Classic


Who doesn’t love a luscious fruit tart? But it’s the middle of winter.  What can you make that is fresh…seasonal?  2016 is my big pie year after all.  Gotta come up with something good.

How about a classic lemon tart? Lemons are in season, in fact, I have some fresh homegrown Meyer lemons my brother sent me from Texas.  And a couple off my man’s little lemon bush he grows in a pot, it is in his kitchen keeping warm for the winter.  Sweet!

Can’t think why it took me this long to make this wonderful yet very traditional lemon tart.  The recipe is fairly simple although you can’t step away from the stove while you cook the filling.  You must hang there and keep stirring or you are gonna have scrambled lemon eggs!  The crust is easy as they come; mix in mixer bowl and press into the pan, bake.  Done. Bam!

I am sure it would be just as tasty with the lemons from the grocery store but I loved being able to make a treat out of homegrown lemons.  This can’t be made with canned or bottled lemon juice; got to be fresh real lemons. I used the lesser amount of sugar and found it plenty sweet. And it is a great choice for anyone; use the crust you prefer, gluten free or not. Sure you could buy one similar to it at a bakery but this would surely wow your family when you say, “I made it myself!”

Some photos of the tart making process. I forgot to take one of the finished whole filled tart and there isn’t much left of it…so that ship has sailed… lemon tart 001

lemon tart 002lemon tart 003lemon tart 014

Classic Lemon Tart

1 pre-baked cookie crust tart shell (recipe at bottom of post) baked in removable bottom round pan.

2/3 cup fresh lemon juice

2/3-3/4 cup sugar

4 large eggs

2 egg yolks

1 tsp. grated lemon rind

½ tsp. lemon extract

½ cup butter cut into 4 chunks.

Directions; combine lemon juice, sugar, eggs, yolks in a medium saucepan and cook over medium low heat until thickened.  Stir constantly, don’t step away for even a moment.  When it thickly coats a spoon it should be done, do not let it boil.  The stirring process takes about 10 minutes.  Remove from heat and add the butter chunks, stir them a few moments and add the lemon rind and extract.  Stir the filling until butter melts.  Pour into a small mixing bowl and cover the surface of the filling with plastic wrap pressed right onto it.  Refrigerate until room temperature; 10-15 minutes.

Pour filling into cooled tart shell.  Refrigerate several hours until well chilled. Remove from tart pan and slice.  Recipe is from my new favorite source: Annalise Roberts latest cookbook, GF Baking Classics, The Heirloom Collection. If you love home baking and are gluten free it is a must purchase.

I like to serve it with a healthy dollop of Stonybrook Farm’s low fat organic yogurt.  The tangy fresh flavor of this topnotch yogurt makes a perfect contrast with the sweet lemon filling.  I served it like that to my mom and she thought it was some kind of special whipped cream.  It is that rich tasting even though it is low fat.  I can’t say enough about this yogurt.  I love it on other dessert treats: guilt free and surprisingly yummy. Great to cook with and to enjoy for a snack.

Crust

1 cup brown rice flour mix

¼ cup sugar

1 tsp. xanthan gum

5 tbsp. cold unsalted butter, in 5 chunks

1/2 tsp. vanilla extract

½-1 tsp. water

Mix the dry ingredients in a stand mixer, cut in the butter by mixing it at a med low speed until crumbly.  Add vanilla and mix well.  If it is really dry looking add the tsp. of water.  Press into the bottom and up the sides of your tart shell as evenly as you can make it. I suggest you spray the pan first with cooking spray and sprinkle it with rice flour. Do not press the dough in too hard or you will have a tough time digging out slices….

For this recipe I use a 9 inch tart pan with a removable bottom.   I think any low pie pan or tart pan will work.  Bake it at 350 degrees for 18-20 minutes.

Brown Rice Flour Mix  Identical to King Arthur’s gf blend.
2 c brown rice flour (finely ground)

2/3 c potato starch – Not potato flour!

1/3 c tapioca flour


Cranberry Crackle Tart: Light and Flavorful

I discovered this recipe on line, back before last Thanksgiving, at splendidtable.com. I loved the look and sound of it but didn’t find time to make it until last Christmas. Love at first bite. Like a fruit tart and a pavlova had a baby: this is the felicitous result. Light and delicate making it perfect after a hearty Thanksgiving feast. It is really guilt free if you eat it minus any toppings. I devoured it with vanilla ice cream on top at last year’s Christmas luncheon, nice flavor combination. I want to make one for Thanksgiving, maybe this time I will be serving it like you do a Pavlova, with lightly sweetened real whipped cream on top. Yumm!

It is really easy to throw together. If you are gluten free you can use the recipe provided below, which I adapted the splendid table recipe to make it gluten free. At holidays like Thanksgiving and Christmas Wegmans often has gf redi-made crusts. So does Frey’s Better Foods in Hellertown. If you are a wheat eater use whatever cookie tart crust you like. I added the cinnamon to my crust and found it added a lot to the complexity of the flavors. The crust absolutely needs to be prebaked before you put the tart together.

I should say I seldom use fresh cranberries; I generally make a fresh relish – old family recipe – for Thanksgiving but never got it made last November. So I had the bag of cranberries in the fridge in the fruit bin. Yeah, it sat there a month: I did have to pick through it (you always should) after I rinsed them and remove and squishy ones. There are usually a few of those mixed in and they aren’t great for anyone to eat. Let the picked over berries dry. Anyway, my point is; this tart is fantastic tasting even if you aren’t a huge cranberry fan.

I used some smooth raspberry jam (what I had) but you could probably use most any jam. Just chose one full of real fruit in a flavor you like as you can definitely taste the jammy flavor mixed in with the crust and the meringue topping. I loved it with raspberry jam, a favorite flavor for me.

crackle tart 006crackle tart 007

Sweet Cookie crust

Place the following in a stand mixer bowl and combine

1 cup GF flour (recipe below)
¼ cup granulated sugar
1 tsp xanthan gum
½ tsp. cinnamon
Add 5 tbsp cold butter, cut into 6-7 chunks. Mix on low until the butter is just crumbs blended in.
Add 1 tsp. vanilla extract and 1 tbsp water. Blend well.

Pour the crumbs into a ten inch tart pan that was sprayed with cooking spray. Or a glass pie pan. Spread it up the sides. Press gently in so it is a cohesive crust but do not press really hard or it will be like concrete when you finish baking it!

Bake at 350 degrees for 18 minutes. Set the crust on a rack to cool to room temperature. Do not let it get more than light brown.

Brown Rice Flour Mix (Same as King Arthur’s GF Blend)
2 c brown rice flour
2/3 c potato starch
1/3 c tapioca flour
Filling

2 tablespoons chunky cherry, raspberry or strawberry jam
2 large egg whites, at room temperature
Pinch of fine sea salt
1/2 cup sugar
1 1/2 cups cranberries (if they’re frozen, don’t thaw)
Confectioners’ sugar, for dusting

Directions: When you’re ready to fill and bake the tart: Preheat the oven to 300 degrees F.

Gently spoon the jam on top of the crust and spread it evenly over the bottom, I used the back of my big spoon for this operation. In a large bowl with a hand mixer, beat the egg whites with the salt at medium speed just until they are fluffy and fairly opaque. With the mixer going, add the sugar in a slow, steady stream, then keep beating on high until the whites are shiny and form definite peaks; they will look like marshmallow. This is a meringue.

Pour the cranberries into the bowl of meringue and, using a flexible spatula or spoonula fold them into the meringue. Try to distribute the fruit evenly, but don’t mix too much– you want to keep the meringue fluffy. Spoon the meringue over the jam and spread it to the edges, making it swirly if you’d like. The jam might push up around the sides of the meringue, and that’s fine. Don’t fret if it looks like not enough filling, it will puff up in the oven to fill the pie pan.

Bake the tart for 1 hour, at which point the top will be light beige and cracked here and there. (If you’d like more color, you can bake it a bit longer or even put it under the broiler.) I did not go there! Transfer the tart to a cooling rack and cool to room temperature. I did cut it while slightly warm and we all thought that was just perfection. If you’d like, and I do, dust the tart with confectioners’ sugar before serving. Whipped cream on top is also great.

Storing: The tart is best the day it’s made, although it’s still pretty nice the next day. Leave the tart at room temperature, covering only the cut part with a piece of wax paper or plastic wrap. I doubt you will have any the second day anyway. It is that tasty.

Cranberry Apple Tartlets: Company Dessert!

Truth is I never was a fan of cranberries, sure I eat cranberry relish at Thanksgiving and maybe Christmas and sometimes I drink cranberry juice but that is about all I ever thought those little red fruits were good for. In this past year I have tried them in a few desserts and they have been spectacular – great flavor and color, yes they are rather tangy but with a little sugar they are perfect.

cranberries

If you only have a few apples and some cranberries you can make a really special dessert. I used my flat bottom tartlet pans to make these elegant little tarts; each one is a separate dessert which makes for a special look. My mom gave me two tart pans a few years ago and I use them all the time; each pan makes 4 tartlets.

cranberry tartlets 003

This is a simple recipe; toss the fruits with sugar and a touch of tapioca. If you don’t have tapioca use some cornstarch or rice flour mix. The individual tarts look like I bought them in a bakery. I tried them with bits of crust for a rustic topping and the crumb version which I liked a bit better in the flavor department so I went with that.

cranberry tartlets 003cranberry tartlets 001

I served them the other day and my guy pleaded for one to take home for breakfast. He does not need to eat gf but he loves a great dessert. Serve these tartlets and I promise you no one will even believe they are eating gluten free!

Angie’s Cranberry Apple Tartlets
Makes 5

Start by making some gf pie crust and the crumb topping. If you have leftover crumb topping in the fridge you are ahead of the game for making pies and tarts!

Crust:
1 c plus 2 tbsp brown rice flour mix (at bottom of recipe)
2 tbsp sweet rice flour
1 Tbps. granulated sugar
½ tsp xanthan gum
¼ tsp salt
6 Tbps. cold butter cut into 6 chunks
1 lg egg
2 tsp fresh orange or lemon juice
Mix dry ingredients in bowl of stand electric mixer. Add butter and mix until crumbly and resembling coarse meal. Add egg and juice. Mix until it comes together into big chunks. Shape into a ball with your hands. Put it on a crust sized piece of wax paper (14 x 14 inches more or less), flatten the crust ball some; put on top of it another piece of wax paper and chill it all in your fridge 15-20 minutes while you prepare the filling.
Crumb topping:Put all four ingredients in the same mixing bowl you made the bottom crust in and mix well with mixer paddle until crumbs form.

¾ c brown rice flour mix
½ c sugar
½ tsp xanthan gum
1/3 c cold butter cut into six chunks

You will use less than a cup of the crumbs. Put the rest in a tightly sealing glass container and store in the fridge for your next pie/tart. It should keep for several weeks.

Heat the oven to 375 while you make the filling.

Filling
1 baking apple
1 1/2 cup raw cranberries
1/4 cup sugar
1 tbsp. granulated tapioca
1/4 tsp. cinnamon

Directions:
Peel, core, quarter and chop coarsely the cooking apple, put in a mixing bowl with the cranberries. Be sure to first wash and pick over the cranberries and remove any soft or iffy ones. Add the sugar, tapioca and cinnamon, mix with a spoon.

Roll out the crust into one big crust, lay it over the tart pans and use a knife to cut it into 4 pieces. Press, snip and fold to fit it into each of the small tart pans. Don’t make a big crust edge; not necessary, cut off excess dough. Re-roll the leftovers for a fifth tartlet.

Pour filling into the crusted tartlet pans. Sprinkle the tartlets with the crumb topping, I didn’t make a solid layer over the entire top; thicker in the middle. Place in the oven and bake 40-45 minutes or until bubbly and lightly browned. Cool at least 10 minutes. Serve warm or cold. Great with vanilla ice cream. Enjoy!

Brown Rice Flour Mix (Same as King Arthur gf flour mix)
2 c brown rice flour (finely ground)
2/3 c potato starch – Not potato flour!
1/3 c tapioca flour

Awesome Apple Crisp

Apples are the lynchpin of the fall harvest season. Some may think pumpkins wear the crown but I firmly believe the apple is king of autumn in America. Crisp, sweet, flavorful and so good for you. That old adage of an apple a day has some basis in fact. When you get tired of apples in the raw; try an apple crisp.  It is very simple because there is no crust to roll out or position over the apples.  Dump, sprinkle and bake: a 7 year old can make this if you cut up the apples for them.

jonagold apples pork tenderloin, banana choco cupcakes 004

If you can, get the organic ones as the sprays they use on growing apples are not at all good for you. I made this today with some Jonagold apples from a farm stand and it was very tasty indeed. I especially suggest you get your apples at an actual apple orchard if you want the most appley taste. South of Hellertown is Bechdolt’s Orchard which grows many apple varieties. Go there if you want the freshest tastiest apples in this geographic area. Apples grow all over the globe so you shouldn’t have problems getting them just picked! The variety is up to you but I would not suggest any that are not meant for baking; don’t use red delicious as they are for eating only, same for honey crisp apples.

This recipe is out of Gluten-Free Baking Classics Cookbook by Annalise G. Roberts with a few minor changes. I am betting you can use any GF flour mix in this recipe, crisp is not like a cake or other baked goods that have very specific flour requirements.

I have made the topping several ways. You can cut un-melted butter into the dry ingredients; it makes for a firmer crumb than the melted version below. I have made it egg free but it really somehow needs that egg to pull it together to mimic a wheat flour based crisp. The oats can be left out if you don’t like them or can’t eat them. I personally love oats in my crisp. A quarter cup of chopped nuts can be added to the topping; really a nice touch too. I don’t like it too sweet so I use the lesser amount of sugar. This is entirely a personal choice. You can up the nutritional value by adding flaxmeal to the dry mix; 2-3 tbsp.

pork tenderloin, banana choco cupcakes 007

For those who love ice cream, this recipe is absolutely perfect with a big scoop of vanilla ice cream next to it. I like it warm from the oven but it also is tasty cold the next day, if you have any left over that is!

Angie’s Apple Crisp

3/4 cup GF flour (mix below)
½ to ¾ cup sugar (I prefer brown sugar)
½ cup old fashioned gf oats
1 ¼ tsp baking powder
1 tsp cinnamon
Sprinkle of nutmeg
½ tsp xanthan gum
½ tsp. salt
1 large egg
6 cups thinly sliced apples
¼-1/3 cup butter, melted

Directions:   Heat oven to 350 degrees. If your oven seems slow make it 375 degrees. Put a rack in the center level of oven. Lightly butter a 9 inch square pan or spray with cooking spray.

Combine all the dry ingredients. Add egg and stir to mix well. Place apples in the baking pan, top with the dry mix and sprinkle with the melted butter. Bake 40-50 minutes until bubbly and the topping is lightly browned. Let cool at least 10 minutes before dishing out. Six servings.

Brown Rice Flour Mix (same as King Arthur’s GF blend)
2 c brown rice flour (finely ground)
2/3 c potato starch – Not potato flour!
1/3 c tapioca flour