Browned Butter Wedding Cake Cookies

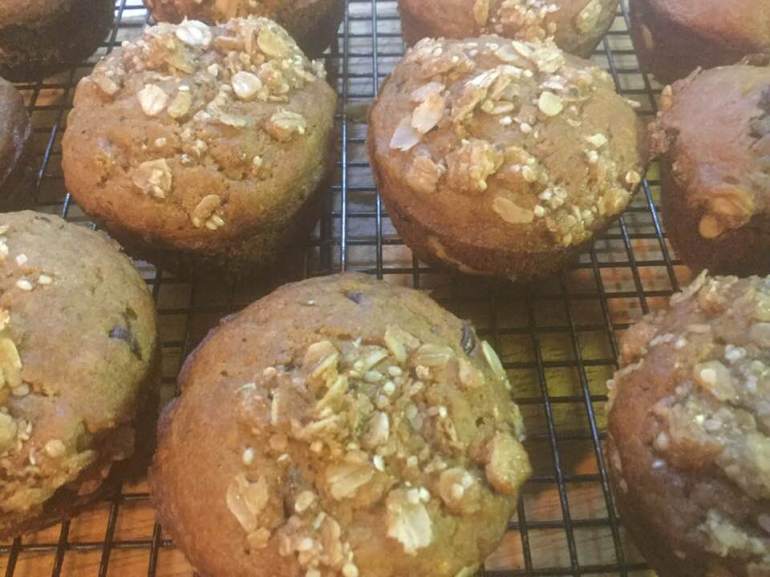
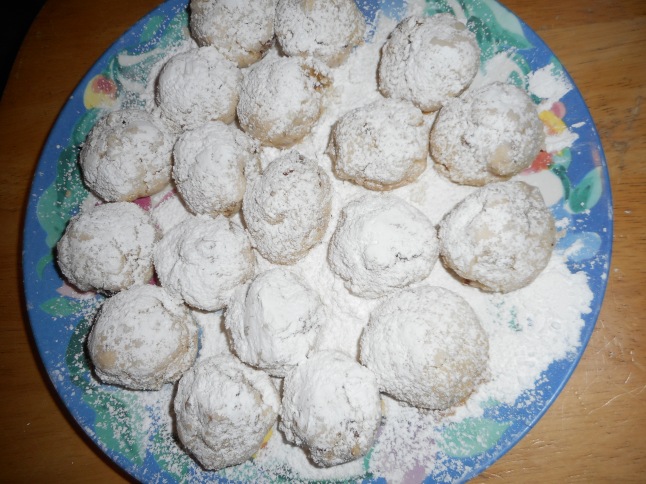
These miniature snowball cookies were the foundation of the Christmas cookie baking when I was a kid.  They were always made every year, sometimes a second batch had to be baked as we ate them all before the big day!  You can use pecans but I rarely do; walnuts are cheaper and I sort of prefer their flavor.  Some people call them Mexican Wedding Cookies but we generally called them Russian Teacakes…but today I am giving you a variation I plan to try this Christmas baking season. I am making them with browned butter today! No change in ingredients; one extra step.

For me it is not Christmas without these cookies so I was extremely pleased to find a great gf recipe. My sisters think they are better tasting than the old regular recipe!

They are super easy to make with not too many ingredients.  Be careful lifting them off the pan as they are delicate until fully cooled. The texture and subtle flavor of this GF version is actually superior to the wheat flour recipe of my childhood. When you bite into one it shatters into a delicious mouthful of sweet cookie. They are delightful with a cup of tea or coffee.  My family clamors for a few to take home!

If you like them really sweet sprinkle on extra powdered sugar, less of it makes them perfect for those who are not used to too much sweetness. No one will ever know they are GF and you will get complements on their flavor and texture.  This recipe is from Annalise Roberts’ fabulous Gluten-Free Baking Classics with some minor changes by me and the browned butter idea which comes from Bon Appetit.  Enjoy: they are rather addictive cookies!

xmas cookies 006

Browned Butter Wedding Cake Cookies

1 cup salted butter, room temperature

6 tbsp. powdered (confectioners) sugar

2 tsp. vanilla extract

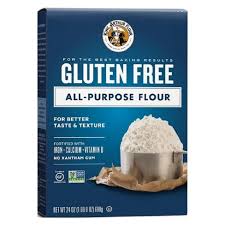
2 cups brown rice mix (King Arthur basic blend or see recipe below)

1 tsp xanthan gum

1 cup walnuts or pecans chopped fine

Confectioner’s sugar for sprinkling

Directions: Heat butter in a heavy sauce pan; swirl it around and NO NOT walk away! It can go from yellow to dark dark brown in a few seconds so stand there and watch closely until it gets lightly brown and then pull the pan off the heat and immediately pour into  your stand mixing bowl. Let it stand until it is mostly congealed into a solid mass. Then beat butter and powdered sugar in large bowl of stand mixer until light and creamy.  Add vanilla, beat in.  Add flour and gum, mix in until well blended, stir in walnuts until distributed.  Chill dough for an hour.

Heat oven to 350 degrees.  Form dough into 1 inch balls. Roll in powdered sugar if you like.  Place on cookie sheet lightly sprayed with Pam (not the baker’s version that has flour).  Place about 1 ½ inches apart.  Bake 13 to 15 minutes until lightly browned on top and bottom.  Cool on pan for 5 min and then sprinkle with lots of powdered sugar before placing on wire rack to cool. I like to sift it onto the cookies so the coating is even.  You could put a sheet of wax paper under the wire rack to catch the excess sugar.  Store well wrapped: in airtight container, in fridge for a week or freezer for up to 30 days.  You could store unbaked dough in fridge for a few days.

Brown Rice Flour Mix base mix  (same as King Arthur gf blend)
2 c brown rice flour

2/3 c potato starch *not potato flour

1/3 c tapioca flour

Note: This wonderful cookie was first posted December 2014 on my blog.  Minor revisions have been made since then.

Fig and Cheese Galette

Yeap…another fig recipe. Sorry, but I still am harvesting the sweet beauties and this new recipe is my favorite dessert to bake right now. A delicate and not overly sweet treat. My figs are small so I used like 14-16 of them, at least! But use store ones if you don’t grow them and if they are big; cut the figs in thirds.  It goes together pretty quickly if you use your stand mixer to blend up the pastry crust. My old recipes used goat cheese but cream cheese is a less tangy choice and reminds me a bit of cheesecake. I softened my cream cheese in the microwave. Don’t worry if there are some tiny lumps in the filling after beating but do soften it close to room temp for best blending results.  One time I used an egg wash on it and one baking version I didn’t. More sugar sticks onto the crust if you use the egg wash. Just saying it helps but if you don’t want to you can get away with not doing that step.

Fig and Cheese Galette

Crust:

1 c plus 2 Tbsp. brown rice flour mix (at bottom of recipe)

2 Tbsp. sweet rice flour

1 Tbsp. granulated sugar

½ tsp xanthan gum

¼ tsp salt

½ tsp. cinnamon

6 Tbsp. cold butter cut into 6 chunks

1 lg egg

2 tsp fresh orange or lemon juice

Line a 15 inch pizza pan with parchment paper.  Can use a thick cookie sheet; preferably with edges. Done it both ways.

Mix dry ingredients in bowl of stand electric mixer.  Add butter and mix until crumbly and resembling coarse meal.  Add egg and juice.  Mix until it comes together into big chunks.  Shape into a ball with your hands. Put it on a crust sized piece of wax paper (14 x 14 inches more or less), flatten the crust ball some; put on top of it another piece of wax paper and chill it all in your fridge 15-20 minutes.  Then roll out and put on the parchment lined pan; put back in the fridge while you prepare the filling.  You can make this crust and refrigerate it for hours or a day; will need to warm up for a bit before rolling out. Get it out first and let it stand a bit. No microwaving though!

Filling:

12-16 small figs or 6-8 larger ones

8 oz light cream cheese, room temperature

1-2 Tbsp. fresh lemon juice

1/4 cup light brown sugar

1 large egg

½ tsp. cinnamon

Sprinkle nutmeg (optional)

Zest of a lemon

————————

1 medium or small egg; beat up to make an egg wash

1 Tbsp. coarse or turbinado sugar

Directions: Cut your figs into halves or if large, thirds or quarters.

Cream cheese filling: put softened cream cheese in medium bowl. Add brown sugar, cinnamon, optional nutmeg, lemon juice; blend with whisk, add egg and blend well. Zest the lemon with either a fine grater or better yet a loop zester that will give you longer strands. I like to do it onto a sheet of wax paper; add to well blended filling.  It is smart to zest your lemon before you want to juice it for the filling and crust.  If you have time chill the filling for 10-15 minutes before compiling the tart.

Get out the tart crust and pour the cream cheese filling in the center. Leave 1.5 inches of plain crust around the edge, put fig halves gently all over the cheese filling, cut side up, leaving no big gaps, not touching them but with a bit of filling between them. Fold up the edges of your crust and pinch together to create the galette shape. Try not to let it crack at the bottom; pinch and fix those cracks! Use a pastry brush to brush the crust with the egg wash. Sprinkle the coarse sugar over it all including the crust.  Bake for 35 to 40 minutes in a 375 degree oven.  The crust should be lightly browned and filling almost bubbling. Let your tart rest a bit; don’t serve hot but a warm slice will be awesome.  Slice and top with a big dollop of crème or yogurt if you like that sort of thing.  We ate it plain – which is actually my favorite way to appreciate the flavors of this awesome tart. I am wondering if coffee ice cream might go great here… Enjoy! fig tart slice

fig tart cutBrown Rice Flour Mix (same as King Arthur All Purpose GF blend)

2 c brown rice flour

2/3 c potato starch – not potato flour!

1/3 c tapioca flour

The crust recipe is from Annalise Roberts great cookbook, GF Baking Classics, Second Edition.

GF Flour Choices and a Few Personal Words….

Wanna know what flour blends I favor? It took me a few months or maybe years to figure this out for my cooking style. First, I bought a zillion weird and a few typical gf flours. Tried to bake with each and every one of them. Found out a few kinda suck and stopped using them. Others are used infrequently but have real value for a few recipes that they match to. If you are new to gluten free or just trying to get into baking gf this post is for you.

My favorite blend is King Arthur’s Gluten Free All-Purpose blend; made of three flours; brown rice, potato starch and tapioca flour. It is versatile. It makes great pie crust that my family really loves. I use it in most of my muffin recipes. I use it for gf pasta making and for cookies that wow.  Get some and give it a try. I actually make my own blend (same exact blend as KA’s basic all-purpose flour) as it is cheaper but you can buy it at your local grocery store in a  box.


king arthur flour

Another blend I like very much is Better Batter, the copycat version you can find on glutenfreeonashoestring. I make a batch and keep it in the freezer so it stays fresh. Great for quick breads, desserts and pastries.

If you want a cup for cup replacement flour there are some good options; Cup 4 Cup or King Arthur’s Measure for Measure flour.  They can be used in your favorite recipes for the most part.

king arthur flour

white rice flour

White rice flour or cornstarch work well for breading things and thickening. I always keep both on hand. Ditto for tapioca flour which I use in my blends and some other recipes. Gotta have it available. I also keep sweet rice flour to use in my main blend and in a few recipes. It adds flakiness in my pie crust. Potato starch is great in my basic blend and a few other blends/recipes. Another must have.

I use sorgum flour in a number of recipes including my delish buttermilk pancakes. It has a nice flavor compared to things like quinoa flour or bean flours. Uggh on them! I still have some in my freezer but I NEVER willingly use them. I do have some chickpea flour but rarely have a need for it.

Occasionally I use teff flour; in small amounts. It makes breads darken and seem like rye or pumpernickel breads.   But, it can give a muddy flavor if you use too much. Coconut flour is another flour I keep in the freezer but only use occasionally.  It can dry out a recipe if you use too much so  use sparingly.

I just got some cassava flour to use to make flour tortillas.  I hear it is fantastic.  I’ll let you know how that goes…

My suggestion is that you start with one or two blends and a couple single flours that can be used in combination. I rarely ever use just one flour except for breading or thickening. A great blend is critical.

Don’t let all the flour choices discourage you.  Try a few and find out what works for you. Some need to be frozen or refrigerated especially if you don’t use them up rapidly; check for that storage information so your flour blend that costs a lot doesn’t get rancid on you.  Have fun!

A personal note. I am sorry I haven’t blogged much lately. Been struggling somewhat. I was diagnosed with breast cancer in July and had a partial mastectomy in early August. On the first of October I started radiation therapy and it has sucked my energy and focus away from most of my enjoyable hobbies including this blog. I hope to feel better soon; 3.5 more weeks to go! At least I won’t lose my hair, LOL! I have done a bit of baking and cooking but due to my low energy I seldom can find it in me to write. This will change in November I hope.  Peace and happy gf cooking!

Pear Cranberry Rustic Tart

A friend gifted me some homegrown pears. What delish dessert to make? How about a rustic tart? I was time limited so no time for a raft of cute little tartlets that had to have their crust rolled out one at a time and fitted into the 4 tartlet pan. Good plan. Then, I added some frozen cranberries to zing it up. Plus a touch of cinnamon and allspice. And a sprinkle of glittery sugar to fancy it up.  Just delish!

I used some small Moonglow pears, another good choice would be bosc pears, just make sure they are within that narrow  ripe pear window; not under ripe and not squishy.  The holy grail of pears; that moment of ripe before they go bad.  That. They need to be peeled, cored and then chopped, in that order. Especially bosc pears; their skin is not tasty but the are great for baking with.

pear cranberry tartPear Cranberry Rustic  Tart

First, make the crust and chill it a bit while you peel, core and slice the pears

GF Pie Crust:

1 c plus 2 tbsp brown rice flour mix (at bottom of recipe)

2 Tbsp sweet rice flour

1 Tbsp granulated sugar

½ tsp xanthan gum

¼ tsp salt

6 Tbsp cold butter cut into 6 chunks

1 lg egg, room temperature

2 tsp fresh orange or lemon juice

Mix dry ingredients in bowl of stand electric mixer.  Add butter and mix until crumbly and resembling coarse meal.  Add egg and juice.  Mix until it comes together into big chunks.  Shape into a flat fat disc with your hands. Put it in a pie bag, on a large piece of sturdy plastic or on a crust sized piece of wax paper (14 x 14 inches more or less), put another piece of wax paper on top and chill it all in your fridge 15 minutes

Filling;

3 -4 cups peeled and chopped pears

2/3 cup frozen or fresh cranberries

1/4 cup sugar

1 Tbsp. granulated tapioca

1/2 tsp cinnamon

1/8 tsp. allspice

a sprinkle salt

Mix dry ingredients; add to the fruit in a bowl, stir and let sit while you roll out the crust.

Directions: Roll out the somewhat  chilled crust between the two sheets of wax paper into a disc; maybe 14 inches, try to get the thickness even, no thick middle! I use my pie bag as it works great. Peel off one side of paper and place on pan, centered.  Remove other slice of wax paper or plastic.

Using a big spoon place your filling carefully on the crust but leave a 1 ½ inch border of crust untouched all around the fruit. Fold that excess crust up to make walls around the fruit filling. Sprinkle with 1-2 tsp. chunky sugar.

Bake at 375 degrees for 35 minutes; golden brown crust and a bubbling, cooked looking filling.  Cool at least an hour before cutting. Great with a scoop of vanilla ice cream!

pear tart slice

Took this by candlelight outside on my back porch just before taking a bite! MMMMM


Chocolate Chip Banana Muffins With a Surprise Inside!

A few years ago I combined my chocolate chip muffins with my classic banana nut muffins to create a lovely sweet snack.  When I made a batch of them yesterday I decided to move the streusel from the top to the insides of each muffin because so often bits of the topping can come off especially after they have been frozen. I thought that this way it is safely trapped inside the muffin for a sweet surprise.

Success: they are perfect in texture, moisture and totally yummy with that bit of streusel filling that goes so well with the chocolate chips.  I left out my usual half cup of chopped walnuts; add some if you like…I was out of walnuts and wanted to keep it a bit simpler.


I don’t include a picture of the inside of a muffin as it really doesn’t photograph the filling very much; just bite into one and you will know it is there.

muffins, stuffed big pix

Chocolate Chip Banana Muffins

2 cups brown rice flour mix (see below)

2/3 c granulated sugar or coconut palm sugar

1 tbsp. baking powder

1 tsp. baking soda

¾ tsp xanthan gum

¼ tsp salt

1 tsp cinnamon

3/4 to 1 c packed ripe mashed banana

¼ cup mini chocolate chips and ¼ cup dark chocolate chips (or any combo of chips that adds up to 1/2 cup total)

2 lg eggs beaten

½ c milk plus 2 tbsp extra if you use coconut sugar, 1 or 2 percent

½ c canola oil

————————————-

Filling

½ cup old fashioned oats

¼ cup brown sugar

2 tbsp. hemp hearts or almond flour (I used hemp hearts this time; awesome!)

½ tsp. cinnamon

2 tbsp. butter

Mix filling dry ingredients, rub butter in with your fingertips.

——————————–

Muffin directions:

Heat oven to 350 degrees, placing the rack in middle of oven.  Spray muffin pans with cooking spray.  One batch makes about 14 or 15 muffins.

Mix all dry ingredients in bowl of stand mixer or big bowl.

Add bananas; stir to coat them with dry mix, then add the chocolate and stir briefly.

Combine milk and oil.  Add liquids and the two eggs to bowl. Stir on low until well blended.

Fill muffin pans 1/3 full.  Sprinkle with filling and top with another glop of batter to fill the pan about 2/3 to 3/4 full.  It doesn’t have to look perfect; the batter will rise and swallow up the streusel into the heart of the muffin.  I had a bit of filling left over so I sprinkled it on top of half the muffins. That looked great too!

Bake 20-22 min until golden brown. Do not overbake or they get dry.  Remove from oven and let cool 5-6 min before gently turning them out from the pans to cool on a rack. I use a butter knife to release them by running it around the edge once before tipping them out. They freeze well for up to 3 weeks.  They keep in my ceramic muffin/cookie jar for a few days.   muffins, stuffed, baked

Brown Rice Flour Mix   *same as King Arthur’s GF flour blend
2 c brown rice flour

2/3 c potato starch

1/3 c tapioca flour

Note: This muffin recipe is my third generation version of the banana muffins from Annalise Roberts’s wonderful cookbook: Gluten Free Baking Classics.