Fig, Goat Cheese, Pancetta and Carmelized Onion Pizza

I have been picking dozens of figs most days in recent weeks. Getting creative in my cooking in order to use up this bounty and so I’m enjoying them in lots of new dishes. Pinterest is my closest bud these joyous weeks of fig festival in my tiny kitchen. Last Friday I whipped up my favorite gf pizza dough baked it for ten minutes and flipped it. Then came the toppings. Never had figs on a pizza, but won’t be the last time! My fridge held some pancetta which is uncured Italian bacon that was purchased at Aldi’s for a rediculously low price, as was a container of tiny fresh mozzarella and a log of herbed goat cheese. Some onions which I carmelized and Bam! My oven produced an amazing treat for supper. I felt like I was in Italy at a small restaurant enjoying the local fare!

Note to all, my computer croaked the end of last week so I am typing one finger on my tablet, no access to Word either. So my apologies for any and all  mistakes in my last post or in this one. Normally I am constantly double checking names, products and prior posts as I create a new post. Not so much of that here in this laborious tablet production.

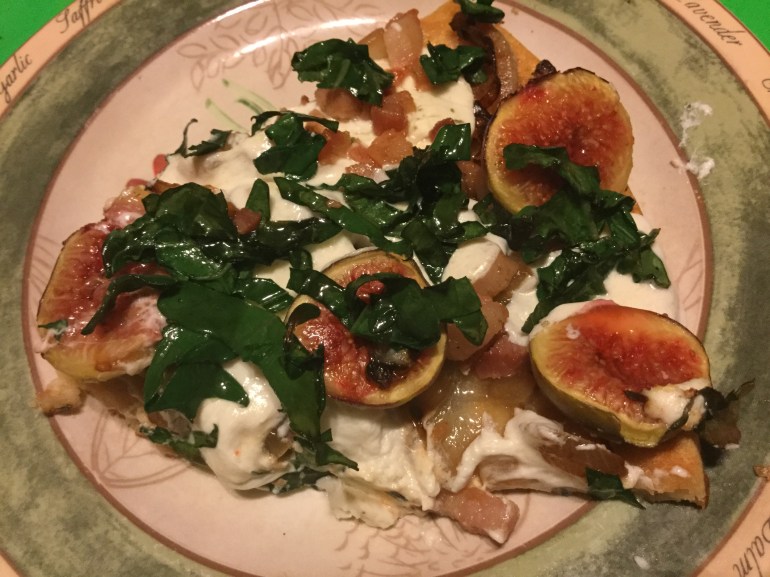
I promise this pizza is going to change your taste buds into fig pizza lovers. One more great fig recipe discovery. I took elements out of several recipes to create this delightful dish. It went together really quickly. Enjoy!

PS, it was still great warmed up the next day but with two or three hungry folks, there won’t be any leftovers.


Angie’s Fig and Goat Cheese Pizza

one large gf pizza crust. See my previous pizza post or use your own recipe.

8-12 ripe fresh brown figs

4 oz. herbed goat cheese, Aldi’s has a great goat cheese at a super price

most of a pint container of fresh tiny mozzarella cheese balls

2 good sized onions

1 Tbsp. EVOL

2-3 ounces pancetta, Aldi’s has a small container, already chopped

a big handful of kale shredded finely

Directions

Slice the onions into rounds. Heat EVOL in a cast iron frying pan, add onion slices. Cook over medium low heat stirring often so it doesn’t burn. Cook 8 -15 minutes until carmelized. Set aside on a plate. Add pancetta to same frying pan and cook a few minutes to render out the fat. Do not overcook. Remove from pan to a small bowl. Add the kale to the frying pan and cook on low a few minutes until it wilts, stir often. Let cool.

Heat oven to 425 degrees. Slice the goat cheese into thin rounds, cut the mozzarella balls in half. Slice the figs in half or quarter them if large.

Assemble: spread the carmelized onions evenly over the partially baked crust. I like to flip the crust before topping. Spread the goat cheese slices evenly over the surface,  Scatter the mozzarella cheese between the goat cheese and top with the cooked pancetta. Then scatter the fig pieces evenly over it.  Evenly is so every slice has a decent amount of both cheeses and the other components.

65E9A88F-5495-46E1-9F79-38851BC15477

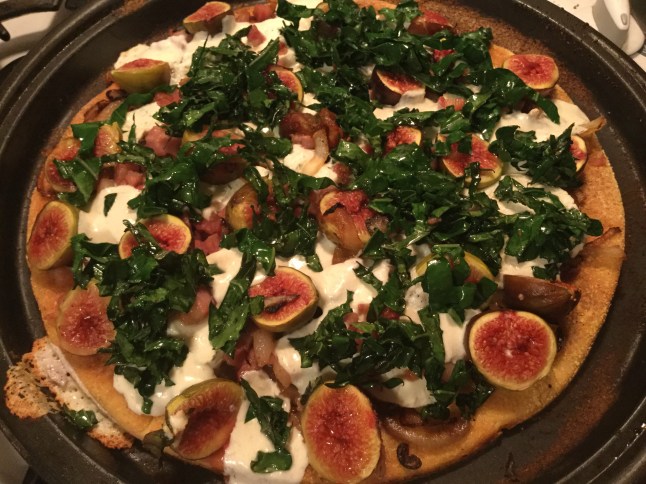
Bake pizza 8-10 minutes. Scatter kale over the top. Let stand 3-5 minutes before slicing and serving. If you can stand that long of a wait to enjoy your masterpiece of a pizza!CFF4F2B8-6D22-4AE6-94C7-A13B6222B266


German Plum Tart, GF 2.0 Version

I love juicy ripe plums eaten out of hand but seldom bake with them.  This is one of the only recipes I make gluten free with blue plums; these are those oval plums, sometimes called prune or Stanley plums that are only available for a few weeks in the early fall.  They are inexpensive, not too sweet and they get soft and purply delish in this simple tart.  It is modeled after some German fruit tarts I had enjoyed in my wheat loving past life.  I think it replicates them quite well.  I posted this last year but wanted to share it again. This time I found really huge Stanley plums and tried them instead of the small ones I have always used in the past. They were great so you can definitely go with either size of oval plum.  I think you could make it with round plums but I do think the oval ones have more flavor and are more suited to baking than round eating plums.

I use my favorite homemade cobbler mix which makes this really simple.  I will put the mix recipe down at the end of this post.  I keep it in my freezer and one cup makes great cobbler or works as this tart base. To this particular batch I added a couple teaspoons of dried lemon peel powder.  This ingredient is made of lemon peels rolled in sugar and dried, leftover after make homemade lemoncello liquor.  They become powder after a few moments in my spice blender. The fine powder adds a subtle lemon flavor but its okay; you don’t absolutely need it to make this recipe work.  It is in the original recipe but I never bothered before to make some even though I had the dried lemon peels.  The addition is great and if you can add it you won’t be disappointed.

A few instructions to assist you if you make this tart: I cut up the plums first and sprinkle them with sugar, let them stand while I mix the dry stuff up and then stir up the wet items in a small mixing bowl.  If you want it lower in sugar just leave off that sprinkle here; it will still taste great.

Be sure to use a 10 inch tart pan; if you made the tart in a 9 inch one it may well spill over and burn on the bottom of your oven which is never a good thing. You could also use a 9-10 inch pie pan as a baking dish.

plum tart 2017

We like it with a small scoop of vanilla ice cream on the side. It is fine all on its own.  Makes a great breakfast too with a cup of coffee or tea.


Fall Plum Tart

1 cup cobbler dry mix; recipe below

¼ c sugar – mix these together

—-

2 eggs

3 Tbsp. buttermilk

2 Tbsp. melted butter

1/2  tsp. vanilla

1/2  tsp. almond extract

————-

1 ½ lbs prune plums (enough to cover the entire tart pan) cut in halves or quarters. I used 9 large ones for this most recent tart.

Mix them with 2 tbsp sugar

Directions:

Heat oven to 350 degrees. Mix two dry ingredients in a small bowl.

Spray a 10 in deep tart pan with cooking spray, could use a 9-10 inch pie pan as a substitute baking dish.

Beat eggs in medium bowl, add rest of wet ingredients, mix well, add to dry ingredients, stir the batter briefly to fully blend.  Pour into the prepared pan and spread it out with a flexible spatula.  It often just spread great if you tilt the pan a bit – the batter will spread all on its own. Top with plums, cut side up, push each in slightly into the batter and cover the entire surface of tart base. Sometimes I cut up a few plums and fit the chunks in around the halves but this time I didn’t; works either way.


Bake 30 min.  Top with mixture of 1 ½ tsp sugar and ½ tsp cinnamon

Bake 3-8 more minutes or until top looks done.


Cool somewhat before slicing/serving.


Dry Cobbler Mix


2 ¼ cups white rice flour

½ cup potato starch

½ cup tapioca flour

1 tsp. baking soda

4 tsp. baking powder

1 tsp salt

1 tsp. xanthan gum

1/3 cup sugar


Reposted from my blog, originally October 2014, minor changes to text, recipe the same.

Chocolate Chip Cookie Perfection

Searching for the holy grail of GF cooking: chocolate chip cookies.  Bet you thought I was going to say some sort of bread!  That’s another post entirely.  Anyway, when I went GF 4.5 years ago I made a batch of chocolate chippers that were gf. They were rather sweet and didn’t taste all that great.  I didn’t give up, I keep looking.  Recipes seemed to require that I buy weird vegetable shortening or use Crisco.  Or they used odd flours and just not worth it to me to add another flour mixture just for one cookie.  So I had not made them in 3 years.  Missed them….desperately.  Store ones are small, hard, drab in flavor and incredibly pricy.

So about a year ago I went to King Arthur’s website and looked in their cookie recipes.  There it was: cookies made with the same flour blend I use and made with butter, one of my few chosen shortenings.  Why the heck didn’t I look there a year ago?  Probably because I didn’t realize they had many gf recipes until that summer when I asked and was directed to their cache of gluten free baked treats. I went to the comments as they can be telling as to the truth of whether a recipe is worth actually making.  Glowing reviews and advice; make them and refrigerate a day or better yet, freeze them formed and ready to bake in a few minutes.  Words about how much they are like Tollhouse cookies, great texture and flavor.  Bingo, this seemed so hopeful.

Less than a week later I made up a batch; 2/3 with walnuts and 1/3 nut free for my nut hating friends.  Froze them all on trays and then into freezer bags except one tray to bake.  Made those and tested them on my friend Josh who came to supper.  Goal scored; perfect brown sugar nutty flavor and texture; not too hard or too soft.

spicy-tomato-jam-005

I put some in my cookie jar, closed it tightly and 4 days later those cookies (what remains) are still delicious. That is pretty long for a gluten free baked good. By the fifth afternoon my last cookie in there was getting soft so suggest not holding them for more than 4 days in a jar. I love that they can be frozen ready to bake in like 12 minutes.  If I have time I let them defrost on the cookie baking sheet before they go in the oven so they spread out nice and thin.

I have made a couple batches since then, always bakes up so scrumptious. Cookie perfection!

So, if you are still looking for a great gf chocolate chip cookie look no further: http://www.kingarthurflour.com/recipes/gluten-free-chocolate-chip-cookies-recipe.  Enjoy!

Originally published on my blog one year ago, September 2016.  A few minor changes.

Peach Crumb Pie

It is near the peak of peach season so get some peaches and whip up a delicious gluten free peach pie.   This is an easy pie to create.  Slice and dump together the filling, crumb topping made in unwashed mixer bowl you used for bottom crust. You can store any leftover crumb mixture in a sealed container in the fridge; it keeps a few weeks.  I let my mix spin a few more moments in the stand mixer for extra big crumbs for this pie; love that look. If you prefer a solid crust just double the crust part and top your pie with it.  Be sure to cut some slits for steam escape! And if you don’t have time, buy a ready-made crust but homemade is always best.

Please make every effort to use local fruit; can get peaches at orchards like Bechdolt’s near Springtown, at most farm stands and at farmer’s markets; one on Saturdays in Easton or Sunday’s in Hellertown.  This pie really showcases great tasting peaches. If you use lousy peaches your pie will taste crummy. But, here’s the thing: store peaches can be poor in flavor and texture due to improper chilling so I strongly suggest you buy only locally grown, sweet, ripe peaches to make your pie.  I love when they have a pink blush; it makes the pie so pretty and perhaps even tastier!

peaches      raspberry-jam-014

To peel easily; heat 3 inches of plain water, drop the peaches gently in 4-5 at a time and cook them 2-3 minutes.  Use the lesser time for more ripe peaches. Allow to cool somewhat before peeling.  I like to do that over a bowl to catch the juices as I slice each peach.

Bake and enjoy late summer in a pie in just a few minutes of work.  Don’t eat it hot; it should be cooled to just warm if you like it so or room temperature or even a bit chilled.  You could certainly serve this with vanilla ice cream.  And this pie works perfectly with fresh nectarines, bonus: no peeling required!


Angie’s GF Peach Crumb Pie

Crust:

1 c plus 2 tbsp brown rice flour mix (at bottom of recipe)

2 tbsp sweet rice flour

1 Tbps granulated sugar

½ tsp xanthan gum

¼ tsp salt

6 Tbps cold butter cut into 6 chunks

1 large egg

2 tsp fresh orange or lemon juice

Spray 9 inch metal pie pan with cooking spray, dust with white rice flour.

Mix dry ingredients in bowl of stand electric mixer.  Add butter and mix until crumbly and resembling coarse meal.  Add egg and juice.  Mix until it comes together into big chunks.  Shape into a ball with your hands. Put it on a crust sized piece of wax paper (14 x 14 inches more or less), flatten the crust ball some; put on top of it another piece of wax paper and chill it all in your fridge 15-20 minutes while you prepare the filling.

Filling:

6 cups sliced fresh peaches, peeled and cut in thick slices, place in medium bowl

Mix with:

½ cup sugar

1/4 tsp. cinnamon (optional)

3-4 Tbsp. quick tapioca

Stir in 1 tbsp. fresh lemon juice and ¼ tsp. almond extract

Let stand while you prepare the crust.

Roll out pie crust in a pie bag or between two sheets of wax paper, try to get the thickness even, no thick middle! Peel off one side of paper and place in pie pan, centered.  Remove other slice of wax paper.  Crimp edges all around.  Fill with fruit mixture.

Crumb topping

Put all four ingredients in the same mixing bowl you made the bottom crust in and mix well with mixer paddle until crumbs form. If you let them go extra long you get big fat crumbs if you want that look and I did!

¾ c brown rice flour mix

½ c sugar

½ tsp xanthan gum

1/3 c cold butter cut into six chunks

Sprinkle the top of the pie with crumb mix; use as much as you like.  I like about a heaping cup of the mixture.  Up to your personal taste… It sinks partially into the fruit mixture and adds lots of sweetness and eye appeal.

Bake in a preheated 400 degree oven for 45-50 minutes until bubbly and the crumb crust is light brown.  Cool at least 1 to 4 hours before serving at room temperature.  I think it is best served the same day you make it, or no more then 12 hours after baking for optimal flavor.  The crumbs will get soggy if too much time passes. Mine was still very good the next day; just not as great as when really fresh.

mom's new watch 013

Note: if you find your bottom crust is not browning enough bake it empty at 375 degrees for ten minutes before filling it with the fruit.  I have a bottom heat pizza style oven which gives me perfect pie crust so I don’t ever have pale pie crust.

Brown Rice Flour Mix (Same as King Arthur GF All purpose blend)
2 c brown rice flour (finely ground)

2/3 c potato starch – Not potato flour!

1/3 c tapioca flour

Note: This post was originally blogged by me the late summer of 2015. Minor changes made.

Peach Tartlet Perfection

It is the peak of peach season so get some peaches and whip up a delicious gluten free peach pie. I wanted individual tarts so everyone would feel special; that I baked them a pie; easy to do!  If you don’t have these deep dish pans you can use the flat bottomed tartlet pans; but they probably won’t hold quite as much filling. Plus I think the proportion of fruit to crust is just perfect in a small tartlet.  Try them and see; a delightful summer dessert.

Please make every effort to use local fruit; can get peaches at orchards like Bechdolt’s near Springtown, at most farm stands and at farmer’s markets; one on Saturdays in Easton or Sunday’s in Hellertown.  This pie really showcases great tasting peaches. If you use lousy peaches your result will lack great flavor. But, here’s the thing: store peaches can be poor in flavor and texture due to improper chilling so I strongly suggest you get locally grown, sweet, ripe peaches to make your pie.  I love when they have a pink blush; it makes the pie so pretty and perhaps even tastier.

To peel; heat 3 inches of plain water, drop the peaches gently in 4-5 at a time and blanch them 2-3 minutes, two if very ripe, 3 if less ripe.  Allow to cool somewhat before peeling.  I like to do that over a bowl to catch the juices as I slice each peach.

Don’t eat these tartlets hot; should be cooled to just warm if you like it so or room temperature or even a bit chilled. They were perfect, just like a big pie only tiny and making one individual dessert.  You could certainly serve them with vanilla ice cream.  And this recipe, like all peach desserts, works perfectly with fresh nectarines, bonus: no peeling required!

Angie’s GF Peach Crumb Tartlets: makes 7

Crust:

1 c plus 2 tbsp brown rice flour mix (at bottom of recipe)

2 Tbsp. sweet rice flour

1 Tbsp. granulated sugar

½ tsp xanthan gum

¼ tsp salt

6 Tbsp. cold butter cut into 6 chunks

1 large egg

2 tsp fresh orange or lemon juice

You will need 7 deep dish 4 inch tartlet pans if you make them all at once. I actually froze my dough and made the second batch of 3 a day later. Adjust the filling to the number of tartlets you are baking.

Mix dry ingredients in bowl of stand electric mixer.  Add butter and mix until crumbly and resembling coarse meal.  Add egg and juice.  Mix until it comes together into big chunks.  Shape into a ball with your hands. Put it on a crust sized piece of wax paper (14 x 14 inches more or less), flatten the crust ball some; put on top of it another piece of wax paper and chill it all in your fridge 15-20 minutes while you prepare the filling.

Filling:

6 cups sliced fresh peaches, peeled and cut in thick slices, place in medium bowl

Mix with:

½ cup sugar

1/4 cup quick tapioca

I made it in two parts; used 7-8 smaller peaches for each batch. Adjust the sugar and tapioca accordingly.  Let stand while you prepare the crust. This is important so the tapioca can soften and absorb some juices before baking.

Break dough into 7 small equal balls.

Roll out each tiny crust in a pie bag or between the two sheets of wax paper, try to get the thickness even and somewhat thin, no thick middle! Peel off one side of paper and place in pie pan, centered.  Remove other slice of wax paper.  Crimp edges all around.  Or not; I left mine kinda rough but it worked fine! Place the crust lined pans on a baking sheet with a rim to catch any spills. Fill each tartlet with fruit mixture after you have the crumb topping ready to go.

Crumb topping

¾ c brown rice flour mix

½ c sugar

½ tsp xanthan gum

1/3 c cold butter cut into six chunks

Put all four ingredients in the same mixing bowl you made the bottom crust in and mix well with mixer paddle until crumbs form. If you let them go extra long you get big fat crumbs if you want that look and I did!

Sprinkle the top of each tartlet with crumb mix; use as much as you like.  I didn’t measure; just sprinkled until the fruit was barely visible through the crumbs. Up to your personal taste… It sinks partially into the fruit mixture and adds lots of sweetness and eye appeal.

Bake in a preheated 400 degree oven for 35 minutes until bubbly and the crumb crust is light brown.  Cool at least 1 hour before serving at room temperature.  I think it is best served the same day you make it, or no more then 12 hours after baking for optimal flavor.  The crumbs will get soggy if too much time passes. Mine was still very good the next day; just not as great as when really fresh.

Note: if you find your bottom crust is not browning enough bake it empty at 375 degrees for 7-9 minutes before filling it with the fruit.  I have a bottom heat pizza style oven which gives me perfect pie crust so I don’t ever have pale pie crust. This is a big benefit of having this type of oven; it is a two oven range with a full sized lower oven.

mass upload 8-22-16 562

Brown Rice Flour Mix (Same as King Arthur GF All purpose blend)
2 c brown rice flour (finely ground)

2/3 c potato starch – Not potato flour

1/3 c tapioca flour

Note: the crust and crumb recipe are out of Annalise Roberts cookbook, Gluten Free Baking Classics, Second Edition. Adaptation and filling recipe are mine.

Reposted with minor changes from my blog; September 2016.