Camping Meals: Can be Done GF: Tasty and Easy

We were camping this past weekend. To some that means burgers or hotdogs. We did have beans and franks for lunch one day but I like to create and enjoy special meals and this is our tenth year together so I dry aged some shell steaks and froze them so they would thaw slowly in the icy cooler.  They were awesome cooked on the campfire grill and topped with mushroom slices that I sauted on the griddle of the camp stove. We baked a large Idaho potato to go with the steak and split it: I really can’t eat a whole big potato; too starchy.  camping PA Grand C 011 Baked a yam cut in half and wrapped in foil for a side the first night.  We had steamed snap peas both suppers as mine were ready to pick; just put in a ziplock and threw them in the cooler. I steamed them in a camping pan.  Simple. That first night we had boneless chicken thighs cooked on a double skewer; marinated first and brushed with Sweet Baby Ray Honey Barbeque Sauce.  So succulent and spicy good.

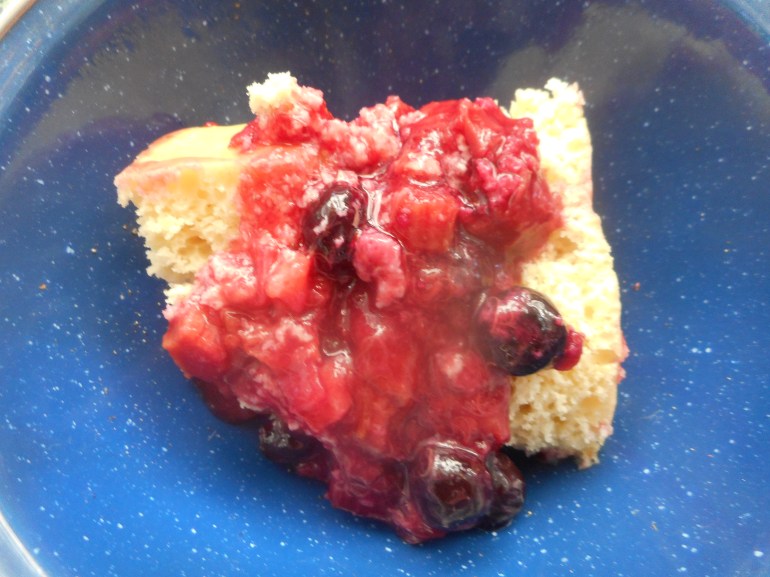
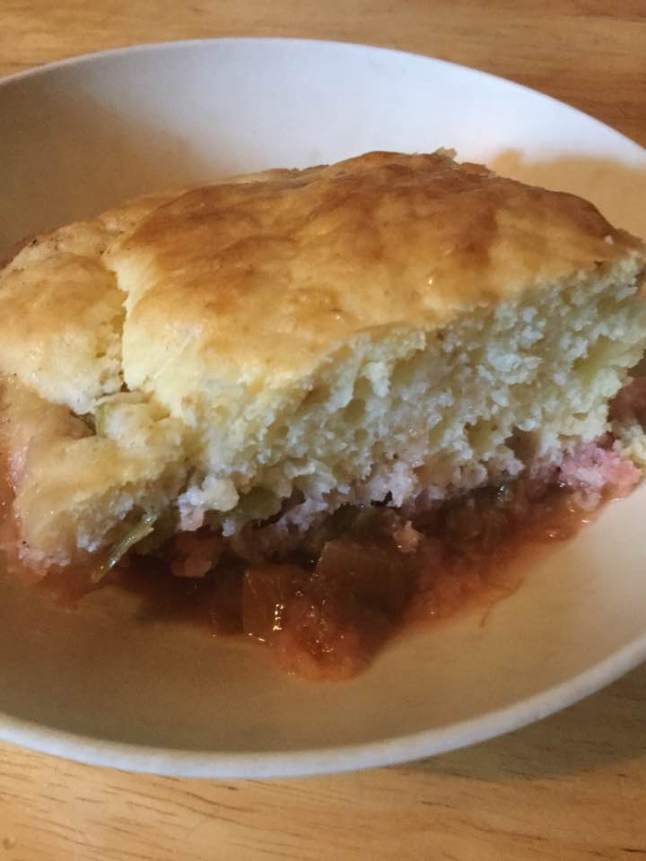
The steak was the second night and I made a rhubarb blueberry cobbler to top the meal off in style. I used my usual cobbler recipe and I refer you to it for the dry mix that will be enough for four cobblers. https://myworldwithoutwheat.wordpress.com/2017/06/06/rhubarb-cobbler-tender-and-tasty/

I pre-measured all the dry ingredients and seal in labeled ziplock baggies. I generally write all the wet ingredients on the baggie so I don’t forget anything.


Rhubarb Blueberry Cobbler

Fruit Filling

4 cups sliced rhubarb

1 cup blueberries

½ cup sugar –add more or less depending on sweet tooth

2 tbsp. tapioca flour

1/4 tsp cinnamon

Directions:

Pour the fruit in a oven safe sauce pan. Stir together the sugar, cinnamon and flour (I pack them at home by pouring into a baggie that I have pre-labeled with a sharpie marker) and mix into the fruit.  Cook on a not too hot camp stove or grill for 5-10 minutes, stir often, until it is thickened and hot.  Top with big blops of the cobbler topping.

Cobbler Topping

1 cup dry cobbler mix (in a pre-labeled ziplock baggie)

2 eggs

2 tbsp melted butter or canola oil

¼-1/3 cup milk/buttermilk

½ tsp. vanilla

Mix the wet ingredients in a medium mixing bowl with a whisk or big spoon. and then add the dry mix. Stir briefly: do not over-mix for best texture.  Use a big spoon to plop it right away on the hot fruit. If it is runny just pour it right over the hot fruit. Mine was runny this time but it tasted great although it took longer to bake.

Cover tightly and bake immediately on grill top for 25 minutes.  The top should be light brown and spring back when you poke it with your finger.  If it looks damp or squishy bake it 5 more minutes before checking. This time I double covered the pan with aluminum foil and put small hot coals on top to help the biscuit topping bake.

Let cool 5-7 minutes before serving as it will burn your mouth if you dig right in!

It was super good the next lunch eaten cold and I had the last of it that night when I was visiting my mom; we had some vanilla ice cream along side it warmed up; perfection!

Banana Custard Pie…in a Chocolate Crust…Luxury Made Easy

The ultimate perfect old school pie… so yummy and all you really need to make is some custard. I changed up my crust from a traditional flaky crust to a gf chocolate cookie crust that I bought at Wegmans. You can too and save the time you would have spent making a crust. No baking for me this time: no hot oven!

My mom used to make this pie when I was in my early adulthood; for some reason she never made it for us as little kids.  I used to cut up and set the banana rounds in the flaky baked pie shell for her.  She never used a chocolate crust so this is a slightly different take on this custard pie. The contrast of the rich custard, the crunchy chocolate crust and the fluffy cream with the delicate banana flavor is just so memorable.  And if you can make custard this pie is simple. I assume you could use a box pudding but I highly recommend this traditional stove top egg custard, straight out of Betty Crocker’s 1978 cookbook.

Angie’s Banana Cream Pie

 A chocolate ready-made crust


Filling:

½ to 2/3 cup sugar (I went with ½ cup and it was plenty sweet)

1/4 cup corn starch

½ tsp sea salt

3 cups whole milk or 2 percent, no lower fat than that

4 egg yolks beaten lightly

3 tbsp. butter cut into small cubes. (optional- skipped it this time)

2 tsp. pure vanilla extract

2 large bananas

Topping: 1 cup whipping cream, ¼ cup powdered sugar and ½ tsp. vanilla

Directions: Mix the dry ingredients in a 1 ½ qt sauce pan, Add the milk and stir constantly as it heats.  Once it reaches a boil time it for one minute. My secret trick is that if I don’t feel it was fully boiling when I started my minute; I add another minute to the process to be sure it is going to turn out thick. Stirring as it boils is mandatory; not the time to walk away from this process.  Then add 1/3 of the hot custard to the egg yolks as you stir, stir some more and return all to the pan, bring back to boil and time for one minute, yeap: stirring constantly.  Add the butter and stir as it melts, then the vanilla, stir.  Pour into a mixing bowl, cool five minutes and then put a film of plastic wrap on the top; press it down onto the custard. let cool a while more; maybe 30 minutes Chill in refrigerator at least an hour before using.

banana custard pie

banana custard pie 002

These slices were served a day after I made it.  Still yummy.  Forgive the paper plates and the poor quality picture. My mom’s room is not the best place for taking pix!


Cut peeled bananas into 1/2 inch rounds and cover the bottom of the pie crust with them close together.  Pour the custard over the sliced fruit and smooth the top.

Chill pie 1- 2 hours before slicing and serving cold topped with a big dollop of real whipped cream.

Whipped cream: Beat 1 cup cold whipping cream with an electric mixer until it holds soft peaks; add a quarter cup powdered sugar and ½ tsp. vanilla.  Do not beat any more, just stir in.

I think it is best served the same day you make it, or no more then 12 hours after assembly for optimal flavor.  The crust will get soggy if too much time passes. Mine was still very good the next day; just not as great a crust as when really fresh.  I like to top my slices of pie with extra rounds of banana to up the nanner flavor.  I liked the chocolate crust but I think I might go back to a homemade crust; either a flaky one or maybe one made with gf gingersnaps. Now that sounds like a winner!

Note: I froze my egg whites for later use in a cake. No wasting them, that’s for sure.

——————-

Pie filling from Betty Crocker Cook Book, 1978 Edition.


Rhubarb Cobbler – Tender and Tasty

Rhubarb….yes another yummy recipe using rhubarb. My spring mission: to convince you rhubarb haters to try one of these recipes.  This one is delicate in flavor with a fluffy yet satisfying cobbler topping and no sour ickiness as some say rhubarb can be.  It takes a bit less fruit than a pie and goes together in just a few minutes.  And it is gluten free for all of you who must avoid gluten which means wheat, rye or barley flours are a no-no in baking.

This recipe is the same basic one I posted about for peach cobbler in the past; it is modified from a muffin dry mix in Bette Hagman’s book, More from the Gluten-Free Gourmet and uses a flour mix that will give you 4 cups of the dry ingredients.  One cup will make an 8×8 pan of cobbler topping.  I keep the rest of my dry mix in the freezer and a pan of cobbler can be thrown together in less than 10 minutes plus baking time.  What a time saver this mix is! I make all sorts of cobblers with it.

I always get the fruit part cooking before putting the topping together so the fruit is hot and ready for the topping and can go right into the oven.

My mom and I enjoyed this on this past Sunday. She really loved the rhubarb flavor and the cobbler topping. Joe, who used to be quite skeptical about rhubarb until he had my rhubarb custard crumb pie, loves this dessert.  He always asks for some to take for lunch the next day!

rhubarb cobbler

Angie’s Rhubarb Cobbler

Dry Cobbler Mix – use one cup for this recipe and freeze the rest

2 ¼ cups white rice flour

½ cup potato starch (not potato flour!)

½ cup tapioca flour

1 tsp. baking soda

4 tsp. baking powder

1 tsp salt

1 tsp. xanthan gum

1/3 cup sugar


Fruit Filling

4 cups sliced rhubarb

½ tsp. almond extract

½-2/3 cup sugar –add more or less depending on how sweet you want it

2 tbsp. GF flour

1/4 tsp cinnamon

Directions:

Mix the fruit and almond extract in a sauce pan. Stir together the sugar, cinnamon and flour and mix into the fruit.  Cook on the stove top for 5-10 minutes until it is thickened and hot.  Pour into a buttered 8 inch square pan, top with big blobs of the cobbler topping.

Cobbler Topping

1 cup dry baking mix

2 eggs

2 tbsp melted butter or canola oil (both work fine)

1/3 cup milk/buttermilk (I skimp a tbsp off to keep it from being runny)

½ tsp. vanilla

Mix the wet ingredients and then add to the dry mix in a big bowl.   Mix briefly: do not over-mix for best texture.  Use a big spoon to plop it right away on the hot fruit.  Bake immediately as baking soda and powder can’t stand around waiting or they lose their umph!

Bake at 350 degrees for 25 minutes.  The top should be light brown and spring back when you poke it with your finger.  If it looks damp or squishy bake it 5 more minutes before cutting.

Let cool 5-7 minutes before serving as it will burn your mouth right out of the oven!  Some people love it with a scoop of vanilla ice cream.  This tender rhubarb cobbler is perfect just on its own.

Reposted with minor changes from June 2015.


Rhubarb Sour Cream Pie

Rhubarb is a perfect choice for a spring pie.  This is easy to make even though it has several steps.  Sour cream rhubarb pie is different from any other rhubarb pie I make because the texture is light, almost fluffy. It has a touch of crumbs on the top; they are added after it bakes a while.  I think this adding of crumbs later help keep them from sinking into the raw pie and keeping it from becoming rather cake-like as my rhubarb custard pie turns out.  I never made this pie before so it was a new experience and everyone loved it! It is my adaption from a recipe off of a website called Mary/The Kitchen Paper. Keeper recipe!

The GF crust will work for any pie you wish and the GF crumb topping is q great pie topper.  I store any leftover crumb mixture in a sealed container in the fridge; keeps a few weeks.  What I am giving you is my mixture of a couple of recipes. I know it has several steps but each one is easy and you can use these crust and crumb recipes for other pies.

Angie’s GF Rhubarb Sour Cream Crumb Pie

Crust:

1 c plus 2 tbsp brown rice flour mix (recipe at bottom of recipe)

2 tbsp sweet rice flour

1 Tbsp. granulated sugar

½ tsp xanthan gum

¼ tsp salt

6 Tbsp. cold butter cut into 6 chunks

1 large egg

2 tsp fresh orange or lemon juice

Spray 9 or 10 inch metal pie pan with cooking spray, dust with white rice flour.

Mix dry ingredients in bowl of stand electric mixer.  Add butter and mix until crumbly and resembling coarse meal.  Add egg and juice.  Mix until it comes together into big chunks.  Shape into a ball with your hands. Put it on a crust sized piece of wax paper (14 x 14 inches more or less), flatten the crust ball some; put on top of it another piece of wax paper and chill it all in your fridge 15-20 minutes while you chop the rhubarb into ½ inch chunks.

Filling:

5 to 6 cups (if you use the ten inch pie pan) cut up fresh rhubarb – place in medium bowl

Mix with

1 c sugar

3 tbsp. rice flour

½ tsp cinnamon

Roll out pie crust between the two sheets of wax paper, try to get the thickness even, no thick middle! Peel off one side of paper and place in pie pan, centered.  Remove other slice of wax paper.  Crimp edges all around.  Fill with dry rhubarb mix.

Topping: Pour evenly over this mixture:  3 eggs beaten lightly with 1 cup sour cream, and 1 tsp vanilla extract.  I did use light sour cream and it worked fine.

Place in 400 degree oven and bake 15 min, lower to 350 degrees and bake 30 minutes more.  Top with crumbs and bake 20-25 minutes until the crumbs are lightly browned.  Cool at least 2 hours before serving.

Crumb topping

Put all four ingredients in the same mixing bowl you made the bottom crust in and mix well with mixer paddle until crumbs form.

¾ c brown rice flour mix

½ c sugar

½ tsp xanthan gum

1/3 c cold butter cut into six chunks

Sprinkle the top of the pie with crumb mix; use as much as you like.  I like about a cup of the mixture.  Up to your personal taste. You could add up to a teaspoon of cinnamon in the crumbs. I think a half teaspoon is enough.

Brown Rice Flour Mix
2 c brown rice flour; 2/3 c potato starch; 1/3 c tapioca flour

Reposted from May 2016

Cloud Bread – Yup…That’s Its Name!

Finding or baking decent gf bread can be problematic.  Poor texture, weird flavors, big holes the middle of the loaf, leaden brick like baked products, high prices and lots of ingredients which must be compiled exactly according to the recipe.  It adds up to a fair amount of stress as to just having a sandwich.

A year ago I made some really interesting bread called “cloud bread” (also called oopsie bread) and it has no flour, no oats nor any grains.  I was intrigued when I saw this cloud bread popping up in my support group messages and just had to try it. My recipe has five ingredients but three should be in your pantry already.  It was very easy, quick and yes; tasty.  So it made a super bread for a ham and cheese sandwich and a ham/turkey and cheese sandwich.  I ate one warm out of the oven, also enjoyable. Great with a little jam or jelly on top.  Posted it back last March and sharing again so you who missed it can give it a try.

I added a couple toppings which add a lot to the flavor and look of it.  I recommend them but it sure can be made plain.   You have to use full fat cream cheese to make it work, only a few tablespoons so don’t get all freaked out over that issue!

Cloud Bread/Rolls

3 eggs, separated

3 ounces cream cheese at room temperature

1 tsp. baking powder

1 tsp. honey

Pinch salt

Toppings; sesame seeds and a tbsp. of chopped fresh rosemary


Directions

Beat the egg yolks with the cream cheese until it is very smooth, lemon yellow. Add the baking powder and honey, beat in.

Beat the egg whites until foamy, add a sprinkle of salt. Beat until stiff peaks form.  Fold together with the yolk mixture until mostly blended together.

While the egg whites were beating I lined a big baking sheet with parchment paper and sprayed it lightly with Pam.  Heat oven to 300 degrees. Some people heat the pan in the oven before spreading the dough; I didn’t bother but feel free to preheat your pan.

Using a big spoon spread the bread mixture on in six big circles spaced 1-2 inches apart.  Sprinkle with sesame seeds and or finely chopped fresh rosemary. Bake until golden brown between 20 and 30 minutes.  Using a spatula separate them from the parchment paper. Let cool.  Store in a ziplock bag overnight; they will get soft and be ready for sandwiches.  Keep them in the fridge. I put slices of wax paper between them to avoid sticking.  shoe fly pie, hash 012They keep about 3 days there and a week in the freezer.  Wonderful for sandwiches: I used one for the top and a second one as the bottom of the sandwich.  Did I mention they are virtually no carbs in this bread? Yeap; great for my low carbing friends!

Originally posted in spring of 2016. Minor changes, none to the recipe.