Shrimp Risotto Made Easy

I love this recipe: fast, easy and delish. We all want easy recipes that taste great, don’t use too many pots/pans and are budget friendly.  I make this in my instant pot electric pressure cooker (IP) and it works fine.

The first try I had some shrimp in the freezer and all the usual ingredients for risotto.  I had read lots of comments on how good IP risotto was but had resisted until I tried this recipe…. being a lover of the traditional endless stirring method.  It still took as long as hand stirred risotto to make but was much easier for a meal made outside my kitchen and it was fresh and ready to enjoy.

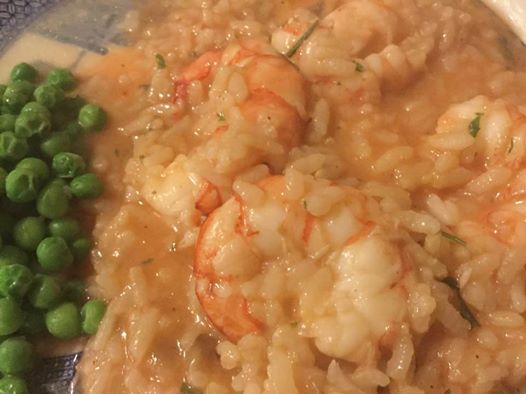
Note: I made this again recently using Asiago cheese and was not a real big fan of that flavor; a good quality chunk of Parmesan is what you need for the best result. Other than that it came out with a perfect texture; for that version I put the peas right in the risotto after releasing it; stirred for a minute and it was ready to serve!

shrimp-risotto

IP Shrimp Risotto, serves 4

1 lb large to extra large shrimp; thawed and shelled

4 tbsp. butter divided

1 small yellow or red onion finely chopped

1 ½ cups Arborio rice

2 tbsp. vermouth or dry white wine

4 ½ cups low sodium great quality chicken broth

1 tsp. sea salt

¼-1/2 tsp. fresh ground black pepper

2 minced garlic cloves

Finely grated rind of one small lemon

¼ cup finely chopped fresh herbs like parsley, rosemary, tarragon, thyme OR 2 tsp dried herbs (same ones)

1/3 cup freshly grated good quality parmesan cheese

Directions: Heat IP and add 2 tbsp. butter, melt and add onion, cook 4 minutes, add rice and cook 1 minute, add vermouth and cook 30 seconds, add 3 cups room temp chicken broth, salt and pepper and put lid on. Seal it and set for 9 minutes on manual pressure, do a quick release, add the minced garlic and then the shrimp the rest of the broth. Stir well and cook 5 minutes on Sauté.  Stir frequently. Turn it off and then add the zested lemon and the herbs, stir.  Add the cheese, stir and serve.

Notes: I think you might be able to cut ¼ cup broth; mine seemed just a tad too loose/wet. It was not quite as creamy as hand stirred but the process was a lot easier and a quick clean up.  Is great with a side salad.  The result was a gourmet meal that could be made anywhere, perfect for a stove less situation. Enjoy!

Revised from original post from Spring 2017. No recipe changes.

Not My Mom’s Rice Pudding, Better!

I always loved rice pudding as a child, creamy custard studded with raisins and topped with a good sprinkle of cinnamon.  But the rice itself was kinda drab, not much flavor and it was not well blended with the rest of the pudding.  A few years ago, I found a recipe that caused a rice pudding revolution in my kitchen: it used sweet rice which is a white short grain oriental rice.  You could substitute Arborio rice if you like, what I have used in my most recent batch. I buy sweet rice in oriental grocery stores but I think Wegmans may carry it too.  Each grain absorbs the milk as it cooks and releases a lot of creaminess as well as providing a soft squishier rice that gives the pudding a more blended feel than my mom’s usage of long grain rice that stayed firm and separate from its pudding surrounding.

This recipe is naturally gluten free.  No one eating it will think, “Oh, darn, another of those weird GF recipes!”  They will just think, “I wonder if she will think I am piggy to want seconds of this?

In a pinch you could skip the second part where you briefly bake the pudding but I rarely do, I think it helps form the best texture.  Do sprinkle the top with cinnamon unless it is something you despise.  I recommend whole milk as it makes pudding taste so good but if you prefer two percent that will work.  I do not recommend skim milk for pudding. Ick on the texture and flavor of such a mutant pudding!  And this recipe is great with chopped dried apricots, dried cherries, golden raisins, or even currents or in it instead of raisins. My original recipe had lemon peel and apricots in it. Recently I put a few long orange peelings in it and a cinnamon stick while it cooked on the stove top which gave it a delicate orange flavor which played well with the raisins. So, you can alter it to suit your mood and your ingredients. I sometimes just use 3 whole eggs rather than end up with two extra egg whites.  Especially with the price of eggs these days. For 3 eggs you get a whole pan of lovely pudding so it is worth it!

I made it this week in the “classic” form; with raisins and sprinkled with cinnamon. I so enjoy a cup of creamy rice pudding.

rice pudding

These cold days make pudding such a treat.  What could be more comforting after a cold walk with the dog than a bowl of wickedly creamy homemade rice pudding.

Creamy Rice Pudding

Ingredients

¾ cup sweet or Arborio rice

1 quart whole milk

1/3 cup raisins

1/3-1/2 cup granulated sugar, depending on your sweetness needs! I go with 1/2 cup

2 egg yolks

2 whole large eggs (or just 3 whole eggs, no extra yolks)

1 tsp pure vanilla

A good sprinkle of cinnamon

Directions:

Rinse the rice in a strainer briefly, (I forgot to do this last week!)  place in a heavy bottomed 1 ½ quart saucepan, pour in the milk (4 cups) and stir frequently as it heats on medium to a bubbly simmer.  Add the raisins and turn down the heat to low, cover and cook 25 minutes.  Be sure to stir it every 5-7 minutes to separate the rice and keep it from scorching on the bottom.  Add the sugar, stir well.  Mix up the egg yolk and whole eggs in a bowl with a whisk and add in some of the hot mixture; maybe 1/3 to ½ cup.  Dump it all back in the pot and stir well.  Turn off the heat and add the vanilla.

Heat your oven to 300 degrees. Butter the bottom and sides of a low ceramic or glass baking dish. I like an oval myself, that shape is what my mom usually used!  Pour in the pudding, removing any lemon or orange peel and the cinnamon stick if you used such and sprinkle it well with cinnamon to dust the surface.  Bake for 20 minutes.  Often,I put it in a hot water bath created with a 9×13 cake pan and some hot tap water. Did this last week.  This method produces a lovely delicate custard, worth the extra fuss.

It is tasty warm and wonderful the next day.  Some people guild the lily with toppings of whipped cream, grated lemon or orange peel or even whipped mascarpone cheese.  Up to you how you dress it up!  I occasionally serve a homemade cookie on the side for added crunch value.  Enjoy!

Originally published in 2015; minor text changes made.

Very Berry Almond Cake

In the winter we are all craving fresh fruit and this cake has that, sort of because we are using frozen berries. But no one eating it will know they were frozen. It’s also easy to make. It doesn’t have a ton of sugar, good.

I used a bag of mixed frozen berries; cherries, raspberries, blueberries and blackberries: so much more available and they taste great, I cut up the bigger ones which is important for an even texture. I also added more berries than the original recipe.

This recipe is from King Arthur’s website. I made a few changes; feel free to look at the original recipe. This cake is made with mostly all almond flour. If you want to skip the gf flour, just use all almond flour. I just like how swapping in some flour improves the texture for me. I put it in a larger pan, and it definitely needed that space. Great for a small gathering or to take to someone’s house. They will never know it’s gluten free. Enjoy!

Winter Berry Cake

Ingredients

1 1/2 cups almond flour

1/2 cup gf flour; I used King Arthurs Basic GF Blend

1/4 tsp. xanthan gum

2 Tbsp. cornstarch

2 tsp. baking powder

1/4 tsp. salt

6 tbsp soft butter: I cut mine into 6 chunks, put it in a glass measuring cup and nuked it for 30 seconds. I then stirred it to make it all soft and well blended

1/2 cup plus 2 Tbsp sugar

zest of a small lemon

4 eggs separated

1 tsp vanilla

1/4 tsp. almond extract

1 1/4 cup frozen berries; chop in half the bigger ones

Directions:

Spray the inside of a 9-inch deep tart pan or a 9-inch cake pan with cooking spray; taller sided is much better. I used a deep tart pan with a removeable bottom. If no removable bottom I suggest a circle of parchment paper in there before spraying it. Mix all the dry ingredients together in a small bowl. Heat your oven to 350 degrees.

Put the 1/2 cup sugar and the soft butter in a mixer. Blend well. Blend in 4 egg yolks. Add zest, vanilla and almond extract. Blend well. Beat the egg whites in a stand mixer, add the 2 Tbsp. sugar as it gets near to soft peaks. Stop when it forms a peak that doesn’t fall over or go flat. Blend the flour mix into the sugar/butter mixture just until blended. Then carefully fold in the egg whites, starting with about a half cup, stir, another half cup, stir and then the rest of the batter. Pour into the prepared pan. Sprinkle the berries over top evenly. Bake at 350 for 40-45 minutes. test with a cake tester at 40 minutes. If the tester is clean; it’s done, if covered with batter; bake more. Remove from oven and let stand 10 minutes on a cooling rack and then remove from pan. I pushed mine up out of the walls and put it right back on the cooling rack for an hour. Sprinkle with powdered sugar if you like. Store any leftovers at room temperature, well wrapped.

Chicken Pot Pie

If you have any leftover chicken from a roast or rotisserie bird this is an excellent way to use it up. You will need two cups of chicken to make this delectable entrée: chicken pot pie.  My version tracks pretty close to that you can find in a 1970’s Betty Crocker Cookbook.  Gluten free though…because I must! You can toss it together in about 30 minutes and it bakes in 35 more. Your tummy will thank me. I put some celery seeds in the pie crust for extra flavor.  I generally make it with just a top crust which is less calories. If you want the full deal; double the crust ingredients and make a bottom crust too. Your creation will be a delicious and substantial meal for sure! This crust bakes up flaky and delicate; perfection for a pot pie.

Notes: you can use light or dark meat or combo. I used baby carrots this time; cut them across into 4 little nibs; they were organic and had a delicious tender flavor.

Chicken Pot Pie

Crust:

1 c plus 2 Tbsp. brown rice flour mix (at bottom of recipe)

2 Tbsp. sweet rice flour

1 tbsp. sugar (You will never know it is in there; it makes the crust more flakey)

½ tsp xanthan gum

¼ tsp salt

6 Tbsp. cold butter cut into 12 small chunks

1 large egg

2 tsp fresh orange or lemon juice

Directions: Mix dry ingredients in bowl of stand electric mixer.  Add butter and mix until crumbly and resembling coarse meal.  Add egg and juice.  Mix until it comes together into big chunks.  Shape into a ball with your hands. Put it on a crust sized piece of wax paper (14 x 14 inches more or less), flatten the crust ball some; put on top of it another piece of wax paper and chill it all in your fridge 15-20 minutes.

Pie filling

1/3 cup butter: I used ¼ cup plus some canola oil to reach 1/3 cup

1/3 cup white rice flour (or another gf flour)

½ cup finely chopped onion

½ tsp. sea salt

¼ tsp. black pepper, freshly ground

1¾ cup good quality gluten free chicken broth

2/3 cup whole or two percent milk

2 cups diced cooked chicken

4 large carrots, diced or 16 plus baby carrots

¾ cup frozen peas (or a ten-ounce bag of frozen carrots and peas)

½ to 1 tsp. celery seeds (optional)

Heat butter/oil in large frying pan, add onion, cook 5-7 minutes until soft and translucent. While it cooks, cook the diced carrots for 4-5 minutes in a ¼ cup of water in a saucepan, lid on. Then turn off the heat, uncover it and throw in peas, set aside.

Heat the oven to 425 degrees.

Add flour, salt and pepper to the fry pan with the butter and onions, cook 2-3 minutes, stir often. Add broth (I held back about 2 tbsp. to make sure it wasn’t watery) and while it heats keep stirring. Add the milk when the mixture is hot but not boiling, stir well until it boils and then let it boil one minute, still stirring.  Add the chicken and then the drained carrots and peas, Stir well. Add rest of broth if needed.

Roll out the pie crust thick; just big enough to cover the top of your 9 inch pie pan [about 11 inches] (I always use a glass pan but I am pretty sure you can use a metal one). I like to roll it just 2/3 of the way out and then sprinkle with about ½ -1 tsp. celery seeds. Roll it the rest of the way and the seeds will be embedded in the crust. I like the subtle flavor they add, a touch of really old-fashioned tastiness my mom would approve of!

Pour the hot chicken mixture into the pie pan and top with the crust. Make sure no crust hangs down; trim to look nice. If you want to go super rich just double the crust recipe and roll half so you can put a bottom crust in before you pour in the filling. Top with your celery seed crust, seal to bottom crust (if you used one) and do cut a few gashes for venting… place pie on a pie drip catcher.  My pie pan is always very full, and that pie drip pan is wonderful for keeping the filling from dripping on my oven. You could use a cookie sheet or a sheet of aluminum foil to catch drips.

Bake 30-35 minutes until crust is light brown and the pie is bubbly.

Let the pie cool five to ten minutes before serving.

All you need is a salad, and you have a wonderful balanced meal. Enjoy!

Brown Rice Flour Mix  (same as King Arthur basic blend)
2 c brown rice flour

2/3 c potato starch

1/3 c tapioca flour

The crust is from Annalise Roberts’ great cookbook: Gluten-Free Baking Classics.

Shoo Fly Pie (Shoe Fly Pie at my house!)

This sweet pie is a Pennsylvania Dutch tradition. It is quick to go together, needs neither refrigeration, nor a long chilling down before consuming it, pleases most everyone and best of all it can be made in any season; no fruit needed.  It wasn’t too hard to change from my old recipe to a gluten free version.  I recommend it for celiacs who miss that old time flavor of shoe fly pie.  Note: some folk say shoo fly pie but my recipe used the spelling you see in this post.  I believe either is appropriate.

I know folks who shy away from gluten free baking thinking it is too complicated.  Well, a couple years ago I featured pies and this is the easiest pie around so I dedicate this to a few friends who have been too scared to bake gf.  You can do this one! If you want, buy a ready made uncooked crust but I swear that with a stand mixer this is the easiest and best gf crust around.

This shoe fly pie recipe is a blending of the filling I have used for years, (my sister Margie gave me the recipe a long time ago) and the pie crust and crumb recipes from Annalise Robert’s cookbook, Gluten-Free Baking Classics.  Her cookbook is a fabulous resource and I can’t recommend it enough to anyone trying to bake gluten free for a family member.

My shoe fly pie is considered a “wet bottom” pie; not too crumbish.  If you want it drier use ½ cup molasses and ½ cup water.  I love it soft and moist so my version always is a wet bottom shoe fly pie.

Angie’s Shoe Fly Pie

Crust:

1 c plus 2 tbsp brown rice flour mix (at bottom of recipe)

2 tbsp sweet rice flour

1 Tbps. granulated sugar

½ tsp xanthan gum

¼ tsp salt

6 Tbps. cold butter cut into 6 chunks

1 lg egg

2 tsp fresh orange or lemon juice

Spray 9 inch metal pie pan with cooking spray.

Mix dry ingredients in bowl of stand electric mixer.  Add butter and mix until crumbly and resembling coarse meal.  Add egg and juice.  Mix until it comes together into big chunks.  Shape into a ball with your hands. Put it on a crust sized piece of parchment or wax paper (14 x 14 inches more or less), flatten the crust ball some; put on top of it another piece of parchment or wax paper and chill it all in your fridge 15-20 minutes. Make the crumb topping while it chills.

Crumb topping

Put all four ingredients in the same mixing bowl you made the bottom crust in and mix well with mixer paddle until crumbs form.  You will only use 1 ½ cups of the crumbs; put it in a jar and store it in the fridge until your next pie; it keeps well for several weeks.

¾ c brown rice flour mix

½ c granulated sugar

½ tsp xanthan gum

1/3 c cold butter cut into six chunks

Next, roll out pie crust between the two sheets of parchment or wax paper; try to get the thickness even, no thick middle! Peel off one side of paper and place in pie pan, centered.  Remove other slice of wax paper.  Crimp edges all around.  Then make filling and pour half into the crust, careful not to splash it out.

Filling:

2/3 cup molasses, I used Grandma’s

¾ cup boiling water

½ tsp. baking soda

1/4 tsp. cinnamon

Mix the ingredients in a medium mixing bowl with a spoon until blended. It will foam up a bit as the baking soda mixes with the molasses! Gently pour half of the molasses mixture into the raw pie shell.

Then pour half the crumb topping (1 1/4 to 1½ cup total) evenly over this mixture.  Add the rest of the molasses liquid and sprinkle the rest of the crumbs on top.

Bake in a preheated 350 degree oven for 30-35 minutes Cool at least ½-1 hour before serving or let cool to room temperature.

Note: I used to bake pies in my bottom heat pizza oven and it gaveme a great browned crust. No longer have that oven so I put the wire rack as close to the bottom as possible and it really helps the bottom of my pie to brown.  One other option: if your oven isn’t bottom heat you might want to pre-bake a gf crust 10 minutes before filling.

Brown Rice Flour Mix (King Arthur’s basic gf blend)
2 c brown rice flour

2/3 c potato starch

1/3 c tapioca flour

** This blog post first appeared in March of 2016, revised slightly in 2023 to clarify the directions.  Enjoy!