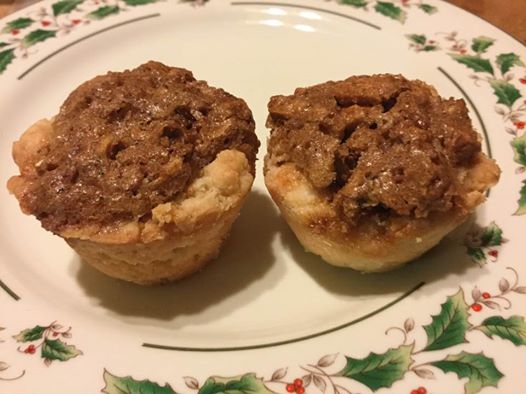
Nut Tassie Cookies

Nut tassies are a local favorite around here in eastern Pennsylvania. They look like a tiny pecan pie, the size of one gigantic bite! Heavenly sweet and best made with pecans.  I have eaten them at many people’s homes. In all fairness I never made them when I could still eat regular gluten all-purpose white flour. Perhaps it is that I was able to just snag them off a cookie plate at someone’s holiday party.  Now, that sort of noshing is no long a possibility, and I was craving a nut tassie. Several years ago, I started looking for a recipe and eventually I found them on food.com; a classic tassie recipe complete with cream cheese dough for the pie crust and a filling almost identical to the traditional filling. And it was gluten free for folks like me…eureka!

Notes: Sometimes my family has a small pre-Christmas gathering and I whip up a batch of these tassies.   After chilling the dough some I make a dozen.  I will make the rest of them another day…reason being that gf cookies don’t keep as well as regular flour cookies so best not to bake the whole batch at once shot.  This way you have fresh cookies twice.  I keep the dough and filling in the fridge nice and cold and it will last up to a week or so.

Speaking of filling, I often don’t chop my nuts really fine; leave some in chunks to give a bigger texture which I prefer. The filing is so simple; chop the nuts, then dump these sugar and eggs in a mixing bowl, add the softened butter and the vanilla and nuts; stir and it is ready to spoon into the little crust cups you just formed.

They are easy to make and totally yummy to devour.  I find it takes me 2-3 bites to down one of these treats.  Happy baking folks!

Nut Tassies

Crust Ingredients

3 ounces cream cheese softened

1⁄2 cup butter, room temp.

1cup gluten-free flour – King Arthur Basic GF Flour or Bob’s Red Mill GF All-purpose flour

1⁄2 teaspoon xanthan gum

2 tablespoons sugar

Crust directions: using a whisk combine the GF flour, Xanthan Gum and 2 Tbsp. spoon sugar in a small bowl, Mix and set aside.  Using a mixer combine the cream cheese, butter and sugar until cream.  Then slowly add the GF flour mix you set aside, continue to mix until well blended. Cover and refrigerate for at least 30 minutes.

Pecan Filling

  • 1 cup finely chopped pecans
  • 3⁄4 cup coconut palm sugar or brown sugar
  • 1 teaspoon vanilla extract
  • 1 tablespoon softened butter
  • 1 lg. egg 

Directions – Using a mixer combine the pecans, brown sugar, vanilla, butter and egg until well blended

Assembly

  • Preheat oven to 325 degrees.
  • Separate the chilled pie crust into 24 equal amounts (spoon or roll into balls).
  • Press the separated crust into a mini muffin pan, making sure that you press it most or all the way up
  • Fill each crust with a heaping mound of the filling.
  • Bake for approximately 30 min or until the crust is lightly browned.
  • Let cool and remove your mini pies from the pan. Use a butter knife to remove without damaging them

Enjoy!

  •  

Best Brownies Ever!

Trying to figure out a special dessert? Let me suggest a brownie recipe that everyone falls in love with because of the delicious flavor and perfect texture of these bars.  Plus, bonus points as it is really easy to make.  All of the ingredients can be purchased at a regular grocery store.  I rarely post this recipe because then I want to make and eat them, and I would be a blimp if these brownies were around all the time!  I dare anyone to think these are GF until you tell them! Everyone who tastes these falls in love and begs for some to take home! Make them to please your special someone for dessert this week.

Notes: I prefer to use really great quality chocolate like Ghirardelli for the best flavor.  I sometimes add a 1/4 to 1/2 tsp cinnamon to the flour mix to add extra kick to these kick ass brownies. I am thinking of replacing some of the sugar with coconut palm sugar. I will update with my results.

Perfect Brownies

Ingredients:
– 2/3 c King Arthur Basic GF flour blend or the brown rice flour mix at bottom of post
– ½ tsp salt
– ½ tsp baking powder
– ½ tsp xanthan gum
– 2 oz unsweetened chocolate
– 4 oz semisweet chocolate *strongly suggest Ghirardelli or other top-notch chocolate
– ½ c butter
– 1 ¼ c sugar
– 1 tsp vanilla extract
– 3 large eggs
– ¾ c chopped walnuts

Directions:
Heat oven to 325 F, with rack in middle of oven. Line bottom and side of 8-inch square pan with foil, spray with cooking spray. Mix dry ingredients in small bowl. Melt chocolates and butter in heavy medium sauce pan over low heat. Remove from heat, whisk in sugar and vanilla. Whisk in eggs one at a time. Whisk until mixture is smooth and glossy. Add flour mixture and whisk just until incorporated. Stir in nuts. Pour into prepared pan, bake 45 minutes until test (I use a steak knife or my fancy long tester skinny metal stick) in middle of pan comes out with wet crumbs. Cool in pan on rack for 5 minutes, remove from pan by lifting out foil. Cool completely on rack and then cut into squares. Store in fridge for up to 5 days or freeze-wrapped in plastic wrap and foil. Frankly, you won’t have much left over by the end of the second day!

Brown Ric Flour Recipe
Ingredients
– 1 c brown rice flour
– 1/3 c potato starch (not potato flour)
– 3 tbsp tapioca flour

Posted originally in June 2014, some changes made for this posting.  This recipe comes from Gluten Free Baking Classics by Annalise G. Roberts.

Image

Thumb Print Cookies 2.0 – Fabulous!

As children we each had our favorite cookies to make, this was traditionally my next older brothers’ to bake but once grown up I began to make them ‘cause they are addictively tasty.  I love making them with apricot jam, you can used chopped slivered almonds instead of chopped walnuts for that version.  But any good quality jam will work, pick what you like.  I am planning two flavors this time: homemade raspberry jam and some homemade apricot jam. Like getting two cookies out of one batch of dough.

xmas cookies 003
xmas cookies 002

A few Christmases ago a dear friend gave me a new cookbook “Gluten-Free Christmas Cookies” by Ellen Brown.  I have tried several recipes, and all were fantastic including this one, I swapped the candied red and green cherries for jam, but you can go old school and use those freaky candied cherries. It is made with cornstarch and white rice flour; not a flour blend but you should be able to find rice flour in a gf flour department or in a Chinese grocery store. Every grocery store has cornstarch. I am actually going to swap out some of the white rice flour for brown rice flour to make the flavor even more similar to gluten based flour. I will let you know how that goes; baking it this coming week. Use the jam you like to put on your toast! That is better than using something you are not particularly fond of.

Jam Thumbprint Cookies

Ingredients:

1 ½ cup white rice flour (or a 50/50 blend of white rice and brown rice flours)

1 cup sifted confectioner’s sugar

½ cup cornstarch

1 tsp. xanthan gum

1 tsp. cream of tartar

Pinch of salt

2 sticks unsalted butter sliced into thin slices

1 lg egg

1 Tbsp. whole milk

1 tsp. vanilla extract

1 cup finely chopped walnuts

½ cup jam; apricot, cherry, raspberry, peach, strawberry

INSTRUCTIONS: Combine dry ingredients in a large bowl food processor, steel blade, blend briefly.  Add butter to work bowl and process off and on until it resembles coarse meal.

Combine egg, milk and vanilla in a small bowl; whisk. Drizzle into the work bowl, pulse about 10-12 times until it forms a stiff dough.  If it doesn’t come together, add more milk a tsp. at a time. I added a tsp. more of milk to get the dough to form up.

Chill the dough for 15 to 20 minutes.

Heat oven to 350 degrees. Put racks in the middle of the oven. Place chopped walnuts in a wide shallow bowl and roll 1 1/2 inch balls of dough.  Roll them in the chopped walnuts, place on a parchment paper lined baking sheet.  Press an indent in with a finger and fill with about ½ tsp. jam.  Bake 14-15 minutes, until just firm but not browned.  They will be very delicate to the touch.  Let cool 2-3 minutes on sheet before carefully moving them to a cooling rack using a metal pancake turner. I bumped a couple and they just fell apart on the sheet; very fragile while hot.  They will solidify once they cool.  I store mine in cookie tins or Tupperware containers.  They won’t last as long as wheat flour based cookies but they get snapped up fast so that shouldn’t be a problem.  I supposed you could freeze them for a week or two if necessary.

They are not too sweet and so delicate, great with a cup of tea or coffee.  As good, if not better, then when I made them with all purpose (wheat) flour years ago before I had to go gluten free.  Your family will be amazed that they are gf, no one you serve them to will ever guess.  Totally tasty and fun to make with your kids! Enjoy.

This is a reposting of the same recipe I posted back in 2016. Minor text changes.

Turkey Posole Stew; Sort of Spicy and So Delish!

I am betting you have some roast turkey in the freezer, maybe a pint of gravy too?  Well, I have just the recipe for you, courtesy of Rachel Ray and foodnetwork.com.  It is nothing like most traditional turkey leftover recipes.  It is a slightly spicy Mexican stew; posole stew can easily be gluten free. Just use care choosing your chicken broth and your tortilla chips that accompany this savory soup. One of these years I will remember to buy an extra carton of gf turkey broth and use in instead of chicken broth; turkey broth disappears immediately after thanksgiving; a bit of a bummer….

I have been making it every fall after Thanksgiving and always look forward to a few bowls of it.  Spicy, crunchy, tangy; unlike any other soup I make.  Posole stew can be made with roasted pork and I have done so but I like it far better created with leftover roast turkey, especially the dark meat.  I have served this stew to many people, and it is always well received and enjoyed, even by my elderly mother.  I made a batch today and it was so delish! You can cut this recipe in half easily which I did this time; didn’t have enough turkey for a whole recipe and my fridge is pretty full anyway; my posole turned out great and I am thrilled to be enjoying it again. 

Notes:  I used most of a good-sized jalapeno pepper and one 15 ounce can of hominy in a half recipe. I used a cup of water for the beer and a carton of gf chicken broth. About 3-4 tablespoons of homemade turkey gravy this time: ate the rest on hot sandwiches. It was absolutely delish!

tomatillos

The more jalapeno pepper you add the hotter it will be. I have tried canned tomatillos, and they are not really a good substitute.  You can get them fresh (found near the fresh tomatoes) in many stores including Giant.  They are used in Hispanic and Mexican cooking and add a lot of flavor and tartness to the soup. I have heard that some folks use salsa Verde instead of tomatillos but it really isn’t hard to chop them up, so I recommend the real deal.

Hominy is a corn product; whole kernels soaked in lye to swell and soften.  The kernels have a mild corn flavor plus they soak up other flavors quickly and add a certain texture and body to the stew.

The wild turkey is native to North America and one turkey species is originally from Mexico.  So turkey is a natural component in this stew.  The Aztecs revered corn and liked to cook it with meat.  Tomatillos are native to Mexico, related to cape gooseberries.  They are used in salsa verde and other Mexican dishes. So this compilation of turkey, corn, tomatillos and lime is a natural combination that will be easy to make and fun to eat. Go on, be adventurous and enjoy a steaming hot bowl of delicious posole and use up that turkey in a totally different way!

Turkey Posole Stew

Ingredients

2 tbsp mild olive oil or canola oil

2 medium onions chopped

4 cloves garlic chopped fine

1-2 jalapeno peppers – seeded and chopped fine –use two if you like it spicy, I use one!

1 tbsp. ground cumin

1 cup GF beer (can use 1 cup water if you want but it gives more flavor)

Coarse salt and pepper

12-16 tomatillos; about 2 lbs, take off the paper cover, rinse and chop up.  Can coarsely chop in food processor

5-6 sprigs fresh thyme; chop it up off the stems.

2   15-ounce cans hominy

1.5 qt chicken stock (can be part gravy)

1 ½ to 2 lbs. chopped turkey meat; can be mixture of light and dark

1 lime juiced

Chopped cilantro leaves to garnish (optional)

Tortilla chips: the ones with lime go particularly well with this.

tomatillos

Cook first six ingredients about 5 min in a large stock pot.  Add beer or water, cook one minute.  Add chopped tomatillos and cook 5-6 minutes until softened.  Add hominy, thyme and stock and cook 15 minutes.  Add chopped turkey and lime juice, stir. Taste and add salt and pepper, stir well.  I never use cilantro; something I just don’t like, but feel free to add it as the original recipe uses a bunch of it.turkey posole soup

Then ladle the posole into bowls and serve lots of white tortilla chips to crunch over the top of the hot soup.  As the soup disappears from my bowl, I like to add more chips to keep the crunch going.


Butternut Squash, Pancetta and Chard Pasta

This colorful pasta dish is pretty healthy and very tasty. Not too tricky either. I have enjoyed it many times in the years. It makes 4 satisfying servings.

It showcases roasted cubes of butternut squash and tender melt-in-your-mouth Swiss chard. My amounts are somewhat approximate.  I used gf fettuccine noodles. Don’t overcook them! You could buy pre-peeled and cubed squash to save time. I used some I grew this fall and honestly it didn’t take long to peel and cube it. I suggest you roast the cubes from a whole squash and use as much as you think works for you. Valley Farms has great fresh Swiss chard; that’s where I get mine if I don’t grow it myself.  I have made this recipe with thick cut bacon, if that is what you have; go for it.  I got a package of chopped pancetta at Giant for a decent price. It will keep a few days in the fridge.

Butternut, Pancetta and Chard Pasta

Ingredients:

1 bunch Swiss chard, I like the red or white stemmed variety, rinsed off

3-4 tbsp. EVOL

1 cup or so of diced red onion; one decent sized one

1 lg garlic clove minced

1 medium butternut squash; peeled, seeded and cubed; at least a pound in weight

4 oz pancetta, diced

10-12 oz dried gf fettucine noodles.

Good quality Parmesan cheese to grate on plated entree

Directions:

Roast the squash; heat the oven to 400 degrees, spray a rimmed baking sheet with olive oil cooking spray; spread the cubed squash, drizzle with 1-2 Tbsp of EVOL and ½ tsp. kosher or sea salt, bake at 400 degrees for 45 to 60 minutes; turn cubes every 20 minutes with a metal spatula to help them cook evenly, a bit of crunch is nice! Start the rest of the recipe as they approach doneness or bake the squash a day before if that works for you. Have done it both ways. Crunchier if made right before serving

Heat a large pot of salted water for the pasta while you make the chard.  Chop it into 1 inch lengths; set the chopped leaves aside separately from the lower stem bits. Heat the EVOL in a large frying pan or smallish wok. Add the stems and cook 2-3 minutes, add garlic, stir, add the onion; cook 3-5 minutes until softening. Add rest of chard in 2-3 handfuls letting it cook down for a minute before stirring and adding the next third. Then push the veggies up the sides or to the edges and add the pancetta. Push the veggies gently back around and over the pancetta. Cook 2-3 minutes until the pancetta is hot and the chard is soft.  Meanwhile you have cooked the pasta to al dente. Add it to the pan with the chard, stir, add the roasted squash cubes. Stir. Serve with freshly grated Parmesan cheese on top; none of that pre-grated crappy cheese please! Enjoy!

swiss chard pasta plated

Not sure where I found this recipe, but it is a keeper; we generally enjoy it in the fall as chard and squash are fall harvest vegetables.