Apple Bread Pudding

This is a great take on bread pudding, adding fruit for flavor and added nutritional value. Apples are good for you and knowing they are in the pudding makes me able to rationalize this rich and delicious dessert concoction. I found this recipe online; it had a caramel sauce but honestly it seems sweet enough without that addition. I make a version that is more or less halved the original one. It’s in my fridge calling to me!

I used some Wide pan whole grain Aldi’s gluten free bread that was getting dry; perfect usage for it. I used more apple than the original as I love apple flavor. When in doubt I increase fruits/veggies in most dishes.

This can be gluten free as it was for me or use any bread you want. Enjoy!

Angie’s Apple Bread Pudding

Ingredients:

2 large eggs

1/4 cup sugar

1 cup heavy cream

1 cup 2 percent milk

2 small apples, peeled and cored and sliced on the thin side

2 Tbsp. melted butter, melted in a glass ramekin

1/2 tsp. cinnamon, divided

3-4 cups of cubed bread; I used 4 slices plus the end crust

1/2 tsp. vanilla extract

Directions:

Preheat oven to 350 degrees. Butter an 8 inch square baking pan or a 9×4 baking pan; I used cooking spray.

Cut the bread into the cubes and get the apples ready. I like thin slices as they go further and cook easily. Crack eggs into a large mixing bowl; whisk briefly to blend, add milk and cream and whisk good. Measure the sugar and set 1/2 Tsp sugar aside; add that to the 2 Tbsp. melted butter and add 1/4 tsp. cinnamon; blend and set aside. Pour the rest of the cinnamon, sugar and the vanilla into the milk and egg mixture and whisk until well blended. Put the bread cubes in the liquid and press into it to absorb the wet into the dry cubes using a large wooden spoon. Then pour half of it into the buttered pan and put apple slices all over the bottom; half of what you cut up. top with the rest of the bread/egg mixture and then with the rest of the apples. Pour the melted butter/cinnamon mixture over the top to cover the apples and bread mixture evenly. Bake about 40 minutes; should still be slightly jiggly when you take it out. Let the pan cool at least 15-20 minutes before serving.

Cowboy Cookie: Crazy Yummy!

My freezer is empty of cookies.  This is Not good.  Cookie baking was a priority for this week.  I saw this recipe 9 years ago on the net. A year or two later I finally had time to throw it together.  These cookies are created just like that; dump and blend and then there is a bit of stickiness in the shaping of them but no matter, just wash those sticky fingers and hands before you put on the oven gloves!

Notes: I like to use all dark brown sugar, I added walnuts, less vanilla and one batch I didn’t have quite enough Better Batter flour mix so I used a brown rice flour mix for the last ½ cup.   I sometimes don’t bother to beat the eggs; added them one at a time though. I got the coconut chips at Freys Better Foods here in Hellertown. I just made them today using Cup 4 cup blend, another good option for flour blend.

coconut chips

Cowboy cookies have been around a long time.  Popular with cowboys I assume! I have provided the recipe revised by it was published by Nicole Hunn in her fabulous blog, a great resource for gf baked goods.

They are sturdy and yummy.  The flavor is a mixture of semi-sweet chocolate chips, cinnamon, brown sugar and oats with a healthy dose of butter.  Totally. nummy. good.

cowboy cookie

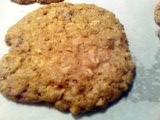
I never heard of them before my first batch although apparently, they have been around for decades. I read today that Laura Bush baked a version of them in her smack down with another First Lady wanna be. They are hearty and really big so I am guessing they might well be from Texas!

cowboy cookies

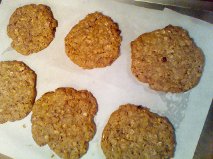
My first batch made 24 cookies, the recipe said 20….  One other time 30 cookies. So, mine were a tad smaller than suggested but still really large.  I ended up baking mine for 14 minutes, so I suggest you do likewise.  If you bake them one sheet at a time they should be done in 12 minutes, but I would rather bake 2 sheets simultaneously.  Some of the sets of six cookies were done on the parchment paper and one sheet was just on a cooking sprayed nonstick cookie sheet.  Both ways worked fine.  They spread some but not a lot so leave some space between them.

I plan to freeze most of them, so they last a bit.  I am guessing success will be my ability to pull one of these big boys out of the freezer and snack down after work next week!

Cowboy Cookies, GF

Ingredients

1 1/2 cups all purpose gluten free flour (Better Batter works great)

1/2 tsp xanthan gum (omit if your blend already contains it) *BB does!

1 tsp baking powder

1 tsp baking soda

1 1/2 tsp ground cinnamon

1/2 tsp kosher salt

8 ounces semi-sweet chocolate chips

1/2 cup granulated sugar

1 cup packed dark brown sugar

1 1/2 cups old fashioned rolled oats

1 1/2 cups coconut chips

2/3 cup chopped walnuts

10 tablespoons unsalted butter, at room temperature

2 eggs at room temperature, beaten

1 teaspoon pure vanilla extract

Directions

Preheat your oven to 325°F. Line rimmed baking sheets with unbleached parchment paper and set them aside.

In a large bowl, place the flour, xanthan gum, baking powder, baking soda, cinnamon and salt, and whisk to combine well.

Place about 1 teaspoon of the dry ingredients in a separate, small bowl and add the chocolate chips to the bowl. Toss to coat the chips, and set the bowl aside.

To the large bowl, add the granulated sugar and the brown sugar and whisk to combine, working out any lumps in the brown sugar. Add the oats and coconut chips and mix to combine. Create a well in the center of the dry ingredients and add the butter, eggs and vanilla, mixing to combine. Add the chips and reserved dry ingredients, and mix until the chips are evenly distributed throughout. If necessary to bring the dough together, knead it with your hands. Divide the dough into 20 pieces, each about 2 ounces. Roll each into a ball and place about 2 inches apart on the prepared baking sheets. Flatten each ball into disk about 1/4-inch thick with your palm or a big spatula.

Place the baking sheets in the center of the preheated oven, two at a time, and bake until lightly golden brown all over (about 14 minutes). Remove from the oven and allow them to cool on the baking sheet for about 5 minutes or until firm before transferring to a wire rack to cool completely.

Enjoy these fat and tasty big cookies; no one will ever guess they are gluten free!

Postscript: these freaking cookies are addictive! They are subtly flavored by the combination of the above-named ingredients.  My guy and my grandson Aiden loves them too.   Trust me, they are the bomb!

Note to self; follow recipe exactly and they are even better….  I make sure to beat the eggs first before pouring them on top of the softened butter and the vanilla.  I also remembered to add the chips last and watch them closely in the oven.  This batch is so yummy I had to put most of them in the freezer to keep myself from eating more cookies.  Perfect warm out of the oven.  OMG: I am in love with these cookies!

Limoncello Tiramisu Teacups

I wanted a special dessert using some leftover ladyfingers. I only had 4 but honestly, I wanted to try making lemoncello tiramisu and a whole big dish of said tiramisu would destroy what is left of my waistline! I cannot resist tiramisu so making a small test version for a lunch dessert for someone’s birthday treat seemed like a good idea. This will make 3 full-sized desserts. I put mine in antique teacups, so fun and gives me a good shape to create it within. Use whatever cup you have; in 4–7-ounce size.
I used homemade Limoncello using Meyer lemons my brother sent me from Texas. I altered the recipe I liked to make less of it and because it doesn’t have whipped cream and I wanted some of that in there.
Be sure to chill it about 3 hours, bare minimum of 2.

Continue reading

Peach Crumb Pie

It is the start of peach season so get some peaches and whip up a delicious gluten free peach pie.   This is an easy pie to create.  Slice and dump together the filling, crumb topping made in unwashed mixer bowl you used for bottom crust. You can store any leftover crumb mixture in a sealed container in the fridge; it keeps a few weeks.  I let my mix spin a few more moments in the stand mixer for extra big crumbs for this pie; love that look. If you prefer a solid crust just double the crust part and top your pie with it.  Be sure to cut some slits for steam escape! And if you don’t have time, buy a ready-made crust but homemade is always best.

Please make every effort to use local fruit; can get peaches at orchards like Bechdolt’s near Springtown, at most farm stands and at farmer’s markets; one on Saturdays in Easton or Sunday’s in Hellertown.  This pie really showcases great tasting peaches. If you use lousy peaches your pie will taste crummy. But, here’s the thing: store peaches can be poor in flavor and texture due to improper chilling so I strongly suggest you buy only locally grown, sweet, ripe peaches to make your pie.  I love when they have a pink blush; it makes the pie so pretty and perhaps even tastier!

peaches      raspberry-jam-014

To peel easily; heat 3 inches of plain water, drop the peaches gently in 4-5 at a time and  gently poach them 2-3 minutes.  Use the lesser time for more ripe peaches. Allow to cool somewhat before peeling.  I like to do that over a bowl to catch the juices as I slice each peach.

Bake and enjoy late summer in a pie in just a few minutes of work.  Don’t eat it hot; it should be cooled to just warm if you like it so or room temperature or even a bit chilled.  You could certainly serve this with vanilla ice cream.  And this pie works perfectly with fresh nectarines, bonus: no peeling required!


Angie’s GF Peach Crumb Pie

Crust:

1 c plus 2 tbsp brown rice flour mix (at bottom of recipe)

2 tbsp sweet rice flour

1 Tbps granulated sugar

½ tsp xanthan gum

¼ tsp salt

6 Tbps cold butter cut into 6 chunks

1 large egg

2 tsp fresh orange or lemon juice

Spray 9 inch metal pie pan with cooking spray, dust with white rice flour.

Mix dry ingredients in bowl of stand electric mixer.  Add butter and mix until crumbly and resembling coarse meal.  Add egg and juice.  Mix until it comes together into big chunks.  Shape into a ball with your hands. Put it on a crust sized piece of wax paper (14 x 14 inches more or less), flatten the crust ball some; put on top of it another piece of wax paper and chill it all in your fridge 15-20 minutes while you prepare the filling.

Filling:

6 cups sliced fresh peaches, peeled and cut in thick slices, place in medium bowl

Mix with:

½ cup sugar

1/4 tsp. cinnamon (optional)

3-4 Tbsp. quick tapioca

Stir in 1 tbsp. fresh lemon juice and ¼ tsp. almond extract

Let stand while you prepare the crust.

Roll out pie crust in a pie bag or between two sheets of wax paper, try to get the thickness even, no thick middle! Peel off one side of paper and place in pie pan, centered.  Remove other slice of wax paper.  Crimp edges all around.  Fill with fruit mixture.

Crumb topping

Put all four ingredients in the same mixing bowl you made the bottom crust in and mix well with mixer paddle until crumbs form. If you let them go extra long you get big fat crumbs if you want that look and I did!

¾ c brown rice flour mix

½ c sugar

½ tsp xanthan gum

1/3 c cold butter cut into six chunks

Sprinkle the top of the pie with crumb mix; use as much as you like.  I like about a heaping cup of the mixture.  Up to your personal taste… It sinks partially into the fruit mixture and adds lots of sweetness and eye appeal.

Bake in a preheated 400 degree oven for 45-50 minutes until bubbly and the crumb crust is light brown.  Cool at least 1 to 4 hours before serving at room temperature.  I think it is best served the same day you make it, or no more then 12 hours after baking for optimal flavor.  The crumbs will get soggy if too much time passes. Mine was still very good the next day; just not as great as when really fresh.

mom's new watch 013

Note: if you find your bottom crust is not browning enough bake it empty at 375 degrees for ten minutes before filling it with the fruit.  I have a bottom heat pizza style oven which gives me perfect pie crust so I don’t ever have pale pie crust.

Brown Rice Flour Mix (Same as King Arthur GF All purpose blend)
2 c brown rice flour (finely ground)

2/3 c potato starch – Not potato flour!

1/3 c tapioca flour

Note: This post was originally blogged by me the late summer of 2015. Minor changes made.

Swiss Chard Tacos

Tomorrow is Tuesday; taco Tuesday to be exact! Meatless meals don’t thrill me like those made with serious proteins, favorites like salmon, poultry, lamb or pork.  That said, I have a few delightful vegetarian items I make on occasion.  Time to add another to my roster; these Swiss chard tacos. My sister made these while I was up visiting her.  I was skeptical but found them to be really delicious and a great way to use up a lot of the Swiss chard growing profusely in my gardens!  No meat but you won’t miss it in these flavorful and filling tacos.

I sometimes use Mexican cheese but you can also use Monterey Jack as that is what the original recipe called for and what I currently prefer.  The recipe is out of an old Home and Garden magazine. I made a few changes….added some ground cumin for extra spice. Don’t forget the red wine vinegar, really a great finishing touch.

The white corn tortillas in these pictures (La Bandarita brand) came from Wegmans; they have one up near Boston.  There are three Wegman’s here near me. I got some light corn tortillas today at my local Giant; they work well. Enjoy!

chard taco

Sorry for the messy picture. I guess I should make a prettier taco!

Karen’s Swiss Chard Tacos

1 lb Swiss chard

½ tsp. cumin seeds

¼ tsp. ground cumin

½ a red onion, chopped

1 red pepper, chopped

1 tbsp. olive oil

1 clove garlic minced

1 Tbsp. red wine vinegar

1 can of black beans, rinsed and well drained

8 tortillas; corn flour

1 cup of Monterey jack cheese or Queso Fresca cheese; grated

1/3 cup sour cream, reduced fat is my preference

cilantro for garnish if desired

Directions:

Chop up the chard stems into half inch dice.  Rough chop the rest of the chard and set aside. Heat a large frying pan and add the cumin seeds; cook 1-2 minutes until fragrant.  Add olive oil then chard stems.  Cook 3 minutes until softening.  Add the chard leaves that you have rough chopped, ground cumin, onion, garlic and red pepper.  Cook 3 min, stirring.  Add the red wine vinegar and the black beans.  Stir well, cook 3-4 minutes longer. The greens should be wilted but they don’t need to be fully cooked down.

Meanwhile while the filling cooks; heat oven to 350 degrees.  Lay tortillas out on baking sheets.  Sprinkle grated cheese in the center of each.  Bake 4-5 minutes until cheese starts melting and tortilla is somewhat crisp. Remove from oven.  Place a generous amount of chard mixture on each tortilla.  Top with a spoonful of sour cream.  Sprinkle cilantro over top if desired.  I am not a fan but you might be…