
I wanted a special dessert using some leftover ladyfingers. I only had 4 but honestly, I wanted to try making lemoncello tiramisu and a whole big dish of said tiramisu would destroy what is left of my waistline! I cannot resist tiramisu so making a small test version for a lunch dessert for someone’s birthday treat seemed like a good idea. This will make 3 full-sized desserts. I put mine in antique teacups, so fun and gives me a good shape to create it within. Use whatever cup you have; in 4–7-ounce size.
I used homemade Limoncello using Meyer lemons my brother sent me from Texas. I altered the recipe I liked to make less of it and because it doesn’t have whipped cream and I wanted some of that in there.
Be sure to chill it about 3 hours, bare minimum of 2.
Uncategorized

Peach Crumb Pie
It is the start of peach season so get some peaches and whip up a delicious gluten free peach pie. This is an easy pie to create. Slice and dump together the filling, crumb topping made in unwashed mixer bowl you used for bottom crust. You can store any leftover crumb mixture in a sealed container in the fridge; it keeps a few weeks. I let my mix spin a few more moments in the stand mixer for extra big crumbs for this pie; love that look. If you prefer a solid crust just double the crust part and top your pie with it. Be sure to cut some slits for steam escape! And if you don’t have time, buy a ready-made crust but homemade is always best.
Please make every effort to use local fruit; can get peaches at orchards like Bechdolt’s near Springtown, at most farm stands and at farmer’s markets; one on Saturdays in Easton or Sunday’s in Hellertown. This pie really showcases great tasting peaches. If you use lousy peaches your pie will taste crummy. But, here’s the thing: store peaches can be poor in flavor and texture due to improper chilling so I strongly suggest you buy only locally grown, sweet, ripe peaches to make your pie. I love when they have a pink blush; it makes the pie so pretty and perhaps even tastier!


To peel easily; heat 3 inches of plain water, drop the peaches gently in 4-5 at a time and gently poach them 2-3 minutes. Use the lesser time for more ripe peaches. Allow to cool somewhat before peeling. I like to do that over a bowl to catch the juices as I slice each peach.
Bake and enjoy late summer in a pie in just a few minutes of work. Don’t eat it hot; it should be cooled to just warm if you like it so or room temperature or even a bit chilled. You could certainly serve this with vanilla ice cream. And this pie works perfectly with fresh nectarines, bonus: no peeling required!


Angie’s GF Peach Crumb Pie
Crust:
1 c plus 2 tbsp brown rice flour mix (at bottom of recipe)
2 tbsp sweet rice flour
1 Tbps granulated sugar
½ tsp xanthan gum
¼ tsp salt
6 Tbps cold butter cut into 6 chunks
1 large egg
2 tsp fresh orange or lemon juice
Spray 9 inch metal pie pan with cooking spray, dust with white rice flour.
Mix dry ingredients in bowl of stand electric mixer. Add butter and mix until crumbly and resembling coarse meal. Add egg and juice. Mix until it comes together into big chunks. Shape into a ball with your hands. Put it on a crust sized piece of wax paper (14 x 14 inches more or less), flatten the crust ball some; put on top of it another piece of wax paper and chill it all in your fridge 15-20 minutes while you prepare the filling.
Filling:
6 cups sliced fresh peaches, peeled and cut in thick slices, place in medium bowl
Mix with:
½ cup sugar
1/4 tsp. cinnamon (optional)
3-4 Tbsp. quick tapioca
Stir in 1 tbsp. fresh lemon juice and ¼ tsp. almond extract
Let stand while you prepare the crust.
Roll out pie crust in a pie bag or between two sheets of wax paper, try to get the thickness even, no thick middle! Peel off one side of paper and place in pie pan, centered. Remove other slice of wax paper. Crimp edges all around. Fill with fruit mixture.
Crumb topping
Put all four ingredients in the same mixing bowl you made the bottom crust in and mix well with mixer paddle until crumbs form. If you let them go extra long you get big fat crumbs if you want that look and I did!
¾ c brown rice flour mix
½ c sugar
½ tsp xanthan gum
1/3 c cold butter cut into six chunks
Sprinkle the top of the pie with crumb mix; use as much as you like. I like about a heaping cup of the mixture. Up to your personal taste… It sinks partially into the fruit mixture and adds lots of sweetness and eye appeal.
Bake in a preheated 400 degree oven for 45-50 minutes until bubbly and the crumb crust is light brown. Cool at least 1 to 4 hours before serving at room temperature. I think it is best served the same day you make it, or no more then 12 hours after baking for optimal flavor. The crumbs will get soggy if too much time passes. Mine was still very good the next day; just not as great as when really fresh.

Note: if you find your bottom crust is not browning enough bake it empty at 375 degrees for ten minutes before filling it with the fruit. I have a bottom heat pizza style oven which gives me perfect pie crust so I don’t ever have pale pie crust.
Brown Rice Flour Mix (Same as King Arthur GF All purpose blend)
2 c brown rice flour (finely ground)
2/3 c potato starch – Not potato flour!
1/3 c tapioca flour
Note: This post was originally blogged by me the late summer of 2015. Minor changes made.
Swiss Chard Tacos
Tomorrow is Tuesday; taco Tuesday to be exact! Meatless meals don’t thrill me like those made with serious proteins, favorites like salmon, poultry, lamb or pork. That said, I have a few delightful vegetarian items I make on occasion. Time to add another to my roster; these Swiss chard tacos. My sister made these while I was up visiting her. I was skeptical but found them to be really delicious and a great way to use up a lot of the Swiss chard growing profusely in my gardens! No meat but you won’t miss it in these flavorful and filling tacos.
I sometimes use Mexican cheese but you can also use Monterey Jack as that is what the original recipe called for and what I currently prefer. The recipe is out of an old Home and Garden magazine. I made a few changes….added some ground cumin for extra spice. Don’t forget the red wine vinegar, really a great finishing touch.
The white corn tortillas in these pictures (La Bandarita brand) came from Wegmans; they have one up near Boston. There are three Wegman’s here near me. I got some light corn tortillas today at my local Giant; they work well. Enjoy!


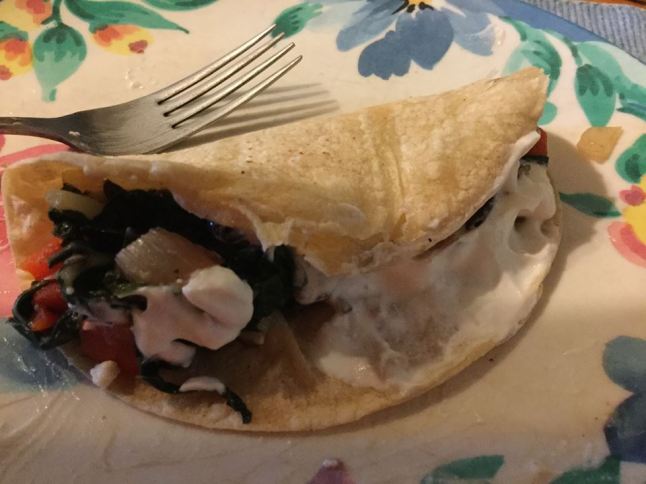
Sorry for the messy picture. I guess I should make a prettier taco!
Karen’s Swiss Chard Tacos
1 lb Swiss chard
½ tsp. cumin seeds
¼ tsp. ground cumin
½ a red onion, chopped
1 red pepper, chopped
1 tbsp. olive oil
1 clove garlic minced
1 Tbsp. red wine vinegar
1 can of black beans, rinsed and well drained
8 tortillas; corn flour
1 cup of Monterey jack cheese or Queso Fresca cheese; grated
1/3 cup sour cream, reduced fat is my preference
cilantro for garnish if desired
Directions:
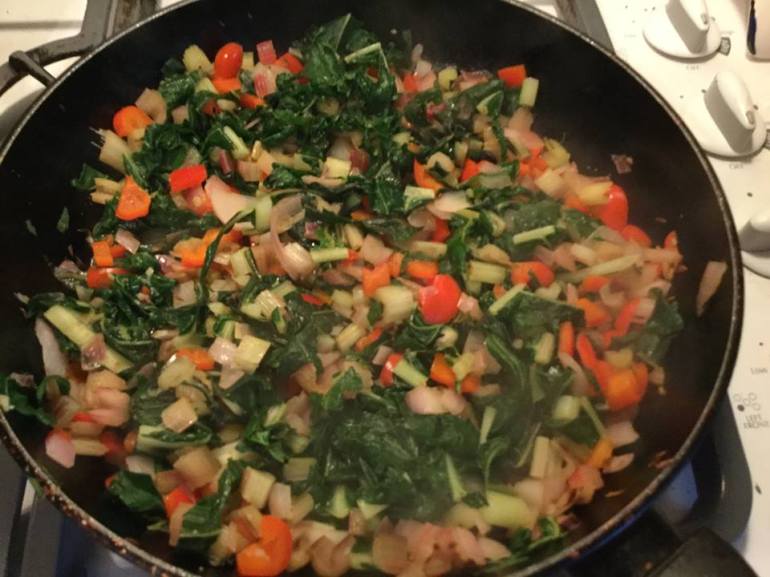
Chop up the chard stems into half inch dice. Rough chop the rest of the chard and set aside. Heat a large frying pan and add the cumin seeds; cook 1-2 minutes until fragrant. Add olive oil then chard stems. Cook 3 minutes until softening. Add the chard leaves that you have rough chopped, ground cumin, onion, garlic and red pepper. Cook 3 min, stirring. Add the red wine vinegar and the black beans. Stir well, cook 3-4 minutes longer. The greens should be wilted but they don’t need to be fully cooked down.
Meanwhile while the filling cooks; heat oven to 350 degrees. Lay tortillas out on baking sheets. Sprinkle grated cheese in the center of each. Bake 4-5 minutes until cheese starts melting and tortilla is somewhat crisp. Remove from oven. Place a generous amount of chard mixture on each tortilla. Top with a spoonful of sour cream. Sprinkle cilantro over top if desired. I am not a fan but you might be…

Summer Risotto: Light and Delicious
I love risotto and am always looking for new recipes. I saw this one on epicurious but I don’t have a subscription, so I lost access to the recipe and had to create my own version. The garlic clove (minced) is optional as is the cheese. It has a lighter texture than my usual risotto made with chicken broth and white wine and a delicate flavor that if you didn’t know it was pineapple you might be stumped as to what was used in place of white wine. I am crazy about it’s subtle flavor and lightened texture. I left off the cheese and garlic but feel free to add them. It is vegetarian, made with pseudo butter it can be vegan. It is my new fav summer dish!
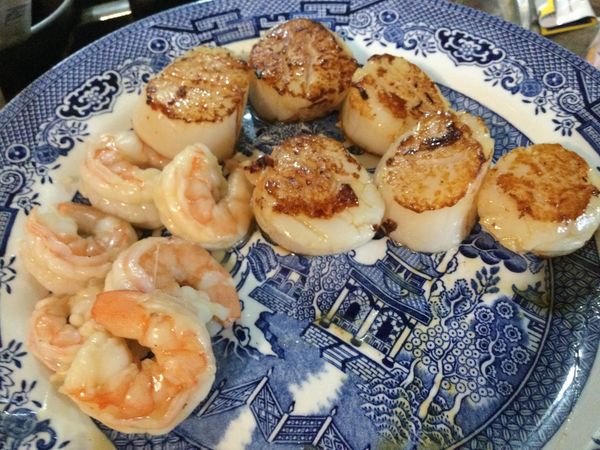
I served it topped with sautéed scallops and shrimp, 3 of each. You can actually cook the shrimp in the rice; toss the peeled raw shrimp in for the last 4-6 minutes or so of cooking. I pan fried the scallops, in mild olive oil for 2 minutes on a side until browned. This is a lovely light summer dish for delightful dining. Other seafood might be lovely too, try oven baked pork tenderloin slices or some sautéed boneless chicken.

Ingredients:
3 Tbsp. butter divided
1 Tbsp. mild olive oil
1 cup arborio rice (I used Italian Vialone Nano rice imported from Itally which is especially authentic for risotto.)
1/2 cup chopped onion
1 minced garlic clove
1 small can pineapple juice; about 2/3 cup. Add veggie broth to make the total 3 1/4 cups.
1/2 tsp. sea salt
1/4 tsp. fresh ground black pepper
1/4-1/3 cup freshly grated parmesan cheese (optional)
1-2 Tbsp. finely chopped fresh basil or whole tiny basil leaves
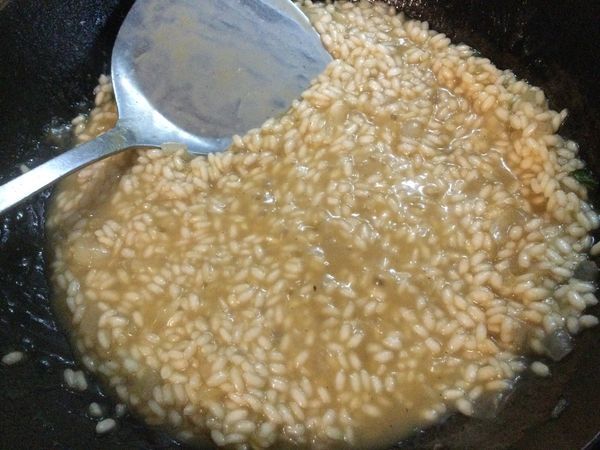
Directions: Heat large saucepan (I use my mini wok) and add 2 tbsp. butter and the oil, melt butter and add chopped onion, cook 2 minutes; add the rice. Stir and cook 2 minutes while you heat the veggie broth and pineapple juice in a saucepan until hot but not boiling.
To the pan add garlic if you want (optional) and then add broth/juice mixture, one ladle full at a time. Stir after adding each ladle and stir a couple times as it cooks. When the broth is mostly absorbed add another ladle. When I add the first ladle, I set my timer for 18 minutes. When the 18 minutes have elapsed add a tablespoon of butter and 1/4 the chopped basil, also salt and pepper. Stir well and cook 1-2 minutes. Add another few tablespoons of veggie broth if it looks dry. I did a quarter cup more liquid when I made it. Stir frequently and taste; can cook another minute if necessary (total of 20 minutes for the dish once rice added.) Turn it off and stir in optional grated cheese, then add the basil leaves, stir and serve.
I served it in a mound with some sauted whole shrimp and scallops fried top and bottom about 4 minutes total. Delicious!

Sweet Corn Cooking Hack
Sweet corn season is here. In many places really good sweet corn can be had, like farms markets, road side stands and even Wegmans! I don’t know about you but when I only am making one or two ears it seems silly to fire up a tall pot of water. I do steam the corn which only takes an inch or so of hot water but still…too much to do.
A few summers ago on a hot day, I realized there was a quick and easy way to make an ear…or two without that big hot pan of water and steam. I just take a large frying pan, put a quarter inch of water in it, sprinkle of salt and let it heat until bubbling. I then lay in my ear or two which I have husked and removed all the silk. Then the pan is topped with a lid or an empty pizza pan if your frying pan is too big for your lids. Cook it the usual time; depends on how fresh the corn is. The fresher your corn ears, the less cooking time you need. The steam in the pan will cook it really fast. Maybe 6 to 8 minutes. I have been doing this since 2016 and it is such a better way to steam corn. Just give it a try; I know you will find this a great way to cook sweet corn.


And the bonus is that if it runs out of water your ear will get a bit of carmelization going which only adds to the flavor. In fact, I hope it gets browned a bit; sometimes I rotate the ear to brown it on another side. Remove with tongs when your corn reaches the done stage you like. Sometimes I take a quick bite to test for eating readiness!
Serve your ear(s) with salt and butter and enjoy fresh corn without heating the kitchen up much. Oh, and I have some lovely prong thingies my sister gave me for pushing into the corn, so my fingers stay cool as I munch corn. Great idea. Get them! Mine are plain like these; they do make corny looking versions, but I prefer these simple looking ones. 
Originally posted in 2016. A few minor grammar changes were made.  
