Summer Risotto: Light and Delicious

I love risotto and am always looking for new recipes. I saw this one on epicurious but I don’t have a subscription, so I lost access to the recipe and had to create my own version. The garlic clove (minced) is optional as is the cheese. It has a lighter texture than my usual risotto made with chicken broth and white wine and a delicate flavor that if you didn’t know it was pineapple you might be stumped as to what was used in place of white wine. I am crazy about it’s subtle flavor and lightened texture. I left off the cheese and garlic but feel free to add them. It is vegetarian, made with pseudo butter it can be vegan. It is my new fav summer dish!

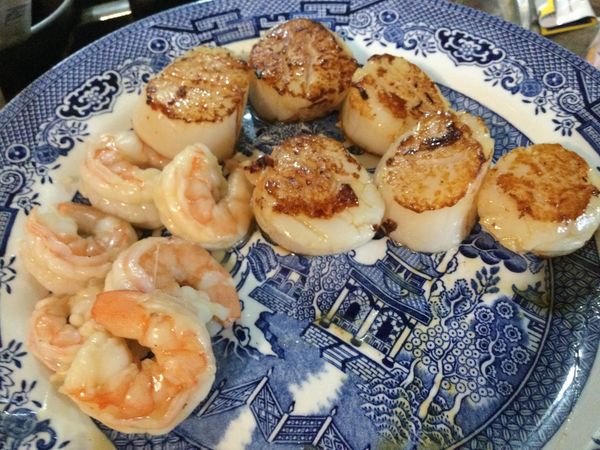
I served it topped with sautéed scallops and shrimp, 3 of each. You can actually cook the shrimp in the rice; toss the peeled raw shrimp in for the last 4-6 minutes or so of cooking. I pan fried the scallops, in mild olive oil for 2 minutes on a side until browned. This is a lovely light summer dish for delightful dining. Other seafood might be lovely too, try oven baked pork tenderloin slices or some sautéed boneless chicken.

The tiny grains of short rice swell up as they absorb the liquid you add to the pan, stirring frequently.
Pan fried scallops and shrimp poached in the rice. Waiting to be added on top of the plated risotto.
Sorry about the old and sad melamine plate; it was a delicious meal for sure!

Ingredients:

3 Tbsp. butter divided

1 Tbsp. mild olive oil

1 cup arborio rice (I used Italian Vialone Nano rice imported from Itally which is especially authentic for risotto.)

1/2 cup chopped onion

1 minced garlic clove

1 small can pineapple juice; about 2/3 cup. Add veggie broth to make the total 3 1/4 cups.

1/2 tsp. sea salt

1/4 tsp. fresh ground black pepper

1/4-1/3 cup freshly grated parmesan cheese (optional)

1-2 Tbsp. finely chopped fresh basil or whole tiny basil leaves

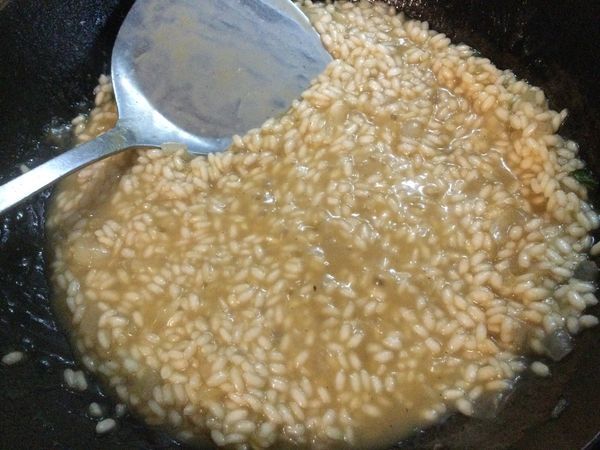
Directions: Heat large saucepan (I use my mini wok) and add 2 tbsp. butter and the oil, melt butter and add chopped onion, cook 2 minutes; add the rice. Stir and cook 2 minutes while you heat the veggie broth and pineapple juice in a saucepan until hot but not boiling.

To the pan add garlic if you want (optional) and then add broth/juice mixture, one ladle full at a time.  Stir after adding each ladle and stir a couple times as it cooks.  When the broth is mostly absorbed add another ladle. When I add the first ladle, I set my timer for 18 minutes. When the 18 minutes have elapsed add a tablespoon of butter and 1/4 the chopped basil, also salt and pepper. Stir well and cook 1-2 minutes. Add another few tablespoons of veggie broth if it looks dry. I did a quarter cup more liquid when I made it. Stir frequently and taste; can cook another minute if necessary (total of 20 minutes for the dish once rice added.) Turn it off and stir in optional grated cheese, then add the basil leaves, stir and serve.

I served it in a mound with some sauted whole shrimp and scallops fried top and bottom about 4 minutes total. Delicious!

Sweet Corn Cooking Hack

Sweet corn season is here.  In many places really good sweet corn can be had, like farms markets, road side stands and even Wegmans!  I don’t know about you but when I only am making one or two ears it seems silly to fire up a tall pot of water.  I do steam the corn which only takes an inch or so of hot water but still…too much to do.

A few summers ago on a hot day, I realized there was a quick and easy way to make an ear…or two without that big hot pan of water and steam. I just take a large frying pan, put a quarter inch of water in it, sprinkle of salt and let it heat until bubbling.  I then lay in my ear or two which I have husked and removed all the silk.  Then the pan is topped with a lid or an empty pizza pan if your frying pan is too big for your lids.  Cook it the usual time; depends on how fresh the corn is.  The fresher your corn ears, the less cooking time you need.  The steam in the pan will cook it really fast.  Maybe 6 to 8 minutes. I have been doing this since 2016 and it is such a better way to steam corn. Just give it a try; I know you will find this a great way to cook sweet corn.

And the bonus is that if it runs out of water your ear will get a bit of carmelization going which only adds to the flavor.  In fact, I hope it gets browned a bit; sometimes I rotate the ear to brown it on another side.  Remove with tongs when your corn reaches the done stage you like.  Sometimes I take a quick bite to test for eating readiness!

Serve your ear(s) with salt and butter and enjoy fresh corn without heating the kitchen up much.  Oh, and I have some lovely prong thingies my sister gave me for pushing into the corn, so my fingers stay cool as I munch corn.  Great idea. Get them! Mine are plain like these; they do make corny looking versions, but I prefer these simple looking ones. 

Originally posted in 2016. A few minor grammar changes were made.  corn prongs

Blueberry Crumb Pie – Delish!

As it is almost blueberry season, I was feeling the need to share my blueberry crumb pie.

This is really easy to create.  Slice and dump together the filling, crumb topping gets quickly made by dumping ingredients in the mixer bowl you used for the bottom crust. You can store any leftover crumb mixture in a sealed container in the fridge; it keeps a few weeks.  This GF crumb topping is perfect for most any fruit pie.

Bake and enjoy summer in a pie in just a few minutes of work.  Don’t eat it piping hot; it should be cooled to room temperature.  You could certainly serve this with vanilla ice cream or any other vanilla topping.

Angie’s GF Blueberry Crumb Pie

Crust:

1 c plus 2 tbsp brown rice flour mix (at bottom of recipe) or King Arthur’s Basic gf flour

2 tbsp sweet rice flour

1 Tbsp. granulated sugar

½ tsp xanthan gum

¼ tsp salt

6 Tbsp. cold butter cut into 6-10 chunks

1 lg egg

2 tsp fresh orange or lemon juice

Spray 9 inch metal pie pan with cooking spray, dust with white rice flour.

Mix dry ingredients in bowl of stand electric mixer.  Add butter and mix until crumbly and resembling coarse meal.  Add egg and juice.  Mix until it comes together into big chunks.  Shape into a ball with your hands. Put it on a crust sized piece of wax paper (14 x 14 inches more or less), flatten the crust ball some; put on top of it another piece of wax paper and chill it all in your fridge 15-20 minutes while you prepare the filling.

Filling:

5 cups fresh blueberries – place in medium bowl

Mix with: ½ cup sugar

1/4 tsp. cinnamon

3 tbsp. quick tapioca

Add and stir in

2 tsp. fresh lemon juice

Let stand while you prepare the crust.

Roll out pie crust in a pie bag or between the two sheets of wax paper, try to get the thickness even, no thick middle! Peel off one side of paper and place in pie pan, centered.  Remove other slice of wax paper.  Crimp edges all around.  Fill with fruit mixture.

Crumb topping

Put all four ingredients in the same mixing bowl you made the bottom crust in and mix well with mixer paddle until crumbs form.

¾ c brown rice flour mix

½ c sugar

½ tsp xanthan gum

1/3 c cold butter cut into six chunks

Sprinkle the top of the pie with crumb mix; use as much as you like.  I like about three quarters of the mixture.  Up to your personal taste… It sinks partially into the fruit mixture and adds lots of sweetness and eye appeal.

Bake in a preheated 375 degree oven for 50 or so minutes until the blueberries are bubbly and the crumb crust is light brown.  I put a piece of aluminum foil on top for the last ten minutes if the crumbs are getting too browned.  Cool at least 2 to 4 hours before serving at room temperature.  I think it is best served the same day you make it, or no more then 12 hours after baking for optimal flavor.  The crumbs will get soggy if too much time passes.

Note: if you find your bottom crust is not browning enough bake it empty at 375 degrees for ten minutes before filling it with the fruit.  I am lucky to have a bottom heat pizza style oven which gives me perfect pie crust so I don’t ever have pale pie crust.

Brown Rice Flour Mix (same as King Arthur basic gf blend)

2 c brown rice flour

2/3 c potato starch – not potato flour!

1/3 c tapioca flour

***************************************

The crust and crumb recipes are from Annalise Roberts great cookbook, GF Baking Classics, Second Edition.

Reprinted from 2016 post; no changes to recipe.

Rhubarb Cobbler – Easy Spring treat

My spring mission: to convince you rhubarb haters to try one of these recipes.  This one is delicate in flavor with a fluffy yet satisfying cobbler topping and no sour ickiness as some say rhubarb can be.  It takes a bit less fruit than a pie and goes together in just a few minutes.  And it is gluten free for all of you who must avoid gluten which means wheat, rye or barley flours are a no-no in baking.

This recipe is the same basic one I posted about for peach cobbler in the past; it is modified from a muffin dry mix in Bette Hagman’s book, More from the Gluten-Free Gourmet and uses a flour mix that will give you 4 cups of the dry ingredients.  One cup will make an 8×8 pan of cobbler topping.  I keep the rest of my dry mix in the freezer and a pan of cobbler can be thrown together in less than 10 minutes plus baking time.  What a time saver this mix is! I make all sorts of cobblers with it.  i made an apple blackberry one last Saturday using some frozen blackberries; very tasty it was!

I always get the fruit part cooking before putting the topping together so the fruit is hot and ready for the topping and can go right into the oven.

rhubarb cobbler

Angie’s Rhubarb Cobbler

Dry Cobbler Mix – use one cup for this recipe and freeze the rest

2 ¼ cups white rice flour

½ cup potato starch (not potato flour!)

½ cup tapioca flour

1 tsp. baking soda

4 tsp. baking powder

1 tsp salt

1 tsp. xanthan gum

1/3 cup sugar

Fruit Filling

4 cups sliced rhubarb

½ tsp. almond extract

½-2/3 cup sugar –add more or less depending on how sweet you want it

2 tbsp. GF flour

1/4 tsp cinnamon

Directions:

Mix the fruit and almond extract in a sauce pan. Stir together the sugar, cinnamon and flour and mix into the fruit.  Cook on the stove top at a low heat for 5-10 minutes until it is thickened and hot. I suggest you stir it every minute or so to prevent burning.  Pour into a buttered 8 inch square pan, top with big blobs of the cobbler topping.

Cobbler Topping

1 cup dry baking mix

2 eggs

2 tbsp melted butter or canola oil (both work fine)

1/3 cup milk/buttermilk (I skimp a tbsp or two off to keep it from being runny)

½ tsp. vanilla or 1/4 tsp almond extract

Mix the wet ingredients and then add to the dry mix in a big bowl.   Mix briefly: do not over-mix for best texture.  Use a big spoon to plop it right away on the hot fruit.  Bake immediately as baking soda and powder can’t stand around waiting or they lose their umph!

Bake at 350 degrees for 25 minutes.  The top should be light brown and spring back when you poke it with your finger.  If it looks damp or squishy bake it 5 more minutes.

Let cool 5-7 minutes before serving as it will burn your mouth right out of the oven!  Some people love it with a scoop of vanilla ice cream.  This tender rhubarb cobbler is perfect just on its own.

Reposted with minor changes from June 2015.

Strawberry Rhubarb Crumb Pie

Strawberry season is here and rhubarb is plentiful right now so let’s make a pie with these spring fruits. This is a crowd favorite and you will certainly get a few compliments if you make it for your family.

This is an easy pie to construct and you can store any leftover crumb mixture in a sealed container in the fridge; it keeps a few weeks.  The GF crust will work for any pie and the GF crumb topping is perfect for any crumb pie.  If you prefer a solid crust just double the crust part and top your pie with it.  Be sure to cut some slits for steam escape!

Please make every effort to use local strawberries; can get at most farm stands.  This pie really showcases the strawberries more than the rhubarb which is a silent partner so that is why I suggest you get the best; locally grown sweet ripe strawberries to make your perfect pie. If you don’t get local, at least get organic berries. They are much healthier for you and probably more flavorful.

Bake and enjoy an early summer pie in just a few minutes of work.  Don’t eat it hot; it should be cooled to room temperature or even chilled. I eat it both ways and love it either way.  I am sure you could top this with vanilla ice cream for even more yumminess.

Angie’s GF Strawberry Rhubarb Crumb Pie

Crust:

1 c plus 2 tbsp brown rice flour mix (at bottom of recipe)

2 tbsp sweet rice flour

1 Tbsp. granulated sugar

½ tsp xanthan gum

¼ tsp salt

6 Tbsp. cold butter cut into 6 chunks

1 lg. egg

2 tsp fresh orange or lemon juice

Spray 9 inch metal pie pan with cooking spray, dust with white rice flour.

Mix dry ingredients in bowl of stand electric mixer.  Add butter and mix until crumbly and resembles coarse meal.  Add egg and citrus juice.  Mix until it comes together into big chunks.  Shape into a ball with your hands. Put it on a crust sized piece of wax paper (14 x 14 inches more or less), flatten the crust ball some; put on top of it another piece of wax paper and chill it all in your fridge 15-20 minutes while you chop the rhubarb into ½ inch chunks and hull/slice the strawberries.

Filling:

2 cups fresh strawberries, hulled and cut in thick slices

2-3 cups cut up fresh rhubarb – place in medium bowl

Mix with

½ to 2/3  cup sugar ( I used ½ cup but you might like it sweeter.)

1/3 c gluten free flour mix (see below recipe or Better Batter flour works great.)

I sometimes add a tsp. of orange zest to the filling; a great pairing with these fruits.

Crust: Roll out pie crust in a pie bag or between the two sheets of wax paper; try to get the thickness even, no thick middle! Peel off one side of paper and place in pie pan, centered.  Remove other slice of wax paper.  Crimp edges all around.  Fill with dry strawberry – rhubarb mixture

Crumb topping

Put all four ingredients in the same mixing bowl you made the bottom crust in and mix well with mixer paddle until crumbs form.

¾ c brown rice flour mix

½ c sugar

½ tsp xanthan gum

1/3 c cold butter cut into six chunks

Continued directions: Sprinkle the top of the pie with crumb mix; use as much as you like.  I like about ½ to 2/3 of the mixture.  Up to your personal taste… It sinks partially into the fruit mixture and adds lots of sweetness and eye appeal.

Bake in a preheated 425 degree oven for 40-50 minutes until bubbly and the crust is light brown.  I have a bottom heat oven so my crust gets nice and brown.  If that is an issue for you, bake the empty bottom crust ten minutes before filling so it gets a head start.

Cool at least 2 to 4 hours before serving at room temperature.

Brown Rice Flour Mix (Same as King Arthur Basic GF Blend) {Not Measure for Measure]
2 c brown rice flour

2/3 c potato starch

1/3 c tapioca flour

This post was originally shared in July 2015.  Slight changes to the text were made but the recipe is pretty much the same.