Un-stuffed Cabbage n Beef Casserole

Stuffed cabbage rolls are definitely a Pennsylvania treat. But making this recipe can be time consuming and complex; you have to cook the whole cabbage leaves and separately cook the filling and roll up it inside the half cooked leaves, sauce it and bake it. This is just way, way easier and pretty much better in my opinion. Less work, less heat in my kitchen (I did it in my Instant Pot but you could use a slow cooker or bake in the oven.) It isn’t a pretty dish to photograph and I frankly forgot to take pictures of making it. I debated even sharing it due to this but the flavor is so delish I knew I was gonna make it again so I wanted you to have the option to give it a try.

cabbages

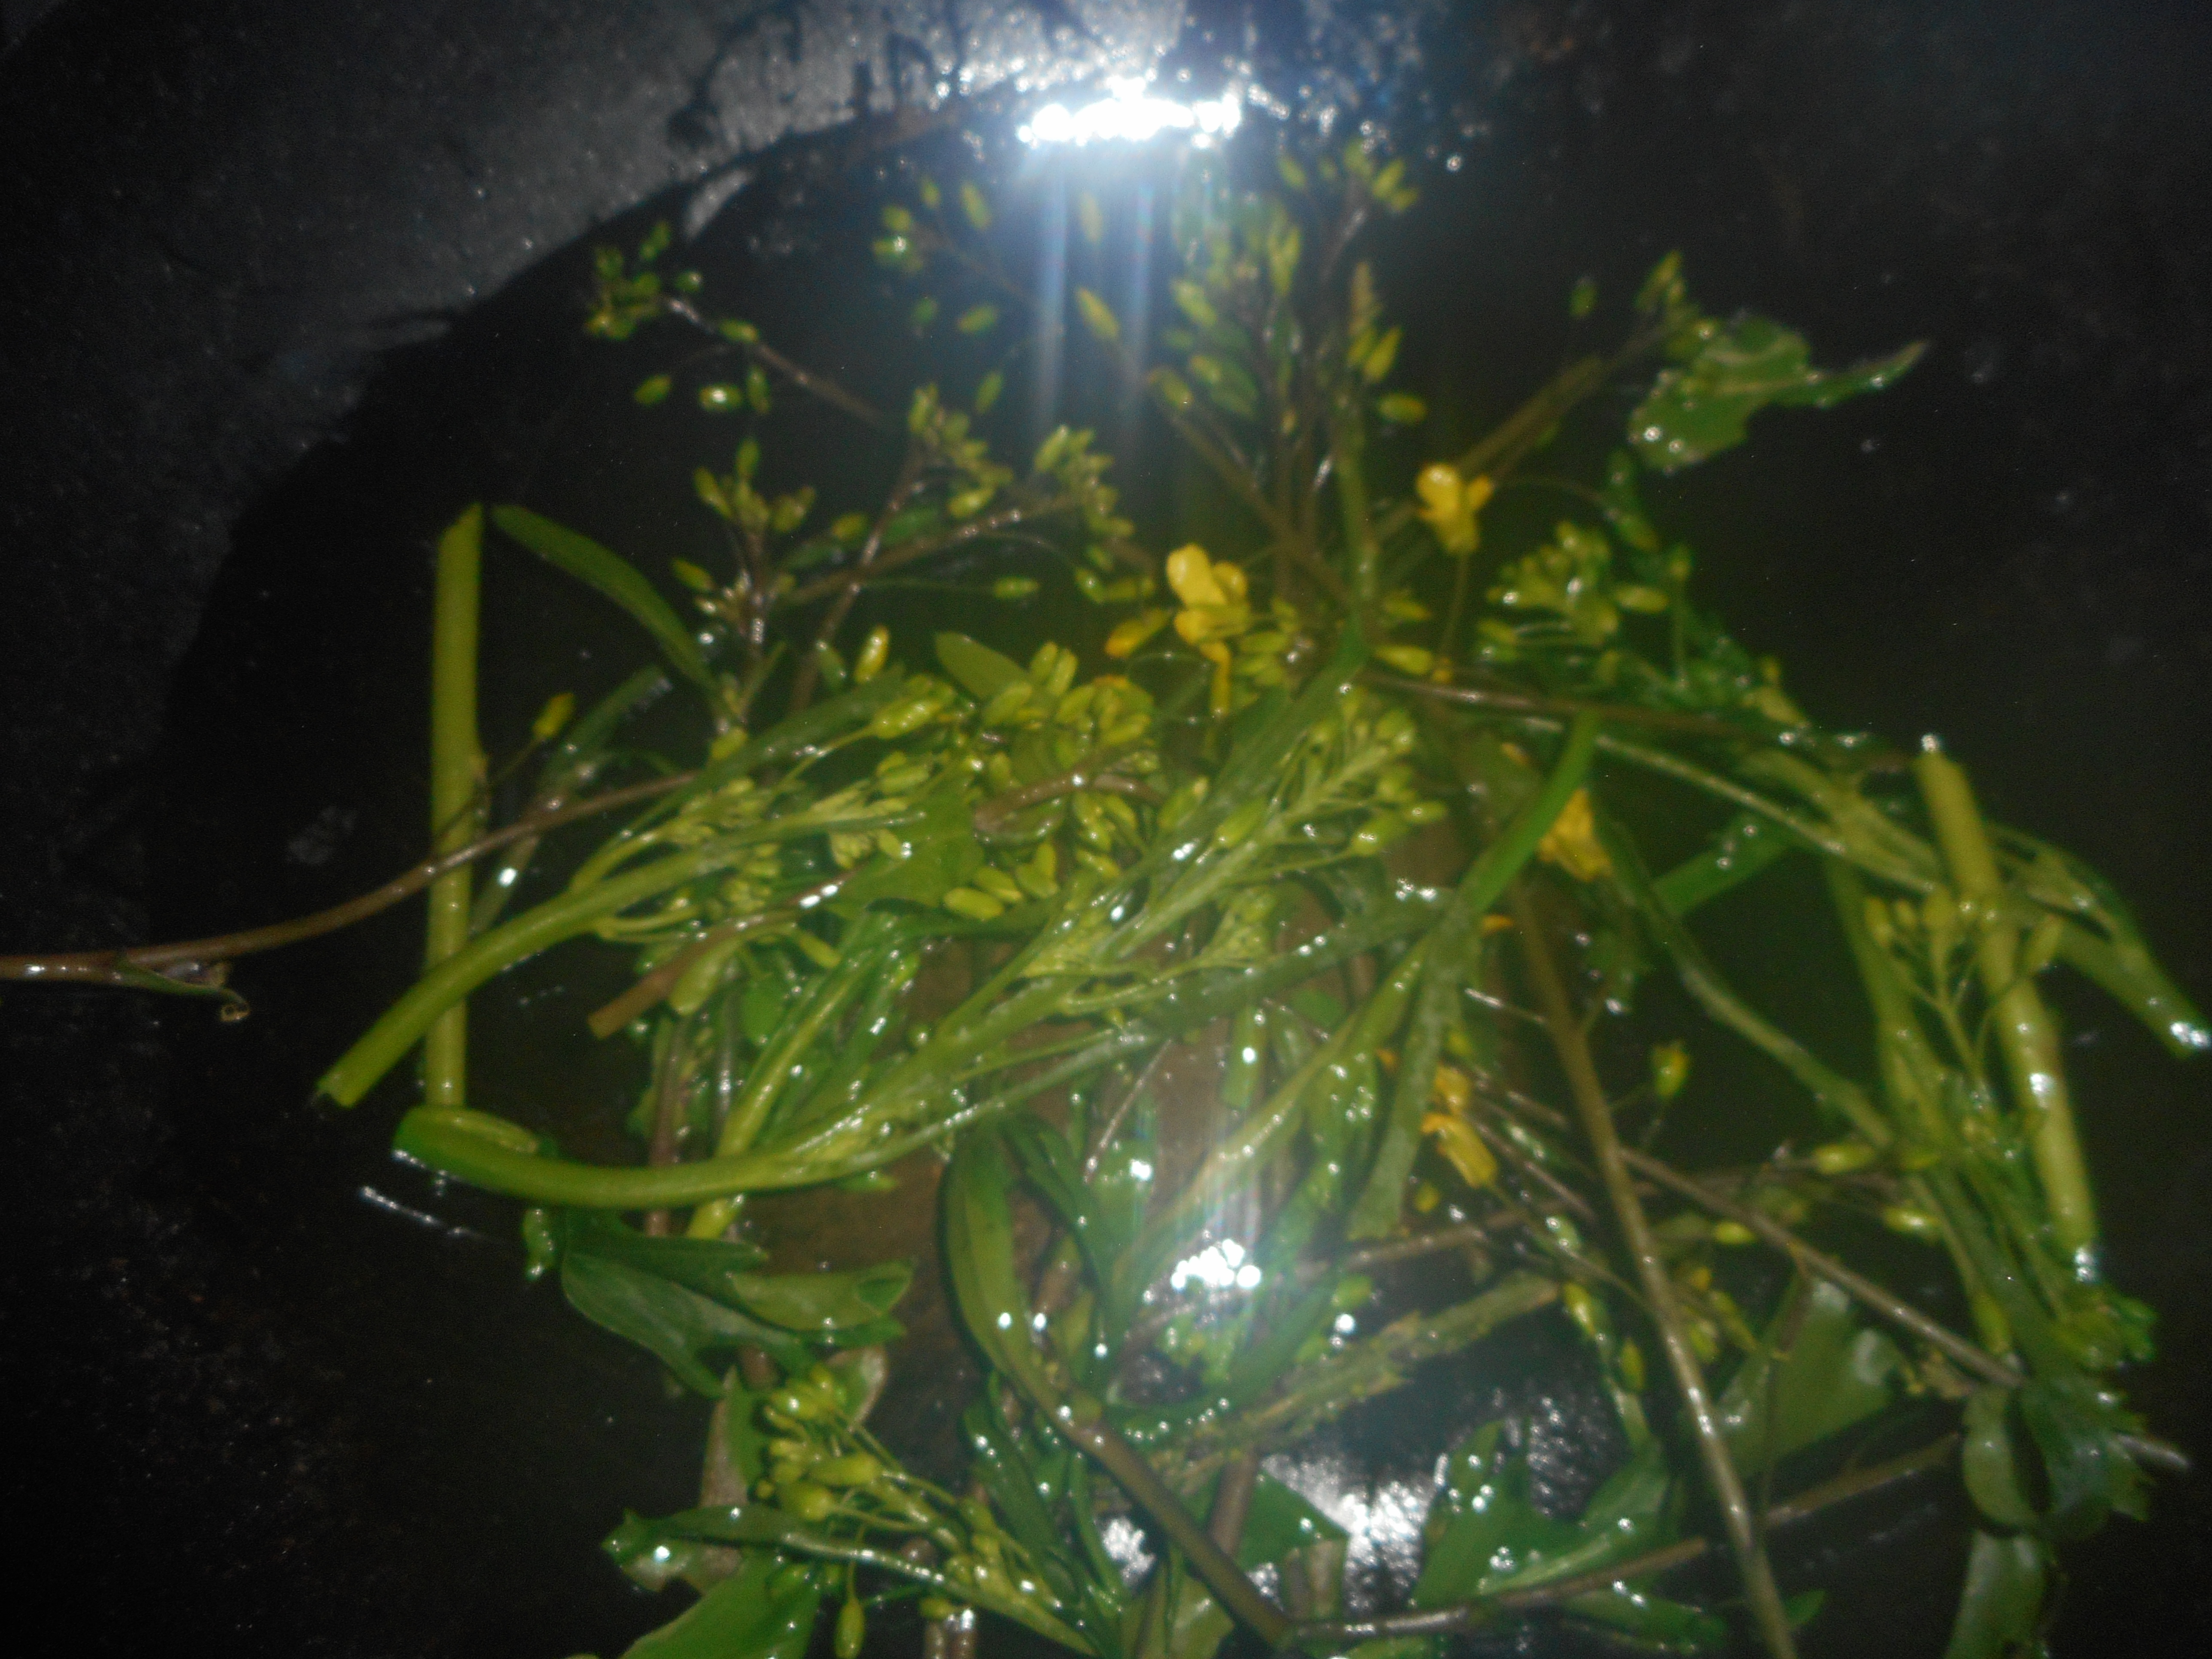
Here is my entire cabbage crop. These fat leaves will make a great batch of this casserole.

This recipe is very homey; great in these trying times. I used some outside cabbage leaves but any fresh cabbage will do.  I used ground chuck but lots of people swear by ground pork or even ground turkey. The amount of spices is variable and you can use any sort of tomato product you wish to get that wonderful tomato flavor in there. I added some smoked paprika and a few raisins to make it like my old recipe. Sometimes I add a tablespoon of red wine vinegar to zip it up a bit. Fiddle with the ingredients as you wish. It will still be a comfort meal your family will appreciate. Makes about 6 servings.

cabbage n rice casserolle

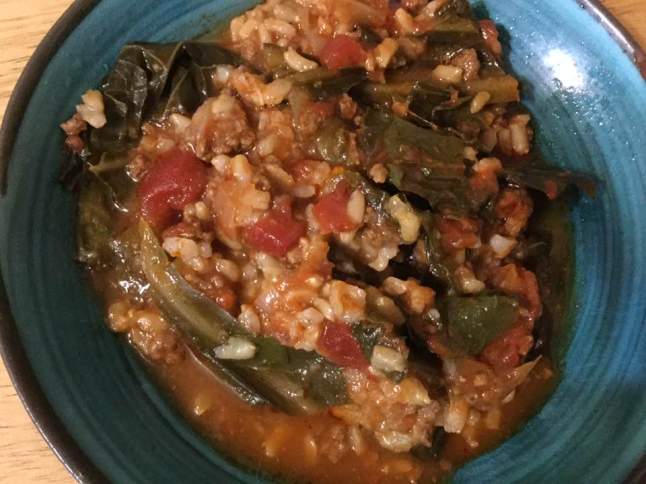
Told you my photo was lousy! Trust me it tastes better than it looks. And it looked better the first time we had it.

Angie’s Unstuffed Cabbage Casserole

Ingredients:

1 lb ground beef

2 big garlic cloves, minced

1 med-large onion diced fine

About 4 cups of cabbage cut into 1-2 inch squares/chunks

1 can (13.5 oz) diced tomatoes

16 oz can plain tomato sauce

1.5 cups beef or chicken broth

1 tsp paprika

½ tsp. smoked paprika

A Tbsp brown sugar (optional…some folks love, some hate this)

2/3 cup white or parboiled brown rice, uncooked

  • sea salt

¼ tsp ground pepper

¼ cup raisins (optional)


Directions: In instant pot or big pan brown ground beef: I sprayed it with cooking spray before starting. Or use a tsp or two of mild olive oil. After the beef is half browned add the onions, stir a couple minutes; add the garlic too.  Add the spices and stir. Add the tomatoes, broth and cabbage, stir, then add the sugar, rice and salt/pepper. Stir well so nothing is stuck to the bottom. Cook in IP under pressure for 35 minutes. Let rest 10 min before depressurizing and adding optional raisins. Then serve. You can bake it in oven for 45 minutes. Slow cooker for maybe 6 hours? I don’t use that function often but I am sure it would work fine for this recipe.

Enjoy!


Rhubarb Cobbler – Spring treat

My spring mission: to convince you rhubarb haters to try one of these recipes.  This one is delicate in flavor with a fluffy yet satisfying cobbler topping and no sour ickiness as some say rhubarb can be.  It takes a bit less fruit than a pie and goes together in just a few minutes.  And it is gluten free for all of you who must avoid gluten which means wheat, rye or barley flours are a no-no in baking.

This recipe is the same basic one I posted about for peach cobbler in the past; it is modified from a muffin dry mix in Bette Hagman’s book, More from the Gluten-Free Gourmet and uses a flour mix that will give you 4 cups of the dry ingredients.  One cup will make an 8×8 pan of cobbler topping.  I keep the rest of my dry mix in the freezer and a pan of cobbler can be thrown together in less than 10 minutes plus baking time.  What a time saver this mix is! I make all sorts of cobblers with it.  i made an apple blackberry one last Saturday using some frozen blackberries; very tasty it was!

I always get the fruit part cooking before putting the topping together so the fruit is hot and ready for the topping and can go right into the oven.


rhubarb cobbler

Angie’s Rhubarb Cobbler

Dry Cobbler Mix – use one cup for this recipe and freeze the rest

2 ¼ cups white rice flour

½ cup potato starch (not potato flour!)

½ cup tapioca flour

1 tsp. baking soda

4 tsp. baking powder

1 tsp salt

1 tsp. xanthan gum

1/3 cup sugar


Fruit Filling

4 cups sliced rhubarb

½ tsp. almond extract

½-2/3 cup sugar –add more or less depending on how sweet you want it

2 tbsp. GF flour

1/4 tsp cinnamon

Directions:

Mix the fruit and almond extract in a sauce pan. Stir together the sugar, cinnamon and flour and mix into the fruit.  Cook on the stove top for 5-10 minutes until it is thickened and hot.  Pour into a buttered 8 inch square pan, top with big blobs of the cobbler topping.

Cobbler Topping

1 cup dry baking mix

2 eggs

2 tbsp melted butter or canola oil (both work fine)

1/3 cup milk/buttermilk (I skimp a tbsp off to keep it from being runny)

½ tsp. vanilla or 1/4 tsp almond extract

Mix the wet ingredients and then add to the dry mix in a big bowl.   Mix briefly: do not over-mix for best texture.  Use a big spoon to plop it right away on the hot fruit.  Bake immediately as baking soda and powder can’t stand around waiting or they lose their umph!

Bake at 350 degrees for 25 minutes.  The top should be light brown and spring back when you poke it with your finger.  If it looks damp or squishy bake it 5 more minutes.

Let cool 5-7 minutes before serving as it will burn your mouth right out of the oven!  Some people love it with a scoop of vanilla ice cream.  This tender rhubarb cobbler is perfect just on its own.

Reposted with minor changes from June 2015.


Oven Roasted Spanish Chicken with Olives and Lemon

I’m always on the lookout for a tasty easy chicken recipe.  Particularly one made with chicken thighs. They are everyone’s favorite around here; what’s not to like? Juicy; flavorful and tender. The spice rub is awesome; I used both smoked paprika and some real Spanish paprika; a Christmas gift from my goddaughter who picked it up in Europe for me.  The homegrown lemons added so much fragrance and zing – made this dish soar!

This recipe is an adaption from one on californiagrown.org. I cut it in half since there are only two of us and reduced the spice amounts quite a bit plus I used boneless thighs instead of bone in.  It was licking the plate delish! The sum of these ingredients is far more than you might expect. Simple but the flavor interplay of these ingredients was perfection. Even the 8-year-old adored it!

chicken with olives in pan

Spanish Chicken with Lemons, Olives and Paprika


Serves 4

Ingredients:

4 boneless, skinless thighs

1-2 Tbsp EVOL

———

1 tsp sea salt

1 tsp. paprika

½ tsp. smoked paprika

1 tsp. dried oregano

1 tsp garlic powder

———

1 medium onion, yellow or red

1 lemon, particularly great if you can use Meyer lemons

½ cup green olives, no pimentos; I used jarred Manzanilla olives

Directions: Put the thighs in a bowl; add half the olive oil. Mix around. Mix the dry ingredients in a small dish and rub/pour over the thighs. Cover with plastic and refrigerate up to 8 hours; I did one hour in fridge and 10 minutes on counter to warm a bit.

Line the bottom of a 9×12 baking dish with aluminum foil. Drizzle with a bit of the olive oil. Cut up the onion from top to bottom in thin wedges. Lay in pan, slice the lemon thin and sprinkle slices around. I actually made 4 oblongs of the lemon and onion and laid my 4 thighs on top. Bake at 400 degrees for 20 minutes, turn thighs over and add olives in the center of the pan, corralled by the chicken thighs; bake 10 more minutes. Let rest 5-10 minutes before serving.  chicken with olives on plate

Side dishes: I took a separate sheet pan; sprayed with olive oil spray and laid halves of small russet potatoes, cut side down and baked along with the chicken. When the 20 minutes of baking time went off I added a pound of whole asparagus spears with bottoms snapped off to the potato pan. Drizzled them with EVOL and sprinkled entire pan with kosher salt. Let it cook until chicken has rested; good if you can flip the potatoes and asparagus spears when you take out the chicken.

Notes; amazing if you have the fragrant Meyer lemon for it. Easy to double. I had some special European paprika which I used; very flavorful; made it amazing tasting. If you want it much spicier visit the original recipe but I wanted a more nuanced version and it was perfection! Enjoy.

Black Forest Cake 2.0 Version

In these difficult days we sometimes need a little cake. This is a quick and easy version of Black Forest Cake, hence the 2.0 my shorthand for easy peasy version. Made with a chocolate mix from Aldi’s. You can use a box mix of any kind you like. It is a lush and sensuous dessert worthy of a special occasion but great when you are in a low place emotionally. The whipped cream and cherries are a real treat together with the dark rich chocolate layers. The sides have grated chocolate on them and the top is a pool of cherry yumminess. I think these flavors together are timeless. I am wondering why I haven’t made it in years. Maybe I was inhibited by the seemingly complex nature of this layer cake. I actually baked it in a single size petal cake pan and cut it into two layers using toothpicks stuck half way up the sides as a guide but you can use 2 8 inch round pans at much less effort.

black forest cake
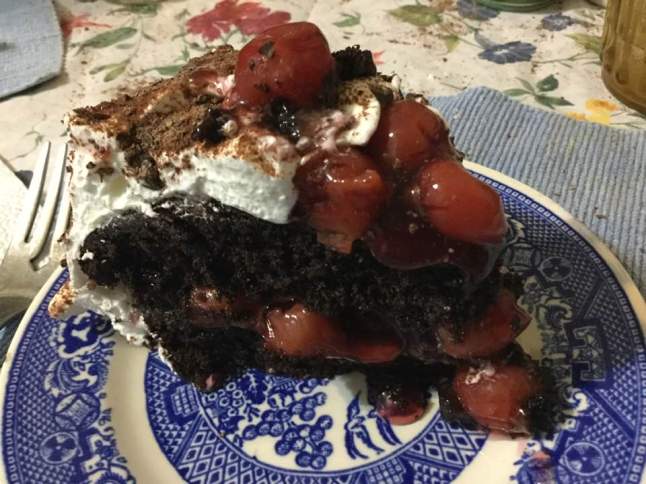
Black Forest Cake 2.0 (easy version)

Ingredients:
1 chocolate cake mix plus the add ins. I used an Aldi’s mix; added 3 eggs, ¼ cup melted butter and the milk the recipe says (it says ¾ cup water but I always use milk for added moistness and better texture)…use the gf mix you prefer.

Toppings/fillings
1-2 Tbsp chocolate syrup
1 can cherry pie filling
2 cups whipping cream
1/3-1/2 cup powdered sugar
2 oz of dark or semisweet chocolate grated

Directions: Make and bake cake according to box directions. Let cool completely after removing from pan. Put bottom layer on a wide cake plate. Top with brushed on chocolate syrup. Pour cherry pie filling on; do not put to the edges; leave ½-1 inch perimeter to allow for squishing out once you lay the top layer on. Put top layer of cake on. Whip cream to soft peaks. Add powdered sugar and beat just a bit more; not too hard or it will start to turn (to butter). Spread cherry filling over the top center of the cake; about half way out. Then spread the whipped cream over the rest of the top and down the sides. I used a cake spatula to smooth it a bit. I had grated the chocolate by hand while the cake baked. You have to get it on the sides. You can toss it at the cake, blow it on or flick it at the cake with your gloved fingers. Not an easy task. But you get to lick your fingers when you are all done! Put a few cherries plucked out of the pie filling on top around the edges to decorate. Serve cold.

black forest cake slice

Excuse the messy background. We were celebrating my guy’s birthday so I didn’t have time to make things neat. It was a glorious birthday cake for sure!Enter a caption

We actually found it tasted even better the next day. It is far easier to make than it looks. Makes a spectacular adult birthday cake! Enjoy.

Cupboard Supper: Seafood Spaghetti

Spring is the season for asparagus, spring onions and peas. I love them all served together with spaghetti and garlic and lots of butter. This recipe can be made from stuff in your pantry other than the scallions. You could use red onion or shallots in place of the green onion but it wouldn’t be the same.

This is the only seafood and pasta dish where I grate cheese on top; normally taboo – considered not a good combination but it works fantastically in this fast to throw together entrée.  This meal is visually appealing with the greens and the white.  I have been making variations of it for many years.  This is one of my favorite versions.  Great flavor and so speedy to make; how fast can you get the water boiling and cook the pasta?  That is how long it takes to create a great meal in one fantastic dish.

Yes, I make it with gf pasta.  Use the brand you love, don’t overcook it; barely done is best.  I made it for years and years with regular pasta before I had to go gluten free.  The original recipe didn’t have the asparagus and peas; my addition.  Good no matter what veggies you add; just don’t take away any of the basic ingredients.

Try to use tuna packed in olive oil; makes all the difference, especially for Italian dishes, much better flavor than any other kind of tuna. Giant carries it as does Wegmans. If you totally hate tuna you could use half a pound of small cooked shrimp. Ditto on using real butter, margarine will ruin the flavor for sure.  And I really love the greens; especially the onions; buy scallions if you can’t find spring onions.  I always cook the white parts a few minutes but the green tops can be close to raw. Better that way than overcooked. Last but not least by any means, use the real deal for your parmesan cheese, that shreddy stuff in the jar is not gf a lot of the time and the flavor is sad when compared to a chunk you just grated on your pasta. You can thank me after you taste this masterpiece!

Seafood Spaghetti with Greens

Ingredients

1 package of gf spaghetti

½ stick of butter

6-10 spears of asparagus

½ cup fresh snap peas, cut in half (frozen oetite peas are fine)

1 can light tuna packed in olive oil

1 can diced clams

1 bundle scallions or spring onions

1 big garlic clove

Directions: Boil a big pot of salted water, add the entire box of spaghetti; usually 12 oz size in gf.  Cook stirring often until barely done.  Drain.  While it cooks make the rest of the dish.

Veggie Prep: I like to snap the asparagus into manageable lengths; like 1 ½ inches long.  Ditch the tough ends. Cut the peas in half, cut the spring onions into ¼ inch rounds. If using frozen peas add in the last 2 minutes of cooking.

Melt 3 tbsp. of the butter in a big saucepan.  I use my mini wok. Add the veggies, cook a minute, and add the garlic pressed or minced.  Stir and cook another minute.  Throw in the white part of the onions; add the tuna and clams with ALL the juices and olive oil in the tuna can.  Stir gently and cook a minute.  Toss in the green parts of the scallions and the cooked hot pasta.  Stir a bit.  Add 1 tbsp. more butter if you dare and up to a quarter cup of pasta water to moisten the pasta.  It is really not a wet sauce; the stuff should cling to the strands of spaghetti.

Serve and top each portion with a healthy amount of finely grated real parmesan cheese.   Should serve four but if you are piggy only serves 3! seafood spagetti on plate

+++++++++++++ Variation for those with a garden +++++++++++++

Yes, you can eat kale flower buds, a lot like broccolini.  I sometimes blanch them in hot water before sauteing with olive oil and garlic.

pasta 012pasta 010pasta 013pasta 017pasta 018

These pictures above show my latest and quite yummy variation: I quick sizzled unopened kale flower buds from my last year’s plants and topped the finished pasta dish with it; really nice and I am guessing this kale option is quite good for your health

Originally posted May 2015.