Josh’s Giant Muffin

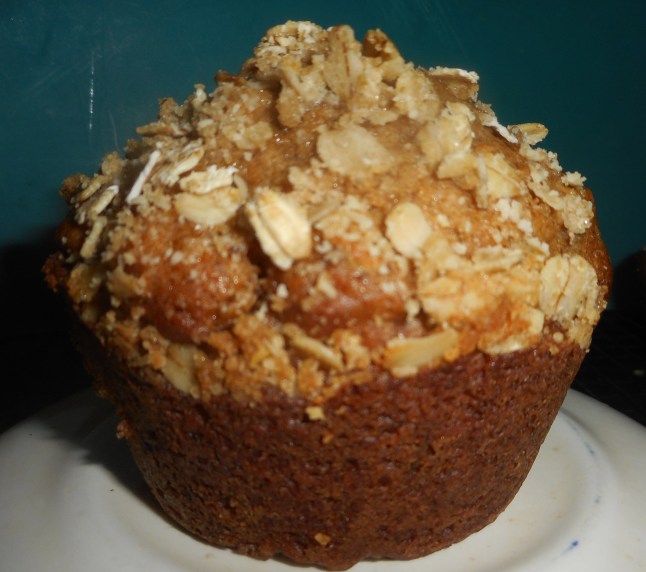
In the interest of friendship and my natural curiosity I finally baked a very special muffin for my friend Josh, lover of the giant muffin!  I know some of you folks are fans of huge muffins. It was a gigantic banana nut chocolate chip muffin and it took enough batter for two regular muffins to fill each giant muffin portion: that’s a lot of batter! They were baked them in this oversized muffin tin someone gave me years ago, never used, so no worries on gluten filled crumbs in crevices.

I used my regular recipe with no alterations and baked them a few minutes longer.  Success!  Moist flavorful muffins with perfect texture.  And they were gorgeous, bakery worthy looks. Still, I was only able to eat half at a time.

Not sure I will be always making giant muffins, I tend to like small snacks but for you big muffin lovers; just know that you will get half as many muffins and I suggest you bake it 5 extra minutes, test it with a skinny cake tester and let it cool about 10 minutes in the pan before removing them to finish cooling on a cake rack.

giant muffin and buckwheat gnocchi 015

The giant muffin is on the left; two small ones on the right.  All tasty!

I ate a giant one the day after baking, it was still so fresh and tasty.  I froze Josh’s muffin so it would be fresh for him.  I did tell him that it was frozen a few days and that he should plan to eat it that day.  He misunderstood and waited a day more. It was getting crumbly but he said the flavors were fantastic, especially the chocolate chips.  Gluten free baked goods has a shorter shelf life plus mine have no preservatives.  That’s why I freeze them and defrost the day I am consuming.

giant muffin and buckwheat gnocchi 016

In conclusion, giant muffins are no big deal; no more work, just need that honking big muffin pan and you are set to go.  Bake them 5 to 7 minutes extra; I put in my cake tester and eye balled them just to be sure; they looked done, tester said done. Done.

Tasty.  But, that big muffin was too much food for my normal snack size.  Still, for company; they might be just the ticket for breakfast.  If you love giant muffins; feel free to use any of my multitude of muffin recipes for those big boys.  Test for doneness and let them cool longer in the metal pan as they are so big they will take longer to be ready to safely lift out of the pan. Enjoy!

Buckwheat Gnocchi with Clams and Rabe

Anyone who eats at my house knows my deep love of authentic Italian food.  I love many different dishes from spaghetti with meatballs to risotto to homemade pasta and sauce.  This post is about gnocchi. Specifically gnocchi made with ricotta cheese rather than potato.  I love their delicate flavor, light texture and how much easier they are to make than the potato version. I make plain ones with rice flour and will share that recipe some other post. Just don’t ask me how to pronounce gnocchi!

These are buckwheat gnocchi and are served with clams and broccoli rabe.  Yeah buckwheat.  No wheat in it; buckwheat is a relative of rhubarb and it has a homey flavor that somehow matches perfectly with the clams and bitter greens.  I have been making this dish for more than ten years; gf the past three years.  It is a traditional spring dish at my house and much loved by my daughter. Not that tricky, I promise you can make it, no fancy pasta machine required. No long process.  Roll, cut, press with fork and briefly boil.

It is a spring dish as broccoli rabe is best right now, bright green, snappy flavor and so good for you.  I cook it a few minutes in boiling water before draining and sautéing briefly in olive oil and garlic. Yumm!

You could use fresh clams but I never bother; if you do – please get tiny ones and save a bit of the cooking water to add to the sauce.  If you want to make it not gf; just use all purpose flour for the white rice flour. Most grocery stores now carry buckwheat flour; store the bag in your freezer please so it keeps longer.

giant muffin and buckwheat gnocchi 010

Gnocchi in my mini wok and ready to serve.

Buckwheat Gnocchi with Clams and Rabe

For the gnocchi

1/3 cup buckwheat flour mixed with

½ cup white rice flour or any blend

1 15 ounce jar of ricotta (whole milk is best)

¼ cup fresh grated Parmesan cheese; fine grater side

1 ½ tsp. sea salt

Sauce:

1 lb broccoli rabe

1 large can tiny whole clams or 2 small cans chopped/minced clams

¼ cup EVOL

2 garlic cloves minced

1 tbsp. butter

Salt and fresh ground pepper

Directions: Heat a big pot of salted water.  While it heats, rinse the broccoli rabe and remove any yellowed leaves.  Cut the very bottom of the stems off and discard.  Cut the stems into 1 inch lengths. Do the same for the rest of the rabe; I set aside the stems and cook them one minute extra.  Throw the rabe stems in the boiling water, cook one minute and add the rest.  Cook maybe 3-4 more minutes; you don’t want it overcooked but not firm either.  Drain and set aside.

Mix all the gnocchi ingredients in a small mixing bowl. Turn out onto a rice floured bread board, knead briefly to form a dough. Do not add a lot of flour or your gnocchi will not be light and pillowy. Take a half cup or so at a time and roll it out on a rice flour dusted bread board; as thick as your middle finger (read ¾-1 inch).  I usually only roll out 5-6 inch lengths at a time.  They don’t have to be perfect looking, a bit irregular is just fine. Cut into 1 inch lengths (one knuckle long).  Using two forks press gently on the top and bottom to form small ridges.  This will somewhat flatten the gnocchi but the ridges are to hold sauce. Lay on cutting board that you dusted with rice flour. Don’t pile them on top of each other; one layer so they don’t stick together. Form all the dough while a big pot of salted (1 tsp) water heats.  I like a wide pan so I can easily fish out the gnocchi with my flat skimmer.  Put ¼ of the gnocchi in the bubbling water.  Let them slowly rise to the top; I leave them in about 3 minutes. I put them into a glass mixing bowl as I do the batches.

While they are cooking, heat the olive oil in a big sauce pan. I like to use my mini wok for this.  It is great for finishing a lot of pasta dishes.  Add the garlic and stir, cook 1 minute.  Add the drained greens, cook 1-2 minutes, adding the clams as it cooks, all the can juices too. Add the cooked gnocchi, the butter and if they seem dry; add a bit of the pot water; maybe ¼ cup. Taste and add salt and pepper as desired.

Dive in! gnocchi 004

They warm up nicely for a meal the next day, keeps 1-2 days in the fridge.

The original recipe is from Italy Al Dente by Bibi Caggiano; adapted to be gf by me. I love this cookbook, use it often; my fav Italian cookbook.  SO many good recipes; has risotto in it as well as homemade pastas and sauces and recipes that use factory pasta.  It works quite well with gf pastas.

Kefir Grain ABCs; Easy and Cost Effective

Back around Christmas I posted about making kefir for improving the health of your digestive system. I was making it with dehydrated kefir powder I got at a health food store. I had heard about kefir made from “grains” that could be reused. Again and again.  Sounds kinda magical doesn’t it?

Well, I did some research online and found that yes, there is such a thing as kefir grains.  They are not grains like we think of, more like a starter clump.  I couldn’t find the grains at any local stores but I found a guy on Craig’s List who was selling enough to get started.  We met in the parking lot of a Dunkin Donuts in Montgomerville, PA. Seemed somehow illicit swapping kefir curds in a baggie for my $10!  He turned out to be a very nice young man who enjoys making and drinking kefir with his wife.  He gave me some advice and coaching on the process for a couple of weeks via emails.

Basic directions: all you do is put the gently rinsed grains (they look like soft cauliflower cut into small flowerets) into a glass or ceramic jar, pour in milk; no need to heat.  Best is raw milk, next best organic whole milk or try two percent. I don’t suggest you make it with skim milk.  I do the raw milk but my quart of it doesn’t keep very long…as I only make a pint of kefir at a time.  Anyway, pour in the milk, put a loose lid on it and let it stand on the kitchen counter top for a day to 36 hours.  I stir mine occasionally as I walk by.  It will clump up – the curds rise to the top. Plastic or wooden stirrer….no metal.

Once it gets thickened you strain out the curds, being gentle with them.  Put the jar of kefir in the fridge to chill and put the curds in a glass jar and just cover with milk, put that also in the fridge; retards the kefir grains; basically brings the process to a halt. For detailed information check out this site: http://www.thekitchn.com/how-to-make-milk-kefir-cooking-lessons-from-the-kitchn-202022.

kitchen sink muffins and spring flowers 004
I drink it cold for a snack.  You can mix it with fruit juice. I sometimes have it over crushed pineapple. It is sort of like buttermilk and yogurt had a baby; thick liquid, tangy flavor.  Great for your gut.  Full of far more probiotics than the stuff you can make using the powdered kefir. Which is what I did before.  Now I have my kefir grains and I don’t need anything but the milk to make it with.  And it is better for you.  I did buy a small plastic strainer; you shouldn’t really use metal in connection with making or storing kefir.

If you have celiac or any sort of gut issues kefir is a great healthy choice to incorporate into your life style.  I hear you can even make it with coconut milk.  Not tried that yet.  Maybe someday…  Meanwhile I have tasty, healthy authentic kefir when ever I want it.

Super Spring Salads

Early spring is not known as the season for great salad but it could be! I am giving you several salad options in this post. Try your own blends but it is best not to throw everything in the fridge in it.  Try to be selective and highlight only a couple ingredients.  Simple ones I enjoy have only three – five ingredients and I use my homemade vinaigrette dressing.   They are pretty healthy and probably fairly low in calories yet high in nutritional value.  These are basic recipes which you can tweak depending on the ingredients in your fridge

Avocado Celery Salad (serves 1)

½ an avocado

1 celery stalk

3-4 leaves of green loose leaf lettuce

2-3 tbsp. fresh pomegranate seeds (optional)

—————-

Or try this yummy salad which shows off citrus flavor and color:

Citrus Fennel Salad (serves one or two)

1 inner stalk of celery cut in 1/3 inch rounds

1 navel orange

1/2 cup fennel bulb, cut in ¼-1/3 inch slices

Peel the orange, either by hand or using a paring knife.  Cut across into rounds about ¼-1/3 inch across.  Cut again across into halves.

Fennel has a sweet crunch to it, faintly tasting of licorice, kinda sort of and it marries really well with citrus.  I also like to use tangerines, Clementines, blood orange or cara cara navel oranges in this recipe.  Even grapefruit slices are great.  Cara cara oranges have an interesting orange-pinkish cast to the fruit and a lovely sweet flavor. My local Giant grocery store has them on display right now.  You can also mix two citrus in your salad; a navel and a blood orange.  Fantastic!

I also make this same salad but instead of an orange I use a half to 3/4 cup of cubed fresh peeled ripe papaya; gives a lot of color and great flavor in this salad.

Finishing directions for these salads:

Place the salad ingredients in your salad dish; I have some very low sided ceramic bowls I got a long time ago that I love for salad. Then sprinkle the salad with vinaigrette which you just shook up one more time! Please don’t add too much salad dressing or you will have soggy salad.

Margie’s Vinaigrette

I named this after my older sister who passed away three years ago.  She made fantastic vinaigrette.  Mine is not quite like hers but close enough to masquerade as it.  She would approve….

So, I like to use one of those Good Seasoning’s jars but add my own ingredients, use a pint jar if you like; the main thing is a tight fitting lid.  Fill it to the vinegar line with red wine vinegar, not the cheap store brand (skimpy 1/4 cup).  Then some filtered water to the water line (about 1/3 inch more or two tbsp.). Next I add 1 tsp Dijon mustard, ½ tsp sea salt, ¼ tsp dried oregano or dried thyme, one garlic clove (peeled and mashed down a bit to release flavor), 1 tsp mayonnaise, ¼ tsp freshly ground black pepper and ½ tsp sugar. Then add extra virgin olive oil, stop a bit before the oil line and finish it with lighter olive oil (1/2 cup plus one tbsp of combined olive oils).  Shake it up really well. Then shake it some more, you need to get the mayo to blend in as completely as possible. It tastes best at room temperature and plan ahead – let it rest for at least an hour before you use it the first time.  Keep it in the refrigerator if there is any left over, lasts like a month in there. The mustard adds snap and the bit of mayo helps the dressing stay emulsified (fully blended) longer than it would without the mayo.  If your salad is delicate and you don’t want as much olive oil flavor use only mild olive oil and skip the EVOL.  If you chill the dressing you will need to let it warm up before using it; ten seconds in the microwave can help with that process.

Note: You could up the nutritional value with a few almonds or walnuts if you like nuts in your salad.

More ideas: I make any number of salad combos depending on what is in my fridge.  Two of my favorite ingredient combinations are: shredded carrot, sliced radishes, chickpeas, romaine and half rounds of European cucumber or a mixture of torn kale leaves, shredded raw Brussels sprouts, scallion rounds and julienned raw summer squash.  Both mixtures are great with this vinaigrette.

Last thought: I avoid tomatoes in winter or spring although some of the grape tomatoes are decent in flavor; use them if you feel the need for tomatoes. One last note: I don’t use tomatoes with citrus or papaya; sort of weird together.

So, go get your healthy green on and enjoy a fruity salad anytime of the year.

Peanut Butter Beauties

Making a batch of these tonight; just what I crave. I searched long for this old fashioned peanut butter cookie recipe and making my own version turned out to be a great move. Yummer!

Angela Drake's avatarMy World Without Wheat

I keep hearing about recipes for three ingredient peanut butter cookies. I wanted something a bit more actual cookie texture (think less greasy) and with less sugar than the versions I have come across. So I decided to play with the proportions and I wanted to add some gf flour. I cut the sugar by one fourth and dumped in a small amount of flour. To make sure my results weren’t like a brick I added some baking powder and to keep them from being incredibly crumbly messes I tossed in a touch of xanthan gum. The resulting dough was still a tad crumbly but when you scrunch up about a tablespoon with your fingers it forms a ball that can be flattened with a fork dipped in granulated sugar in the traditional cross hatch of all great peanut butter cookies.

The results: simple but tasty = peanut butter heaven…

View original post 298 more words