Real Strawberry Shortcake…The Best!

strawberry shortcake

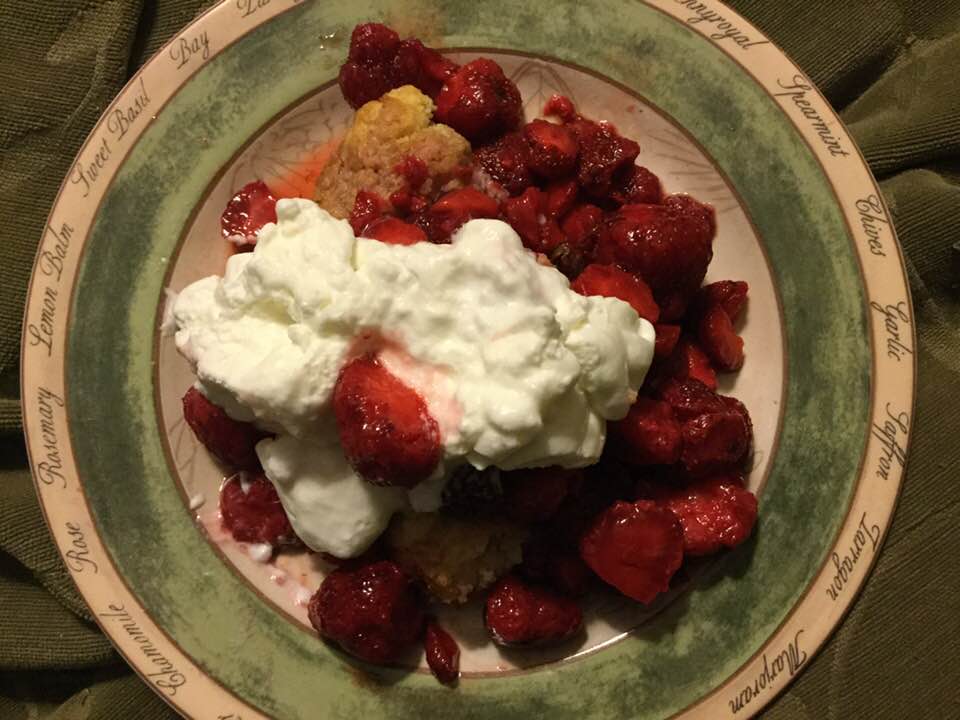
Strawberry shortcake is a classic and no one turns down a slice of it at at a family gathering. I am not sure where I got the gf shortcake recipe; maybe my old Bette Hagman Gourmet Cookbook. I used to make a fantastic shortcake when I could still use all purpose flour but my gf biscuit version is pretty tasty. But there is one thing, you gotta make it with the best freaking strawberries you can find.  None of those ultra firm ones with whitish cores that are shipped in from far away.  You need juicy ripe scented red berries that are served over a gluten free short bread. My local season is peaking now so try for local grown berries – the riper the better and it will taste great!

My mom always made a gorgeous version of strawberry shortcake. When I was a kid she would serve it as an entire meal.  I have done that and it is kinda cool.  Pre gluten free I generally made a huge oval biscuit with a smaller topping biscuit that I split off and buttered the split area before topping with berries and the smaller biscuit and topped with more ripe berries and a pillow of softly whipped heavy cream.  Oh berry perfection!  Now I bake it in two separate pans but the construction of the final product is the same otherwise. The pictures on construction are a couple of years old but the process is the same and the results are consistently heavenly….

shortcake 2
shortcake bisquit
shortcake 5
shortcake 3
shortcake ready
strawberry shortcake

Mom’s Strawberry Shortcake, GF2.3

Biscuit dough

1 cup white rice flour

2/3 cup potato starch flour

4 tsp. baking powder

1 tsp. baking soda

2 tbsp. sugar

½ tsp. salt
½ tsp. xanthan gum

6 tbsp cold butter

1 medium egg

2/3 cup buttermilk

2-3 tsp. sugar (optional)

2 tsp. soft butter

————————–

Other ingredients:

2 quarts ripe strawberries

½ cup sugar

2-3 tbsp. Karo light syrup

1 cup heavy whipping cream

½ tsp. real vanilla

2 tbs. powdered sugar (if you like your cream sweet)

Directions
Heat oven t0 400 degrees. Mix the dry ingredients in a medium mixing bowl. Cut in the cold butter until it is small pebbles.  Add the egg and most of the buttermilk.  Mix with a spoon; add rest of buttermilk if you need it.  It should be a bit sticky, don’t over mix; just until dry is blended in.  Spray the inside of an eight inch cake pan and a 6 inch cake pan with cooking spray.  If you don’t have a small pan just use two 8 inch ones.  Pat ¾ of the dough into the 8 inch; make it about ¾ to 1 inch thick and try to smooth the top and side edges a bit.  Put the rest of the dough in the smaller pan and do the same smoothing.  Make that one ½ to ¾ inch thick.  Optional: take 2-3 tsp. of granulated sugar and sprinkle it over top of them. I think it gives a great finish to the shortcake. Bake them about 20 to 25 min; the smaller one should be done in 20 minutes; a golden light brown. Set on a cooling rack for a few minutes.

While it bakes, get the berries ready.  Hull 2 quarts of fresh ripe berries.  Place them in a glass mixing bowl; chop through them a few strokes with a sharp knife.  Add ½ cup sugar and about 2-3 tbsp. Karo light corn syrup to the berries.  Stir well and refrigerate until the shortcake is baked.  You could do this berry preparation up to two hours in advance.  No more or they will start to disintegrate.

Place the fairly hot bigger layer on a large platter, one big enough to hold the shortbread and still have room for a generous overflow of strawberries. Butter lightly if you wish.  Top with several big spoonfuls of berries.  Don’t worry if there is juice in the berry bowl; there should be; melted down sugar and Karo syrup with berry juice will give you a delish berry liquid.  Top with the second smaller biscuit and then more berries.   Cut into chunks.  Top with freshly whipped cream; beat a cup of heavy whipping cream until it is softly whipped.  Add ½ tsp. vanilla and ¼ cup sugar if you wish it sweet.  Be sure to pour the berry juice over your shortcake; it soaks in and adds to the strawberry experience.

My dad liked to pour unbeaten cream over his shortcake. My mom usually set out the whipped cream, a jug of cream and some whole milk so we could choose how to finish off your personal shortcake.  I might add that I grew up on a farm, so this was raw milk from grass pastured cows; fantastic cream equaling a freaking perfect shortcake topper.  We also grew our own berries; no chemical sprayed on them ever.’

Notes: Karo is sugar syrup; I know, I know its not very healthy but it is only a bit and it improves the berries’ flavor to have some. Just do it. And while I am being bossy: please use real whipped cream. So easy to make and if you are going to the trouble of a scratch shortcake you need the real deal topping. It is hugely worth it.  I actually stored some whipped cream in the fridge overnight and it was still decent the next day although the texture is a bit softer than it originally was. Strawberry shortcake is a decadent treat but honestly no more so than a sundae you get at an ice cream place. SO go ahead and indulge. Enjoy!

shortcake, one serving

If there is any left over it makes a great breakfast the next morning!

Originally published in June 2014.

strawberry shortcake

Mango Blueberry Muffins

unbaked mango and blueberry muffins.

I love muffins for their great flavor, texture and how easy they are to make.  Plus they are really portable and they freeze like a dream. Homemade snacks have the great feature of no chemical preservatives or additives like snack bars you buy which is a great attraction for me.  Plus, if you have never baked gluten free these muffins are a super easy starter recipe. I make them on the small size as when they are big they are too much of a snack; I just want a medium to small muffin to keep my blood sugar level.

This is a riff on my past version of a muffin recipe out of Annalise Robert’s cookbook; Gluten-Free Baking Classics.  It is very similar to her blueberry muffins but with some mango cubes and oat flour.  You can just use only the flour blend and no oat flour; tjey won’t be quite as tender. I left off the toppings as I wanted a more low calerie/healthyish muffin.

These muffins will not disappoint: delicate texture, a great blueberry flavor and bursts of mango too and they have just enough sugar for me.  I used about 1 cup of drained cubed canned mango flesh (you could use fresh mango cut into 1/3 inch cubes) and a heaping 1/2 cup of frozen  blueberries. Or the opposite proportions…use any proportion of fruit that you prefer. I used frozen blueberries and canned mango; so convenient, don’t defrost any frozen fruit before adding. Peaches could be subbed in for mango; be sure to cut in small cubes and drain them well. You could add a coarse sugar topping to insure that they look fancy if that is your desire.

I used coconut palm sugar so not much guilt in eating one of these treats! You can swap the coconut palm sugar for plain sugar if you want.  I liked coconut palm sugar which is very low as far as raising blood sugar.  Just increase the milk by 2 tbsp if you do the coconut palm sugar.

It is smart to freeze any you won’t eat in two days’ time; a zip lock freezer bag works great.

 Mango Blueberry Muffins

1 1/2 cups brown rice flour mix (see below)

1/2 cup oat flour

1/2 cup granulated sugar or coconut palm sugar

1 tbsp. baking powder

1 tsp. baking soda

¾ tsp. xanthan gum

¼ tsp. salt

1/4 tsp cinnamon

1 cup drained mango cubes (canned ones are like 1/3 inch cubes; a good size)

heaping 1/2 cup fresh or frozen blueberries 

2 large eggs

½ cup milk, 1 or 2 percent

½ cup canola oil

1-2 tbsp. coarse sugar if you want a sugar topping 

——-

Directions: Heat your oven to 425 degrees, placing the rack in middle of oven.  Spray muffin pans with cooking spray.  One batch makes 14-16 muffins.  I got 16 when I made them yesterday.

Mix all dry ingredients in bowl of stand mixer or big bowl. Combine milk and oil in measure cup and add. Beat in eggs, add vanilla.  Add fruits; stir just until fully blended.  It is a very thick batter. Let stand 10-15 minutes now or in the muffin pans.

Fill muffin pans 2/3 full.  I use a big serving spoon and fill it about half way to dump in each muffin space. Sprinkle the top with the coarse sugar if desired. Bake 5 minutes and lower heat to 350 degrees and bake 15-18 minutes more until golden brown. Do not over bake or they will taste dry.  Remove immediately from the pans and cool on a rack.  They freeze well for a few weeks, if they last that long.  Keeps in fridge (well wrapped) or an airtight cookie jar for 2-3 days.

Cut in half you can see they are more tan in color than most muffins. That is the coconut palm sugar’s doing. You can see the bits of fruit; every muffin is different in each bite; might be blueberry or you might get mango!

Brown Rice Flour Mix base mix 

(This mix is the same as King Arthur’s basic gf blend)2 c brown rice flour

2/3 c potato starch

1/3 c tapioca flour

Alternate Streusel Topping: A tasty alternative. Mix the following in a bowl, make sure the butter is in tiny pebbles; use your fingertips to blend.

½ cup rolled oats

¼ cup brown sugar

2 tbsp. almond meal

1½ tbsp. butter

¼ tsp. cinnamon

Sprinkle on top; press in lightly to help it adhere.

Baked and cooling. These mango and blueberry muffins are ready to snack on!

Sourdough Can be Gluten Free!

Recently someone said in my hearing that sourdough is safe for gluten avoiders to eat. I thought, nope. Then I heard it again from a neighbor. I asked a few questions. This very nice neighbor and I share gf baked goods with each other. It turns out she has tummy issues that are causing wheat intolerance. I have celiac. She finds that sourdough bread is very digestible for her. I had to explain that if I ate regular sourdough it would not be at all safe for me. The sourdough process does not remove or magically inactivate the gluten in the wheat based flour. Sadly nope. Would be nice if that were so.

But I do have to say that I have been making some gluten free sourdough baked goods and find that they are delicious and not crazy difficult. The scones I posted a couple of weeks ago come to mind. So tasty, what great texture and flavor! And I have twice made delicious gf sourdough breads; one using white flours that I added oats and oat flour to base flour as well as seeds like poppy and fax seed. Makes such incredible toast. The other bread success has been the raisin bread; a fruited version of a plain sourdough loaf. Both recipes came from a facebook group for gluten free sourdough bakers who want to help each other bake gf sourdough foods. If you are on fb; put in that topic and you should find them. This awesome group has lots of recipes in their home page top right at “files”. And folks answer your questions when a bake turns out less than optimal.

I feel that sourdough breads have a better crumb and texture than regular gf breads. They toast up simply amazing, sort of like an English muffin bread. Makes great sandwiches. Lovely for us celiacs who miss good bread in a deep and fundamental way. I actually have eaten a lot less bread since going gf, its expensive and sometimes very disappointing so I just kept finding ways to avoid it. Baking bread that is worth the time and ingredients can be very hit or miss. My French baguettes are delicious, and my Italian fennel and golden raisin wide loaves are wonderful but I have also made many subpar loaves of gf bread over the past 9 years. Gummy, heavy, grainy and poor flavor plus they often only taste good the day you bake them. I strongly urge you just take a minute and check out this gf sourdough group on fb. Another recent and strong source for possible gf bake recipes are the two cookbooks out by Aran Goyoaga. Last month I bought Cannelle et Vanille in hardcover which is mostly very interesting components of a healthy meal using lots of flavors and lots of vegetables and I just got Cannelle et Vanille Bakes Simple on kindle. I haven’t baked much yet from either book but I hear a lot of good buzz in social media from gluten free bakers. Folks on fb call her CV as a nickname, now you are in the know too! I will report in this blog on how bread turns out when I use her recipes.

As I wrote above, the ones out of the gf sourdough bread bakers on fb are pretty tasty, the raisin and current loaf was amazing fresh and delish toasted a couple days later. I froze a lot of it and it defrosts quickly in my microwave before toasting slices to give it all those golden nooks and crannies. The seeded one makes awesome avocado toast and I love it toasted along with a couple of eggs in the morning. Just know that these gf sourdough breads take several hours to rise, can’t be rushed. AG’s Bakes Simple has several non sourdough bread recipes. Also other kinds of baked goods. They are much quicker than sourdough; use yeast from the store. Enjoy!

The other book by her is all bakes cookbook but is is pretty much sold-out hence I bought it as a kindle.

Meanwhile, join that gf sourdough group on fb (who would have ever thought that such a group exists!) and make a starter; takes about 7-10 days. I used CV’s recipe that is made with brown rice flour. It’s not that difficult to stir up a loaf if you have a stand mixer and you might really enjoy watching the slow rise of a tasty loaf of gf sourdough bread.

Raisin bread before I cut into it. Incredible scent and flavor. Mmmmm best raisin bread ever!

I feed my starter most every day; just a little bit and try to discard some each week. I guess it is time for some scones this weekend! I made some interesting chocolate chip sourdough cookies the other day; uses just almond flour so it is a bit grainy to me, made also with coconut sugar and coconut oil so kinda healthy but just not quite the texture I am dreaming of. My favorite CC recipe is King Arthur’s recipe. I love how you can form and freeze the cookies in a ziplock bag and bake just as many as I like. I guess I will live without sourdough in them! Back to the sourdough scones; there is nothing going less than perfect with them. Incredible flavor and impeccable texture. This weekend it is raspberry time!

Chocolate chip and walnut sourdough scones. My dieting downfall…

Cheddar Cheese Biscuits: Guilty Pleasure

I don’t buy redi-made mixes that often, in fact I have never bought a gf biscuit mix except these. From Aldi’s; a fav hangout! Cheddar cheese biscuits in the orange and blue box. This was my fourth or fifth time making them.

You add water, quarter cup oil and a third of a cup of grated cheese, stir and it becomes this slightly weird fluffy white stuff that looks more like cotton batting than anything else. Next, plop big clumps of this fluffy mixture onto a parchment paper lined (or baking oil sprayed) baking sheet and pop them into the hot oven to bake.  After about 16-17 minutes out comes the pan.  Each biscuit gets brushed with a buttery mixture you create with an herb/garlic powder that is blended with fresh melted butter. Super easy to make and definitely popular at my house.

cheddar cheese bisquits

They are nicely browned on the bottom and very tender. The buttery flavor definitely has a garlic vibe going on. We had them with sausage lasagna I made for supper.  My guy took home a container of lasagna and two biscuits. He left happily clutching his treats including those biscuits.   That should tell you they are tasty; Joe does not need to eat gf and he is fairly picky about his bread.  If it passes the Joe test; it is pretty tasty! This time I used colby cheese; mild cheddar and a great choice for them.cheddar cheese bisquit

They were a couple bucks and the add ins are minimal. I made 10 decent sized biscuits. I froze two which were destined for consumption in future weeks of February and March. Totally yummy even if not particularly healthy, white gf flour, sugar, cheese and butter as major components.  Not gonna tell you how many calories are in them, but frankly regular rolls have lots of calories. If it tastes buttery it gonna have calories…. Still, not often I find something this easy to make and this tasty.  I put this in my win win column. Enjoy!

Reposted from 2020 with minor changes.

Almond Flour Chocolate Cake

My guy wanted chocolate cake for Valetine’s Day. With chocolate icing. I don’t care for chocolate icing and was kinda tired of cake after the holidays. This cake has a more distinct crumb due to the almond flour…. the only other flour in it is tapioca starch so it is gluten free which I need. It is easy to make; no tricky process here plus it is dairy free which can be helpful to some folks. I made it but used half peanut butter icing and half chocolate: just made a half batch of each. It was a big it with my man; he took home the chocolate iced portion and I feasted on the peanut butter iced half.

Mine sunk a little in the middle; I think my 4 eggs were all kinda large; there is variation in a dozen eggs; try not to get the 4 largest from the box, live and learn. I did bake it the full time. The center was like fudge; quite yummy if squishy. The peanut butter icing was the bomb!!

Chocolate cake ingredients:

1 1/2 cup almond flour (not almond meal)

1/2 cup tapioca starch

1 1/4 cup sugar

3/4 cup cocoa

1/2 tsp. kosher salt

1/2 tsp baking soda

1/2 cup canola oil

4 large eggs at room temp

2 tsp. vanilla extract

Directions: mix the dry ingredients in a medium bowl; I used a whisk. Spray a 9 inch cake pan and line the bottom with a round of parchment paper. Heat the oven to 350 degrees, shelf for baking set in the middle. In a large mixing bowl beat the eggs until well blended, blend in the oil and vanilla until smoothly blended. Add in the dry ingredients 1/3 of it at a time; blend in and do the next third and then the final third. Pour into the cake pan. Let stand 5 minutes. Bake 30-34 minutes until tester comes out clean. Let cool in the pan for 15-20 minutes before turning out onto a drying rack. Ice when completely dry.

Chocolate icing (this is a half recipe)

1/4 cup room temp butter

2 tbsp. cocoa

1/2 tsp vanilla extract

a pinch of kosher salt (about 1/8 tsp)

1 cup powdered sugar

2 Tbsp. milk (may need another tsp)

Beat the butter with your mixer until fluffy, add the other ingredients and beat until fluffy; add extra milk if too stiff.

Peanut butter icing (half recipe)

1/2 cup creamy peanut btter

2 Tbsp. room temp butter

1/2 tsp vanilla

1 1/4 cup sifted powdered sugar

2 Tbsp. milk (may need another tsp or two)

Beat the peanut butter and butter until fluffy; add the rest of the ingredients and beat until fluffy; add extra milk if too stiff.

Ice half the cake with the chocolate icing and the other half with peanut butter. Enjoy!