This healthy muffin is a variation of my kitchen sink muffin recipe; the changes include adding locally sourced pawpaw pulp and swapping sugar for coconut palm sugar *lower on hypoglycemic index. I have grown to love pawpaws and this is my first muffin attempt. They are tender and delicious. These are breakfast style muffins so not that sweet, great texture and totally yummy. I do love muffins for snacks. They are healthy; more fruit and no sugary topping. If you want to add extra sweetening use my oatmeal topping from my chocolate chip banana muffin recipe. This time I used pawpaw puree, golden raisins and dried sweetened coconut, great combo! I swapped walnuts for slivered almonds, either is fine.
Because they will lose moisture if they sit around, I will freeze any I won’t eat in 2 days; I love using a Ziplock freezer bag for this but cool them first. Label carefully with date and contents…be sure to eat them within a month. 
Pawpaw Kitchen Sink Muffins
2 cups brown rice flour mix (see below) or King Arthur Basic GF Mix
2/3 c coconut palm sugar
1 tbsp. baking powder
1 tsp. baking soda
¾ tsp xanthan gum
¼ tsp salt
1/2 tsp cinnamon
1/4 tsp. nutmeg
2/3 cup pawpaw puree
2/3 c flaked coconut
½ c golden raisins
½ c slivered almonds (optional)
2 large eggs beaten
½ c plus 2 Tbsp. milk, whole or 2 percent
½ c canola oil
Directions:
Heat oven to 375, placing the rack in middle of oven. Spray muffin pans with cooking spray. One batch makes 14-15 muffins.
Mix all dry ingredients in bowl of stand mixer or big bowl
Add fruits and nuts; stir to coat them with dry mix
Combine milk and oil, beat in eggs. Add liquids to big bowl; stir until blended. Note: If you used regular sugar you will need to leave out the extra 2 tbsp. of milk.
Fill muffin pans 3/4 full. Bake 22-24 min until golden brown. Do not overbake or they will be dry. Remove within a minute from the pans and cool on a rack. Freezes well for up to 3-4 weeks and keeps in fridge (well wrapped) a few days.
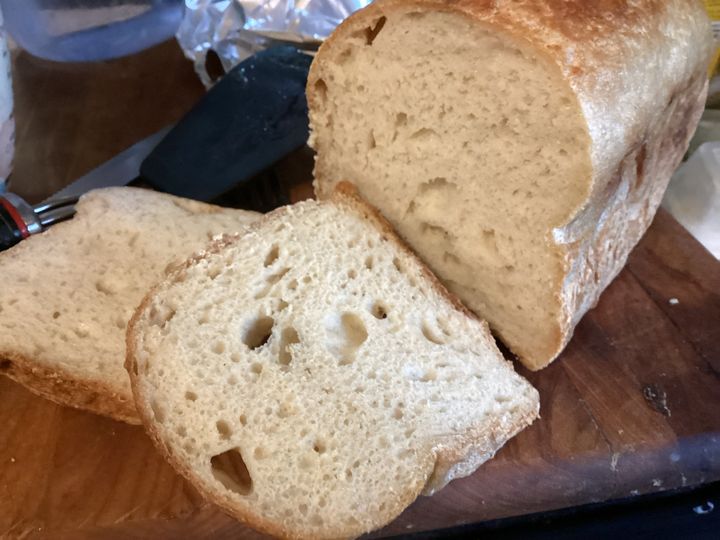
This is my new favorite bread recipe. You need to make a gf starter; lots of directions online. its not that difficult and you can buy a freeze dried one on-line. I prefer one made with brown rice flour and it needs to be at least 2 or 3 weeks old before using it. The weeks of forming it include lots of discarding a portion of it in efforts to get rid of harmful or poor tasting bacteria. I suggest you read up on the process, so you have a good idea of the process before you make one.
This is a pretty easy bread recipe for a beginner. You do need these assorted flours but trust me, if you have to eat gf you are probably sick of expensive and flavorless store breads so buying these flours is well worth it. I keep the sorghum, brown rice, millet and psyllium husk powder in the freezer, so they each stay fresh. You should put them in a freezer bag if their container is flimsy.
You could probably use a portable mixer, but a stand mixer is best. I use a scale to weigh most of my ingredients, necessary for exacting measurements. They aren’t that expensive and if you bake much, one is a necessity. My recipe is a take-off of one by Gluten Free Gourmand. I added the preferment step to my version to increase flavor and improve texture.
The preferment is a fancy term for a mixture of the sourdough starter, flour and warm water that stands around for 4 to 24 hours, some people let it stand even longer. Its purpose is to add sour flavor to the bread; without it your bread will be a bit bland, and it also can help the texture especially if you use an active starter (fed with flour and water that day so it is bubbly and active). I find the use of the preferment step makes this bread deliciously sour and with a lighter texture. It isn’t hard to do; I actually use a 32 oz yogurt container with a lid and just leave it sit for that day to get sour; simply dump the entire contents, including any separated liquid, into the bread dough mixture. Super easy and it definitely improves flavor and texture.
There is no tricky kneading or shaping of this bread. I roll it into a tube shape and bake in a metal loaf pan so I have the traditional bread shape for use in sandwiches. This bread made great grilled cheese or panini sandwiches. I slice up the loaf the day after baking it and freeze it in a freezer Ziplock; defrost in microwave for 50-60 seconds and you are ready to toast it or make a grilled sandwich! You can make it in a round or oval boule if that floats your boat; you might want to use a banneton to shape it as it rises and a cast-iron Dutch oven to bake it in. I generally like the boule recipe on Bakerita.com for that sort of sourdough but this recipe below could be shaped, risen in a mold called a banneton and baked in a boule. My Dutch oven is oval, so I tend to make oval loafs in it; they slice in nice slices which are mostly the same size.
Discard Sourdough Bread Made with a Preferment
Preferment:
200 gms (grams) active starter
80 gms sorghum
100 gms warm water (95-115 degrees)
Mix in a plastic lidded container and let stand for 24 or more hours
Dough directions – Ingredients:
Mix in stand mixer bowl
65 gms potato starch (you could do 115 gms potato starch and leave out the cornstarch)
50 gms cornstarch
40 gms millet flour
40 gms tapioca flour
9 gms sea salt
20 gms psyllium husk powder
Mix well and add 1 tsp active dry yeast
Add 280 gms warm water and the preferment. Mix with beater of stand mixer for 1-2 minutes until well blended. I have a beater with a built-in scraper; use it or a separate scraper to push all dough together into a rough ball. Cover with a damp lint free kitchen towel and put in a warm place for 60-90 minutes. I leave the beater in the bowl for this first rise.
Add these three things: 75 gms tapioca flour, 1 tbsp. sugar and 1 tbsp apple cider vinegar, Blend well with the stand beater. Turn out onto lightly floured bread board, form into a log; I like to roll it back and forth to smooth the bumpy surface. Place in a metal baking loaf pan sprayed with gf cooking spray. Cover with the damp cloth and put back in the warm place for 60-90 minutes. It should have risen some but doubtful it will double. I like it to be puffy but not too puffy or it might become over risen, not good!
Preheat oven to 450 degrees when the bread is close to ready for baking. While it heats put a low pan of hot water in the oven so it comes to a boil while in your oven. I like my baking shelf set in the middle slot. Bake the bread 30 minutes covered loosely with aluminum foil and then 20 minutes more without the foil. Remove from pan within 5 minutes and cool for a minimum of 4 hours; I like more than that. I often bake this in the later afternoon to evening and then cut it in the morning. Enjoy!
I make a lot of blueberry cobbler when we are camping. Since the blueberry season is pretty much over, I decided to add some fresh apple cubes and they made it taste so bright and lively, cobbler delightful!
This recipe is modified from one in Bette Hagman’s book, More from the Gluten-Free Gourmet and is based on a flour mix that will give you 4 cups of the dry ingredients. One cup is the base for an 8×8 pan of cobbler topping. I bet two cups dry mix will make a big 9×13 cobbler. Store the dry mix in an airtight container in the freezer to keep it fresh.
I have tried a number of cobbler recipes but nothing has been better than this one, so I generally stick to what works for me. But I have modified it a bit lately; cut out one egg, less milk, coconut palm sugar in the filling and I grate cold butter on large hole side for great dumpling texture.
I always get the fruit cooking before putting the topping together so the fruit is hot and ready for the topping and can go right into the oven. I always let it stand 10-20 minutes as it is way too hot to eat fresh off the campfire or the oven.
Dry Cobbler Mix
2 ¼ cups white rice flour
½ cup potato starch
½ cup tapioca flour
1 tsp. baking soda
4 tsp. baking powder
1 tsp salt
1 tsp. xanthan gum
1/3 cup sugar
Cobbler Topping
1 cup dry baking mix
1 egg
2 tbsp grated cold butter
1/4 cup milk/buttermilk
½ tsp. vanilla
Mix the wet ingredients and then add to the dry mix in a big bowl. Grate in butter BEFORE adding the wet ingredients; i stir it gently after grating it in.
Fruit Filling
2 cups blueberries
2 cups cubed peeled and cored apples; 2 medium apples was enough.
1/3 ½cup coconut palm sugar
2-3 tbsp. GF flour like rice flour, tapioca flour (use 3 if juicy)
½ tsp cinnamon
Directions:
Put the fruit in a thick bottomed saucepan. Stir together the sugar, cinnamon and flour and mix into the fruit. Cook on the stove top for 3-5 minutes until it is thickened and hot. Pour into a buttered 8 inch square or round oven pan, top with big blops of the cobbler topping. Bake immediately: at 350 degrees for 25 minutes. The top should be light brown and spring back when you poke it with your finger. If it looks damp or squishy bake it 5 more minutes. This happens if I use more than 4 cups of fruit; slows it down, sometimes even ten extra minutes if you put 5 or so cups of fruit in it.
Let cool 10-20 minutes before serving as it will burn your mouth right out of the oven! Some people love it with a scoop of vanilla ice cream. Cobbler is perfect just on its own.
Note: if you use oil and almond milk then this cobbler will be dairy free. Spray the cobbler pan with cooking oil instead of rubbing with butter. I think you can use any sort of milk you can find or even fruit juice.
No new pictures; we were camping and I didn’t take any pictures.
This is a modified version of my delectable peach cobbler. I swapped out the white sugar in the filling for coconut palm sugar which has a lover number on the hypoglycemic index. I am pre-diabetic, so any sugar or sugar substitute is problematic. But I do try to use the coconut palm sugar whenever possible. It does darken the look of whatever you put it in unless you sub it in for brown sugar and there it performs perfectly in the color department. Secondly, I grated cold butter rather than using soft butter or oil for the fat ingredient. It actually worked fantastically; the crust was a tad crunchier in a wonderful way and the texture of the cobbler topping was perfect. Definitely a great technique to use whenever possible, use the coldest stick of butter you have!
Well, this post will be a modified peach cobbler and it is peachy keen! I often make cobbler with blueberries and even sliced rhubarb. Most any fruit works; blackberries, raspberries, cherries, plums, nectarines and apricots come to mind.
This recipe is modified from one in Bette Hagman’s book, More from the Gluten-Free Gourmet and is based on a flour mix that will give you 4 cups of the dry ingredients. One cup is the base for an 8×8 pan of cobbler topping. I freeze this cobbler mix and it is super handy for a quick cobbler treat.
Notes: I always get the fruit cooking for just a couple minutes before putting the topping together so the fruit is hot and ready for the topping and can go right into the oven. I recently cut the eggs down from 2 to 1 and I like the texture of the cobbler topping better. The grated butter improves the crust texture and the sugar change is healthier for us pre-diabetics.
Dry Cobbler Mix
2 ¼ cups white rice flour
½ cup potato starch
½ cup tapioca flour
1 tsp. baking soda
4 tsp. baking powder
1 tsp salt
1 tsp. xanthan gum
1/3 cup sugar
Cobbler Topping
1 cup dry baking mix
1 egg
2 tbsp cold butter – I peeled back the waxed paper and grated it into the dry flour mix using the biggest hole
1/4 C buttermilk
½ tsp. vanilla
Mix the wet ingredients and then add to the dry mix in a big bowl.
Fruit Filling
4 cups sliced ripe peeled peaches or nectarines
½ tsp. almond extract
½-2/3 cup coconut palm sugar – amount depending on how sweet you want it
2-3 tbsp. GF flour like rice flour or my preference, tapioca flour (use 3 if juicy)
½ tsp cinnamon
Directions:
Mix the fruit and almond extract in a thick bottomed saucepan. Stir together the sugar, cinnamon and flour and mix into the fruit. Cook on the stove top for 2-3 minutes until it is thickened and hot. Pour into a buttered 8 inch square pan, top with big blops of the cobbler topping. I have used 1/4 cup milk or buttermilk. Bake immediately: at 350 degrees for 25 minutes. The top should be light brown and spring back when you poke it with your finger. If it looks damp or squishy bake it 5 more minutes. This happens if I use more than 4 cups of fruit; slows it down, sometimes even ten extra minutes if you put 5 or so cups of fruit in it.
Let cool 7-10 minutes before serving as it will burn your mouth right out of the oven! Some people love it with a scoop of vanilla ice cream. I feel fruit cobbler is perfect just on its own.
Original recipe posted on my blog in August 2014. I made some changes to the recipe to lower the sugar impact and improve the texture of the cobbler crust.
Peaches in late summer: ripe peach chunks on my cereal, peach ice cream, peach pie, peach tartlets and peach cobbler. Well, this post will be on peach cobbler and it is peachy keen! I often make cobbler with blueberries and even sliced rhubarb. I am guessing most any fruit might work; blackberries, raspberries, cherries, plums, nectarines and apricots come to mind.
This recipe is modified from one in Bette Hagman’s book, More from the Gluten-Free Gourmet and is based on a flour mix that will give you 4 cups of the dry ingredients. One cup is the base for an 8×8 pan of cobbler topping. I bet two cups dry mix will make a big 9×13 cobbler. Store the dry mix in an airtight container in the freezer to keep it fresh.
I have tried a number of cobbler recipes but nothing has been better than this one so I stick to what works for me. If you use nectarines there is no peeling involved which makes it easy to throw together.
I always get the fruit cooking before putting the topping together so the fruit is hot and ready for the topping and can go right into the oven. I cut the eggs down from 2 to 1 and I like the texture of the cobbler topping better.
Dry Cobbler Mix
2 ¼ cups white rice flour
½ cup potato starch
½ cup tapioca flour
1 tsp. baking soda
4 tsp. baking powder
1 tsp salt
1 tsp. xanthan gum
1/3 cup sugar
Cobbler Topping
1 cup dry baking mix
1 egg
2 tbsp melted butter or canola oil
1/4 to 1/3 cup milk/buttermilk
½ tsp. vanilla
Mix the wet ingredients and then add to the dry mix in a big bowl.
Fruit Filling
4 cups sliced ripe peeled peaches or nectarines
½ tsp. almond extract
½-2/3 cup sugar depending on how sweet you want it
2-3 tbsp. GF flour like rice flour, tapioca flour (use 3 if juicy)
½ tsp cinnamon
Directions:
Mix the fruit and almond extract in a thick bottomed sauce pan. Stir together the sugar, cinnamon and flour and mix into the fruit. Cook on the stove top for 4-5 minutes until it is thickened and hot. Pour into a buttered 8 inch square pan, top with big blops of the cobbler topping. I have used 1/4 cup milk and that is less runny than using 1/3 cup. Frankly it works either way. Bake immediately: at 350 degrees for 25 minutes. The top should be light brown and spring back when you poke it with your finger. If it looks damp or squishy bake it 5 more minutes. This happens if I use more than 4 cups of fruit; slows it down, sometimes even ten extra minutes if you put 5 or so cups of fruit in it.
Let cool 7-10 minutes before serving as it will burn your mouth right out of the oven! Some people love it with a scoop of vanilla ice cream. Cobbler is perfect just on its own.
Note: if you use oil and almond milk then this cobbler will be dairy free. Spray the cobbler pan with cooking oil instead of rubbing with butter. I think you can use any sort of milk you can find or even fruit juice.
Originally posted on my blog in August 2014. I made some small changes to the recipe.