Peach Melba: Peachy Perfect

Peach season is nearly done.  I have enjoyed excellent cobbler, spectacular peach tartlets and whole peaches au natural, the peach fuzz is full of fiber!  One more easy peach recipe for you: one with no cooking.  A recipe for a company dessert with next to no work, that sounds about perfect for my busy life.  raspberry-jam-014

Your success depends on the quality of the three ingredients. Yes, just three so they better be the best you can find!  I like peaches direct from the orchard, the best quality raspberry jam you can afford (homemade jam is the bomb for this recipe!) and excellent vanilla ice cream; I prefer Turkey Hill handmade vanilla. I got my pturkey-hill-vanilla-ice-creameaches at Bechdolt’s Orchard. Perfect full peachy flavor. Yessss.

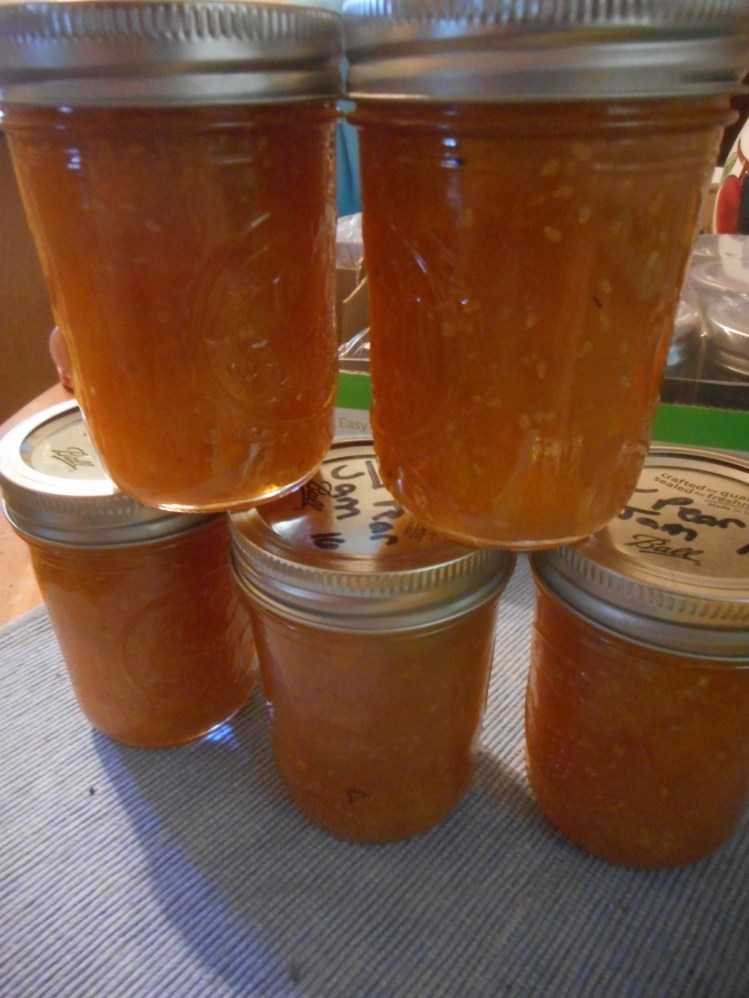
I made raspberry jam this week; we picked raspberries at a pick your own farm in NJ.  Cooked down with sugar and pectin to give me 4 half pints and a quarter pint.  The flavor is intensely raspberry.  I highly recommend making your own jam for this recipe; it makes the flavor spectacular. raspberry jam 013.JPG

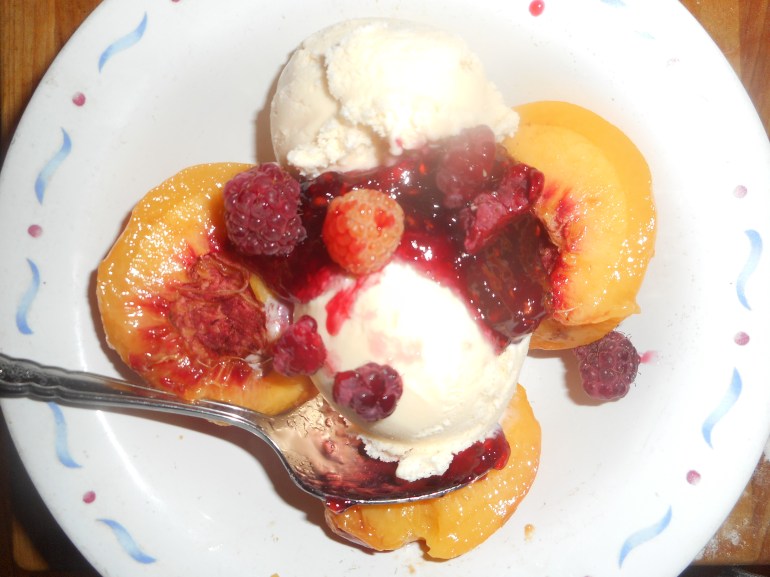
This post is about Peach Melba, created by that world renowned French chef Escoffier in honor of an Australian opera singer, Nellie Melba back in the early 1890’s.  If you look it up on line you can find fancy versions in stemmed glassware using a whole peach.  It is old school but truthfully the classics never go out of style. The flavors are just perfect together with next to no effort on your part.

My version of peach melba is very rustic; in a desert bowl, no stemmed foot ware, no six dollar a pint ice cream, but delightful.  A friend of mine wanted something special for company dessert, no baking, no gluten and fruit based.  I gave her this recipe and it was a huge hit.  Even a non-cook can put this beauty together in less then 10 minutes.

Peach Melba

(quantity per person)

One perfect ripe peach

One-two scoops vanilla ice cream

1 Tbps. raspberry jam, stirred up until it is semi-liquid

Directions:

Heat a pot of hot tap water just deep enough to immerse your peaches, bring it to a boil.  Gently drop in the peaches, turn heat down to medium and simmer for 3 minutes, remove with a slotted spoon.  Cool enough to be able to peel.  Peel the fruit, cut in half and remove the pit.

Place the peach halves in a dessert cup.  Top with 1-2 scoops of high quality vanilla ice cream and then drizzle the raspberry jam over the peaches and ice cream.  That’s all there is to peach melba.  Takes like 5 minutes to put together.  You can gild the lily with slivers of almonds but I prefer it with no additions.  The peaches and raspberries play off each other perfectly and the vanilla ice cream is the ideal base for them to be showcased with.  Enjoy this naturally gluten free treat before all the good peaches are gone!

Originally posted September 2015, with minor revisions.

Yellow Pear Tomato Jam…Yeap That’s A Real Jam

When I was a kid my mom used to make this jam out of yellow pear tomatoes.  Those are small and yellow; about the size of a large grape tomato, and yes, they are shaped like a pear.  Just really tiny.  They grow in a viney mess of a plant and are definitely old school tomatoes but you can still buy the seeds from superseeds.com. yellow-pear-tomato-jam-001

It had a cinnamon flavoring cooked deep into the conserve. It is sweet as any fruit jam generally is, so get that flavor of traditional tomato sauce totally out of your head!  Yes, sweet cinnamony tomato jam.  It can be done and is amazingly yummy.

Mom made this jam for my father every late summer when the yellow pear tomatoes were loaded with ripe fruit. He loved chowing down on it smeared thickly on a big slab of homemade white bread coated with fresh butter. I couldn’t find a recipe anywhere online so I have been experimenting for a couple of years.  Finally, I think I have perfected my version replicating Mom’s delicious conserve.  I think the secrets are to cook it long and slow until it is truly jammy in texture and the spices are enough but not overwhelming the tomatoes. We will be enjoying it this winter…on gluten free bread, of course!  You could also eat it on top of cream cheese spread on a cracker. Or use it in a recipe to add flavor; maybe a broiled fish dish?  I am going to experiment a bit with it to find more ways to enjoy my tomato jam.


Daddy’s Yellow Pear Tomato Jam
Yield: five 8-ounce jars

Ingredients
1 lemon
3 1/2 pounds yellow pear tomatoes
2 cups sugar
3 small cinnamon sticks
4 or 5 whole cloves
4 tsp pectin mixed with 2 tsp. sugar

Directions

Wash the yellow pear tomatoes,  chop up somewhat; halve the larger ones.  Then put in heavy wide sauce pan, add the sugar. Turn on low and let the sugar melt, once sugar is melted turn up some, stir frequently. Using a zester, remove the zest from the lemon in wide strips, leaving the bitter white pith behind. Cut the lemon in half and squeeze the lemon juice through a strainer into a dish. Add the lemon zest, lemon juice, cinnamon sticks, and cloves to the cooking tomatoes. Cook over medium-high heat, stirring occasionally, until the tomatoes are juicy and the sugar dissolves, 15 to 20 minutes.  Add the pectin and sugar mixture. Continue to cook, stirring occasionally, until the tomatoes are dark and syrupy and a candy or deep-fry thermometer registers 220 degrees F, 40 to 50 minutes (the timing may vary depending on the juiciness of the tomatoes). Reduce the heat if the mixture starts to scorch. I didn’t really use the thermometer this last time; just stirred it often and waited for it to reduce down to a thick jammy consistency.  That consistency is key

Discard the cinnamon sticks and cloves.  They have done their part in flavoring the jam and you sure wouldn’t want to bite down on a clove hiding on your jammed up toast! Sometimes I wash up the cinnamon sticks, let them dry and put them in a small dish as a room potpourri, waste not want not! They still have a lot of cinnamon flavor left in them….

Meanwhile, sterilize five 8-ounce canning jars and lids in boiling water.  I think 15 minutes in bubbling water for jars, and 5-6 for lids is fine.

Fill the jars with the tomato jam mixture, leaving 1/4 inch headspace, then seal and process ten minutes in a hot water bath.  Cool and store in a dry, cool, non sunny location.  I always label my jam; sometimes we forget and it is just safer to write a label of what it is and when it was canned so you will know 10 months later just what you have in that jar…  Enjoy!

Beautiful Bread and Butter Pickles

I got a gift of someone’s extra pickling cucumbers so I created something yummy; I made pickles last week.  Old fashioned bread and butter pickles which are tangy and sweet slices of yummy pickly goodness.  I think the name may come from the Depression era; from poor folk eating them often like you might enjoy bread and butter for a cheap meal.

This recipe comes out of an old Rodale cookbook, Stocking Up.  I did swap honey for sugar; not enough honey around here this week and I will have to try that next summer.  Otherwise pretty close translation.  FYI: they need to have sugar, turmeric, mustard and onions to be called bread and butter pickles.

They have to sit a few weeks so I am trying to be patient.  Want pickles now.  Oh well, I guess store pickles will have to do at present. (Addition in 2016: these pickles are rocking good; been enjoying them all year since I made them last summer; pickle perfection!)

If you get a few pickling cukes; they are kinda cute; all bumpy and gray green, try this recipe and impress your family.  Fun to make and gluten free, of course!

Bread and Butter Pickles

6 decent sized pickling cucumbers

2 medium sized onions

2 tsp. sea salt.

2 ¼ cups white vinegar

1 1/3 cup sugar

¾ tsp. celery seed

¾ tsp. ground ginger

¼ tsp turmeric

¾ tsp. mustard seed

Rinse off your cukes, peel the onions, slice cucumbers and onions, sprinkle with salt. Let stand an hour. Drain well.  Make a vinegar mix with the rest of the ingredients; put in a pot and bring to a boil.  Add the cukes and onions, bring back to boil.  Back in sterilized pint jars, leaving ¼ inch head space.  Put on brand new lids and rings (which can be used) – tighten, process ten minutes in a boiling water bath. Make sure the water is an inch above the top of the pots.  Let cool, store a few weeks before opening.

Makes 4 pints.

Originally posted in September 2015.  Minor revisions to text made. Recipe remains the same.

Sweet Corn and Lobster Chowdah

Sweet corn is one of my favorite summer treats.  So is lobster. Why not combine them in a delightful light summer fish chowder? So I did.  This is as good a chowder as any I had when I was living in Massachusetts or visiting New England.

You can vary the fish/shell fish as you wish, ditto for the veggies. Or cut back on the veggies if you are a hater of produce! This is my basic recipe, change as needed to make it less rich, richer or even dairy free. Just don’t overcook it or boil the chowder once the half and half is added.  I used yellow straight squash; love the color but green zucchini will work just as well.

I promise you that chowder lovers will be crazy for this fish soup!

lobster chowder

Sweet Corn and Lobster Chowder  six servings

Ingredients:

1 tbsp. olive oil

1 cup chopped onion; one large

2 cloves garlic, minced

3 cups fish broth or chicken if that is what you have

1 pound of Yukon gold or small red potatoes, diced

½ to 3/4 cup of summer squash diced

1/4 to 1/2 cup chopped red pepper

1 carrot diced

One large ear of sweet corn (could add another ear if you adore corn)

1 lobster tail (thawed)

¼ lb bay scallops

1/3 lb cod, dice into large chunks

6-8 large shrimp, shelled

1 tbsp shredded fresh basil

1-2 tsp. fresh thyme leaves

1 tsp fresh oregano leaves

½ tsp sea salt

¼ tsp. freshly ground black pepper

½ cup half and half (cream if you want it rich or milk for less rich)

1-2 Tbsp. chopped fresh parsley

Directions:

Heat the oil in a two quart sauce pan, add onion, cook 3-4 minutes, stirring, don’t let brown.  Then add garlic and cook another minute.  Add the broth.  When it is hot again add the potatoes.  Meanwhile, while broth heats cut the sweet corn off the cob, put the cob in the broth as it will release a lot of flavor.  Set the kernels aside to add later. Add the lobster tail to the hot mixture; let it cook about 6-7 minutes, remove and let cool a few minutes, snip open the underside and remove the meat, dice and set aside: will add back when potatoes are done.  Add the summer squash, red pepper and carrot, cook until all the veggies are nearly done, no more than 15 minutes.  Remove the corn cob. Add the cod, the scallops and the shrimp.  Let cook about five minutes.  Add the half and half and return to medium heat.  Do not boil.  If the soup is too thick add more half and half or more broth. Add the sweet corn kernels, the cooked lobster meat, salt, pepper and the fresh herbs. You could sub in snipped up rosemary for the oregano if  you like.  As soon as it is hot; sprinkle with parsley and serve.

Great with fresh gf French bread or rolls and a green salad.

The inspiration for my recipe is the potato, corn and monkfish soup in Jane Brody’s Good Seafood Book. A number of changes have been made.  Great cookbook for seafood lovers.


Swiss Chard Tacos

Meatless meals don’t thrill me like those made with serious proteins, favorites like salmon, poultry, lamb or pork.  That said, I have a few delightful vegetarian items I make on occasion.  Time to add another to my roster; these swiss chard tacos. My sister made these while I was up visiting her.  I was skeptical but found them to be really delicious and a great way to use up a lot of the swiss chard growing profusely in my August gardens!  No meat but you won’t miss it in these flavorful and filling tacos.

I used Mexican cheese but you can also use Monterey Jack as that is what the original recipe called for.  The recipe is out of a recent Home and Garden magazine. I made a few changes….added some ground cumin for extra spice. Don’t forget the red wine vinegar, really a great finishing touch.

The white corn tortillas (La Bandarita brand) came from Wegmans; they have one up near Boston.  There are three here near me. Enjoy!

chard taco

Sorry for the messy picture. I guess I should make a prettier taco!

Karen’s Swiss Chard Tacos

1 lb Swiss chard

½ tsp. cumin seeds

¼ tsp. ground cumin

½ a red onion, chopped

1 red pepper, chopped

1 tbsp. olive oil

1 clove garlic minced

1 Tbsp. red wine vinegar

1 can of black beans, rinsed and well drained

8 tortillas; corn flour

1 cup of Monterey jack cheese or Queso Fresca cheese; grated

1/3 cup sour cream, reduced fat is my preference

cilantro for garnish if desired

Directions:

Chop up the chard stems into half inch dice.  Rough chop the rest of the chard and set aside. Heat a large frying pan and add the cumin seeds; cook 1-2 minutes until fragrant.  Add olive oil then chard stems.  Cook 3 minutes until softening.  Add the chard leaves that you have rough chopped, ground cumin, onion, garlic and red pepper.  Cook 3 min, stirring.  Add the red wine vinegar and the black beans.  Stir well, cook 3-4 minutes longer. The greens should be wilted but they don’t need to be fully cooked down.

Meanwhile while the filling cooks; heat oven to 350 degrees.  Lay tortillas out on baking sheets.  Sprinkle grated cheese in the center of each.  Bake 4-5 minutes until cheese starts melting and tortilla is somewhat crisp. Remove from oven.  Place a generous amount of chard mixture on each tortilla.  Top with a spoonful of sour cream.  Sprinkle cilantro over top if desired.  I am not a fan but you might be…