Blueberry Smush Delish!

There are times when nothing but ice cream will do.  After a long tiring day and not much in my tummy I ate an omelet for supper.  It was pretty tasty but I had seen this article on ice cream blends in a food magazine at the library and was craving to try one. There were more than a dozen mixtures pictured, all based on vanilla ice cream and fruit and at least one or two other ingredients like a sauce and cookies/nuts.

There was one combination I was sure I had all the ingredients, ice cream, bananas, nutella sauce and cornflakes.  Seemingly simple with clean, clear flavors.  Upon some reflection I decided to replace the banana with some fresh blueberries I had purchased at a farm stand. Bananas seemed too bland and I adore blueberries with ice cream.

I put two small scoops nutella of ice cream in a cereal bowl, about a quarter cup of blueberries, a spoonful of nutella sauce and I dumped the cornflakes over it all.  Maybe ¼ cup of them.  I didn’t measure any of it.  I let the dish stand 2 or 3 minutes to allow the ice cream to soften.  Then using a spoon I blended the goop partially together before diving my spoon deep into it to try and get some of all four ingredients.

OMG, it was freaking crazy tasty.  The nutella sauce which is toasted ground up hazelnuts and chocolate/cocoa was wicked good against the other flavors. The corn flakes gave a nice crunch and the blueberries were bursts of fruity yumminess.  blueberry smush

I would say that this dessert is more than the sum of its parts. I was skeptical about cornflakes in ice cream but they worked well and didn’t get soggy.  The nutella was the star of the dish as far as my taste buds were concerned.  I could barely stop long enough to take this photograph as I suddenly knew I had to share this revelation with you my readers!

Now I need to go back and write down some of those other blends.  One had pureed peaches with bourbon and smoked almonds.  Oh, I think I must try that smushed up treat and soon!


Glorious Gnudi to Enjoy!

A while ago I saw this interesting recipe for something called gnudi.  It appeared to be a lot like gnocchi but with spinach built in.  I kept putting off making it and finally, out of curiosity more than anything I made some this past Saturday. And no, I am not sure how to pronounce it.  I think the g is silent so it sounds like “nudi” when I say the word.

Image

I found a similar recipe on Food Network, made with wheat flour, but what was really interesting were the comments.  A lot of whining about how they fall apart while cooking and words as to how bland they are.  Many comments later I was ready to make them with a few modifications. Despite all the negative comments this recipe got 3.5 stars so I knew it had something going for it.

I made sure to get as much liquid out of the spinach as humanly possible.  I even pressed the spinach in a strainer using a paper towel to force out as much liquid as could be expelled.  Then I was careful to chill the dough well.  And I remembered, for the most part, to turn down the stove temperature once I put the gnudi in.

My best friend’s mom made these but she called them “maflda” according to Bernie.  Unfortunately Sparky has been gone for many years and I cannot confirm that name.  I do know they remind me of her fabulous authentic Italian home cooking.  They have a delicate ricotta and Parmesan cheese flavor and are pillow like bundles of yummy Italian flavor.  I declined to serve them with marinara as both recipes I found suggested. I like them with a touch of butter and Bernie says that is how her mom served them.  I think the marinara sauce would cover up their delicate and subtle symphony of flavors.  The nutmeg in them has an affinity with spinach and really makes the flavor perfect, don’t leave it out.

gnudi on plate

GF Gnudi Dumplings

Ingredients

1 cup whole milk ricotta cheese (if it seems watery drain it for a while)     I didn’t see the need but some in the comments on line suggested draining.
1 pound frozen chopped spinach, thawed and squeezed dry
1 cup freshly grated Parmesan (best quality you can afford)
2 eggs
2 egg yolks
1/4 teaspoon freshly grated nutmeg [I used nutmeg from a jar I had recently opened and it was really fresh smelling and worked great.]
1 teaspoon sea salt
1 teaspoon freshly ground black pepper (I didn’t measure; just ground a bunch up!)
6 tablespoons all-purpose gf flour, plus 1 cup for coating

Directions

Bring a large pot of salted water to a boil.  I used one that was wide but not that deep for ease of plopping in the dumplings.

In a large bowl, mix ricotta, spinach, Parmesan cheese, eggs, and yolks. Stir in nutmeg, salt, pepper, and flour. Cover with plastic and refrigerate 30 minutes to an hour.

gnudi dough and formed dumplingsUse two spoons to form mixture in to small, slightly flattened balls about an inch to 1 ½ inches in diameter.  I used my favorite gf flour which is mostly brown rice flour with some potato starch and tapioca flour; see previous posts for a recipe. Use it in my pie dough and brownie recipe.

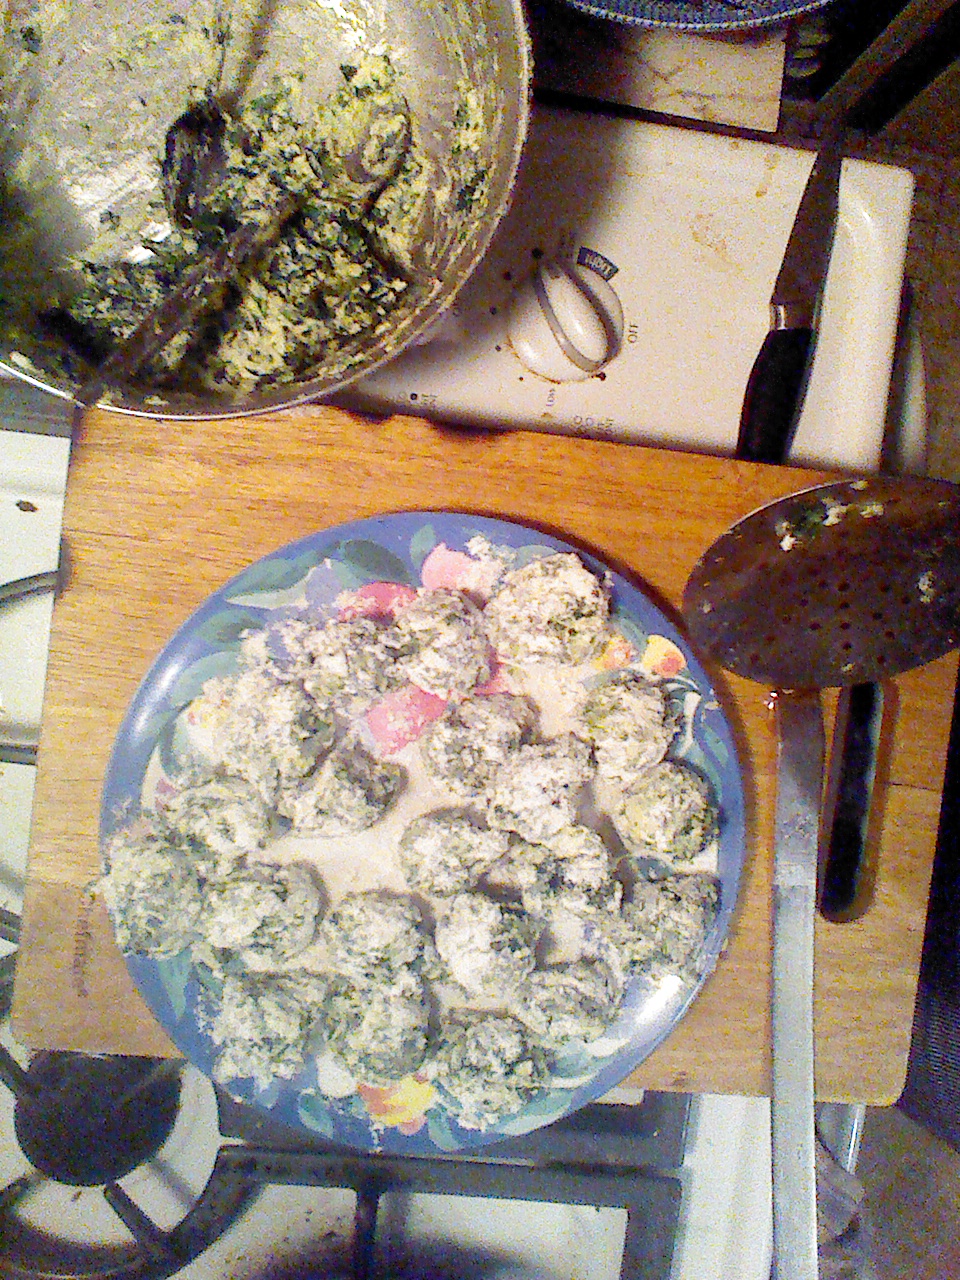
Put the cup of flour in a low flat bottomed bowl or on a plate. Roll the formed gnudi in the gf flour to coat, tapping off the excess. Slide formed gnudi into the boiling water. Be careful not to overcrowd the pan; I like to work in batches of 12. Remove the cooked gnudi using a slotted spoon after they float to the top and have cooked for about 4 minutes.

Place them in a serving platter and dot with small bits of fresh butter.

I served them as a starch along with some chicken kebabs but I am guessing they could go with most any protein or even standing alone as the entrée.

I served some to my family on Sunday as an appetizer and everyone but the two year old adored them.  He ate most of his but wasn’t quite as thrilled as the adults were!  i have some in that Tupperware container you see in the photograph.  I will be having them for supper tonight!

They aren’t that difficult to make; easy to form with a spoon.  Just follow the recipe pretty closely and you will be thrilled with the end results. Manja, manja!

Big Bites BBQ in Quakertown is Awesome!

If you are craving some tasty barbecued pork or brisket and can’t decide where to go, head South to Quakertown along Route 309 below the 663 junction.  On the left you will find Big Bites BBQ in a small strip mall.   bigbites I read about it on FaceBook and had to give it a whirl.  I had been feeling the need for all the yummy goodness of BBQ and couldn’t imagine where I would find barbecued meat safe for me to eat.  I didn’t have to look any further; this place is run by a family with three members who have celiac or another wheat allergy.  So they definitely know how to cook and serve GF foods.

You can get regular wheat buns there which are tasty according to my man.  But they order their GF burger buns directly from Udi’s in Colorado to get them as fresh as possible.  All the bbq and the fixings are made gluten free. Safe, safe safe!

On my first visit I ordered a brisket sandwich as well as smoky baked beans, coleslaw and some GF cornbread that came with a small cup of honey butter. It was all delicious. There was a lot of meat in that sandwich and it was tender to say the least.  I added extra bbq sauce from a squeeze bottle on the table.  The slaw was some of the best I have ever eaten in a restaurant.  My dish of baked beans was indeed smoky with great flavor including some shredded pork. And the corn bread was lovely; tender, flavorful and sweet after I poured on some of the BigBites special butter.

Joe had a fat juicy pulled pork sandwich and the same sides as me.  He polished it all off and didn’t have a single negative comment.  I know he was glad I could relax and eat without worrying about food safety.  He took home a second sandwich for lunch the next day.

The service was pretty fast and the owner came over to check and see how we liked our meal.  BigBites only has counter service with maybe 8-9 tables for customers to chow down at.  As we ate people came in to pick up orders, turns out get takeout to eat at home is a popular option.  There is a cooler full of ice tea and other drinks to have with your meal.  The small restaurant is comfortable and cozy if not fancy.

I wrote this October 2013 but have eaten there 3-4 times since then.  I tend to get the same thing, the half a bbq’d chicken platter which includes a quarter rack of ribs and two sides.  The chicken is so tender and smokey I had hardly bear not to have it every visit. We took some friends with us last time and they loved the barbecue too!

I am longing to go back and try some more of the menu including a bbq parfait that a friend says is awesome.  It is not a huge menu but for someone who loves barbecue and all the sides, it is exactly the right size!


Microgreens are Mighty in Taste and Nutrients

Microgreens…what the heck are they?  Well…they are, basically, sprouts grown in dirt.  I got some from superseeds.com a/k/a Pinetree Seeds of Maine, a family business which has been around since 1979.  I have found it to be a great place for inexpensive, good quality seeds and plants.  I get most of my seeds there.

Going gluten free has lead me to continue searching for healthy food choices and I always loved sprouts so this past winter I bought a packet of these microgreens.  I chose the kitchen sink variety; a mixture of many greens and veggies.  I planted them 1/3-1/2 inch deep in seed starter medium.  Watered them well, and waited. In just 4-5 days the first shoots appeared.  I was thrilled with the more than 95% germination rate.  That meant that my pot was packed solidly with tiny shoots.  Maybe a tad too tightly……. I put them in the kitchen window sill.  Watered them almost daily and turned them around every other day. Some grew extra fast; pea shoots that were nearly 2 inches taller than the rest of the plants.

In less than two weeks I was getting out my kitchen scissors and snipping off a section of my shoots to toss on a just made salad. This boosted the nutritional value of my salad considerably.  Not to mention the interesting flavor of all those tangy sprouts!

Sprinkled on my salad they added lots of phytonutrients, vitamins and minerals.  They are a great flavor booster for your side or main salad.

Phytonutrients are what you say?  Well, one definition, courtesy of Wiki links is this:

The term is generally used to refer to those chemicals that may have biological significance, for example antioxidants, but are not established as essential nutrients.[1] Scientists estimate[citation needed] that there may be as many as 10,000 different phytochemicals having the potential to affect diseases such as cancerstroke or metabolic syndrome.   From: http://en.wikipedia.org/wiki/Phytonutrients.  FYI: Wiki Links uses phytochemicals as a synonym of phytonutrients.


According to medterms.com:

Currently, the terms “phytonutrient” and “phytochemical” are being used interchangeably to describe those plant compounds which are thought to have health-protecting qualities.

Anyhow, definitions aside, microgreens are chock full of those healthy phytonutrients as well as crunch and flavor.  A small handful would be perfect in a spring salad or on top of a burger.

So, if you are not much of a gardener but want fresh salad stuff that is cheaper, fresher and healthier for your body than you can buy just about anywhere, get some packets of microgreens and start planting!  If you want to learn more Pinetree seeds has a book for sale called Microgreens by Eric Franks and Jasmine Richardson.   Image

If you don’t have any pots lying around most any container with drainage will do.  Actually, I used a half and half container scrubbed clean and laid on its side with the uppermost side cut off and a few holes punched in the bottom.  I filled it with potting soil.  Do avoid soil mixtures with “miracle grow” in them.  Get plain soil, preferably organic. This is as easy as gardening can be. I promise that in a few short weeks you will be able to cut and enjoy your own super sprouted greens. Go forth and sprout!

Chopped Strikes Again…Mahi Mahi Style

Another episode of Chopped occurred at my house tonight.  I worked late, two jobs actually, starving hungry by time I drove to my house.  So there wasn’t much time for messing around in the kitchen when I got home after 8.  I had defrosted a fillet of mahi mahi.  I like its firm texture and meaty flavor.  My other required “Chopped” ingredients were a zucchini which had been languishing in my fridge veggie bin for more than a few days, a just barely sprouting yellow potato, and some garlic chives growing lush in my herb garden.   Image  Image The second picture is of them blooming, best used before they bloom.

Ingredients (for one)

1 4-6 oz. mahi mahi fillet

¼-½ tsp Cajun seasoning

2 tsp sweet rice flour

1 tbsp olive oil (I prefer EVOL but use what you have)

1-2 tbsp chopped shallot (or onion)

½ cup zucchini cut in ¼ inch half rounds

1 tsp. fresh thyme leaves

½ small lemon; zest and juice

1-2 tbsp. snipped leaves of garlic chives

1 potato

1-2 tsp butter

Directions

Place the mahi mahi fillet on a sheet of wax paper; sprinkle it with some Cajun seasoning; about ¼ tsp.  Sprinkle with 1 tsp sweet rice flour, spread it around with your fingers.  Flip it and do the same thing on the other side of the fillet.   Image

Heat a small to medium Teflon frying pan and add the olive oil.  Slide in the fillet.  Cook for 5 minutes on med high heat.  I used half a shallot, just cutting the peeled bulb into thin half rounds.  As the fish cooks sprinkle the chopped shallots around the fillet and then the zucchini rounds. Stir them often. Keep them moving but not on top of the fish.  Carefully turn the fillet after 5 minutes and cook 4-5 more minutes until it is firm and opaque.  Do not let it burn or overcook. Poke the potato in two places and put in the microwave, cook until done.  Let rest while you finish the fish. At the end of the second cooking place the fish on top of the zucchini and zest the lemon peel on top. I used a zester that makes long skinny strands but you can grate it if you don’t have a zester like mine.  Squeeze the lemon juice all over the fish, add the thyme leaves.  Then add 1-2 tbsp. dry white wine; I used some Italian Bollo pinot grigio I had left in the fridge.  Sometimes I make do with the vermouth I keep in the fridge for cooking purposes.  After the mixture cooks for 10-20 seconds add 2 tbsp water and stir up the zuke.  Sprinkle the pan with the garlic chives; I just snip them with a scissors into the pan.  If you don’t have garlic chives you can use regular chives.  Put a tsp of butter in the pan and allow to melt before serving, Gently stir the veggie mixture to coat it with the melted butter.  Taste the mix and add some sea salt and freshly cracked pepper.

Place the fish on a plate, spoon the zuke and shallot mixture next to it; be sure to get all the pan juices. I put some of the veggie mixture on my baked potatoes which I had split and seasoned with salt/pepper and 1 tsp. fresh butter.  Dive in to this healthy and GF meal.  The fresh herbs and lemon juice add a lot of flavor and seasoning.  You might add a side salad to round out the meal.  It took me about 14 minutes to pull it together.

You can sub other herbs as long as they are fresh.  Don’t use too much or you will overwhelm the delicate flavor of your fish.  And yes, you can use any fish you like if you don’t have mahi mahi or dislike it for some reason.  I have begun to love shallots as they have a delicate flavor that does not intrude or cover over the other ingredients but if you only have yellow onion that will work fine. Other veggies might work as well but I do suggest you try the recipe unchanged before you start mixing things up!  Image

My camera is missing in action and my tablet camera seems out of order today.  Phone not available either so no picture of this lovely meal.  I will toss up some photos of the ingredients. 

Of course you can make this for 2-4 people; just increase your ingredients accordingly. It is definitely going to be a go to recipe of mine for busy summer evenings particularly when the zucchini crop come in!