Peach Tartlet Perfection

It is the peak of peach season so get some peaches and whip up a delicious gluten free peach pie. I wanted individual tarts so everyone would feel special; that I baked them a pie; easy to do!  If you don’t have these deep dish pans you can use the flat bottomed tartlet pans; but they probably won’t hold quite as much filling. Plus I think the proportion of fruit to crust is just perfect in a small tartlet.  Try them and see; a delightful summer dessert.

Please make every effort to use local fruit; can get peaches at orchards like Bechdolt’s near Springtown, at most farm stands and at farmer’s markets; one on Saturdays in Easton or Sunday’s in Hellertown.  This pie really showcases great tasting peaches. If you use lousy peaches your result will lack great flavor. But, here’s the thing: store peaches can be poor in flavor and texture due to improper chilling so I strongly suggest you get locally grown, sweet, ripe peaches to make your pie.  I love when they have a pink blush; it makes the pie so pretty and perhaps even tastier.

To peel; heat 3 inches of plain water, drop the peaches gently in 4-5 at a time and blanch them 2-3 minutes, two if very ripe, 3 if less ripe.  Allow to cool somewhat before peeling.  I like to do that over a bowl to catch the juices as I slice each peach.

Don’t eat these tartlets hot; should be cooled to just warm if you like it so or room temperature or even a bit chilled. They were perfect, just like a big pie only tiny and making one individual dessert.  You could certainly serve them with vanilla ice cream.  And this recipe, like all peach desserts, works perfectly with fresh nectarines, bonus: no peeling required!

Angie’s GF Peach Crumb Tartlets: makes 7

Crust:

1 c plus 2 tbsp brown rice flour mix (at bottom of recipe)

2 Tbsp. sweet rice flour

1 Tbsp. granulated sugar

½ tsp xanthan gum

¼ tsp salt

6 Tbsp. cold butter cut into 6 chunks

1 large egg

2 tsp fresh orange or lemon juice

You will need 7 deep dish 4 inch tartlet pans if you make them all at once. I actually froze my dough and made the second batch of 3 a day later. Adjust the filling to the number of tartlets you are baking.

Mix dry ingredients in bowl of stand electric mixer.  Add butter and mix until crumbly and resembling coarse meal.  Add egg and juice.  Mix until it comes together into big chunks.  Shape into a ball with your hands. Put it on a crust sized piece of wax paper (14 x 14 inches more or less), flatten the crust ball some; put on top of it another piece of wax paper and chill it all in your fridge 15-20 minutes while you prepare the filling.

Filling:

6 cups sliced fresh peaches, peeled and cut in thick slices, place in medium bowl

Mix with:

½ cup sugar

1/4 cup quick tapioca

I made it in two parts; used 7-8 smaller peaches for each batch. Adjust the sugar and tapioca accordingly.  Let stand while you prepare the crust. This is important so the tapioca can soften and absorb some juices before baking.

Break dough into 7 small equal balls.

Roll out each tiny crust in a pie bag or between the two sheets of wax paper, try to get the thickness even and somewhat thin, no thick middle! Peel off one side of paper and place in pie pan, centered.  Remove other slice of wax paper.  Crimp edges all around.  Or not; I left mine kinda rough but it worked fine! Place the crust lined pans on a baking sheet with a rim to catch any spills. Fill each tartlet with fruit mixture after you have the crumb topping ready to go.

Crumb topping

¾ c brown rice flour mix

½ c sugar

½ tsp xanthan gum

1/3 c cold butter cut into six chunks

Put all four ingredients in the same mixing bowl you made the bottom crust in and mix well with mixer paddle until crumbs form. If you let them go extra long you get big fat crumbs if you want that look and I did!

Sprinkle the top of each tartlet with crumb mix; use as much as you like.  I didn’t measure; just sprinkled until the fruit was barely visible through the crumbs. Up to your personal taste… It sinks partially into the fruit mixture and adds lots of sweetness and eye appeal.

Bake in a preheated 400 degree oven for 35 minutes until bubbly and the crumb crust is light brown.  Cool at least 1 hour before serving at room temperature.  I think it is best served the same day you make it, or no more then 12 hours after baking for optimal flavor.  The crumbs will get soggy if too much time passes. Mine was still very good the next day; just not as great as when really fresh.

Note: if you find your bottom crust is not browning enough bake it empty at 375 degrees for 7-9 minutes before filling it with the fruit.  I have a bottom heat pizza style oven which gives me perfect pie crust so I don’t ever have pale pie crust. This is a big benefit of having this type of oven; it is a two oven range with a full sized lower oven.

mass upload 8-22-16 562

Brown Rice Flour Mix (Same as King Arthur GF All purpose blend)
2 c brown rice flour (finely ground)

2/3 c potato starch – Not potato flour

1/3 c tapioca flour

Note: the crust and crumb recipe are out of Annalise Roberts cookbook, Gluten Free Baking Classics, Second Edition. Adaptation and filling recipe are mine.

Reposted with minor changes from my blog; September 2016.


Banana Custard Pie…in a Chocolate Crust…Luxury Made Easy

The ultimate perfect old school pie… so yummy and all you really need to make is some custard. I changed up my crust from a traditional flaky crust to a gf chocolate cookie crust that I bought at Wegmans. You can too and save the time you would have spent making a crust. No baking for me this time: no hot oven!

My mom used to make this pie when I was in my early adulthood; for some reason she never made it for us as little kids.  I used to cut up and set the banana rounds in the flaky baked pie shell for her.  She never used a chocolate crust so this is a slightly different take on this custard pie. The contrast of the rich custard, the crunchy chocolate crust and the fluffy cream with the delicate banana flavor is just so memorable.  And if you can make custard this pie is simple. I assume you could use a box pudding but I highly recommend this traditional stove top egg custard, straight out of Betty Crocker’s 1978 cookbook.

Angie’s Banana Cream Pie

 A chocolate ready-made crust


Filling:

½ to 2/3 cup sugar (I went with ½ cup and it was plenty sweet)

1/4 cup corn starch

½ tsp sea salt

3 cups whole milk or 2 percent, no lower fat than that

4 egg yolks beaten lightly

3 tbsp. butter cut into small cubes. (optional- skipped it this time)

2 tsp. pure vanilla extract

2 large bananas

Topping: 1 cup whipping cream, ¼ cup powdered sugar and ½ tsp. vanilla

Directions: Mix the dry ingredients in a 1 ½ qt sauce pan, Add the milk and stir constantly as it heats.  Once it reaches a boil time it for one minute. My secret trick is that if I don’t feel it was fully boiling when I started my minute; I add another minute to the process to be sure it is going to turn out thick. Stirring as it boils is mandatory; not the time to walk away from this process.  Then add 1/3 of the hot custard to the egg yolks as you stir, stir some more and return all to the pan, bring back to boil and time for one minute, yeap: stirring constantly.  Add the butter and stir as it melts, then the vanilla, stir.  Pour into a mixing bowl, cool five minutes and then put a film of plastic wrap on the top; press it down onto the custard. let cool a while more; maybe 30 minutes Chill in refrigerator at least an hour before using.

banana custard pie

banana custard pie 002

These slices were served a day after I made it.  Still yummy.  Forgive the paper plates and the poor quality picture. My mom’s room is not the best place for taking pix!


Cut peeled bananas into 1/2 inch rounds and cover the bottom of the pie crust with them close together.  Pour the custard over the sliced fruit and smooth the top.

Chill pie 1- 2 hours before slicing and serving cold topped with a big dollop of real whipped cream.

Whipped cream: Beat 1 cup cold whipping cream with an electric mixer until it holds soft peaks; add a quarter cup powdered sugar and ½ tsp. vanilla.  Do not beat any more, just stir in.

I think it is best served the same day you make it, or no more then 12 hours after assembly for optimal flavor.  The crust will get soggy if too much time passes. Mine was still very good the next day; just not as great a crust as when really fresh.  I like to top my slices of pie with extra rounds of banana to up the nanner flavor.  I liked the chocolate crust but I think I might go back to a homemade crust; either a flaky one or maybe one made with gf gingersnaps. Now that sounds like a winner!

Note: I froze my egg whites for later use in a cake. No wasting them, that’s for sure.

——————-

Pie filling from Betty Crocker Cook Book, 1978 Edition.


Rhubarb Sour Cream Pie

Rhubarb is a perfect choice for a spring pie.  This is easy to make even though it has several steps.  Sour cream rhubarb pie is different from any other rhubarb pie I make because the texture is light, almost fluffy. It has a touch of crumbs on the top; they are added after it bakes a while.  I think this adding of crumbs later help keep them from sinking into the raw pie and keeping it from becoming rather cake-like as my rhubarb custard pie turns out.  I never made this pie before so it was a new experience and everyone loved it! It is my adaption from a recipe off of a website called Mary/The Kitchen Paper. Keeper recipe!

The GF crust will work for any pie you wish and the GF crumb topping is q great pie topper.  I store any leftover crumb mixture in a sealed container in the fridge; keeps a few weeks.  What I am giving you is my mixture of a couple of recipes. I know it has several steps but each one is easy and you can use these crust and crumb recipes for other pies.

Angie’s GF Rhubarb Sour Cream Crumb Pie

Crust:

1 c plus 2 tbsp brown rice flour mix (recipe at bottom of recipe)

2 tbsp sweet rice flour

1 Tbsp. granulated sugar

½ tsp xanthan gum

¼ tsp salt

6 Tbsp. cold butter cut into 6 chunks

1 large egg

2 tsp fresh orange or lemon juice

Spray 9 or 10 inch metal pie pan with cooking spray, dust with white rice flour.

Mix dry ingredients in bowl of stand electric mixer.  Add butter and mix until crumbly and resembling coarse meal.  Add egg and juice.  Mix until it comes together into big chunks.  Shape into a ball with your hands. Put it on a crust sized piece of wax paper (14 x 14 inches more or less), flatten the crust ball some; put on top of it another piece of wax paper and chill it all in your fridge 15-20 minutes while you chop the rhubarb into ½ inch chunks.

Filling:

5 to 6 cups (if you use the ten inch pie pan) cut up fresh rhubarb – place in medium bowl

Mix with

1 c sugar

3 tbsp. rice flour

½ tsp cinnamon

Roll out pie crust between the two sheets of wax paper, try to get the thickness even, no thick middle! Peel off one side of paper and place in pie pan, centered.  Remove other slice of wax paper.  Crimp edges all around.  Fill with dry rhubarb mix.

Topping: Pour evenly over this mixture:  3 eggs beaten lightly with 1 cup sour cream, and 1 tsp vanilla extract.  I did use light sour cream and it worked fine.

Place in 400 degree oven and bake 15 min, lower to 350 degrees and bake 30 minutes more.  Top with crumbs and bake 20-25 minutes until the crumbs are lightly browned.  Cool at least 2 hours before serving.

Crumb topping

Put all four ingredients in the same mixing bowl you made the bottom crust in and mix well with mixer paddle until crumbs form.

¾ c brown rice flour mix

½ c sugar

½ tsp xanthan gum

1/3 c cold butter cut into six chunks

Sprinkle the top of the pie with crumb mix; use as much as you like.  I like about a cup of the mixture.  Up to your personal taste. You could add up to a teaspoon of cinnamon in the crumbs. I think a half teaspoon is enough.

Brown Rice Flour Mix
2 c brown rice flour; 2/3 c potato starch; 1/3 c tapioca flour

Reposted from May 2016

Old School Pie; Banana Custard

Early spring brings a dearth of fresh fruit.  I find the apples to be less than optimal for pies after about February.  I was looking for something fresh and fruity.  No frozen fruit either; pricy to fill a whole pie and I really try to find things that are seasonal.  I had a pie to bake for Joe, he loves a pie so what should I chose? My sister said why not the venerable banana cream pie. Bananas are here and fresh so yes!

My mom used to make this pie when I was in my early adulthood; for some reason she never made it for us as kids.  I used to cut up and set the banana rounds in the baked pie shell for her.  The contrast of the rich custard, the flaky crust and the fluffy cream with the delicate banana flavor is just so memorable.  And if you can bake an empty pie crust and make custard this pie is really simple.  If you want, buy a crust in a package to bake; that will simplify things even more.  I assume you can use a box pudding but I highly recommend this custard, straight out of Betty Crocker’s 1978 cookbook.

Angie’s Mom’s Banana Cream Pie

Crust:

1 c plus 2 tbsp brown rice flour mix (at bottom of recipe)

2 tbsp sweet rice flour

1 Tbps. granulated sugar

½ tsp xanthan gum

¼ tsp salt

6 Tbsp. cold butter cut into 6 chunks

1 large egg

2 tsp fresh orange or lemon juice

Spray 9 inch metal pie pan with cooking spray, dust with white rice flour.

Mix dry ingredients in bowl of stand electric mixer.  Add butter and mix until crumbly and resembles coarse meal.  Add egg and juice.  Mix until it comes together into big chunks.  Shape into a ball with your hands. Put it on a crust sized piece of wax paper (14 x 14 inches more or less), flatten the crust ball some; put on top of it another piece of wax paper and chill it all in your fridge 15-20 minutes while you prepare the filling.

Filling:

2/3 cup sugar

1/4 cup corn starch

½ tsp sea salt

3 cups whole milk or 2 percent, no lower fat than that

4 egg yolks beaten lightly

3 tbsp. butter cut into small cubes.

2 tsp. pure vanilla extract

2 large bananas

Topping: 1 cup whipping cream, ¼ cup powdered sugar and ½ tsp. vanilla

Directions: Mix the dry ingredients in a 1 ½ qt sauce pan, Add the milk and stir as it heats.  Once it reaches a boil time it for one minute.  Then add 1/3 of it to the egg yolks, stir and return all to the pan, bring back to boil and time for one minute stirring constantly.  Add the butter and stir as it melts, then the vanilla, stir.  Pour into a mixing bowl, let cool a bit and then put a film of plastic wrap on the top; press it down onto the custard.  Chill at least an hour before using.

Roll out pie crust in a pie bag or between the two sheets of wax paper, try to get the thickness even, no thick middle! Peel off one side of paper and place in pie pan, centered.  Remove other slice of wax paper.  Crimp edges all around.  Prick with a fork evenly every inch so it won’t bubble as it bakes.

Bake in a preheated 400 degree oven for 12-18 minutes until the crust is light brown.  Cool at least 15 minutes

Cut peeled bananas into 1/2 inch rounds and cover the bottom of the pie crust with them close together.  Pour the custard over the sliced fruit and smooth the top.

Chill pie 1- 4 hours before slicing and serving cold topped with a big dollop of real freshly whipped cream.

Whipped cream: Beat 1 cup cold whipping cream with an electric mixer until it holds soft peaks; add a quarter cup powdered sugar and ½ tsp. vanilla.  Do not beat any more, just stir in.

I think it is best served the same day you make it, or no more then 12 hours after baking for optimal flavor.  The crust will get soggy if too much time passes. Mine was still very good the next day; just not as great as when really fresh.

Originally posted on my blog in April 2016.  Making one later this holiday week!

Apple Cranberry Holiday Pie

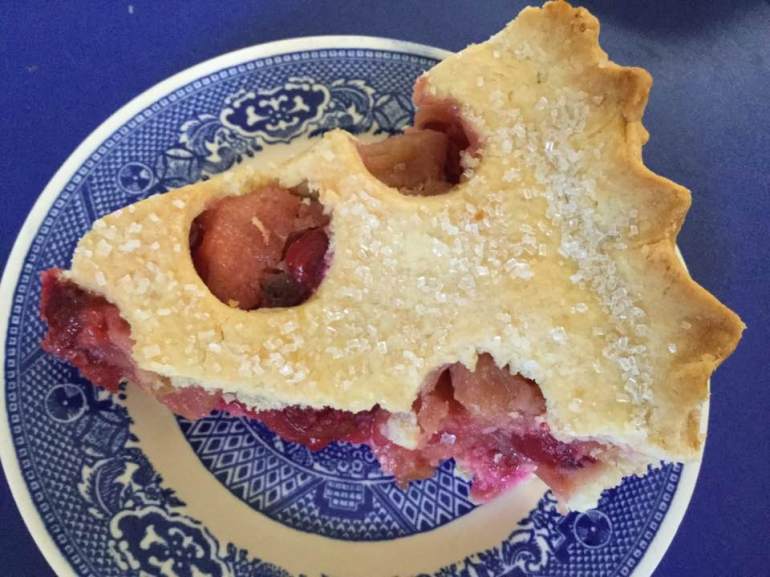
I had a few last apples from our fall orchard expedition and a bag of fresh cranberries in my fridge bin.  Needed a tasty and different holiday pie, saw this recipe and knew it was just the ticket.  I revised some: simplified and made my version gf (of course!)  It is a much brighter in flavor and color than an apple pie but you can definitely taste those apples.

This is my mixture of a couple of recipes. I know it has several steps but each one is easy. Note that I cook the fruit briefly so it smushes down a bit and you don’t have crust issues due to fruit settlement.

I call this top crust my cherry cheater crust as I love it for a cherry pie so you can see the bright red filling. But, because making a woven lattice gf crust is a lot of work, I just cut out circles on the rolled out dough using a small round jar lid and use a butter knife to pull out the marked circles.  Then, flip it onto the fruit filing and there you go…almost as fancy as a lattice crust! Just crimp the edges and sprinkle it with sparkly sugar for a very pretty look.  One last great tasting pie to round out 2016, “My Year of the Pie!”

apple-cranberry-pie

Angie’s GF Apple Cranberry Pie

Double Crust:

2 ¼ c brown rice flour mix (at bottom of recipe)

¼ cup sweet rice flour

2 Tbsp. granulated sugar

1 tsp xanthan gum

1/2 tsp salt

12 Tbsp. cold butter cut into 6 chunks

2 large eggs

4 tsp fresh orange or lemon juice

Spray 9 or 10 inch metal pie pan with cooking spray, dust with white rice flour. Or not; I forget to do it most of the time, hah!

Mix dry ingredients in bowl of stand electric mixer.  Add butter and mix until crumbly and resembling coarse meal.  Add egg and juice.  Mix until it comes together into big chunks.  Shape into two equal balls with your hands. Put each on a crust sized piece of wax paper (14 x 14 inches more or less), flatten the crust balls some; put on top of it another piece of wax paper and chill it all in your fridge 15-20 minutes while you make the filling.

Filling:

4-5 cups sliced fresh baking apples

1/2 tp 2/3 c sugar (use the higher amount if you like it sweeter)

2 cups fresh or frozen cranberries

1/4 tsp cinnamon

1 tsp. fresh orange rind

½ tsp. grated fresh ginger

2 tbsp. butter at room temp

1 large egg (optional)

1 tbsp. rice flour

Raw or big/fancy crystal sugar to sprinkle on top

Directions: Mix the fruit, spices and sugar in a large bowl, add the butter to a large sauce pan and melt; dump in the fruit mixture, cook about 6-8 minutes until apples soften and the cranberries are bursting. Then add the rice flour, stir.  Let cool a few minutes and then add egg (if you want but I made it without myself) which you first beat up a bit. Cool filling to room temperature.

Heat oven to 375 degrees.

Roll out one pie crust between the two sheets of wax paper; try to get the thickness even, no fat middle! Peel off one side of paper and place in pie pan, centered.  Remove other slice of wax paper.  I have a plastic pie bag to roll my crust in and love it.  It is sturdier than wax paper.  Parchment paper works well I am thinking….

Pour cooled filling into pie shell, top with crust; I like to cut circles out of the top crust using a jar lid; about 1 ¼ inch diameter. So the filling peeps out but no need to weave pie crust strips which is pretty tricky for gf crust. Center it on the fruit and crimp the edges.  Use your fingers for this or maybe a fork to create a nice look that seals the top edge completely to the bottom crust.

Place on baking sheet to catch drips (I have a pie drip pan I love!)  Bake for 50-60 min until crust is golden and you can see the filling bubbling.  I put aluminum foil strips around the edges for last 15 minutes to keep them from getting too dark. Cool on rack for at least 1-2 hours before serving.

I made a couple yummy hand pies with all that leftover crust due to the cutouts.  Bonus!

Brown Rice Flour Mix
2 c brown rice flour

2/3 c potato starch

1/3 c tapioca flour


This recipe is a blending of one I found on foodnetwork.com and the crust by Annalise Roberts as well as my own touches to the filling. http://www.foodnetwork.com/recipes/food-network-kitchens/apple-cranberry-pie.html