Pasta Perfection: Fettuccine with Shrooms

A great pasta dish is a gem to keep in your culinary pocket for future use.  This recipe has been a favorite of mine for a long time.  Only detriment is that I could never get the sauce thick enough. It was always on the edge of runny no matter how long I reduced it down.  I made it this week and one ingredient change made a huge difference. Instead of a can of whole tomatoes in thin juice that you break up before cooking, I used a can of crushed whole tomatoes with thick sauce. So, I started with a thicker tomato product and that really changed the sauce results. This is an easy dish to compile. I usually use baby bella mushrooms but pretty much any type will do. This time it was plain old white mushrooms sliced thickly.  Do not slice them thin; just not meaty tasting then. Sometimes I quarter the small bellas for this; but I do think thick sliced is my favorite cut.

The dish may seem simple in flavor but it is a delightful balance of all these fresh ingredients. The original recipe came from “Italy Al Dente” by Biba Caggiano with some small changes by me. This cookbook is hands down my favorite Italian cooking bible; so many great pasta recipes plus super soups and wonderful risottos.  Even has polenta recipes.  Highly recommend getting it if you cook Italian often.

Notes: use the best EVOL you have for this; it seems like a lot of oil but it combines with the tomatoes and cream to make a luxurious creamy sauce.

Fettuccine with Mushrooms in Creamy Sauce, 4 servings

Ingredients

3-4 Tbsp. EVOL

½ lb. fresh mushrooms like baby bellas, shiitake, white buttons, cleaned

Half a big red pepper cut in large dice

1/3 lb. pancetta or prosciutto (I have used either; this time pancetta from Aldi’s already diced)

1 garlic clove minced

4-5 shredded fresh sage leaves

1 28 oz can Italian tomatoes, crushed in thick sauce

¼ cup heavy cream

Salt and pepper to taste

Fettuccine; most or all of a 12 oz box of dried gf pasta cooked until barely al dente. Cook while the sauce thickens; try to time it so it gets done when you have added the cream to the sauce.

Directions:

Heat the oil in a large skillet, add the mushrooms which you have thickly sliced.  Stir and cook about 3 minutes until they turn golden. Add the red pepper, pancetta, garlic and fresh sage (can use parsley but sage is so great in this sauce) and stir for a minute.  Add t he tomatoes and season with some salt/pepper. Once it reaches boiling, turn down and simmer about 10 minutes; it should thicken a bit. Stir a few times as it cooks. Add the cream, stir and simmer 2-5 more minutes. Do not boil. Turn off heat and add hot pasta, Stir a minute or two. Double check whether you need more salt/pepper and serve.

pasta plated with mushroom sauce

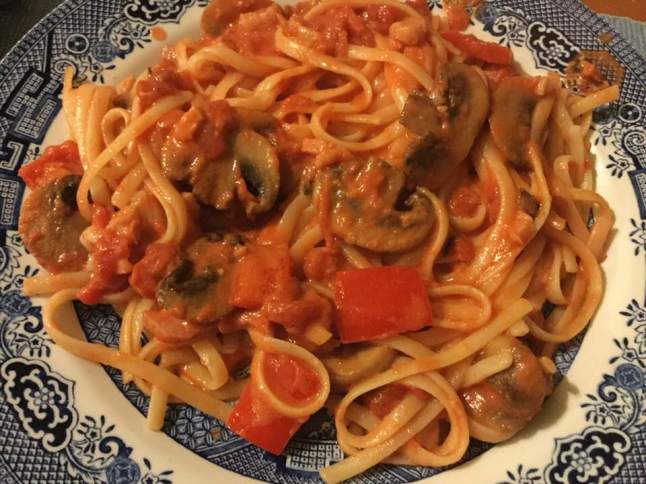
The original recipe didn’t have the red pepper but I think it is a great addition; leave it out if you don’t care for red pepper. Enjoy!

Turkey Pot Pie For Dinner

If you have any leftover turkey still lurking in the fridge this is an excellent way to use it up. You will need two cups of turkey to make this rib sticking entrée; turkey pot pie.  My version tracks pretty close to that you can find in a 1970’s Betty Crocker Cookbook.  Gluten free though…cause I must. You can toss it together in about 30 minutes and it bakes in 35 more. Your tummy will thank me. I put some celery seeds in the pie crust for extra flavor.  I generally make it with just a top crust which is less calories. If you want the full deal; double the crust ingredients and make a bottom crust too. Your creation will be a delicious and substantial meal for sure!

Angie’s Turkey Pot Pie

Crust:

1 c plus 2 Tbsp. brown rice flour mix (at bottom of recipe)

2 Tbsp. sweet rice flour

½ tsp xanthan gum

¼ tsp salt

6 Tbsp. cold butter cut into 12 chunks

1 large egg

2 tsp fresh orange or lemon juice

Directions: Mix dry ingredients in bowl of stand electric mixer.  Add butter and mix until crumbly and resembling coarse meal.  Add egg and juice.  Mix until it comes together into big chunks.  Shape into a ball with your hands. Put it on a crust sized piece of wax paper (14 x 14 inches more or less), flatten the crust ball some; put on top of it another piece of wax paper and chill it all in your fridge 15-20 minutes.

Pie filling

1/3 cup butter: I used ¼ cup plus some canola oil to reach 1/3 cup

1/3 cup white rice flour (or another gf flour)

½ cup finely chopped onion

½ tsp. sea salt

¼ tsp. black pepper, freshly ground

1¾ cup good quality gluten free chicken broth

2/3 cup whole or two percent milk

2 cups diced cooked turkey

4 large carrots, diced

¾ cup frozen peas (or a ten ounce bag of frozen carrots and peas)

½ to 1  tsp. celery seeds (optional)

Heat butter/oil in large frying pan, add onion, cook 5-7 minutes until soft and translucent. While it cooks, cook the diced carrots for 4-5 minutes in a ¼ cup of water in a saucepan, lid on. Then turn off the heat, uncover it and throw in peas, set aside.

Add flour, salt and pepper to the fry pan with the butter and onions, cook 2-3 minutes, stir often. Add broth (I held back about 2 tbsp. to make sure it wasn’t watery) and while it heats keep stirring. Add the milk when the mixture is hot but not boiling, Stir well until it boils and then let it boil one minute, still stirring.  Add the turkey and then the drained carrots and peas, Stir well. Add rest of broth if needed.

Heat the oven to 425 degrees.

Roll out the pie crust thick; just big enough to cover the top of your 9 inch pie pan [about 11 inches] (I always use a glass pan but I am sure you can use a metal one). I like to roll it just 2/3 of the way out and then sprinkle with about ½ -1 tsp. celery seeds. Roll it the rest of the way and the seeds will be embedded in the crust. I like the subtle flavor they add, a touch of really old fashioned tastiness my mom would approve of!

Pour the turkey mixture into the pie pan and top with the crust. Make sure no crust hangs down; trim to look nice. If you want to go whole hog double the crust recipe and roll half so you can put a bottom crust in before you pour in the filling. Top with your celery seed crust, seal to bottom crust (if you used one) and do cut a few gashes for venting… place pie on a pie drip catcher.  My pie pan is always very full and that pie drip pan is wonderful for keeping the filling from dripping on my oven.

Bake 30-35 minutes until crust is light brown and the pie is bubbly.

Let the pie cool five minutes before serving.

All you need is a salad and you have a wonderful balanced meal. Enjoy!

turkey pot pie on plate


Brown Rice Flour Mix  (same as King Arthur basic blend)
2 c brown rice flour

2/3 c potato starch

1/3 c tapioca flour

The crust is from Annalise Roberts’ great cookbook: Gluten-Free Baking Classics.

Stuffed Peppers..2.0 Version

Stuffed peppers are a great homey fall supper. I made them a few weeks ago and my recipe is just about the same as my mom used to make, comfort food for sure.  My garden produced more bell peppers….not sure I wanted the same flavor so I went looking for a different take. I found this vegetarian recipe by Robert Irvine on Food Network.  I changed it by adding ground chicken and removing some veggies to make room for that chicken. The result was just a great combination of flavors and very satisfying. I will put my version here.  If you want it vegetarian look for his recipe on the website. It got five stars and they are well deserved. I guess you could use any ground meat for this recipe.  I got my dark meat ground chicken at Valley Farm Markets in Bethlehem.

I don’t cook with tarragon that often but it really makes the flavor of this dish so delightful and different. Just try it.

Notes: I used cooked brown rice, the original choice was wild rice. You can use whatever rice floats your boat or is in your pantry; just cook it and cool somewhat before mixing with the other filling ingredients.  This is a naturally gluten free meal and I never got tired of it – ate all the servings up in a week and know I will be making it again for sure.


Angie’s Italian Stuffed Peppers   makes six


6 green, red or yellow bell peppers; nice sized

3-4 Tbsp. olive oil

1 lb ground chicken; dark meat if you can find it

1 yellow onion, diced

2 garlic cloves minced

1-2 cups diced summer squash

2 cups cooked brown rice

1 14 oz can diced tomatoes

½ cup diced red pepper

2 tbsp. tomato paste

Salt and pepper to taste

2 tsp. fresh tarragon chopped

½ cup Asiago cheese freshly grated (Parmesan would also work)

Directions:

Cut the lids off the peppers, discard seeds, I cut about ½ inch down the pepper so the center and stem stays part of the lid.  Heat a cup of water in a big pot with a steamer in it. Add the peppers and their lids, cook about 8 minutes, remove lid and let cool.

In a large skillet pour half the olive oil, heat, add the chicken and cook until no longer pink.  After it is cooking a couple minutes add the onions and garlic.  Cook a minute or two and add the diced squash and red pepper.  Do not overcook the squash. I used a firm variety of squash(tromboni) so it stayed together and didn’t get mushy.  Add the tomato paste and tomato; don’t add all the juice in the can of tomatoes; reserve about half for adding to the baking pan later on. Stir and cook until onions are soft.  Total cooking time; no more than ten or twelve minutes.  Heat the oven: 375 degrees.

Dump the cooled rice in a big bowl, add the skillet’s contents. Season with salt and pepper to taste and fresh tarragon.  Mix up gently. Stuff the cooled and drained peppers, do not pack in filling. Put a bit of filling in the bottom of a large oval baking dish that will hold your six peppers and stand the stuffed peppers upright in there.  Sprinkle them with the grated cheese, put the pepper lids on the peppers, I would add that reserved tomato juice from the can to the stuffing loose in the pan to keep it moist.  Bake at 375 for 35-45 minutes or until hot and bubbly. Let cool 5-10 minutes before serving. Enjoy  stuffed pepper


Chicken and Dumplings, GF of Course!

We all have times when we long for home cooking, stressful days that wear us down.  This is fairly quick to make and incredibly soothing. It is gluten free,  of course and reminds me of my old recipe for chicken fricassee with herbed dumplings. Creamy,  flavorful and totally satisfying. My IP makes it so easy to put together in less than an hour.   This recipe made 5 meals out of four chicken thighs so it is an inexpensive dish to serve.                 

Chicken with Dumplings

4 medium chicken thighs

2 Tbsp. butter

Kosher salt

¼ cup gluten free flour; I used King Arthur basic blend

2 celery stalks chopped

2 carrots in coins

1 onion chopped

2 cups gf chicken broth

¼ cup whole milk

1 Tbsp. cornstarch

Dumplings

1 ¾ cup brown rice flour mix

1 tsp. xanthan gum

1 Tbsp. sugar

3 tsp. baking powder

1/3 cup canola oil

2 eggs lightly beaten

¾-1 cup 2 percent milk

For herbal version; add 1 Tbsp. poppy seeds, 1 tsp. celery seeds, 1-2 tsp. dried parsley to dry ingredients.

Directions

Heat Instant Pot on sauté mode, high. Place flour, ½ tsp. salt and ¼ tsp fresh ground pepper on some wax paper, blend up and roll the chicken in it to coat evenly, shake off excess. Add butter to IP, melt it and then add chicken thighs. Sauté for 4 minutes, flip and cook 3-4 more minutes. Remove from pot, set aside. Add the celery, onions, and carrots to the pot, cook for 3 minutes. Add back the chicken and the broth. And more salt if desired. Secure lid Cook on manual pressure for 12 minutes.  Let release naturally for 5 minutes. Remove chicken from pot.  Pull/cut apart into bite sized pieces, removing the bones, discard all skin and any odd bits like cartilage.

While the chicken is cooking prepare the dumplings.  Mix the dry ingredients, in a separate bowl mix the wet ingredients. After the chicken is shredded, pour the wet into the dry ingredients, hold back a bit as you stir it together, do not over mix. Add the rest of the milk if it looks dry; it should be fairly thick/goopy and the xanthan gum will thicken it even more as it stands.  After the release add the ¼ cup milk to the broth and veggies, stir well. In a small bowl mix the cornstarch with ¼ cup hot broth. Add back to the pot and stir. Put pot on sauté, add back the cut up chicken. Use a big spoon to glop in heaping spoonfuls of the dumpling mix all over the top of the broth. Spread them out evenly. Put on cover loosely, I used my glass slow cooker lid so I could watch them steam.  Cook 18-27 minutes; until they double in size, rise to the surface and the tops are not wet or under cooked looking. Serve in shallow wide soup bowls.  Should serve 5 unless you are piggies; then serves four!

chicken and herb dumplings

Notes; I combined two recipes; one from “The Instant Pot Electric Pressure Cooker Cookbook” by Laurel Randolph and one from Carrie S. Forbes “Everything Gluten-Free Slow Cooker Cookbook”.  I used my usual  brown rice mix; King Arthur’s basic blend.  I had trouble getting my IP to sauté on low so I toggled back and forth from slow cooker to sauté to keep things bubbling but not boiling.  Hopefully next time I will get the low setting to work.  There will definitely be a next time.  This was a satisfying old-fashioned entree that I loved every bite of.  Try it with the herbs, they really add a lot of flavor. Enjoy!

PS: if you want to cook this in a slow cooker; do the chicken for 6-8 hours on low and  thirty minutes before serving add the dumplings, do not open lid until the 30 minutes is done.

Fig, Goat Cheese, Pancetta and Carmelized Onion Pizza

I have been picking dozens of figs most days in recent weeks. Getting creative in my cooking in order to use up this bounty and so I’m enjoying them in lots of new dishes. Pinterest is my closest bud these joyous weeks of fig festival in my tiny kitchen. Last Friday I whipped up my favorite gf pizza dough baked it for ten minutes and flipped it. Then came the toppings. Never had figs on a pizza, but won’t be the last time! My fridge held some pancetta which is uncured Italian bacon that was purchased at Aldi’s for a rediculously low price, as was a container of tiny fresh mozzarella and a log of herbed goat cheese. Some onions which I carmelized and Bam! My oven produced an amazing treat for supper. I felt like I was in Italy at a small restaurant enjoying the local fare!

Note to all, my computer croaked the end of last week so I am typing one finger on my tablet, no access to Word either. So my apologies for any and all  mistakes in my last post or in this one. Normally I am constantly double checking names, products and prior posts as I create a new post. Not so much of that here in this laborious tablet production.

I promise this pizza is going to change your taste buds into fig pizza lovers. One more great fig recipe discovery. I took elements out of several recipes to create this delightful dish. It went together really quickly. Enjoy!

PS, it was still great warmed up the next day but with two or three hungry folks, there won’t be any leftovers.


Angie’s Fig and Goat Cheese Pizza

one large gf pizza crust. See my previous pizza post or use your own recipe.

8-12 ripe fresh brown figs

4 oz. herbed goat cheese, Aldi’s has a great goat cheese at a super price

most of a pint container of fresh tiny mozzarella cheese balls

2 good sized onions

1 Tbsp. EVOL

2-3 ounces pancetta, Aldi’s has a small container, already chopped

a big handful of kale shredded finely

Directions

Slice the onions into rounds. Heat EVOL in a cast iron frying pan, add onion slices. Cook over medium low heat stirring often so it doesn’t burn. Cook 8 -15 minutes until carmelized. Set aside on a plate. Add pancetta to same frying pan and cook a few minutes to render out the fat. Do not overcook. Remove from pan to a small bowl. Add the kale to the frying pan and cook on low a few minutes until it wilts, stir often. Let cool.

Heat oven to 425 degrees. Slice the goat cheese into thin rounds, cut the mozzarella balls in half. Slice the figs in half or quarter them if large.

Assemble: spread the carmelized onions evenly over the partially baked crust. I like to flip the crust before topping. Spread the goat cheese slices evenly over the surface,  Scatter the mozzarella cheese between the goat cheese and top with the cooked pancetta. Then scatter the fig pieces evenly over it.  Evenly is so every slice has a decent amount of both cheeses and the other components.

65E9A88F-5495-46E1-9F79-38851BC15477

Bake pizza 8-10 minutes. Scatter kale over the top. Let stand 3-5 minutes before slicing and serving. If you can stand that long of a wait to enjoy your masterpiece of a pizza!CFF4F2B8-6D22-4AE6-94C7-A13B6222B266