Chocolate Cloud Pie…Oh My!


I have a fantastic cookbook, all pies, nothing else. By Farm Journal, published in 1981 but it has the vibe of the 1950’s. Lots of interesting combo fruit pies and chiffon pies like you never heard of. I found this recipe for a chocolate rum pie. The pre-made cookie crust could sub in for a traditional pie crust which the recipe called for. I had all the ingredients except the crust ….but I thought it sounded tasty and worth a trip to the grocery store for the crust cookies, gluten free of course!

chocolate pudding

It was not hard to make either. I threw it together in three easy steps. It was one of those recipes where the sum of the ingredients is far tastier than the components would lead one to believe. Everyone devoured their slice. People took slices home. My mom was eager to keep a second slice….for tomorrow. This enthusiastic audience caused me to mention it on facebook. I got all these likes and a few hungry comments. The buzz of happy responses led me to decide to share my version of chocolate rum pie. I have renamed it Chocolate Almond Cloud Pie. That was four years ago….

The name came from the fact that it is as light as a fluffy cloud and from my love for my older sister who died five years ago. Margie’s love of pie was renown in our family and I am absolutely sure she would have adored this pie. Whip some up this week and woo your family with chocolaty goodness that should please everyone. choco cloud pie slice (2)

Notes: I used french brandy instead of rum as I was out of dark rum. I think cognac would be nice too. .I used 3/4 cup almonds as that’s all I had; worked great; I put 2 Tbsp. aside for topping and rest went on top of the baked cookie crust. You can just buy a crust.

I posted this back in the spring of 2014 and hadn’t made it since; a matter of just forgetting how amazing it tastes.  Like eating a chocolate cloud….with puffs of cream and the crunch of toasted almonds. I used a hybrid crust when I made it yesterday; I was tired of my gf oreos; so I scraped out and discarded the filling and crunched up the cookies, I thought I was a bit short on cookies so I added 7-8 gingersnaps I still had from my last cookie crust. Crunched up and mixed with butter, baked into what became a flavor delight of a cookie crust! One of the best pies I have ever made. And I make a lot of pies….


Chocolate Almond Cloud Pie

Ingredients
1 pre-made chocolate cookie crumb crust, GF
1 pkg chocolate pudding, the kind you have to cook
2 cups whole milk
1 tbsp cornstarch
1 tbsp cocoa

1 tbsp dark rum
1 cup slivered almonds, divided
1 1/3 cup heavy cream, divided

4 Tbsp. powdered sugar

Pour the almonds into a frying pan, no oil and toast them, stirring constantly. Alternately you could do this in the oven at a low temperature but I prefer the frying pan. Stop when they are medium brown, try not to let too many get black on the sides.

Cook the filling; put 2 cups whole milk into a medium sized and heavy sauce pan, Then add the dry pudding mix, the corn starch and the cocoa. Stir with a whisk as it heats. Once the mixture is bubbling all over the surface turn off the heat and add the rum. Pour into a bowl, cover with plastic wrap and chill until cooled. Take ½ cup heavy cream and whip. Add this to the pudding and whisk until blended. Take 3 tbsp of almonds and set aside for garnishing the pie later. Sprinkle the rest of the toasted almonds over the chocolate pie crust Gently spoon the filling into the pie shell on top of the toasted almonds. Chill at least 2 hours until set and cold. Whip the rest of the heavy cream in a chilled bowl, adding the sugar near the end of the whipping. Gently put dollops of it all over the pie top. Sprinkle the reserved almonds on top. Enjoy!

choc cloud pie

Originally posted March 2014. No changes to recipe.

Baked Alaska Pie: Amazing

Everyone loves ice cream.  In my family, everyone loves a pie. So I was looking for something different when I saw a recipe somewhere, can’t remember where but it fit my search requirements plus it was gorgeous but somehow I lost the recipe so I did my best to replicate it for my family. We had it over the Easter weekend. It was a big hit.  Remember baked Alaska? A dessert of the 70’s? It is a fancy construction of a layer of yellow cake topped with a mound of ice cream and then covered with a thick layer of meringue which is briefly baked in the oven to brown the meringue lightly. Well, introducing the Baked Alaska Pie!  Gingersnap crust, coffee ice cream and the traditional meringue topping. Not as heavy because the pie crust is ¼ the thickness of the layer of cake in a standard baked Alaska and gingersnap is a pow of a flavor compared to the blandness of yellow cake. The coffee ice cream pairs with it exceptionally well but I am betting chocolate ice cream would be crazy good too! I suppose you could do a graham cracker crust but what would be the fun in that? The meringue is not overly sweet and is fluffy perfection with the ice cream and cookie crust.

This dessert is remarkably easy to do but you must have patience as there are several steps and a lot of chilling in the freezer.  If you are not needing to be gf you can use a regular gingersnap crust.


Baked Alaska Pie

Ingredients

7/8 of a box of gluten free gingersnaps

1/3 cup melted butter

Most of a carton of coffee ice cream

5 egg whites

½ tsp. cream of tartar

Pinch of salt

1/3-1/2 cup granulated sugar

Directions: Use your food processor, blender or a baggie and a rolling pin to reduce the cookies to a fine crumble. Pour them in a mixing bowl, add the butter, stir well and pour into a 9 inch pie tin. Press across the bottom and up the sides. Bake at 350 for 6-9 minutes; take out before it browns much. Let cool completely before next step.

Let the ice cream warm a few minutes so it isn’t rock hard and is easily scooped.  Fill the pie crust with the ice cream; spread it to cover evenly and mound it slightly.  Put in freezer for 2 to 3 hours.

Make the meringue: put the room temp egg whites in a mixing bowl, add the salt and the cream of tartar. Beat until it is in soft peaks. Add the sugar a spoonful at a time while it beats to the stiff peak stage. It should be glossy and hold a stiff peak of curled meringue. Get the pie out of the freezer and quickly mound the meringue over the pie making absolute sure you cover every bit of ice cream with lots of meringue which will act as insulation.  Chill for 2-4 hours in freezer. Heat oven to 400 degrees. Slide the frozen pie in for 4-8 minutes until lightly browned, if possible return to freezer for 30-60 minutes. Cut into wedges with a sharp knife and dig in. Enjoy

alaska pie 2

Not a very pretty picture; just doesn’t convey the incredible flavor. I took this of a leftover slice out of my freezer; we were too busy eating it to take pictures that day! So it lost some of the browned topping in my freezer. It was very pretty when we first cut the pie.

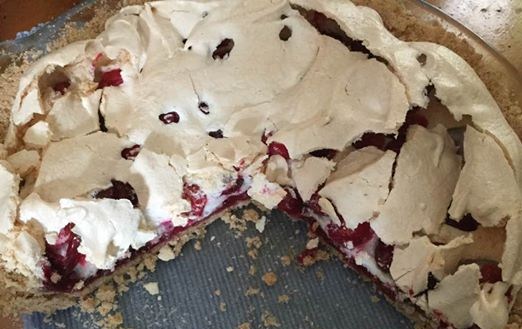
Cranberry Crackle Spring Pie

I had a bag of frozen cranberries in the freezer. There aren’t that many choices for a fresh fruit pie right now in this chilly weather.  But, I got the perfect recipe for an early spring pie. Easy to make, not too rich or too filling and very tasty. I found this recipe on line, several years ago, at splendidtable.com.  I loved the look and once I tasted it; definitely love at first bite.  Like a fruit tart and a pavlova had a baby: this is the delightful result.  Light and delicate in nature; making it perfect after a hearty Easter feast.  It is really guilt free if you eat it plain.  I devoured it in the past with vanilla ice cream, Greek yogurt or plain organic yogurt dolloped on top. Love it all those ways. Maybe next time I will be serving it like you do a Pavlova, with lightly sweetened real whipped cream on top. Yumm!

It is super easy to throw together.  If you are gf you can use the cookie crust recipe I provide, I adapted the splendid table recipe to make it gluten tree using Annalise Roberts’great cookie crust. At holidays,like Thanksgiving and Christmas, Wegmans often has gf ready-made crusts. So does Frey’s Better Foods in Hellertown. If you are a wheat eater use whatever cookie tart crust you like.  I added the cinnamon to my crust and found it added to the complexity of the flavors.  The crust absolutely needs to be prebaked and cooled before you put the tart together.

I made it in a glass pie tin but often use a ten inch ceramic tart pan.  Both work great; so it is a tart or a pie depending on the vessel you bake it in!. This tart is fantastic tasting even if you aren’t a huge cranberry fan.

The recipe calls for a few  tablespoons of raspberry jam but you could probably use most any jam, strawberry comes to mind as a great second choice.  Just chose one full of real fruit in a flavor you like as you can definitely taste the jammy flavor mixed in with the crust and the meringue topping. I love it with homemade raspberry jam, bursting with incredible raspberry flavor.

Cranberry Crackle Pie

Sweet Cookie Crust

Place the following in a stand mixer bowl and combine

1 cup GF flour (recipe below)

¼ cup granulated sugar

1 tsp xanthan gum

½ tsp. cinnamon

Add 5 tbsp cold butter, cut into 6-7 chunks.  Mix on low until the butter is just crumbs blended in.

Add 1 tsp. vanilla extract and 1 tbsp water.  Blend well.

Pour the crumbs into a ten inch tart pan that was sprayed with cooking spray.  Or a glass pie pan which is how I made it this past weekend.  Spread it up the sides.  Press gently in so it is a cohesive crust but do not press really hard or it will be like concrete when you finish baking it!

Bake at 350 degrees for 18-19 minutes. Set the crust on a rack to cool to room temperature.  Do not let it get more than light brown. You could do this step the night before.

Filling

2-3 tablespoons chunky cherry, raspberry or strawberry jam

2 large egg whites, at room temperature

Pinch of fine sea salt

1/2 cup sugar

1 1/2 cups cranberries (if they’re frozen, don’t thaw)

Confectioners’ sugar, for dusting

When you’re ready to fill and bake the tart: Preheat the oven to 300 degrees F.

Cranberry prep: I rinse them and remove any squishy ones.  There are usually a few of those mixed in and they aren’t great for anyone to eat.  Let them dry. Frozen; ready to go just as they are!

Gently spoon the jam on top of the crust and spread it evenly over the bottom, I used the back of my big spoon for this operation. In a large bowl with a hand mixer, beat the egg whites with the salt at medium speed just until they are fluffy and fairly opaque. With the mixer going, add the sugar in a slow, steady stream, then keep beating on high until the whites are shiny and form definite peaks; they will look like marshmallow.  This is a meringue. Be sure to wait until the whites are opaque and starting to get full or the sugar will not blend in properly.

Pour the cranberries into the bowl of meringue and, using a flexible spatula or spoonula fold them into the meringue. Try to distribute the fruit evenly, but don’t mix too much– you want to keep the meringue fluffy. Spoon the meringue over the jam and spread it to the edges, making it swirly if you’d like. The jam might push up around the sides of the meringue, and that’s fine.  Don’t fret if it looks like not enough filling, it will puff up in the oven to fill the pie pan.

Bake the tart for 1 hour, at which point the top will be light beige and cracked here and there. (If you’d like more color, you can bake it a bit longer or even put it under the broiler.)  I never go there!  Transfer the tart to a cooling rack and cool to room temperature.  I did cut it while slightly warm and my slice was just perfection.  If you’d like, and I do, dust the tart with confectioners’ sugar before serving. Ice cream, whipped cream or even organic plain yogurt on the side are a great complement to the berry flavors.
cranberry-crackle-tart-cut

Storing: The tart is best the first two days after it’s made, although it’s still pretty nice the third day. Leave the tart at room temperature, covering with plastic wrap.  I doubt you will have any after the second day anyway. It is that tasty. Enjoy!

Brown Rice Flour Mix  (Same as King Arthur’s basic GF Blend)
2 c brown rice flour

2/3 c potato starch

1/3 c tapioca flour

Originally posted in 2014 on this blog. Minor text changes.


Peach Crumb Pie

It is near the peak of peach season so get some peaches and whip up a delicious gluten free peach pie.   This is an easy pie to create.  Slice and dump together the filling, crumb topping made in unwashed mixer bowl you used for bottom crust. You can store any leftover crumb mixture in a sealed container in the fridge; it keeps a few weeks.  I let my mix spin a few more moments in the stand mixer for extra big crumbs for this pie; love that look. If you prefer a solid crust just double the crust part and top your pie with it.  Be sure to cut some slits for steam escape! And if you don’t have time, buy a ready-made crust but homemade is always best.

Please make every effort to use local fruit; can get peaches at orchards like Bechdolt’s near Springtown, at most farm stands and at farmer’s markets; one on Saturdays in Easton or Sunday’s in Hellertown.  This pie really showcases great tasting peaches. If you use lousy peaches your pie will taste crummy. But, here’s the thing: store peaches can be poor in flavor and texture due to improper chilling so I strongly suggest you buy only locally grown, sweet, ripe peaches to make your pie.  I love when they have a pink blush; it makes the pie so pretty and perhaps even tastier!

peaches      raspberry-jam-014

To peel easily; heat 3 inches of plain water, drop the peaches gently in 4-5 at a time and cook them 2-3 minutes.  Use the lesser time for more ripe peaches. Allow to cool somewhat before peeling.  I like to do that over a bowl to catch the juices as I slice each peach.

Bake and enjoy late summer in a pie in just a few minutes of work.  Don’t eat it hot; it should be cooled to just warm if you like it so or room temperature or even a bit chilled.  You could certainly serve this with vanilla ice cream.  And this pie works perfectly with fresh nectarines, bonus: no peeling required!


Angie’s GF Peach Crumb Pie

Crust:

1 c plus 2 tbsp brown rice flour mix (at bottom of recipe)

2 tbsp sweet rice flour

1 Tbps granulated sugar

½ tsp xanthan gum

¼ tsp salt

6 Tbps cold butter cut into 6 chunks

1 large egg

2 tsp fresh orange or lemon juice

Spray 9 inch metal pie pan with cooking spray, dust with white rice flour.

Mix dry ingredients in bowl of stand electric mixer.  Add butter and mix until crumbly and resembling coarse meal.  Add egg and juice.  Mix until it comes together into big chunks.  Shape into a ball with your hands. Put it on a crust sized piece of wax paper (14 x 14 inches more or less), flatten the crust ball some; put on top of it another piece of wax paper and chill it all in your fridge 15-20 minutes while you prepare the filling.

Filling:

6 cups sliced fresh peaches, peeled and cut in thick slices, place in medium bowl

Mix with:

½ cup sugar

1/4 tsp. cinnamon (optional)

3-4 Tbsp. quick tapioca

Stir in 1 tbsp. fresh lemon juice and ¼ tsp. almond extract

Let stand while you prepare the crust.

Roll out pie crust in a pie bag or between two sheets of wax paper, try to get the thickness even, no thick middle! Peel off one side of paper and place in pie pan, centered.  Remove other slice of wax paper.  Crimp edges all around.  Fill with fruit mixture.

Crumb topping

Put all four ingredients in the same mixing bowl you made the bottom crust in and mix well with mixer paddle until crumbs form. If you let them go extra long you get big fat crumbs if you want that look and I did!

¾ c brown rice flour mix

½ c sugar

½ tsp xanthan gum

1/3 c cold butter cut into six chunks

Sprinkle the top of the pie with crumb mix; use as much as you like.  I like about a heaping cup of the mixture.  Up to your personal taste… It sinks partially into the fruit mixture and adds lots of sweetness and eye appeal.

Bake in a preheated 400 degree oven for 45-50 minutes until bubbly and the crumb crust is light brown.  Cool at least 1 to 4 hours before serving at room temperature.  I think it is best served the same day you make it, or no more then 12 hours after baking for optimal flavor.  The crumbs will get soggy if too much time passes. Mine was still very good the next day; just not as great as when really fresh.

mom's new watch 013

Note: if you find your bottom crust is not browning enough bake it empty at 375 degrees for ten minutes before filling it with the fruit.  I have a bottom heat pizza style oven which gives me perfect pie crust so I don’t ever have pale pie crust.

Brown Rice Flour Mix (Same as King Arthur GF All purpose blend)
2 c brown rice flour (finely ground)

2/3 c potato starch – Not potato flour!

1/3 c tapioca flour

Note: This post was originally blogged by me the late summer of 2015. Minor changes made.

Peach Tartlet Perfection

It is the peak of peach season so get some peaches and whip up a delicious gluten free peach pie. I wanted individual tarts so everyone would feel special; that I baked them a pie; easy to do!  If you don’t have these deep dish pans you can use the flat bottomed tartlet pans; but they probably won’t hold quite as much filling. Plus I think the proportion of fruit to crust is just perfect in a small tartlet.  Try them and see; a delightful summer dessert.

Please make every effort to use local fruit; can get peaches at orchards like Bechdolt’s near Springtown, at most farm stands and at farmer’s markets; one on Saturdays in Easton or Sunday’s in Hellertown.  This pie really showcases great tasting peaches. If you use lousy peaches your result will lack great flavor. But, here’s the thing: store peaches can be poor in flavor and texture due to improper chilling so I strongly suggest you get locally grown, sweet, ripe peaches to make your pie.  I love when they have a pink blush; it makes the pie so pretty and perhaps even tastier.

To peel; heat 3 inches of plain water, drop the peaches gently in 4-5 at a time and blanch them 2-3 minutes, two if very ripe, 3 if less ripe.  Allow to cool somewhat before peeling.  I like to do that over a bowl to catch the juices as I slice each peach.

Don’t eat these tartlets hot; should be cooled to just warm if you like it so or room temperature or even a bit chilled. They were perfect, just like a big pie only tiny and making one individual dessert.  You could certainly serve them with vanilla ice cream.  And this recipe, like all peach desserts, works perfectly with fresh nectarines, bonus: no peeling required!

Angie’s GF Peach Crumb Tartlets: makes 7

Crust:

1 c plus 2 tbsp brown rice flour mix (at bottom of recipe)

2 Tbsp. sweet rice flour

1 Tbsp. granulated sugar

½ tsp xanthan gum

¼ tsp salt

6 Tbsp. cold butter cut into 6 chunks

1 large egg

2 tsp fresh orange or lemon juice

You will need 7 deep dish 4 inch tartlet pans if you make them all at once. I actually froze my dough and made the second batch of 3 a day later. Adjust the filling to the number of tartlets you are baking.

Mix dry ingredients in bowl of stand electric mixer.  Add butter and mix until crumbly and resembling coarse meal.  Add egg and juice.  Mix until it comes together into big chunks.  Shape into a ball with your hands. Put it on a crust sized piece of wax paper (14 x 14 inches more or less), flatten the crust ball some; put on top of it another piece of wax paper and chill it all in your fridge 15-20 minutes while you prepare the filling.

Filling:

6 cups sliced fresh peaches, peeled and cut in thick slices, place in medium bowl

Mix with:

½ cup sugar

1/4 cup quick tapioca

I made it in two parts; used 7-8 smaller peaches for each batch. Adjust the sugar and tapioca accordingly.  Let stand while you prepare the crust. This is important so the tapioca can soften and absorb some juices before baking.

Break dough into 7 small equal balls.

Roll out each tiny crust in a pie bag or between the two sheets of wax paper, try to get the thickness even and somewhat thin, no thick middle! Peel off one side of paper and place in pie pan, centered.  Remove other slice of wax paper.  Crimp edges all around.  Or not; I left mine kinda rough but it worked fine! Place the crust lined pans on a baking sheet with a rim to catch any spills. Fill each tartlet with fruit mixture after you have the crumb topping ready to go.

Crumb topping

¾ c brown rice flour mix

½ c sugar

½ tsp xanthan gum

1/3 c cold butter cut into six chunks

Put all four ingredients in the same mixing bowl you made the bottom crust in and mix well with mixer paddle until crumbs form. If you let them go extra long you get big fat crumbs if you want that look and I did!

Sprinkle the top of each tartlet with crumb mix; use as much as you like.  I didn’t measure; just sprinkled until the fruit was barely visible through the crumbs. Up to your personal taste… It sinks partially into the fruit mixture and adds lots of sweetness and eye appeal.

Bake in a preheated 400 degree oven for 35 minutes until bubbly and the crumb crust is light brown.  Cool at least 1 hour before serving at room temperature.  I think it is best served the same day you make it, or no more then 12 hours after baking for optimal flavor.  The crumbs will get soggy if too much time passes. Mine was still very good the next day; just not as great as when really fresh.

Note: if you find your bottom crust is not browning enough bake it empty at 375 degrees for 7-9 minutes before filling it with the fruit.  I have a bottom heat pizza style oven which gives me perfect pie crust so I don’t ever have pale pie crust. This is a big benefit of having this type of oven; it is a two oven range with a full sized lower oven.

mass upload 8-22-16 562

Brown Rice Flour Mix (Same as King Arthur GF All purpose blend)
2 c brown rice flour (finely ground)

2/3 c potato starch – Not potato flour

1/3 c tapioca flour

Note: the crust and crumb recipe are out of Annalise Roberts cookbook, Gluten Free Baking Classics, Second Edition. Adaptation and filling recipe are mine.

Reposted with minor changes from my blog; September 2016.