Summer Roast Chicken Minus Oven

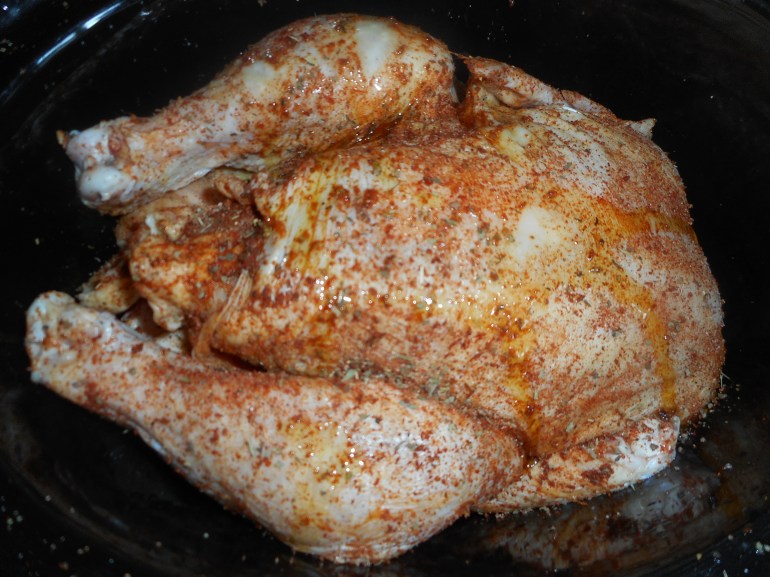
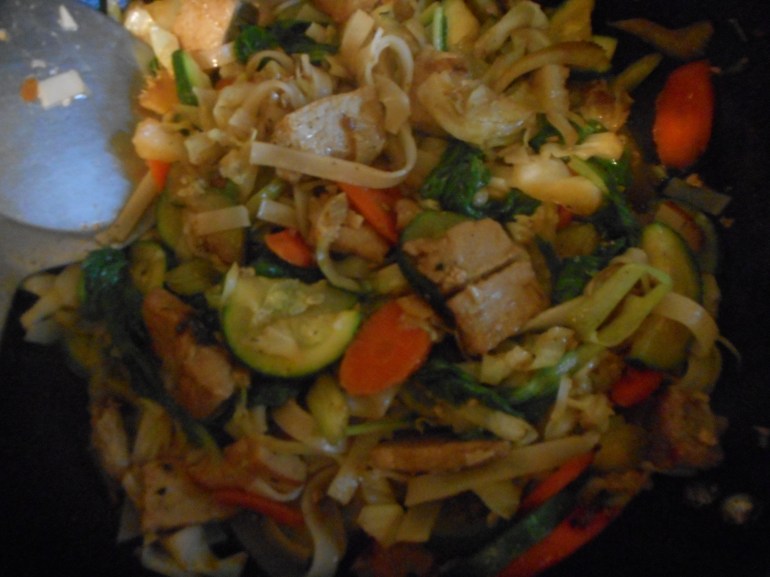
Hot days of late, too hot to roast a fricken chicken.  Not that many gluten free rotisserie chickens around here that I know of, although I here Wegmans has them.  What to do if we crave roast chicken and don’t want to heat the house too?  It’s Super Slow Cooker to the rescue!  So easy too, make a dry rub of spices, sprinkle all over the bird and stick some under the skin.  Plop it in the pot and let er rip for 4 plus hours!  How did it turn out? Great! Mildly spicy, flavorful, moist and tasty.  Best of all: no hot kitchen.  I ate it that night with some leftover potato salad and some veggies.  The next night I created a big salad of many veggie things with my homemade rotisserie chicken breast as the star ingredient.  A few nights later another salad with different veggies and more of the fabulous chicken topping it.  Then a day later I made a simple stir fry with pad Thai noodles, broccoli florets, fresh ginger in thin strips, zuke half moons, fresh pea pods from the garden, onion and a diagonally sliced carrot.  Oh and I used the rest of the chicken breast for the protein in it. The rest of the stir fry: cold Thai salad for lunch the next day: I just added a bit of sesame oil and it was ready! Awesome!  No oven needed. Or wanted!

It is from my slow cooker cookbook by Carla Forbes. I know you will be pleased with how cool your kitchen stays and that it is safe for us gluten intolerant types.  For some reason most stores that sell rotisserie chicken add some gluten in the process.  I am guessing it is in the spice blend as is often the case with such flavor blends.  In any case, your homemade rotisserie chicken will be safe and succulent! And for anyone who doesn’t worry on gluten; well, this is a tasty dish you will love to have in your arsenal of hot weather entrée choices.

Hot Summer Rotisserie Chicken

1 four pound whole chicken, rinsed and patted dry

2 tbsp. olive oil

Spice blend: mix in a small dish

1 ½ tsp sat

2 tsp. paprika

½ tsp. onion powder

½ tsp. dried thyme

½ tsp. dried basil

½ tsp. white pepper

½ tsp. cayenne pepper or hot chili powder

½ tsp. black pepper

½ tsp. garlic powder

Directions: Remove any giblets and dispose of them how ever you like.  Just not gonna use them in this recipe! Or any I provide.  Ick!  Rinse the bird or not as you prefer: just be sure to pat dry with a couple paper towels.  Rub the spice mix all over the bird, pull back some breast skin and sprinkle the mix in there.  Sprinkle any extra inside the bird.  Place bird breast up in your six quart oval (not so good in round one!) slow cooker.  Drizzle the olive oil on top of your bird; all over it.  Cover and cook 4-5 hours on low or 3.5 on high.  I did 4 on low and turned it up to high for 45 minutes at the end. My bird was close to 5 pounds so I felt it needed a bit more cooking.

My recipe said you could make gravy: what I did was remove the bird and add 1/3 cup brown rice mixture flour and stir well to blend it into the pan juices and naturally created chicken broth.  Add salt and pepper to taste; cook on high for 10-15 minutes.

I ate some hot with potato salad that night and put the rest of it into a big batter bowl that has a lid.  Once it was cooled somewhat the bird went into the refrigerator to keep fresh and flavorful.  The broth soaks in and adds even more flavor as it rests in the cold fridge.

I have no picture of the done bird whole.  I was so hungry the first night I dug in and totally forgot to take one; next time I made it I will snap a few and upload to this post.  It looks like your regular rotisserie chicken if not as dry or dark skinned.

Originally posted July 2015. Minor changes to text made.

Pork Stir Fry: Delightfully Healthy

When time is short, the weather is hot and you are hungry for a real meal I find a stir fry can be a great choice.  It allows me to use whatever is in the fridge and pantry to create a fresh wholesome meal. For a starch my go to choice is often rice noodles, they come in skinny to very wide size and are so easy to prepare.  They take on the flavor of the rest of the dish which can be handy; no flavor conflicts here!

This version I am sharing today is a pork stir fry with those delightful medium to wide rice noodles you can get these days in most grocery stores.  I soak them in very hot water for ten minutes and drain well before stirring them into the completed dish.  Foolproof.

Notes: the veggie amounts are very fluid; use more if you like a lot of something or skip if you hate.  And sub in other things if you dislike any of the veggies I used; other choices are broccoli, onion, or snap peas. Best made in a wok; I have a small one I use all the time.  I guess you can use a fry pan; keep it hot and stir constantly.

Pork Stir Fry with Rice Noodles

Ingredients:

rice noodles, any thickness; a handful; around a cup

3/4 lb of boneless pork cut into bite sized bits

½ tsp. dry ginger

1-2 tbsp. cooking oil (I like mild olive oil)

2 carrots; sliced on the diagonal

2 celery stalks sliced on diagonal

1 cup sliced zucchini; about ¼ inch thick

1 cup bok choy; I used bokchoy greens from my garden

1 cup thinly sliced cabbage

1 big garlic clove minced

About a tbsp of slivered fresh ginger

1 tsp. corn starch dissolved in 1/3 cup water

1/2 tsp. soy sauce (be sure it is gf)

Directions: Put the noodles in a bowl half full of very hot water; I heat it in the microwave until almost boiling. I break them in half before putting in water; up to you if you like long strands. Let stand ten minutes.  Meanwhile, cut the pork up into thin slices or chunks; nothing that can’t fit easily into someone’s mouth, sprinkle it with the dried ginger.  You can also sprinkle it with meat tenderizer if you like; I would put that on before the ginger.

Heat mini wok, add oil.  Add pork and stir it after a minute; start flipping over; brown all over lightly; 3-4 minutes.  Remove to a plate.  Add celery and carrot, stir a minute or two then add cabbage, stir a minute, add the zucchini and garlic; stir 2 minutes then add the bok choy, stir 1-2 minutes.  Add the pork back and the fresh ginger slivers.  Cook 2-3 minutes, stirring constantly.  You want the veggies to be a touch crisp but mostly cooked.  Pour in the cornstarch water slurry and 1/2 tsp. soy sauce.  Stir well and add the drained noodles; keep stirring as it cooks for one  to two minutes; add more water if not enough sauce to your liking. This last minute is critical to make the sauce clear; you need to cook the cornstarch. Taste and add more soy sauce if you want, also, season with salt and fresh black pepper to your liking.

I often use fruit juice for some or all of the water.  Pineapple is my favorite but orange juice works well for some of the fluid; adds a lot of flavor. Should serve 3 people.

This is a naturally gluten free dish.  If you dislike the rice noodles service it over rice. Enjoy!

Sweet Corn Hack

Sweet corn season is here.  In many places really good sweet corn can be had, like farms markets, road side stands and even Wegmans!  I don’t know about you but when I only am making one or two ears it seems silly to fire up a tall pot of water.  I do steam the corn which only takes an inch or so of hot water but still…too much to do.

Two summers ago, on a hot day, I realized there was a quick and easy way to make an ear…or two without that big hot pan of water and steam. I just take a large frying pan, put a quarter inch of water in it, sprinkle of salt and let it heat until bubbling.  I then lay in my ear or two which I have husked and removed all the silk.  Then the pan is topped with a lid or an empty pizza pan if your frying pan is too big for your lids.  Cook it the usual time; depends on how fresh the corn is.  The fresher your corn ears, the less cooking time you need.  The steam in the pan will cook it really fast.  Maybe 6 to 8 minutes.


And the bonus is that if it runs out of water your ear will get a bit of carmelization going which only adds to the flavor.  In fact I hope it gets browned a bit; sometimes I rotate the ear to brown it on another side.  Remove with tongs when your corn reaches the done stage you like.  Sometimes I take a quick bite to test for eating readiness!

Serve your ear(s) with salt and butter and enjoy fresh corn without heating the kitchen up much.  Oh and I have some lovely prong thingies my sister gave me for pushing into the corn so my fingers stay cool as I munch corn.  Great idea. Get them! Mine are plain like these; they do make corny looking versions but I prefer these simple looking ones.corn prongs

GF Blackberry Shortcake – 2.5 version

I made a strawberry shortcake last weekend but only used ½ the biscuit.  I had some blackberries leftover from camping so I went for it; blackberry shortcake.  A touch seedy but all blackberry recipes got that going! But I must say this was a great change up from the usual way I eat blackberries; raw on the hoof. blackberries 
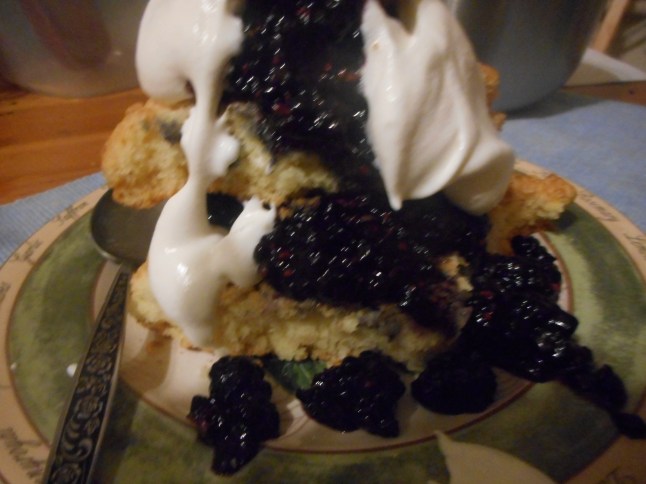
I got them at a produce stand for a great price. The fresh whipped cream is a must to make this a memorable dessert! Making it again for sure.

camping 6-16 005flowers 005

Angie’s Blackberry Shortcake, GF2.5

Biscuit dough

1 cup white rice flour

2/3 cup potato starch flour

4 tsp. baking powder

1 tsp. baking soda

2 tbsp. sugar

½ tsp. salt
½ tsp. xanthan gum

6 tbsp cold butter

1 medium egg

2/3 cup buttermilk

2-3 tsp. sugar (optional)

2 tsp. soft butter

Other ingredients:

1-2 quarts ripe blackberries

½ cup sugar (or less to taste)

2-3 tbsp. Karo light syrup

1 cup heavy whipping cream

½ tsp. real vanilla

2 tbs. powdered sugar (if you like your cream sweet)

Directions
Heat oven t0 400 degrees. Mix the dry ingredients in a medium mixing bowl. Cut in the cold butter until it is small pebbles.  Add the egg and most of the buttermilk.  Mix with a spoon; add rest of buttermilk if you need it.  It should be a bit sticky, don’t over mix; just until dry is blended in.  Spray the inside of an eight inch cake pan and a 6 inch cake pan with cooking spray.  If you don’t have a small pan just use two 8 inch ones.  Pat ¾ of the dough into the 8 inch; make it about ¾ to 1 inch thick and try to smooth the top and side edges a bit.  Put the rest of the dough in the smaller pan and do the same smoothing.  Make that one ½ to ¾ inch thick. Take 2-3 tsp. of granulated sugar and sprinkle it over top of the two biscuits. I think it gives a great finish to the shortcake. Bake them about 20 to 25 min; the smaller one should be done in 20 minutes; a golden light brown. Set on a cooling rack for a few minutes.

While it bakes, get the berries ready.  Hull 1-2 quarts of fresh ripe berries.  Place the berries in a glass mixing bowl; chop through them a few strokes with a sharp knife or better yet use the potato masher to squash most of them.  Add ½ cup sugar and about 2-3 tbsp. Karo light corn syrup to the berries.  Stir well and refrigerate until the shortcake is baked.  You could do this berry preparation up to two hours in advance.  No more or they will start to disintegrate.

Place the fairly hot bigger layer on a large platter, one big enough to hold the shortbread and still have room for a generous overflow of berries. Butter lightly if you wish.  Top with several big spoonfuls of berries.  Don’t worry if there is juice in the berry bowl; there should be; melted down sugar and Karo syrup with berry juice will give you a delish berry liquid.  Top with the second smaller biscuit and then more berries.   Cut into chunks.  Top with freshly whipped cream; beat a cup of heavy whipping cream until it is softly whipped.  Add ½ tsp. vanilla and ¼ cup sugar if you wish it sweet.  Be sure to pour the berry juice over your shortcake; it soaks in and adds to the blackberry experience.  My dad liked to pour unbeaten cream over his shortcake. My mom usually set out the whipped cream, a jug of cream and some whole milk so everyone could chose how to finish off their personal shortcake. flowers 005

If there is any left over it makes a great breakfast the next morning!

Butter Poached Eggs and Beet Greens

I know it is the Fourth of July weekend and everyone is eating potato salad and burgers and guzzling booze.  Got that in my plans but this healthy and simple lunch is just the ticket to balance against all those less than healthy meals I plan on consuming. Bonus: it is naturally gluten free and tasty.

Beet greens are underutilized; most people buy beets in a can or if fresh, the beet tops are cut off.  But, if you grow your own maybe you have tried them.  They are full of vitamins and minerals and are crazy healthy (lots of protein, fiber, iron, folate, magnesium and calcium!) – some consider beet greens to be in the top ten of healthy greens:  http://www.whfoods.com/genpage.php?tname=foodspice&dbid=151.  I steam them a few minutes; depends on how much I put in the pan; maybe 5 minutes.  As shown above I love them with butter, salt and pepper: tasty with a subtle beet flavor.  And I still have the beets for use in another meal.  I do love raw beets in a salad; I suggest you try that sometime! I have a new recipe for that; trying this weekend.

To butter poach eggs melt a tbsp. butter in an egg frying pan at medium heat.  This is the Teflon pan I use only for making eggs.  They don’t stick when you don’t share the pan with other cooking.  I slide in each egg.  Then I add 1-2 tbsp. water and sprinkle the eggs with green Tabasco sauce.  It is far milder than the red and I love the way it goes with fried eggs.  Cover the pan with a lid and steam on low for 2 minutes.  Turn off heat and if you are like me; I want my eggs barely runny; so I let them stand a minute. If you want runny take them out after the two minutes.  Butter poaching with a tablespoon or so of water gives you a soft egg, no hard edges and the flavor almost of a poached egg but shaped like a fried egg. Bonus is you have total control because you can see the yolk, even touch it to test for doneness and you can flavor it as soon as the eggs go in the pan or as the eggs cook.  My green hot sauce is my go to topper but there are a host of sauce choices out there like sriracha sauce, Tabasco hot sauce, gf soy sauce, etc. For this posting I tried my eggs with a big sprinkle of fresh feta cheese or minus the feta cheese. I loved them either way. Feta cheese lovers rejoice!

eggs and beets 001

One of these eggs is a farm egg and one is from the grocery store.  Love farm eggs!

Sprinkle with good quality salt and freshly ground pepper and you have an inexpensive, tasty and healthy protein.  Eggs were out of favor for a long while but I never gave up on them. My dad always said they were good for you and that the lecithin in them counteracted the rich yolks.  Now experts say they are okay to eat within moderation. Go figure!  Regardless, I do love them for a quick satisfying meal at a low cost and they match perfectly with the earthy flavor of beet greens.  Don’t forget a touch of butter and the salt/pepper; this dish really needs it to brighten the greens.  Enjoy!