Lemon Birthday Layer Cake

If you know me you know I love to bake. Pies, cookies, bars, muffins, sweet breads….cakes not so much except angel food cake which I am rather good at if I do say so. But birthday cakes are my kryptonite – I screw them up time after time. I guess it is the pressure….it gets to me. So I was going to make my birthday cake last week and went with a lemon flavored layer cake with a bit of lemon curd between the layers. Sounds kinda ambitious but I was determined to try a new recipe and use some of my wonderful homegrown lemons mailed all the way from Texas.

I had some new Bob’s Red Mill 1-1 baking mix to try out. But it turned out that what I needed was the same flour mix I love and use in the majority of my recipes *King Arthur’s All Purpose blend. Perfect. The new mix will wait….

My sister Karen suggested cream cheese icing after I told her I was not too happy over the super sweet sounding icing that this recipe used. The cake was simple to make; lower fat as it was made with canola oil not butter.  It can also be dairy free but I used the whole milk I had.

I made the layers using my hand held mixer as I have found that the stand mixer is too strong; it over-beats cakes.  Both layers rose well; I used those old school cake strips I have; they help make for level layers that aren’t overbaked on the edges. The cake texture was perfect; not heavy but not light; great crumb and moist.

I had made my own lemon curd the day before; used the Meyer lemons my brother Robert sends every year about now.  The recipe is actually calibrated with Meyer lemons but I am sure you can use standard lemons; will be a bit tarter.  It really added the perfect filling inside this cake; don’t be tempted to use more than half a cup as  your cake will have lemon curd running down the sides….not a good look.

Putting it together was tricky; the curd made the layers slide a touch so I put the whole thing in the freezer to chill and stabilize before I finished the icing. The topping per the recipe was fresh blackberries; got some at Aldi’s and put them around the edge and in the center.  My family gobbled up their slices. Everyone loved it and that is hard to accomplish!  Maybe the birthday cake curse is over…….


lemon cake layer

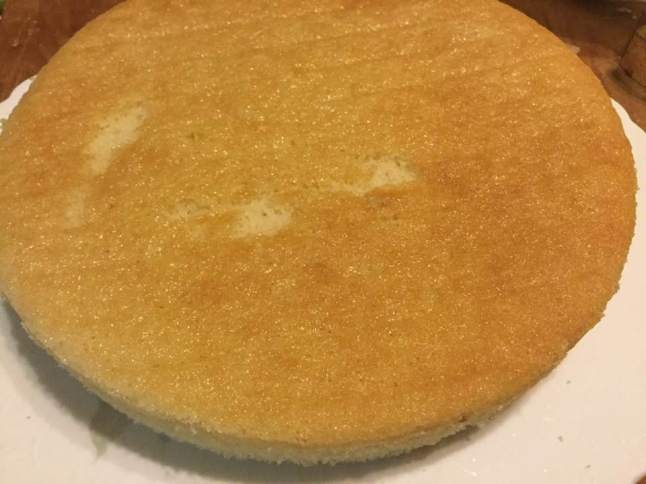
A few minor defects but it is tall and well baked.

The recipe can be found at glutenfreepalate.com/gluten-free-lemon-cake/

I didn’t use the icing used there; went with something less sweet. My citrus cream cheese icing recipe:

1 stick butter, at room temperature

4 ounces light cream cheese at room temperature

3 cups powdered sugar; sift unless it is a new bag

1/2 tsp. lemon extract

1 tsp. vanilla extract

1  to 2 Tbsp. fresh lemon juice

Grated zest of one lemon, zest of half a navel orange (about a tsp)

Use hand mixer to fluff up butter; ;add cream cheese and blend well. Add powdered sugar 1/3 cup at a time on slow speed. Add extracts, one Tbsp. lemon juice and zest. Blend until fluffy adding more lemon juice if needed to reach a good spreading consistency.

lemon birthday cake

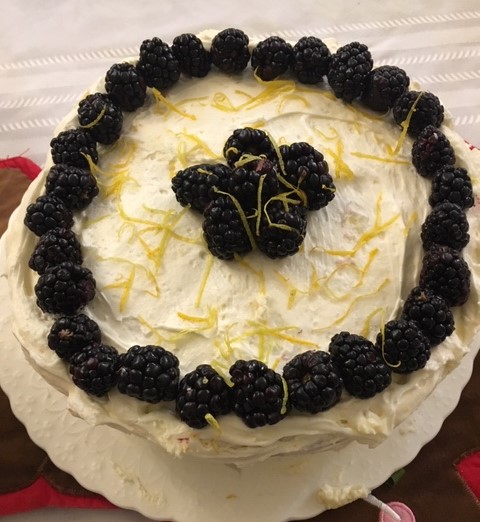
As you can see I am not a great decorator or a fantastic photog but  you get the idea of this rich lemony treat of a birthday cake!

You can buy some lemon curd. I made mine as I am an overachiever and I had all the ingredients; can be pricy stuff plus it tastes even better fresh. THe recipe I used is from the Cake Mix Doctor’s GF Cookbook;  2 large lemons, 3/4 c sugar, 2 large eggs and 6 Tbsp. butter melted and cooled somewhat.

Wash the lemons and dry. Grate the zest onto a plate lined with some wax paper. You need about a Tbsp of zest. I had to use most of a third lemon to get that much zest. Juice the two lemons; you want 1/4 to 1/3 cup juice. Put juice, sugar and eggs in medium sauce pan; heavy bottom and whisk until blended. Then add the melted butter and whisk. Heat pan on medium heat until it comes to a boil; you MUST keep whisking it constantly so it doesn’t burn. Once it reaches a boil I like to boil it up to a minute; stir like a mad woman (or man)! Take off heat; pour into a bowl and chill. You can strain it but I like the zest in mine and my lemon juicer strains off seeds so I don’t see that step as necessary. Chill it well before using; at least 2 hours. I made mine the night before. I had 8 oz leftover and am debating how best to enjoy it! lemon birthday cake slice

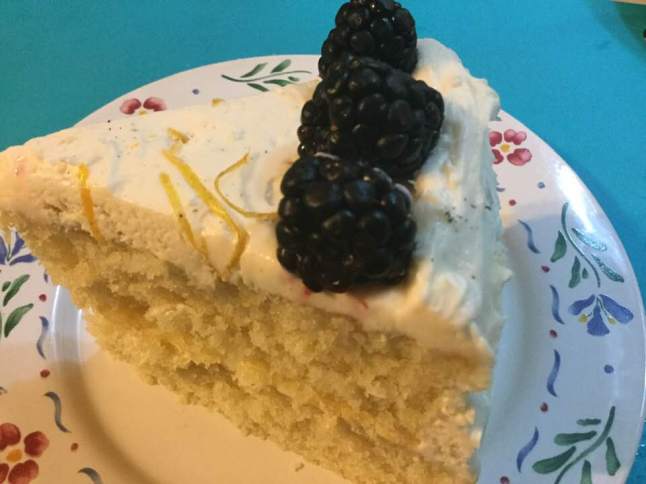
I used one small container of blackberries and a few more from a second container. Afterwards I wished I had put them all on there as the flavor of them is just perfect with this lemon cake.  Just thinking about it makes my mouth water! Enjoy!

lemon cake half cropped

Can you see the lemon curd layer? I used my three hole zester to make long strands of Meyer lemon zest to decorate after I put on the blackberries. Not too pretty but pretty darn delish!


Browned Butter Wedding Cake Cookies

These miniature snowball cookies were the foundation of the Christmas cookie baking when I was a kid.  They were always made every year, sometimes a second batch had to be baked as we ate them all before the big day!  You can use pecans but I rarely do; walnuts are cheaper and I sort of prefer their flavor.  Some people call them Mexican Wedding Cookies but we generally called them Russian Teacakes…but today I am giving you a variation I plan to try this Christmas baking season. I am making them with browned butter today! No change in ingredients; one extra step.

For me it is not Christmas without these cookies so I was extremely pleased to find a great gf recipe. My sisters think they are better tasting than the old regular recipe!

They are super easy to make with not too many ingredients.  Be careful lifting them off the pan as they are delicate until fully cooled. The texture and subtle flavor of this GF version is actually superior to the wheat flour recipe of my childhood. When you bite into one it shatters into a delicious mouthful of sweet cookie. They are delightful with a cup of tea or coffee.  My family clamors for a few to take home!

If you like them really sweet sprinkle on extra powdered sugar, less of it makes them perfect for those who are not used to too much sweetness. No one will ever know they are GF and you will get complements on their flavor and texture.  This recipe is from Annalise Roberts’ fabulous Gluten-Free Baking Classics with some minor changes by me and the browned butter idea which comes from Bon Appetit.  Enjoy: they are rather addictive cookies!

xmas cookies 006

Browned Butter Wedding Cake Cookies

1 cup salted butter, room temperature

6 tbsp. powdered (confectioners) sugar

2 tsp. vanilla extract

2 cups brown rice mix (King Arthur basic blend or see recipe below)

1 tsp xanthan gum

1 cup walnuts or pecans chopped fine

Confectioner’s sugar for sprinkling

Directions: Heat butter in a heavy sauce pan; swirl it around and NO NOT walk away! It can go from yellow to dark dark brown in a few seconds so stand there and watch closely until it gets lightly brown and then pull the pan off the heat and immediately pour into  your stand mixing bowl. Let it stand until it is mostly congealed into a solid mass. Then beat butter and powdered sugar in large bowl of stand mixer until light and creamy.  Add vanilla, beat in.  Add flour and gum, mix in until well blended, stir in walnuts until distributed.  Chill dough for an hour.

Heat oven to 350 degrees.  Form dough into 1 inch balls. Roll in powdered sugar if you like.  Place on cookie sheet lightly sprayed with Pam (not the baker’s version that has flour).  Place about 1 ½ inches apart.  Bake 13 to 15 minutes until lightly browned on top and bottom.  Cool on pan for 5 min and then sprinkle with lots of powdered sugar before placing on wire rack to cool. I like to sift it onto the cookies so the coating is even.  You could put a sheet of wax paper under the wire rack to catch the excess sugar.  Store well wrapped: in airtight container, in fridge for a week or freezer for up to 30 days.  You could store unbaked dough in fridge for a few days.

Brown Rice Flour Mix base mix  (same as King Arthur gf blend)
2 c brown rice flour

2/3 c potato starch *not potato flour

1/3 c tapioca flour

Note: This wonderful cookie was first posted December 2014 on my blog.  Minor revisions have been made since then.

Hot and Sour Chinese Chicken Soup

Leftover roasted chicken, a can of bamboo shoots, freshly made chicken broth and scallions.  What to make?  Ah hah! Chinese hot and sour soup; even better than take out ever was when I could eat it and super simple.  Lots of stuff in it but just measure and dump basically.

Notes: you can use leftover roast chicken or pork as the protein or tofu if you want to be vegetarian. I like all the vegetables but leave any of them out if you wish. You can even leave out the noodles; I would use the cornstarch then to help it be a tad thicker.

hot and sour soup in pot

Hot and Sour Chinese Chicken Soup

Ingredients:

5 cups homemade chicken broth

about 3/4 cup broken rice noodles; I prefer extra wide size

2 garlic cloves

about 2 tsp. freshly grated ginger root

1 Tbsp. balsamic vinegar

2-3 Tbsp. rice wine vinegar; can use red wine vinegar

1 Tbsp. chili sauce

3 Tbsp. gf soy sauce

1/4 tsp. sriracha sauce

2 tsp. brown sugar

1 stalk celery cut on the diagonal into thin slices

1/2 cup thinly sliced red pepper; I cut it into 1 inch lengths

4 oz mushrooms; shiitake are traditional but you can use any fresh mushroom, sliced

1 8 oz can bamboo shoots; drained

1/2 cup petite frozen peas

1/2 tsp. black pepper

2 cups roasted chicken cut in small chunks

2 eggs

2 tsp. toasted sesame oil

4 green onions (scallions)

Pour the broth into a large saucepan. Start it heating on medium.  While it heats heat 3 cups of water to boiling and add 1/2-3/4 cup broken rice noodles; I used extra wide size. Let stand 9 minutes. Add minced garlic, grated ginger, two vinegars, chili sauce, soy sauce, sriracha sauce, brown sugar, celery slices, red pepper strips, bamboo shoots and mushrooms to the heating broth. Cook 5 minutes. Add peas, black pepper and roasted chicken. Then the rice noodles which you have drained. Beat the eggs up and add them, and then the sesame oil and the scallions. I like to add the white part of my scallions a minute earlier than this as I don’t like them raw; up to you! Stir as you add the eggs.  Turn off heat. Taste and adjust seasoning.  Pour into bowls; makes about 5 servings.hot and sour soup in bowl

Notes; some folks add corn starch mixed with cold water to thicken it. I like the broth thin and brothy but you can do the cornstarch; 2 Tbsp. mixed with same amount cold water; add after the initial 5 minutes of cooking. This recipe is the one where you really need that homemade chicken broth; it is critical to the perfect flavor but use what ever you have and all will be amazed at your Chinese cooking skills. Enjoy!

Turkey Posole Stew; Different and Delish!

I am betting you have some roast turkey in the fridge or freezer, maybe a pint of gravy too?  Well, I have just the recipe for you, courtesy of Rachel Ray and foodnetwork.com.  It is nothing like most traditional turkey leftover recipes.  It is a Mexican stew.  Posole stew can easily be gluten free. Just use care choosing your chicken broth and your tortilla chips that accompany this savory soup.

I have been making it every fall after Thanksgiving and always look forward to a few bowls of it.  Spicy, crunchy, tangy; unlike any other soup I make.  It is called turkey posole. It can be made with roasted pork and I have done so.  I like it far better with roast turkey.  I have served this stew to many people and it is always well received and enjoyed, even by my elderly mother.  I made it tonight and it was so delish!

Ingredients

2 tbsp mild olive oil or canola oil

2 medium onions chopped

4 cloves garlic chopped fine

1-2 jalapeno peppers, seeded and chopped fine –use two if you like it spicy, I use one!

1 tbsp. ground cumin

1 GF beer (can use 1 cup water if you want but it gives more flavor)

Coarse salt and pepper

12-16 tomatillos; about 2 lbs, take off the paper cover and chop up.  Can coarsely chop in food processor

5-6 sprigs fresh thyme; chop it up off the stems.

2   15 ounce cans hominy

1.5 qt chicken stock (can be part gravy)

1 ½ to 2 lbs chopped turkey meat; can be mixture of light and dark

1 lime juiced

Chopped cilantro leaves to garnish (optional)

Tortilla chips; the ones with lime go particularly well with this.

tomatillos

Cook first six ingredients about 5 min in a large stock pot.  Add beer or water, cook one minute.  Add chopped tomatillos and cook 5-6 minutes until softened.  Add hominy, thyme and stock and cook 15 minutes.  Add chopped turkey and limb juice, stir. Taste and add salt and pepper, stir well.  I never use cilantro; something I just don’t like, but feel free to add it as the original recipe uses a bunch of it.turkey posole soup

Then ladle the posole into bowls and serve lots of white tortilla chips to crunch over the top of the hot soup.  As the soup disappears from my bowl I like to add more chips to keep the crunch going.

Notes:  I halved the garlic and tomatillos this time. Used most of a good sized jalapeno pepper and one can of hominy. I used a cup and a quarter of water for the beer and 3/4 of a carton of gf chicken broth. About a cup of homemade turkey gravy this time.  It was delish!

tomatillos

The more jalapeno pepper you add the hotter it will be. I have tried canned tomatillos and they are not really a good substitute.  You can get them fresh (found near the fresh tomatoes) in many stores including Giant.  They are used in Hispanic and Mexican cooking and add a lot of flavor and tartness to the soup. I have heard that some folks use salsa verde instead of tomatillos but it really isn’t hard to chop them up so I recommend the real deal.

Hominy is a corn product; whole kernels soaked in lye to swell and soften.  The kernels have a mild corn flavor plus they soak up other flavors quickly and add a certain texture and body to the stew.

The wild turkey is native to North America and one turkey species is originally from Mexico.  So turkey is a natural component in this stew.  The Aztecs revered corn and liked to cook it with meat.  Tomatillos are native to Mexico, related to cape gooseberries.  They are used in salsa verde and other Mexican dishes. So this compilation of turkey, corn, tomatillos and lime is a natural combination that will be easy to make and fun to eat. Go on, be adventurous and enjoy a steaming hot bowl of delicious posole and use up that turkey in a totally different way!

Coconut Shrimp Stew

I was not been feeling so great last week. So, I was searching for a healthy soup or stew for supper one night. I took a cauliflower turmeric soup recipe from realfarmacy.com and changed it quite a bit to fit the ingredients I have. I love and it feels so healthy. It even has some seaweed in it, yeap I went there and it worked; just one sheet of nori seaweed chopped up with a scissors. Adds complexity and it is good for skin care which is what I need right now.  You can alter it as you like. I used shrimp as I had them. If you prefer chicken go right ahead and swap out for that. Or use cauliflower and make it more veggie driven. I think this is a flexible stew; thick and very flavorful. Great on a cold day especially if you feel ill or sluggish. It will perk you up!

Shrimp and Coconut Stew

Ingredients:

1 medium onion chopped

2 Tbsp. coconut oil

1 tsp. cumin seeds

2 lg garlic cloves

1 can (15 oz) diced tomatoes

2 tsp. ground cumin

2 tsp. ground coriander

1 tsp. turmeric

2 tsp. finely chopped fresh ginger

1 can unsweetened coconut milk

1 cup chicken broth

1 cup finely sliced Chinese cabbage

1/2 cup shredded snow peas

1 tsp. sea salt

1 sheet nori seaweed

Big handful of dry rice noodles; maybe a cup of them; I used large width.

3/4 lb large raw shrimp; peeled or not!

Directions: heat oil in large soup pot, add cumin seeds and stir for a few moments; add onion and cook for 2-3 minutes; add garlic; cook a minute and then add all the dried spices and chopped ginger. Stir and cook a minute; add the tomatoes and cook for 3-4 minutes until they soften. Add the Chinese cabbage, coconut milk and broth. 

Meanwhile; heat 2 or 3 cups water to a boil in a separate dish and add the noodles; turn off heat and let stand 8 or 9 minutes. I heat the water in my microwave but you can do it on the stove of course.

Add the shrimp and snow peas to the soup once the mixture had come nearly to a boil. While it is heating you can add the seaweed. I folded my sheet up and cut it into narrow strips with a scissors and dumped it all in. Turn down heat so it doesn’t boil, and simmer 5-6 minutes. Don’t over cook those shrimp! Add the cooked rice noodles and salt at the end of this time, stir and add  water or more broth if it has gotten too thick. Make sure it is hot, and that you have tasted to see if there is enough salt to your tastes. Serve in a wide shallow bowl. Enjoy!


Notes: I generally break up the rice noodles into 2-4 inch lengths; they come in a packet of long strips; hard to measure. I just grab out a big chunk and break them up somewhat before dumping in the very hot water. You can use any width you prefer.  You can use any type noodle you prefer but rice noodles are most authentic.

If you don’t like shrimp use another seafood like scallops or a white fish like cod. If you don’t like seafood/fish you could add cooked chicken in slivers or go with no protein at all. To make it vegetarian use vegetable broth instead of chicken broth. To “beef up” your vegetarian version try adding some small flowerets of cauliflower; maybe a cup or two when you add the tomatoes.

If you shiver at the very thought of the nori; just leave it out. It adds flavor and protein and does increase the authenticity of the flavors. Enjoy!