Blueberry Tartlets, Love Em!

Blueberries rule my universe right now; still fairly plentiful and still sweet.  The flavor can’t be beat. My guy loves them and I have to agree; they are the tastiest and healthiest fruit.  I am in love with these tartlets. The crust to fruit ratio is perfect and I made them with a minimum of sugar as these ripe berries are already quite sweet. I got my fruit at Aldi’s for a great price; every grocery store has blueberries by the pint. They are very good for your body; full of fiber, low in sugar, and full of other nutrients. They are especially you have blood sugar issues.  See http://www.medicalnewstoday.com/articles/287710.php for more information.

Tips: Try not to bake in a hot kitchen; it makes it hard to roll out dough or even make the crumb mix. If it gets above 76 degrees you should turn on the air to keep your crust from acting weird.  I had to put mine in the freezer for a bit to help it hold the desired shape.

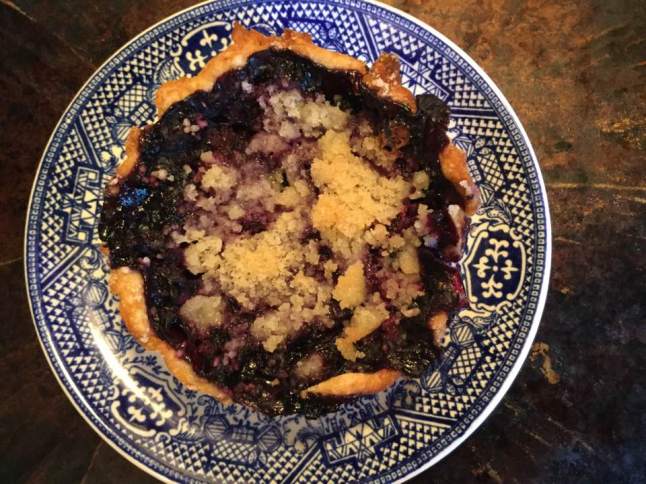
Don’t eat these tartlets fresh from the oven; they should be cooled to just warm or room temperature or even a bit chilled. They were perfect, just like a big pie only tiny each is one individual dessert.  You could certainly serve them with vanilla ice cream. We had them that way the other night and that was a treat indeed.

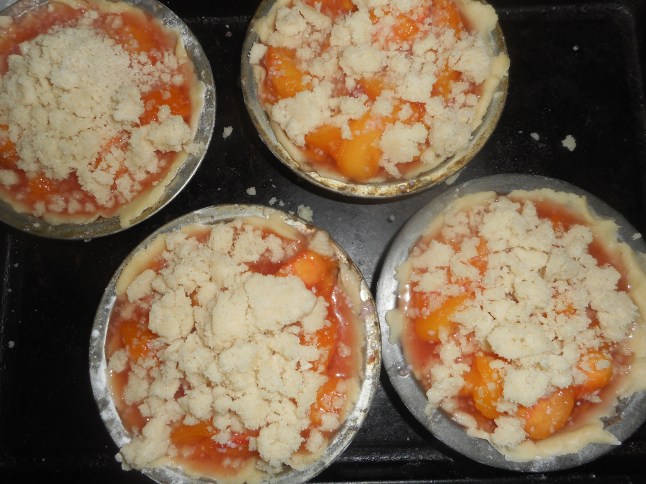
My apologies: these pictures were taken in a hurry; hot day and there was no spare time so they are looking rustic and crumbs dot the baking pan but frankly rustic tartlets are lovely. Be as tidy as fits your needs.


Angie’s GF Blueberry Crumb Tartlets: makes 6

Crust:

1 c plus 2 tbsp brown rice flour mix (at bottom of recipe)

2 Tbsp. sweet rice flour

1 Tbsp. granulated sugar

½ tsp xanthan gum

¼ tsp salt

6 Tbsp. cold butter cut into 6 chunks

1 large egg

2 tsp fresh orange or lemon juice

You will need 6 flat bottom 4 inch tartlet pans if you make them all at once. My pans are 4 in an attached group. I baked 4 one day and 2 the next day

Mix dry ingredients in bowl of stand electric mixer.  Add butter and mix until crumbly and resembling coarse meal.  Add egg and juice.  Mix until it comes together into big chunks.  Shape into a ball with your hands. Put it on a crust sized piece of wax paper (14 x 14 inches more or less), flatten the crust ball some; put on top of it another piece of wax paper and chill it all in your fridge 15-20 minutes while you prepare the filling.

Filling:

2 1/3 cups fresh blueberries, place in medium bowl

Mix with:

6 Tbsp. sugar

2 Tbsp. quick tapioca

¼ tsp. cinnamon

Let stand while you prepare the crumb crust. This is important so the tapioca can soften and absorb some juices before baking. If you like things tart add a tsp or two of fresh lemon juice to the berries.

Tartlet construction: Break dough into a large ball and a small one. Roll out big ball in a pie bag or between the two sheets of wax paper, try to get the thickness even and somewhat thin, no thick middle! Peel off one side of paper and place in 4 set tartlet pan, centered.  Remove other slice of wax paper.  Cut into 4 pieces with a sharp knife. Mold the crust to fill each tartlet shape with no holes or thin spots. Do the same with the smaller ball and create 2 more tartlet crusts. If you only have one pan you can refrigerate the dough and make the two other tartlets later.  Fill each tartlet with fruit mixture to the top of the dough… after you have the crumb topping ready to go.

Crumb topping

Put all four ingredients in the same mixing bowl you made the bottom crust in and mix well with mixer paddle until crumbs form. If you let them go extra long you get big fat crumbs if you want that look.

¾ c brown rice flour mix

½ c sugar

½ tsp xanthan gum

1/3 c cold butter cut into six chunks

Sprinkle the top of each tartlet with crumb mix; use as much as you like.  I didn’t measure; just sprinkled until the fruit was barely visible through the crumbs. Up to your personal taste… It sinks partially into the fruit mixture and adds lots of sweetness and eye appeal.

Bake in a preheated 375 degree oven for 30-32 minutes until bubbly and the crumb crust is light brown.  Cool at least a half hour before serving at room temperature.  I think it is best served the same day you make it, or no more then 12 hours after baking for optimal flavor.  The crumbs will get soggy if too much time passes. Mine was still very good the next day; just not as great as when really fresh.

blueberry tartlet 2017

Note: if you find your bottom crust is not browning enough bake it empty at 375 degrees for 5-8 minutes before filling it with the fruit.  I have a bottom heat pizza style oven which gives me perfect pie crust so I don’t ever have pale pie crust. This is a big benefit of having this type of oven; it is a two oven range with a full sized lower oven.

Brown Rice Flour Mix (Same as King Arthur GF All purpose blend)
2 c brown rice flour

2/3 c potato starch – Not potato flour

1/3 c tapioca flour

Note: the crust and crumb recipe are out of Annalise Roberts cookbook, Gluten Free Baking Classics, Second Edition. Adaptation and filling recipe are mine. Originally posted summer of 2017. No changes made to recipe.

Mediterranean Pasta Saute


Summer produce is at flood stage right now. Quantities of ripe tomatoes are ridiculous and there are lots of other veggies fresh and cheap to be had.  It’s pretty darn hot; what to make that is quick and tasty and uses up some produce?  I like to make this sort of Mediterranean stir fry; you can vary the ingredients based on what is in your veggie bin or garden.  It is quick and it still tasted great the two times I enjoyed it again.

gorguta squash

Tromboni Italian squash aka gorgutza

Notes: Feel free to swap out a veggie for another if you want. Or change the basil to fresh oregano or any fresh herb you like. I love the tromboni squash as it is tender yet firm…not watery, but it can be hard to find; a substitute is summer squash of any kind. Use any melting cheese you like; I prefer either of the two I suggested. Chunks of fresh ripe tomato will work fine too. Any kind of mild pepper is a good choice.  Red onion will be great instead of regular onions.

Angie’s Mediterranean Sauté

Serves three

Ingredients

2 Tbsp. EVOL

1 med onion, cut in long strips and then cut across to shorten them in half or thirds.

1 frying pepper cut into narrow 1 to 1.5 inch long strips

2-3 cups tromboni Italian summer squash or use zucchini; cut into half moons or rounds about 1/3 inch thick max

2 garlic cloves minced

3-4 lengths of Italian sausage precooked and cut into ¼ inch wide rounds.

1 cup uncooked gf rotini pasta, cooked until one minute less than the package says to cook it

1/3 cup Mexican cheese crumbled or mozzarella cheese cut in ½ inch chunks

3-5 basil leaves chopped fine

A pint of cherry tomatoes; if they are big you could cut them in half

Directions:

Heat the olive oil until nearly smoking in a mini wok or sauté pan. Add the cut onion, the trombone squash and the pepper. If you use zucchini wait to add it for 2 or 3 minutes as it won’t take as long to cook as the tromboni squash. Stir for a minute, add the garlic, stir another minute. Add the cooked coins of sausage (I sauted them in a fry pan the day before; about 8-9 minutes), stir and cook a few minutes until the squash is nearly done. Add the cooked pasta and then the tomatoes, stir and add cheese, stir a minute until cheese is melting. Add the fresh basil leaves and maybe ½ tsp. sea salt. Toss well. Do not overcook; cheese should be just about melting and tomatoes warm and slightly soft but not burst open. Enjoy! saute on plate


Summer Tomato Soup with Spaetzle

Summer always is tomato time around here.  But it’s now officially autumn and this day is distinctly chilly. I still have a few nice tomatoes, so I made my homemade tomato soup but added something special to it. Spaetzle; skinny egg dumplings which my mom made free form and tossed in her tomato soup often served for Saturday lunch. I got a lovely spaetzle maker for Christmas which I had not used too much yet and so I decided that I would try to replicate my mom’s luncheon soup. You don’t have to make spaetzles, but I highly recommend them. They really shine in the soup’s rich flavor; they are delicate and delicious.

I generally make Ina Garten’s tomato soup recipe but simplified a tad.  I made it today without the cream; I don’t think it goes as well with the spaetzles. So, if you don’t make spaetzles and don’t like it creamy leave out the cream or use half and half or whole milk for less calories.  If you are a vegetarian use veggie broth instead of chicken broth. I actually did half of each type of broth today as I had nearly a cup of veggie broth to use up.  You can strain or blend the soup. I never strain but sometimes I use my immersion blender to make it smoother. But I generally prefer it unstrained and chunky. Note: It has a good amount of garlic which you can reduce as wished.  I cut back on the salt, but you can cut it even further as you wish.

Your family will love this soup with a sandwich or salad. It is naturally gluten free.  GF croutons would bring a lovely crunch to it if you have any and aren’t doing the spaetzle dumplings. Enjoy!

See my trusty spaetzle maker in action! Notice how thick the dough is,


Just after I added the dumplings and before I put the lid on for their 5 minute beauty bath.


Fresh Tomato Soup with Spaetzles

Ingredients
3 tablespoons extra virgin olive oil
1 1/2 cups chopped red or yellow onions (2 onions)
2 carrots, unpeeled and chopped
1 tablespoon minced garlic (3 cloves)
4 pounds vine-ripened tomatoes, coarsely chopped (5-6 large)
1 1/2 teaspoons sugar
1 tablespoon tomato paste
1/4 cup packed chopped fresh basil leaves

2-3 cups chicken stock, preferably homemade
1 tsp. kosher salt
1/4- 1/2 tsp. freshly ground black pepper
3/4 cup heavy cream/half and half or whole milk (optional)

Spaetzle Ingredients

1 large egg

100 grams of Better Batter gf flour

1/4 tsp. salt

1/4-1/3 cup 2 percent milk ( I believe I used a full 1/3 cup)

Soup Directions
Heat the olive oil in a large, heavy-bottomed pot over medium-low heat. Add the onions and carrots and sauté for about 10 minutes, until very tender. Add the garlic and cook for 1 minute. Add the tomatoes, sugar, tomato paste, basil, chicken stock, salt, and pepper and stir well. Bring the soup to a boil, lower the heat, and simmer, uncovered, for 30 to 40 minutes, until the tomatoes are very tender.

Or: use your Instant Pot Electric Pressure Cooker to make it; saute as per recipe in the pot, add the rest of the ingredients and put the lid on and cook under pressure 20 minutes.  You might have to blend it a bit with an immersion blender. I sometimes leave off the cream but my next paragraph is how to add that….

Spaetzles:  Beat the egg with a whisk in a medium mixing bowl. Add in the milk and then the salt mixed with the flour, Stir briefly until you have a very thick batter. Use a spaetzle maker to drop the dough in strands into the hot soup; I added it about 6-8 minutes before the soup was supposed to be done. I cooked it 5 minutes once all the dumplings were in and turned off the heat; let it stand 10 minutes. 

Thick, chunky and fragrant with EVOL and fresh basil as well as the ripe tomatoes. Heavenly.

Read more at: http://www.foodnetwork.com/recipes/ina-garten/cream-of-fresh-tomato-soup-recipe.

Original post of this was way back in the summer of 2014.  Minor changes and addition in this recipe of the spaetzle dumplings. Enjoy!

Golden Gazpacho…Cold Tomato Soup for Summertime Dining

Hot summer days mean I need a cool recipe. One with minimal cooking: gotta be easy and totally tasty.  Plus I gotta use some of my garden produce.  Gazpacho is the classic Spanish cold soup. I make it every summer out of ripe red tomatoes. This time I made it from some golden yellow tomatoes; they had some bad spots and couldn’t be included in a free produce give away due to that. I believe the actual variety is Kelloggs Golden; think big fat heirloom tomaters. They are especially nice for some people as this variety is lower in acid; we grow it in our church community garden for seniors who have trouble with regular tomatoes.  Using yellow tomatoes changed nothing else about this recipe but it sure looks different! The flavor is mild and delightfully tomato-y.golden tomatoes in bucket

So, this recipe is perfect for using excess tomatoes and I love it on a hot day. It absolutely must be made with ripe summer tomatoes, never ever attempt it with any less than the best vine ripened fruit.  You can get great tomatoes at farm stands, farmer’s markets and even the grocery store; look for the grown local label for the best flavored tomatoes. Please do not use greenhouse tomatoes grown far away and shipped while not really ripe. Your soup will not be full of tomato flavor and it will taste disappointing.  These ripe locally grown tomatoes are vital to the flavor of gazpacho.  If you can’t find golden tomatoes just use red ones; a more traditional looking gazpacho.

I make my gazpacho in the blender but I believe a food processor works okay too.  No heat,  minimal fuss.

golden gazpacho in blender

My version allows you to add chopped raw veggies in the amount you prefer just before you slurp it down. I prefer its fresh pure flavors to those soulless restaurant versions that are often gelatinous and terminally crammed full of assorted chunky veggies…uggh.

golden gazpacho toppings

Warning: you do need to peel the tomatoes but that goes pretty fast.  I heat about a wide sauce pan filled 3 inches deep with water to a boil and pop the ripe tomatoes in for 2 to 3 minutes. I put in two big ones at a time; done in a couple batches.  Let them cool a bit and then peel off the skin and cut out the blossom end (top) and they are ready to use. Saying large tomatoes is kinda vague; just think about how many will fill your blender about 2 times 2/3 of the way full. For me it was about 4 or 5 huge tomatoes.  I had a bit extra I put in a bowl and sprinkled with white balsamic vinegar to eat as a tomato salad; good way to use up extra  tomato slices. golden tomatoes in pot

One important instruction: gazpacho just HAS to chill really good; make it early in the morning to serve as a late lunch or better yet; for supper. The colder the better, I always put my soup bowls in the freezer for 15 or 20 minutes and yank them out just before filling and serving this cold summer delight.

It is a flexible recipe; depends on the size of your tomatoes. This should make close to 50 ounces or nearly a  quart and a half.  It will keep 3-5 days in the refrigerator.

Golden Gazpacho

Soup ingredients:

3 to 6 ripe fat golden tomatoes (large ones)

About ¼ cup EVOL; best quality you can afford: I used some from Aldi’s

2 slices white bread (GF if you have celiac)

1 lemon

2 large garlic cloves, peeled

1 to 1 ½ tsp. sea salt

Toppings:

2 tomatoes diced, heirloom if possible

1 cup diced burpless cucumber

2 scallions, sliced thin, green and white parts. Chives work okay too.

Directions: peel the tomatoes as described above.  When I peel them I do it over a bowl to capture the juices and seeds. I save them, strain off the seeds and I add back the juice as needed to thin the finished soup.    Put half of your cut up tomatoes in the blender; add a slice of bread broken up, 2 tbsp. olive oil, the juice of half a lemon and one garlic clove.  Put the lid on and blend well.  Note: do not fill the blender more then ¾ full. Taste; add salt; ½ to ¾ tsp. Pour in a glass bowl.

Repeat entire process with the rest of the ingredients and thin with reserved tomato juice – it should be thick but not porridge thick.  Mix the two batches together in a big glass bowl; never metal because of the acidity of tomatoes and cover tightly with plastic wrap.  Then chill it at least 3 to 4 hours.

Serve with bowls of toppings to sprinkle on top of the thick soup; diced ripe tomatoes, scallion slices and cucumber ( preferably burpless) cut in small dice.  If you want to guild the lily, top with croutons (gf ones if you have celiac), I don’t often bother. golden gazpacho in bowl


Note: gluten free bread often gives a slightly different texture to the soup; somewhat less smooth in the look of it and the taste.  It’s okay as it doesn’t affect the flavor: it still is delicious and a bowl of it is so very refreshing on a hot day.  Serve with a small sandwich and you have a perfect summer lunch.

Peach Tartlets = Peach Perfect!

It is the peak of peach season so get some peaches and whip up a delicious gluten free peach pie. I wanted individual tarts so everyone would feel special; that I baked them their own mini pie; easy to do!  If you don’t have these deep dish pans you can use the flat-bottomed tartlet pans; probably won’t hold quite as much filling. mass upload 8-22-16 563

Please make every effort to use local fruit; can get peaches at orchards like Bechdolt’s near Springtown, at most farm stands and at farmer’s markets; one on Saturdays in Easton or Sundays in Hellertown.  This pie really showcases great tasting peaches. If you use lousy peaches your result will lack great flavor. But here’s the thing: store peaches can be poor in flavor and texture due to improper chilling, so I strongly suggest you get locally grown, sweet, ripe peaches to make your pie.  I love when they have a pink blush; it makes the pie so pretty and perhaps even tastier.

To peel; do it old school: heat 3 inches of plain water in a wide pot, drop the peaches gently in 4-5 at a time and blanch them 2-3 minutes, two if very ripe, 3 if less ripe.  Allow to cool somewhat before peeling.  I like to do that over a bowl to catch the juices as I slice each peach. Or just use a potato peeler and slide off the skins. Slice thin and you are ready to use the peaches! If they are quite ripe this works well. Less work, less heat in the kitchen.

Don’t eat these tartlets hot; should be cooled to just warm if you like it so or room temperature or even a bit chilled. They were perfect, just like a big pie only tiny and making one individual dessert.  You could certainly serve them with vanilla ice cream.  And this recipe, like all peach desserts, works perfectly with fresh nectarines, bonus: no peeling required!

Sorry I have not been posting much lately; dealing with illness.  Makes it hard to focus on my blog but these tartlets were just too good to not blog about.

Angie’s GF Peach Crumb Tarlets: makes 7

Crust:

1 c plus 2 tbsp brown rice flour mix (at bottom of recipe)

2 Tbsp. sweet rice flour

1 Tbsp. granulated sugar

½ tsp xanthan gum

¼ tsp salt

6 Tbsp. cold butter cut into 6 chunks

1 large egg

2 tsp fresh orange or lemon juice

———————

You will need 7 deep dish 4 inch tartlet pans if you make them all at once. I actually froze my dough and made the second batch of 3 a day later. Adjust the filling to the number of tartlets you are baking.

Mix dry ingredients in bowl of stand electric mixer.  Add butter and mix until crumbly and resembling coarse meal.  Add egg and juice.  Mix until it comes together into big chunks.  Shape into a ball with your hands. Put it on a crust sized piece of wax paper (14 x 14 inches more or less), flatten the crust ball some; put on top of it another piece of wax paper and chill it all in your fridge 15-20 minutes while you prepare the filling.

Filling:

6-7 cups sliced fresh peaches, peeled and cut in thick slices, place in medium bowl

Mix with:

½ cup sugar

1/4 cup quick tapioca

Notes: I made it in two parts; used 7-8 smaller peaches for each batch. Adjust the sugar and tapioca accordingly.  Let the filling stand while you prepare the crust. This is important so the tapioca can soften and absorb some juices before baking.

Construction: Break dough into 7 small equal balls.  Roll out each tiny crust in a pie bag or between the two sheets of wax paper, try to get the thickness even and somewhat thin, no thick middle! Peel off one side of paper and place in pie pan, centered.  Remove other slice of wax paper.  Crimp edges all around.  Or not; I left mine kinda rough but it worked! Place the crust lined pans on a baking sheet with a rim to catch any spills. Fill each tartlet with fruit mixture after you have the crumb topping ready to go. Fill to a tad less than the top edge of the crust.  Do not overfill; they will bubble and spill if you take the filling right to the top edge.mass upload 8-22-16 560

Crumb topping

Put all four ingredients in the same mixing bowl you made the bottom crust in and mix well with mixer paddle until crumbs form. If you let them go extra long you get big fat crumbs for when you want that look, they work great!

¾ c brown rice flour mix

½ c sugar

½ tsp xanthan gum

1/3 c cold butter cut into six chunks

Sprinkle the top of each tartlet with crumb mix; use as much as you like.  I didn’t measure; just sprinkled until the fruit was barely visible through the crumbs. Up to your personal taste… It sinks partially into the fruit mixture and adds lots of sweetness and eye appeal.

Bake in a preheated 400 degree oven for 35 minutes until bubbly and the crumb crust is light brown.  Cool at least 1 hour before serving at room temperature.  I think it is best served the same day you make it, or no more then 12 hours after baking for optimal flavor.  The crumbs will get soggy if too much time passes. Mine was still very good the next day; just not as great as when really fresh.

Note: if you find your bottom crust is not browning enough bake it empty at 375 degrees for ten minutes before filling it with the fruit.  I have a bottom heat gas oven which gives me perfect pie crust if I put the pie down on the lowest possible level so I don’t ever have pale pie crust. I used to have a two oven range with a full sized lower oven. and an upper pizza oven that I called the Pie Oven!    I miss it a little but I am managing just fine to have perfectly browned pie crusts.

mass upload 8-22-16 562

Brown Rice Flour Mix (Same as King Arthur GF All purpose blend)
2 c brown rice flour (finely ground)

2/3 c potato starch – Not potato flour

1/3 c tapioca flour

Note: the crust and crumb recipe are out of Annalise Roberts cookbook, Gluten Free Baking Classics, Second Edition. Adaptation and filling recipe are mine.

First published in Summer 2016. No changes to recipe in this posting.