Caesar Supper Salad Spectacular

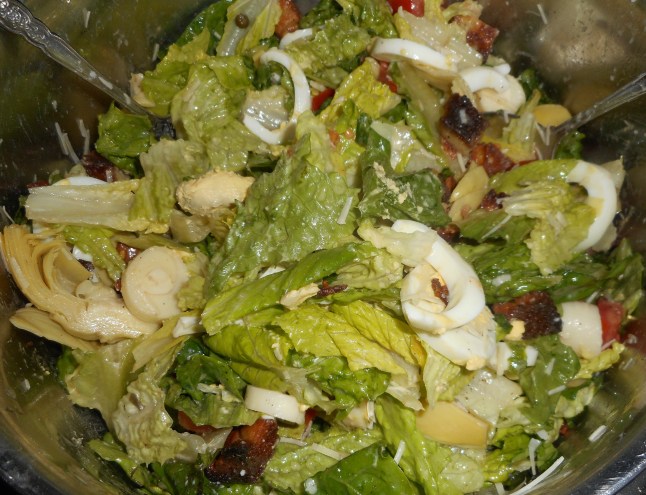
Summertime is salad time at my house.  Salads that are full of fresh seasonal veggies and have the crunch factor.  There is a salad I eat only on special occasions but I don’t know why I don’t make it more often.  It is that good. I have it every year for my birthday party entrée. This recipe is a Drake family holiday tradition started by my parents long ago. The Full Caesar. It is a variation on the Caesar salad found in The Joy of Cooking by Rombauer and Becker, page 96, my copy of which is well used…slightly stained with tomato juice and other salad ingredients… A salad that is legendary in how much we each consume. Long ago, my dad used to like to experiment with his recipe and I shudder to think of the weird things he added sometimes. Don’t get me wrong, I love a lot of ingredients in this salad but I draw the line at blue cheese or even worse, cheddar cheese!  Blah!  I am the one who puts it together when we gather and there is never any cheese but real Parmesan cheese in our caesar salad.

Anyway, this salad is a meal in itself. If you are lazy you can buy a Caesar dressing; check for gf on the label. I always make it from scratch but I leave that choice to you.  The coddled eggs blends in with the lemon juice, olive oil and red wine vinegar to make an authentic dressing.  I am not a big anchovy fan but it really adds a special under flavor; you can’t really tell it’s in there but it adds a lot of authenticity to the dressing.  I bake my own French bread and we have a loaf with a meal and the next day the leftover bread becomes the croutons for this salad.  Use any gf white bread you like. Don’t use bought croutons; they are so so much more delicious when you make them fresh.

This is a show stopper salad that is always put together table side when we have it. Some of my siblings make it too and they do it very similarly to this recipe. It is a delightful treasure hunt for the various additions we have grown to love in our Caesar. Manga!


Real Caesar  Salad – for six

½ cup good olive oil

1 clove garlic

2 big heads of romaine lettuce

6 slices bacon

1 Tsp. salt

½ Tsp. dry mustard

½ Tsp. freshly ground pepper (only fresh will do!)

2-3 fillets of anchovy mashed to a paste or 1-2 tsp. anchovy paste

½ Tsp. Worcestershire sauce

3 Tbsp. red wine vinegar

A lemon

3 Tbsp. freshly grated parmesan cheese

7 eggs

2-3 Tbsp. tiny capers

1 14 oz. can hearts of palm

1 14 oz. can artichoke hearts

A pint of cherry tomatoes, halved

Half a loaf of gf French bread

Preparation the night before; put the peeled garlic clove in the olive oil to stand for at least 4 to 12 hours. Boil six of the eggs and chill, in shell.

Salad Day:  chop the bacon into ½ inch chunks and fry until crisp; drain on paper towel.

Peel the hard boiled eggs and slice into about 5-6 rounds each, set aside.  Slice the cherry tomatoes in half. You can use any kind of tomato; the riper the better. Just cut into bite sized pieces. Wash and tear the romaine into 1-2 inch squares; be sure to dry it in the salad spinner.  Put it all in a big bag and chill in the fridge. Slice the hearts of palm into 1/3 inch rounds, cut the artichoke hearts in halves or quarters.

Cut the French bread into cubes, heat 2 tbsp. of the garlicky olive oil in a large frying pan and add the bread cubes, cook on medium heat tossing often until they are browned some and crisp. Set aside until time to assemble the salad.

The Big Assembly:

Put the lettuce in a large salad bowl; even a big stainless steel pot or wok will work.  Add the salt, pepper, dry mustard, Worcestershire sauce and the anchovy paste. Toss.

In a small pot; heat water to boil; add one egg and cook for 90 seconds.  This is the coddled egg, necessary for the dressing.

Start adding in the good stuff; the sliced hard boiled eggs, capers, the hearts of palm, artichoke hearts, tomato halves, fried bacon.  Stir gently.  Add red wine vinegar, the remaining 5-6 tbsp. of olive oil, the coddled egg which you broke in half with a knife and scooped out with a spoon right into the salad. It will totally disappear into the dressing. Squeeze in the juice of one lemon and add the fresh parmesan you just grated as well as the freshly fried croutons. Note: Do NOT use pre-grated cheese!  Heresy…   Stir gently and thoroughly to spread the dressing around well and mix the ingredients. Taste it and add more salt and pepper if needed plus add more vinegar and olive oil if there isn’t enough dressing.  We always discuss whether there is the right amount of dressing and have been known to add more to it tasting to be sure to balance the flavors so it is perfect.

mass upload 8-22-16 066

Serve on a big dinner plate. Enjoy!

I have been known to eat any leftovers the next day for lunch; still delicious even if the croutons get soggy.

Blueberry Cobbler Time!

Love this cobbler for how quickly it goes together plus it takes less fruit than a pie.  And it is gluten free for all of you who must avoid gluten. I honestly thought I had posted a recipe for this treat a year or two ago. Shocked to find no such recipe in my blog archives. It be blueberry season so perfect timing to post this classic dessert.

This recipe is the same basic one I posted for peach cobbler and for rhubarb cobbler in the past; it is modified from a muffin dry mix in Bette Hagman’s book, More from the Gluten-Free Gourmet and uses a flour mix that will give you 4 cups of the dry ingredients.  One cup will make an 8×8 pan of cobbler topping.  I keep the rest of my dry mix in the freezer and a pan of cobbler can be thrown together in less than 10 minutes plus baking time.  What a time saver this mix is! I make all sorts of cobblers with it.

It’s best to always get the fruit part cooking before putting the topping together so the fruit is hot and ready for the topping and can go right into the oven.

I make this blueberry cobbler most every time we go camping; put the dry cobbler mix in a baggie labeled cobbler, topping mix of sugar and flour in a separate labeled baggie.  I bring a small mixing bowl and whisk; don’t recommend mixing the cobbler cake in a baggie: it is difficult to mix it properly.  I start the fruit cooking on the camp stove and then after I mix up the cobbler topping and it’s ready to bake, I cover the pot with foil and bake it on the grill over the campfire. Takes a bit longer to bake; keep checking it every 5 minutes once it has baked 30 minutes. Make sure your pot is fire proof…

Angie’s Blueberry Cobbler

Dry Cobbler Mix use one cup for this recipe and freeze the rest

2 ¼ cups white rice flour

½ cup potato starch (not potato flour!)

½ cup tapioca flour

1 tsp. baking soda

4 tsp. baking powder

1 tsp salt

1 tsp. xanthan gum

1/3 cup sugar

Fruit Filling

4 cups fresh blueberries; rinsed and stems removed

½-2/3 cup sugar –more or less depending on sweet tooth

2 tbsp. GF flour; I use tapioca flour

1/4 tsp cinnamon

Directions:

Place the fruit in a sauce pan. Stir together the sugar, cinnamon and flour and mix into the fruit.  Cook on the stove top for 5-10 minutes until it is thickened and hot.  Stir often so it doesn’t stick or burn. If you are worried it will burn, add a tbsp. of water to it and keep stirring. Pour into a buttered 8 inch square or round pan, top with big blops of the cobbler topping.

Cobbler Topping

1 cup dry baking mix

2 large eggs

2 tbsp melted butter or canola oil

¼ to 1/3 cup milk/buttermilk

½ tsp. vanilla  *optional

Mix the wet ingredients and then add to the dry mix in a big bowl.   Mix briefly: do not over-mix for best texture.  Use a big spoon to plop it right away on the hot fruit.  Bake immediately as baking soda and powder can’t stand around waiting or they lose their oomph!

Bake at 350 degrees for 25 minutes.  The top should be lightly browned and spring back when you poke it with your finger.  If it looks damp or squishy bake it 5 more minutes before removing from oven.  cobbler in dish

Let cool 5-7 minutes before serving as it will burn your mouth right out of the oven!  Some people love it with a scoop of vanilla ice cream.  This tasty cobbler is perfect just on its own.

Notes: I use canola oil most of the time but butter is great too. The original recipe was 1/3 cup milk but I have cut back to ¼ and I like it a bit better; less runny. I also use buttermilk for mine but you can use milk, fruit juice or even water for the liquid. Can’t say it will taste as good…but if you have to avoid dairy….

Yummy Bacon Quiche!

Quiche has sort of a clichéd reputation.  Something ladies eat for lunch. Something real men avoid.  A boring slice of eggy stuff. All NOT true. Well, except for it being a luncheon treat. I love a well crafted quiche. They can be pretty nasty though if not carefully made. I don’t want to go into negative details but what I aim for is a flaky crust, lots of fresh flavors and a creamy filling. I have an alternative crust if you are feeling lazy; you can butter the pie pan and lay down a single layer of buckwheat grouts (2/3 cup) and any left over go thinly over the first layer.  As it bakes they swell and create a sort of a crust. Nice, but today we are going for fantastic and that means real crust.  It is just like my fruit pie crust but minus the tablespoon of sugar.  You can use a store bought unbaked crust and no one will call you out.

To fill it I like mushroom slices, bacon and onions sautéed in the leftover bacon grease.   Totally yummy and a bit oinky especially when you add some cheese cubes. For this quiche I used fresh mushrooms which amped up the flavor quite a bit but generally the canned mushrooms are how I roll.

The egg/cheese part that holds it together; mine is a bit different than most. I use a mixture of cottage cheese, eggs and milk; blended in my blender. Easy peasy. I confess I never measure the cottage cheese but you might be more cautious so I gave an amount. My recipe adds cubes of cheese to amp up the cheese factor. I used Colby here but often I chose sharp cheddar, Swiss or Munster cheese.

If you are gluten free like me check the bacon package for a gf label as I have gotten quite ill from bacon that had gluten in it. I know…why would you put gluten in bacon? I guess it is in the brining solution? Or the spices?? No idea, but do be careful. I used four slices but if you are a bacon lover you could add two more slices and that will increase the pork factor a tad.

Sometimes I vary the filling a bit; sautéed chunks or slices of summer squash are nice.  Ham instead of bacon works nicely. Don’t use too much filling or it won’t hold together.


quiche slice
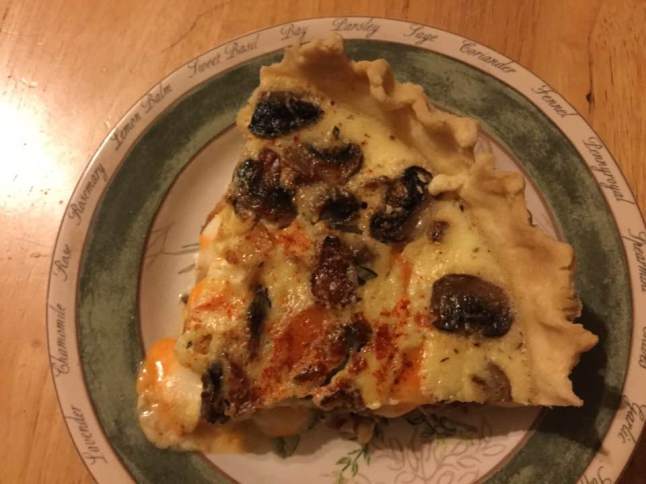
Bacon and Mushroom Quiche  six servings

 Crust:

1 c plus 2 tbsp brown rice flour mix (at bottom of recipe)

2 tbsp sweet rice flour

½ tsp xanthan gum

¼ tsp salt

6 Tbsp. cold butter cut into 8-9 chunks

1 lg egg

2 tsp fresh orange or lemon juice

Mix dry ingredients in bowl of stand electric mixer.  Add butter and mix until crumbly and resembling coarse meal.  Add egg and juice.  Mix until it comes together into big chunks.  Shape into a ball with your hands. Put it on a crust sized piece of parchment or wax paper (14 x 14 inches more or less), flatten the crust ball some; put on top of it another piece of parchment or wax paper and chill it all in your fridge for about 15 minutes. Make the filling while it chills.

Filling

4 slices gluten free bacon

1 small can mushroom slices or 1/3 lb fresh mushrooms

1 medium onion

1 ½ cup plain cottage cheese

3 eggs

1/3 cup whole milk or half and half

A chunk of bar cheese; about 2 inches of it: cheddar, Colby, muenster

Sprinkle thyme

Sprinkle paprika or smoked paprika

Filling preparation: cut the bacon into large dice; sauté in frying pan, stir often. Remove to a paper towel lined plate when nearly crisp.  Slice the onion in half rounds, not too thick and not thin and cook slowly in the bacon fat until soft but not browned; about 5-8 minutes.  Remove to a paper towel lined plate to drain a bit.  If using canned mushrooms drain them. If fresh; slice and sauté  in a clean fry pan in about a tbsp of butter and a tbsp. of olive oil until fairly cooked; about 5 minutes.

Heat oven to 350 degrees. I use my bottom heat oven for this recipe to bake the crust nicely.

Put cottage cheese, eggs and milk in blender; put lid on. Blend 10-15 seconds or until well mixed.

quiche blender

Cut the cheese chunk into small cubes.

Assembly: Roll out the pie crust; fit into 9 inch pie pan. Flute or crimp the edge. If you don’t have a bottom heat oven bake it about 8 minutes before filling. Gently spread the onion then mushroom, then bacon on the raw or par-baked crust. Pour in the blender mixture. Spread evenly all the cheese cubes over the top. Sprinkle with just a bit of dried thyme and a touch of paprika.  Bake for 35-40 minutes until the center is just barely giggly when you bump it.  Cool at least 30 to 60 minutes before slicing. That is non negotiable; it will be a mess and not taste great if you cut it hot.

Keeps about 3 days in the fridge if it lasts that long; I cover it tightly with plastic wrap. To reheat, I warm a slice in the microwave about a minute until the cheese starts to bubble. Enjoy!

Curcuzza Side Dish: Delish

A zillion years ago my best friend’s mom, Sparky, used to grow these long skinny Italian squashes on long string trellis’ in her tiny back yard.  They lived in a narrow row house in Harrisburg so space was at a premium.  Sparky was 100 percent Italian and a great cook. She used to make this simple but delish side dish of small cubes of curcuzza squash cooked in tomato sauce. I never had access to this old time variety until I saw them at my sister’s garden last summer and searched until I found seeds at superseeds.com.  They go by the name of trombolini heirloom Italian summer squash.  You can pick them from small to very large sized.  They can be allowed to harden and dry and then used like winter squash particularly as butternut squash. They grow on long vines and are really cool looking. So this summer they are growing wildly and I’m learning how to cook with these unusual squash fruits.


The other week I made a delightful sauté. Success led me to feel I should try the special dish Sparky made all those years ago. It was simple actually, with just a few ingredients and some loving attention.

I strongly suggest you find trombolini squash but in a pinch any other summer squash will do; just cook it for a far shorter time.

trombolini squash with sauce and sausage

Sparky’s Curcuzza in Red Sauce

2  Tbsp.  EVOL

½ cup diced yellow onion

3-4 cups cubed trombolini squash

1 large garlic clove

1 15 ounce can tomato sauce; good quality

2  Tbsp. dry red wine

Kosher salt and freshly ground black pepper

Directions:

Heat olive oil in large saucepan, add onion, cook about 4 minutes until it starts to soften.  Add cubed squash, cook 5 minutes, add minced garlic clove, cook one minute.  Add tomato sauce. Put 2 tbsp. red wine in can to rinse it out and add to pan.  If you don’t like wine; use water.  Cover and cook on low heat for about 30 minutes until squash is cooked but still holds it’s shape. Stir it a few times to make sure it is not sticking or burning. If you used zucchini your cook time will be more like ten minutes.  I add salt before the 30 minute cooking; maybe ½ tsp of it and a few grinds of my pepper grinder.

Serve over hot spaghetti pasta.  You can serve it with some Italian sausage or fried eggplant or top your plate with grated fresh Parmesan cheese if desired. My pasta was gf of course.  This can be made vegan, gf, a side to a meat entree or just a delightful snack. Manga!trombolini squash with sauce

Blueberry Tartlets That Thrill!


Blueberries rule my universe right now; plentiful and sweet.  The flavor can’t be beat. My guy loves them and I have to agree; they are the tastiest and healthiest fruit for me. Haha! Seriously this is all true and I am in love with these tartlets. The crust to fruit ratio is perfect and I made them with a minimum of sugar as these ripe berries are already quite sweet. I got my fruit at Aldi’s for a great price; every grocery store has blueberries by the pint, often on sale. They are very good for your body; full of fiber, low in sugar, and full of other nutrients. They are especially you have blood sugar issues.  See http://www.medicalnewstoday.com/articles/287710.php for more information.

Tips: Try not to bake in a hot kitchen; it makes it hard to roll out dough or even make the crumb mix. If it gets above 76 degrees you should turn on the air to keep your crust from acting weird.  I had to put mine in the freezer for a bit to help it hold the desired shape.

Don’t eat these tartlets fresh from the oven; they should be cooled to just warm or room temperature or even a bit chilled. They were perfect, just like a big pie only tiny each is one individual dessert.  You could certainly serve them with vanilla ice cream. We had them that way the other night and that was a treat indeed.

My apologies: these pictures were taken in a hurry; hot day and there was no spare time so they are looking rustic and crumbs dot the baking pan but frankly rustic tartlets are lovely. Be as tidy as fits your needs.

Angie’s GF Blueberry Crumb Tartlets: makes 6

Crust:

1 c plus 2 tbsp brown rice flour mix (at bottom of recipe)

2 Tbsp. sweet rice flour

1 Tbsp. granulated sugar

½ tsp xanthan gum

¼ tsp salt

6 Tbsp. cold butter cut into 6 chunks

1 large egg

2 tsp fresh orange or lemon juice

You will need 6 flat bottom 4 inch tartlet pans if you make them all at once. My pans are 4 in an attached group. I baked 4 one day and 2 the next day

Mix dry ingredients in bowl of stand electric mixer.  Add butter and mix until crumbly and resembling coarse meal.  Add egg and juice.  Mix until it comes together into big chunks.  Shape into a ball with your hands. Put it on a crust sized piece of wax paper (14 x 14 inches more or less), flatten the crust ball some; put on top of it another piece of wax paper and chill it all in your fridge 15-20 minutes while you prepare the filling.

Filling:

2 1/3 cups fresh blueberries, place in medium bowl

Mix with:

6 Tbsp. sugar

2 Tbsp. quick tapioca

¼ tsp. cinnamon

Let stand while you prepare the crumb crust. This is important so the tapioca can soften and absorb some juices before baking. If you like things tart add a tsp or two of fresh lemon juice to the berries.

Tartlet construction: Break dough into a large ball and a small one. Roll out big ball in a pie bag or between the two sheets of wax paper, try to get the thickness even and somewhat thin, no thick middle! Peel off one side of paper and place in 4 set tartlet pan, centered.  Remove other slice of wax paper.  Cut into 4 pieces with a sharp knife. Mold the crust to fill each tartlet shape with no holes or thin spots. Do the same with the smaller ball and create 2 more tartlet crusts. If you only have one pan you can refrigerate the dough and make the two other tartlets later.  Fill each tartlet with fruit mixture to the top of the dough… after you have the crumb topping ready to go.

Crumb topping

Put all four ingredients in the same mixing bowl you made the bottom crust in and mix well with mixer paddle until crumbs form. If you let them go extra long you get big fat crumbs if you want that look and I did!

¾ c brown rice flour mix

½ c sugar

½ tsp xanthan gum

1/3 c cold butter cut into six chunks

Sprinkle the top of each tartlet with crumb mix; use as much as you like.  I didn’t measure; just sprinkled until the fruit was barely visible through the crumbs. Up to your personal taste… It sinks partially into the fruit mixture and adds lots of sweetness and eye appeal.

Bake in a preheated 375 degree oven for 30-32 minutes until bubbly and the crumb crust is light brown.  Cool at least a half hour before serving at room temperature.  I think it is best served the same day you make it, or no more then 12 hours after baking for optimal flavor.  The crumbs will get soggy if too much time passes. Mine was still very good the next day; just not as great as when really fresh.

blueberry tartlet 2017

Note: if you find your bottom crust is not browning enough bake it empty at 375 degrees for 5-8 minutes before filling it with the fruit.  I have a bottom heat pizza style oven which gives me perfect pie crust so I don’t ever have pale pie crust. This is a big benefit of having this type of oven; it is a two oven range with a full sized lower oven.

Brown Rice Flour Mix (Same as King Arthur GF All purpose blend)
2 c brown rice flour

2/3 c potato starch – Not potato flour

1/3 c tapioca flour

Note: the crust and crumb recipe are out of Annalise Roberts cookbook, Gluten Free Baking Classics, Second Edition. Adaptation and filling recipe are mine.