Shrimp Risotto, IP Style: Winner!

We all want easy recipes that taste great, don’t use too many pots/pans and are budget friendly.  I needed something quick that would use my instant pot electric pressure cooker (IP) as I am recovering from a total knee replacement and Joe is cooking right now. He found making a roast chicken far too time consuming and frankly difficult.  I had to talk him through every tiny step.  That was rather exhausting for me!

We had some big fat shrimp in the freezer and all the usual ingredients for risotto.  I had read lots of comments on how good IP risotto was but had resisted until now being a lover of the traditional endless stirring method, LOL.  It still took as long as hand stirred risotto to make but was much easier for him to understand and to complete the tasks plus it was an IP training class for him. Now I think using the IP will be what he wants to do for meals; the quick cleanup sold him.

shrimp risotto

IP Shrimp Risotto, serves 4

1 lb large to extra large shrimp; thawed and shelled

4 tbsp. butter divided

1 small yellow or red onion finely chopped

1 ½ cups Arborio rice

2 tbsp. vermouth or dry white wine

4 ½ cups low sodium great quality chicken broth

1 tsp. sea salt

¼-1/2 tsp. fresh ground black pepper

2 minced garlic cloves

Finely grated rind of one small lemon

¼ cup finely chopped fresh herbs like parsley, rosemary, tarragon, thyme or

2 tsp dried herbs (same ones)

1/3 cup freshly grated good quality parmesan cheese

Directions: Heat IP and add 2 tbsp. butter, melt and add onion, cook 4 minutes, add rice and cook 1 minute, add vermouth and cook 30 seconds, add 3 cups room temp chicken broth, salt and pepper and put lid on. Seal it and set for 9 minutes on manual pressure, do a quick release, add the minced garlic and then the shrimp the rest of the broth. Stir well and cook 5 minutes on Sauté.  Stir frequently. Turn it off and then add the zested lemon and the herbs, stir.  Add the cheese, stir and serve.

Notes: I think you might be able to cut ¼ cup broth; mine seemed just a tad too loose/wet. It was not quite as creamy as hand stirred but the process was a lot easier for a beginner cook like Joe and he loved the quick clean up.  We had a side serving of peas cooked on stove top with some butter added as it cooked for about 3 minutes.  The result was a gourmet meal that a novice could pull off; perfect for our situation.

Italian Wedding Soup


It is bitterly cold out there, perfect weather for arctic foxes or penguins.  In here I feel soup is called for to warm from the inside out. This is American comfort food at it’s best; simple to make, flavorful and always comes out right. My dear friend Cathy made this a lot for her kids.  They used to call this “grass soup” when they were little because it is chock full of fresh spinach that melts into this healthy yet still meaty classic soup.  I make mine with ground chicken for the tiny meatballs.  You could use ground turkey, veal or beef.

You can make this soup with canned broth; but, be sure the package is marked gluten free if you have celiac disease like I do, my favorite choice is Kitchen Basic, and they have a low salt chicken broth broth which is perfect for cooking.  Homemade is going to make it more flavorful if you have some around but sometimes we just don’t have time to make fresh broth.  The recipe is modified slightly from one by Ina Garten, foodnetwork.com. Cathy, being Italian, just tosses it together so I had t0 find a source for a decent recipe and I am happy with my choice.

Don’t freak out if you only have one carrot or don’t want as much of any ingredient; make it your way.  Some versions have fresh dill chopped up and added at the end 2-3 tbsp. of it.

stir fry, pan dowdey and crocus 007

Angie’s Italian Wedding Soup

Meatballs

1 lb ground chicken

1 large egg

About ½-2/3 cup gf bread crumbs

¼ cup fresh grated parmesan cheese

½ tsp. sea salt

Soup

1 tbsp olive oil

1 medium to large yellow onion, diced

2 carrots, unpeeled, sliced into quarter rounds

2 celery stalks diced including the leaves

1 or 2 garlic cloves

½ cup white wine

1 1/2 quarts of chicken broth

½ cup tiny gf pasta; I found some tiny ring shaped pasta

1 package fresh baby spinach, 12 oz. size

½ to 1 tsp. sea salt and some fresh black pepper

Directions: Dump the meatball ingredients into a large mixing bowl, (beat the egg somewhat before dumping the rest in) stir up with your hands and form into 1 1/4 inch meatballs, 1 and ½ inches maximum.  Place them 1 inch apart on a parchment lined baking sheet.  Bake at 350 degrees for about 30 minutes, bigger ones will need a few more minutes. If you feel perfectionistic, turn them half way though the baking, not really that necessary though.

While they bake, heat the olive oil in a large saucepan; I used a two quart one.  Add the diced onion, celery and carrots.  Cook them about 6-8 minutes until soft, add the garlic and cook another minute.  Add the broth and white wine to the soup, stirring frequently; bring to a boil and add the meatballs, reheat, add the pasta, cook until nearly done, add the spinach, cook 1-2 minutes; taste and adjust the salt. Add fresh ground black pepper to taste.

Pour in a bowl.  I topped mine with some more fresh grated parmesan cheese. Perfect meal when you want to sooth a still slightly iffy tummy.

Sweet Cherry Tartlets

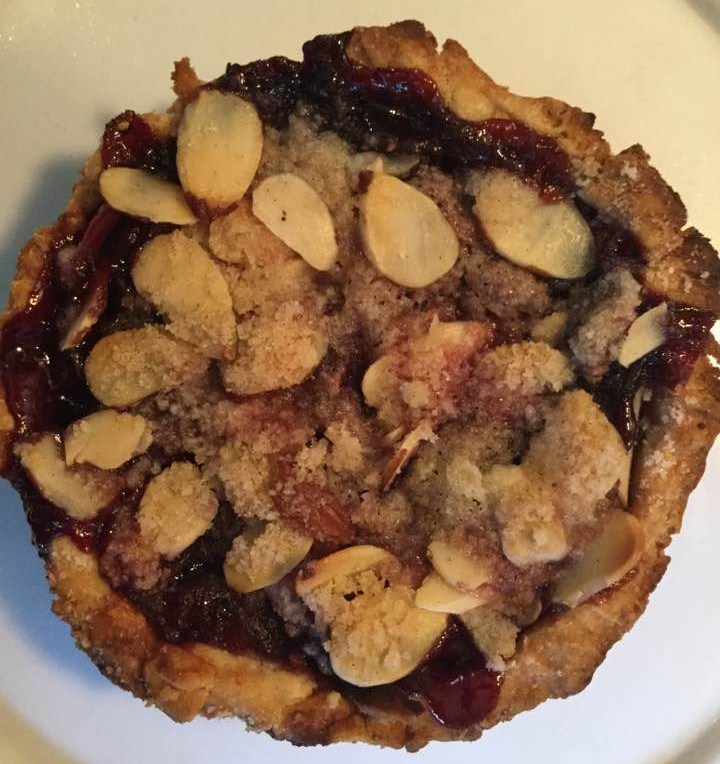
I love a little fruit tartlet for dessert; there is something winsome about having your very own tiny pie to enjoy.  Fruit is high on my list of loved things.  So you can see why I am really into tartlets these days.  Sadly, winter is a desert as to enjoying fresh stone fruit…they are plentiful in the summer to early fall, not in March.  I do not care for fruit shipped from the southern hemisphere; picked so green the flavors are lacking. Thank goodness for frozen bagged fruit.  I love using them to bring back the flavors and scents of fresh baked fruit pies even in March. I couldn’t find frozen sour cherries so I decided to experiment with the frozen sweet (bing) cherries that are readily available.  Bonus over fresh; they are pitted and they keep a long time in your freezer.  I wanted to make these tartlets for President’s Day.  Only two weeks late, LOL!

Don’t eat these tartlets hot; should be cooled to just warm if you like it so or room temperature or even a bit chilled. They are a perfect size, just like a big tart only tiny and each makes one individual dessert.  You could certainly serve them with vanilla ice cream, I had one like that today; dessert perfection!

Angie’s GF Bing Cherry Tartlets: makes 4

Crust:

1 c plus 2 tbsp brown rice flour mix (at bottom of recipe)

2 Tbsp. sweet rice flour

1 Tbsp. granulated sugar

½ tsp xanthan gum

¼ tsp salt

6 Tbsp. cold butter cut into 6 chunks

1 large egg

2 tsp fresh orange or lemon juice

Crust: You will need 6 flat bottom 4 inch tartlet pans if you make them all at once. I actually refrigerated my dough and made the second batch of 2 a few days later so just one tart pan worked.  Adjust the filling to the number of tartlets you are baking.

Mix dry ingredients in bowl of stand electric mixer.  Add butter and mix until crumbly and resembling coarse meal.  Add egg and juice.  Mix until it comes together into big chunks.  Shape into a ball with your hands. Put it on a crust sized piece of wax paper (14 x 14 inches more or less), flatten the crust ball some; put on top of it another piece of wax paper and chill it all in your fridge 15-20 minutes while you prepare the filling.

Filling:

2 cups frozen sweet cherries; measure and then cut in halves or even quarters if big, place in medium bowl

Mix with:

2-3 tbsp. sugar (I used 2) mixed with ¼ tsp. cinnamon and

1 tbsp. quick tapioca

A sprinkle of sea salt (less than

1 tsp. grated lemon zest

Add 2 tbsp. orange juice

Stir and let stand while you prepare the crust. This is important so the tapioca can soften and absorb some juices before baking.

Break dough into 2 balls, one twice the size of the other.  Roll out the bigger ball of crust in a pie bag or between the two sheets of wax paper, try to get the thickness even and somewhat thin, no thick middle! Peel off one side of paper and place across the tart pan, centered.  Remove other slice of wax paper. Cut into four squares, mold to fit the pan, I cut off all extras and saved them for the second batch of tarts. Crimp edges all around with fork tines.  Fill each tartlet with cherry mixture after you have the crumb topping ready to go.

Crumb topping

Put all four ingredients in the same mixing bowl you made the bottom crust in and mix well with mixer paddle until crumbs form. If you let them go extra long you get big fat crumbs if you want that look.  Leftover crumbs can be stored for a few weeks in the fridge in a tightly covered container.

¾ c brown rice flour mix

½ c sugar

½ tsp xanthan gum

1/3 c cold butter cut into six chunks

Take one half cup of the mixture and put in a medium sized mixing bowl.

Add 2 ½ tbsp. sliced or slivered almonds, 1/8 tsp. cinnamon, and a sprinkle of sea salt.

Sprinkle the top of each tartlet with crumb mix; use as much as you like.  I didn’t measure; just sprinkled until the fruit was barely visible through the crumbs but I did use up all the almond crumb blend. Up to your personal taste… It sinks a little into the fruit mixture.

Bake in a preheated 375 degree oven for 35 minutes until bubbly and the crumb crust is light brown.  Cool at least 1 hour before serving at room temperature.  I think it is best served within in 24 hours of when you make it for optimal flavor.  The crumbs will get soggy if too much time passes.

cherry-tart-on-plate

Note: if you find your bottom crust is not browning enough bake it empty at 375 degrees for 7-9 minutes before filling it with the fruit mixture.  I have a bottom heat pizza style oven which gives me perfect pie crust so I don’t ever have pale pie crust. This is a big benefit of having this type of oven; it is a two oven range with a full sized lower oven.

Note: Keep the rest of the dough in the fridge; will keep a few days; when you are ready for a repeat: make a half recipe of the filling and use it to bake 2 more tartlets after you remove the tartlets from the pan.

Brown Rice Flour Mix (Same as King Arthur GF All purpose blend)
2 c brown rice flour (finely ground)

2/3 c potato starch – Not potato flour

1/3 c tapioca flour

Note: the crust and base crumb recipe are out of Annalise Roberts cookbook, Gluten Free Baking Classics, Second Edition. Adaptation and filling recipe are mine.

Blueberry Cranberry Muffins

Oh nuts, out of muffins….again.  I love muffins for their great flavor, texture and how easy they are to make.  Plus they are really portable and they freeze like a dream. Homemade snacks have the great feature of no chemical preservatives or additives like snack bars you buy which is a great attraction for me.  Plus, if you have never baked gluten free these muffins are a super easy starter recipe.

This is a riff on my fall of 2014 version on a muffin recipe out of Annalise Robert’s cookbook; Gluten-Free Baking Classics.  It is very similar to her blueberry muffins but with some cranberries and a coarse sugar topping.  Yes, my picture has the streusel topping (forgot to take a pix when I made them with coarse sugar on top) and I am adding the streusel recipe at the bottom just in case you prefer it. The sugar sprinkles are extra easy and quicker when you don’t have time for fancy streusel. Either option for a topping is great.

I was never been a big fan of cranberries until a little over year ago! I decided to experiment with them and found that they play very well with a variety of fruits for muffins, tarts, pies and crisps.  The cranberries brighten the flavor and add a lovely rosy color.  Try to look beyond your prejudices as to their “zingy” flavor and give cranberries a second try.  I am so glad I did.

These muffins will not disappoint: delicate texture yet slightly crunchy outside with great berry flavor and just enough sugar for me.  To measure I poured about 1 cup of blueberries and added the rest of the measure out of the bag of cranberries. Or the opposite proportions…use any proportion of fruit that you prefer. I used frozen fruit; easy to get in the winter, don’t defrost them before adding. The coarse sugar topping insures that they look fancy and it goes on in moments.

cranberry-blueberry-muffins

There are walnuts in there to so you get some really great nutrients from the fruit and nuts.  Not much guilt in eating one of these treats! You can swap the white sugar for coconut palm sugar which is very low as far as raising blood sugar.  Just increase the milk by 2 tbsp if you do.

It is smart to freeze any you won’t eat in two days time; a zip lock freezer bag works great.

 Blueberry Cranberry Muffins

2 cups brown rice flour mix (see below)

2/3 cup granulated sugar or coconut palm sugar

1 tbsp. baking powder

1 tsp. baking soda

¾ tsp. xanthan gum

¼ tsp. salt

1 tsp cinnamon

½ tsp. ground ginger

1 1/3 cup fresh or frozen blueberries and cranberries

1/2 cup chopped walnuts

2 large eggs

½ cup milk, 1 or 2 percent

½ cup canola oil

1-2 tbsp. coarse sugar

——-

Directions: Heat your oven to 375 degrees, placing the rack in middle of oven.  Spray muffin pans with cooking spray.  One batch makes 12-16 muffins.  I got 16 when I made them yesterday.

Mix all dry ingredients in bowl of stand mixer or big bowl Add fruits and walnuts; stir to coat them with dry mix.  Combine milk and oil.  Beat in eggs, add vanilla.  Add liquids to big bowl; stir just until blended.  It is a very thick batter.

Fill muffin pans 2/3 full.  I use a big serving spoon and fill it about half way to dump in each muffin space. Sprinkle the top with the coarse sugar. Bake 21-23 min until golden brown. Do not over bake or they will taste dry.  Remove immediately from the pans and cool on a rack.  They freeze well for a few weeks, if they last that long.  Keeps in fridge (well wrapped) or an airtight cookie jar for 2-3 days.

Brown Rice Flour Mix base mix 

(This mix is the same as King Arthur’s basic blend)
2 c brown rice flour

2/3 c potato starch

1/3 c tapioca flour

Alternate Streusel Topping: Mix the following in a bowl, make sure the butter is in tiny pebbles; use your fingertips to blend.

½ cup rolled oats

¼ cup brown sugar

2 tbsp. almond meal

1½ tbsp. butter

¼ tsp. cinnamon

Sprinkle on top; press in lightly to help it adhere.

Blueberry Tartlets

It is off season for blueberries but the canned pie filling will do in a pinch if you want to whip up a delicious gluten free blueberry pie. I wanted individual tarts so everyone would feel special; that I baked them a personal fruit pie; easy to do with this simple filling recipe!  I used my flat bottomed tartlet pans.

Don’t eat these tartlets hot; should be cooled to just warm if you like it so or room temperature or even a bit chilled. They were perfect, just like a big pie only tiny and making one individual dessert.  You could certainly serve them with vanilla ice cream.

Sorry I have not been posting much lately; busy working and out of town on a retreat.  Just been hard to find time to focus on my blog but these tartlets were just too good to not blog about.

Angie’s GF Blueberry Tartlets: makes 6

Crust:

1 c plus 2 tbsp brown rice flour mix (at bottom of recipe)

2 Tbsp. sweet rice flour

1 Tbsp. granulated sugar

½ tsp xanthan gum

¼ tsp salt

6 Tbsp. cold butter cut into 6 chunks

1 large egg

2 tsp fresh orange or lemon juice

You will need 1 square attached set of flat bottom 4 inch tartlet pans or two if you make them all at once. I refrigerated my dough and made the second batch of a day later. Adjust the filling to the number of tartlets you are baking.

blueberry-tartlets-baked

Mix dry ingredients in bowl of stand electric mixer.  Add butter and mix until crumbly and resembling coarse meal.  Add egg and juice.  Mix until it comes together into big chunks.  Shape into a ball with your hands. Put it on a crust sized piece of wax paper (14 x 14 inches more or less), flatten the crust ball some; put on top of it another piece of wax paper and chill it all in your fridge 15-20 minutes while you prepare the filling.

Filling:

1 21 ounce can of blueberry pie filling

Zest of one small lemon

2 tbsp. lemon juice

Sprinkle of cinnamon

I made it in two parts; used part of can and lemon for each batch. Adjust accordingly.

Break dough into 2 balls, one a bit bigger.  Roll out each crust in a pie bag or between the two sheets of wax paper, try to get the thickness even and somewhat thin, no thick middle! Peel off one side of paper and place across the tart pan, centered.  Remove other slice of wax paper. Cut into four squares, mold to fit the pan Crimp edges all around.  Or not; I left mine kinda rough but it worked. Fill each tartlet with blueberry mixture after you have the crumb topping ready to go. Do the same with the other portion of dough; makes 3 crusts.

Crumb topping

Put all four ingredients in the same mixing bowl you made the bottom crust in and mix well with mixer paddle until crumbs form. If you let them go extra long you get big fat crumbs if you want that look.

¾ c brown rice flour mix

½ c sugar

½ tsp xanthan gum

1/3 c cold butter cut into six chunks

Sprinkle the top of each tartlet with crumb mix; use as much as you like.  I didn’t measure; just sprinkled until the fruit was barely visible through the crumbs. Up to your personal taste… It sinks partially into the fruit mixture and adds lots of sweetness and eye appeal. Sprinkle with a touch of cinnamon.

blueberry-tartlets-unbaked

Bake in a preheated 400 degree oven for 35 minutes until bubbly and the crumb crust is light brown.  Cool at least 1 hour before serving at room temperature.  I think it is best served the same day you make it, or no more then 18 hours after baking for optimal flavor.  The crumbs will get soggy if too much time passes. Mine was still very good the next day.

blueberry-tartlets-baked

Note: if you find your bottom crust is not browning enough bake it empty at 375 degrees for 6-7 minutes before filling it with the fruit.  I have a bottom heat pizza style oven which gives me perfect pie crust so I don’t ever have pale pie crust. This is a big benefit of having this type of oven; it is a two oven range with a full sized lower oven.

blueberry-tartlets-cut

Not a great picture; day after they were baked and after I cut the last tartlet in half.  So yummy I totally forgot to take a picture after the first batch!

Brown Rice Flour Mix (Same as King Arthur GF All purpose blend)
2 c brown rice flour (finely ground)

2/3 c potato starch – Not potato flour

1/3 c tapioca flour

Note: the crust and crumb recipe are out of Annalise Roberts cookbook, Gluten Free Baking Classics, Second Edition. Adaptation and filling recipe are mine.