Ratatouille Tonight…Not the Movie!


Summer time is the best time to cook with garden produce; makes the most sense, that’s when they are at their peak of quality and variety. I love to make this dish every year in the late summer particularly when I have most of the vegetables growing in my garden.  Ratatouille is a French dish made of eggplant, zucchini, tomatoes, onions, peppers and lots of olive oil and basil. To me it tastes more Italian with all those veggies and the olive oil and basil. It’s a great side dish with grilled meats or fish and I love it inside an omelet or alongside a slice of quiche.  And yes, I know there was a kids movie out in 2007 by the same name.  Disney even came out with their own recipe for ratatouille!

Lots of veggie chopping for this delicious dish and then you should stir it carefully as the mixture cooks in a big pan. I like to make it in a wok or paella dish. I have a Teflon paella dish that I use these days; holds a lot and things don’t stick to it.

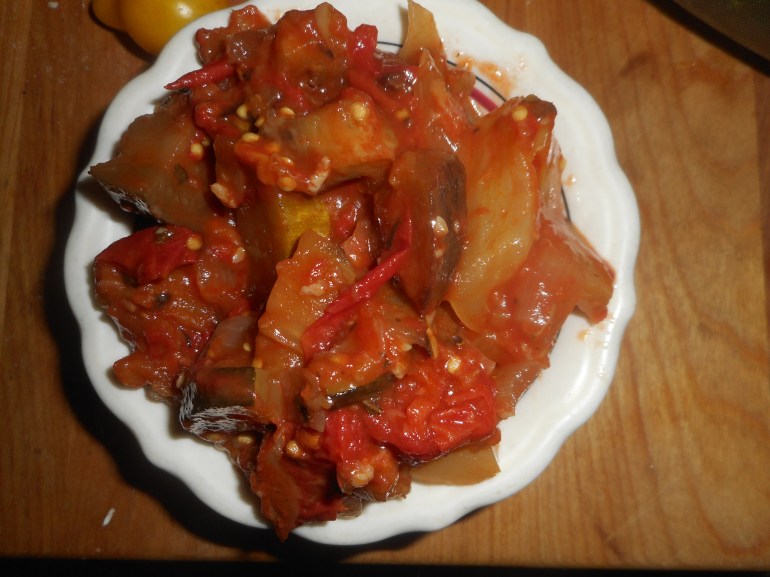
Tips: The amounts are somewhat fluid; I don’t really measure the veggies; just use an approximate amount. Be sure to cook the eggplant until it is mostly done before proceeding to the next step or your dish will be less than stellar.  You can use red, orange, yellow or green bell peppers and yellow summer squash works just as good as zucchini. I used a huge pale green bell pepper in my photographed version. Just makes sure all your vegetables are fresh and best quality.


Ratatouille  by Angela, makes about six servings

Ingredients:

2 medium onions

4 tbsp. olive oil divided

1 large eggplant – cut into rounds and then across into ½ in slices (don’t peel)

1 med zucchini  – cut into 1/3 inch rounds and halved

2 large tomatoes, diced

2 garlic cloves – minced

1 large red or green bell pepper- cut into long slices, can half them

1-2 Tbsp. tomato paste

1 tsp. brown sugar, optional

1 Tbsp. dried basil

1 tsp. sea salt (to taste)

Directions:

Put 3 tbsp. of the oil in a large frying pan; 16 inch or wok works well. Add the eggplant slices and toss the slices around to evenly soak up the oil.  Fry turning occasionally; try to get them at least half done and then add the zucchini half moons.  Keep frying until both are just about done.  Turn out into a big bowl.  Add the rest of the olive oil and when it is hot; add the onion bits. Cook about 5-6 min until softening.  Add garlic and cook a minute.  Add the sliced pepper and cook 5-6 minutes until softening.  Add the diced tomato.  Stir well.  Cook about 5-6 minutes and add the tomato paste and sugar, stir well, add back the zuke/eggplants and  until mixture looks mostly done; maybe 10 min.  Add the basil and salt and cook another couple of minutes. spicy tomato jam 006  Great cold the next day; aging in the fridge melds the flavors together.

Refreshing Gazpacho Soup: Ole Summer’s Ripe Tomatoes!

Made this again this past week; using golden tomatoes; really nice looking. A perfect hot summer dinner choice.

Angela Drake's avatarMy World Without Wheat

Hot Hot HOT summer days mean I need a cool recipe. One with minimal cooking: that is easy and tasty.  Plus I want to use some of my garden produce.  This classic Spanish soup called gazpacho is perfect for all of that and my family loves it. It absolutely must be made with ripe summer tomatoes, never ever attempt it with any less than the best vine ripened fruit.  You can get great tomatoes at farm stands, farmer’s markets and even the grocery store; look for the grown local label for the best flavored tomatoes. Please do not use greenhouse tomatoes grown far away and shipped while not really ripe. Your soup will not be full of tomato flavor and it will taste disappointing.  These ripe locally grown tomatoes are vital to the flavor of gazpacho.

I make my gazpacho in the blender but I believe a food processor works…

View original post 610 more words

Perfect Peach Pie

Peach season is here so get some ripe juicy peaches and whip up a delicious gluten free peach pie.   This is an easy pie to create.  Slice and dump together the filling, crumb topping made in unwashed mixer bowl you used for creating the bottom crust. You can store any leftover crumb mixture in a sealed container in the fridge; it keeps a few weeks.  Sometimes I let the mix spin in the stand mixer for extra big crumbs for this pie; love that look. If you prefer a solid crust just double the crust part and top your pie with it.  Be sure to cut some slits for steam escape! I think a lattice crust would be fantastic, if a bit more time consuming to construct.

Please make every effort to use local fruit; can get peaches at orchards like Bechdolt’s near Springtown, at most farm stands and at farmer’s markets; one on Saturdays in Easton or Sunday’s in Hellertown.  This pie really showcases great tasting peaches. If you use lousy peaches your pie will be lack luster. But, here’s the issue I want you to think about: store peaches can become quite poor in flavor and texture due to improper chilling during transport or storage so I strongly suggest you get locally grown, nearly ripe peaches to make your pie.  I love when they have a pink blush; it makes the pie so pretty and perhaps even tastier!  You might have to let them ripen a bit so plan ahead and buy them a few days before you want to make that spectacular late summer peach pie.

mass upload 8-22-16 557

Some peaches I bought a week ago at Bechdolts’ Orchard

To peel peaches for a pie (and you really must peel them); heat 3 inches of plain water, drop the peaches gently in 4-5 at a time and cook them 2-3 minutes.  Use the lesser time for more ripe peaches. Allow to cool somewhat before peeling.  I like to do that over a bowl to catch the juices as I slice each peach.

Bake and enjoy late summer in a pie in just a few minutes of work.  Don’t eat it hot; it should be cooled to just warm if you like it so or room temperature or even a bit chilled.  You could certainly serve this with vanilla ice cream.  And this pie works perfectly with fresh nectarines, bonus: no peeling required!


GF Peach Crumb Pie

Crust:

1 c plus 2 tbsp brown rice flour mix (at bottom of recipe)

2 Tbsp. sweet rice flour

1 Tbsp. granulated sugar

½ tsp xanthan gum

¼ tsp salt

6 Tbsp. cold butter cut into 6 chunks

1 large egg

2 tsp fresh orange or lemon juice

Spray 9 inch metal pie pan with cooking spray, dust with white rice flour. I forget to do that most of the time so you can too!

Mix dry ingredients in bowl of stand electric mixer.  Add butter and mix until crumbly and resembling coarse meal.  Add egg and juice.  Mix until it comes together into big chunks.  Shape into a ball with your hands. Put it on a crust sized piece of wax paper (14 x 14 inches more or less), flatten the crust ball some; put on top of it another piece of wax paper and chill it all in your fridge 15-20 minutes while you prepare the filling.  The warmer your kitchen the better chilled your crust dough should be or it will surely stick to the paper/plastic.

Filling:

6 cups sliced fresh peaches, peeled and cut in thick slices, place in medium bowl

Mix with:

½ cup sugar

1/4 tsp. cinnamon

1/4 cup quick tapioca


Add and stir in

1 tbsp. fresh lemon juice

¼ tsp. almond extract *(optional but it does add a lot of flavor)

Let stand while you prepare the crust.

Roll out pie crust in a pie bag or between the two sheets of wax paper, try to get the thickness even, no thick middle! Peel off one side of paper and place in pie pan, centered.  Remove other slice of wax paper.  Crimp edges all around.  Fill with fruit mixture.

Crumb topping

Put all four ingredients in the same mixing bowl you made the bottom crust in and mix well with mixer paddle until crumbs form. If you let them go extra long you get big fat crumbs if you want that look and I did!

¾ c brown rice flour mix

½ c sugar

½ tsp xanthan gum

1/3 c cold butter cut into six chunks

Sprinkle the top of the pie with crumb mix; use as much as you like.  I like about a heaping cup of the mixture.  Up to your personal taste… It sinks partially into the fruit mixture and adds lots of sweetness and eye appeal.

Bake in a preheated 400 degree oven for 45-50 minutes until bubbly and the crumb crust is light brown.  Cool at least 1 to 4 hours before serving at room temperature.  I think it is best served the same day you make it, or no more then 12 hours after baking for optimal flavor.  The crumbs will get soggy if too much time passes. Mine was still very good the next day; just not as great as when really fresh.

mom's new watch 013

Note: if you find your bottom crust is not browning enough bake it empty at 375 degrees for ten minutes before filling it with the fruit.  I have a bottom heat pizza style oven which gives me perfect pie crust so I don’t ever have pale pie crust.

Brown Rice Flour Mix (Same as King Arthur GF All purpose blend)
2 c brown rice flour (finely ground)

2/3 c potato starch – Not potato flour!

1/3 c tapioca flour

Note: the crust and crumb recipe are out of Annalise Roberts cookbook, Gluten Free Baking Classics, Second Edition. Adaptation and filling recipe are mine.  This blog post was originally published in August 2014.


Chocolate Chocolate Chip Cookies

Freshly baked chocolate chocolate chip cookies for dessert and snacks.  What is not to like?  Especially if they are gluten free and thus safe for me to eat.  Doublely good if they are totally yummy.  Triple great if they are a simple mix you can stir together in a few minutes and drop onto cookie sheets in ball shapes that spread into perfect round tasty chocolate treats that look like you bought them at a bakery. And: they freeze well, important if you can’t eat them in a couple of days…. Did I say chocolate? And chocolate chips?  I did!

ratatouile 8-16 012

This picture is actually of cookies I had frozen; I couldn’t find the shot I swore I had taken of them freshly baked; so I was reduced to this pile of cold, yet still yummy, cookies!

Where can you get these delights? Aldi’s of course, and for $4 for the box which made nearly 30 cookies. Good deal.  I bought them about 3 months ago and then made them up for a special birthday party I was going to the other weekend.  It was way too hot to spend hours concocting cookies from scratch.  But I wanted something totally delish for everyone who was there.  And they were.  Simply scrumpers! Some folks could hardly believe they were gluten free.  People seem to have gotten the idea that all gluten free baked goods are mediocre or worse.  I am here to tell you that such is not the case.  In fact, some of my scratch gf versions of classic cookies are actually better gluten free! Like Russian teacakes, aka Mexican wedding cookies.  They are incredible gf.  Don’t get me wrong, there are still a number of cookies I haven’t been able to figure out gf but I will be trying…..

ratatouile 8-16 014

So if you need a chocolate cookie fix, by all means, bake up a batch of these dark flavorful treats.  No one will believe they are gf but you!

Peach Tartlets, Peachy Keen

It is the peak of peach season so get some peaches and whip up a delicious gluten free peach pie. I wanted individual tarts so everyone would feel special; that I baked them their own mini pie; easy to do!  If you don’t have these deep dish pans you can use the flat bottomed tartlet pans; probably won’t hold quite as much filling. mass upload 8-22-16 563

Please make every effort to use local fruit; can get peaches at orchards like Bechdolt’s near Springtown, at most farm stands and at farmer’s markets; one on Saturdays in Easton or Sunday’s in Hellertown.  This pie really showcases great tasting peaches. If you use lousy peaches your result will lack great flavor. But, here’s the thing: store peaches can be poor in flavor and texture due to improper chilling so I strongly suggest you get locally grown, sweet, ripe peaches to make your pie.  I love when they have a pink blush; it makes the pie so pretty and perhaps even tastier.

To peel; heat 3 inches of plain water in a wide pot, drop the peaches gently in 4-5 at a time and blanch them 2-3 minutes, two if very ripe, 3 if less ripe.  Allow to cool somewhat before peeling.  I like to do that over a bowl to catch the juices as I slice each peach.

Don’t eat these tartlets hot; should be cooled to just warm if you like it so or room temperature or even a bit chilled. They were perfect, just like a big pie only tiny and making one individual dessert.  You could certainly serve them with vanilla ice cream.  And this recipe, like all peach desserts, works perfectly with fresh nectarines, bonus: no peeling required!

Sorry I have not been posting much lately; a little (2.5 day) vacation, a family crisis and a dear friend passing away.  Just been hard to focus on my blog but these tartlets were just too good to not blog about.

Angie’s GF Peach Crumb Tarlets: makes 7

Crust:

1 c plus 2 tbsp brown rice flour mix (at bottom of recipe)

2 Tbsp. sweet rice flour

1 Tbsp. granulated sugar

½ tsp xanthan gum

¼ tsp salt

6 Tbsp. cold butter cut into 6 chunks

1 large egg

2 tsp fresh orange or lemon juice

———————

You will need 7 deep dish 4 inch tartlet pans if you make them all at once. I actually froze my dough and made the second batch of 3 a day later. Adjust the filling to the number of tartlets you are baking.

Mix dry ingredients in bowl of stand electric mixer.  Add butter and mix until crumbly and resembling coarse meal.  Add egg and juice.  Mix until it comes together into big chunks.  Shape into a ball with your hands. Put it on a crust sized piece of wax paper (14 x 14 inches more or less), flatten the crust ball some; put on top of it another piece of wax paper and chill it all in your fridge 15-20 minutes while you prepare the filling.

Filling:

6 cups sliced fresh peaches, peeled and cut in thick slices, place in medium bowl

Mix with:

½ cup sugar

1/4 cup quick tapioca

Notes: I made it in two parts; used 7-8 smaller peaches for each batch. Adjust the sugar and tapioca accordingly.  Let the filling stand while you prepare the crust. This is important so the tapioca can soften and absorb some juices before baking.

Construction: Break dough into 7 small equal balls.  Roll out each tiny crust in a pie bag or between the two sheets of wax paper, try to get the thickness even and somewhat thin, no thick middle! Peel off one side of paper and place in pie pan, centered.  Remove other slice of wax paper.  Crimp edges all around.  Or not; I left mine kinda rough but it worked! Place the crust lined pans on a baking sheet with a rim to catch any spills. Fill each tartlet with fruit mixture after you have the crumb topping ready to go. Fill to a tad less than the top edge of the crust.  Do not overfill; they will bubble and spill if you take the filling right to the top edge.mass upload 8-22-16 560

Crumb topping

Put all four ingredients in the same mixing bowl you made the bottom crust in and mix well with mixer paddle until crumbs form. If you let them go extra long you get big fat crumbs for when you want that look, they work great!

¾ c brown rice flour mix

½ c sugar

½ tsp xanthan gum

1/3 c cold butter cut into six chunks

Sprinkle the top of each tartlet with crumb mix; use as much as you like.  I didn’t measure; just sprinkled until the fruit was barely visible through the crumbs. Up to your personal taste… It sinks partially into the fruit mixture and adds lots of sweetness and eye appeal.

Bake in a preheated 400 degree oven for 35 minutes until bubbly and the crumb crust is light brown.  Cool at least 1 hour before serving at room temperature.  I think it is best served the same day you make it, or no more then 12 hours after baking for optimal flavor.  The crumbs will get soggy if too much time passes. Mine was still very good the next day; just not as great as when really fresh.

Note: if you find your bottom crust is not browning enough bake it empty at 375 degrees for ten minutes before filling it with the fruit.  I have a bottom heat pizza style oven which gives me perfect pie crust so I don’t ever have pale pie crust. This is a big benefit of having this type of oven; it is a two oven range with a full sized lower oven.

mass upload 8-22-16 562

Brown Rice Flour Mix (Same as King Arthur GF All purpose blend)
2 c brown rice flour (finely ground)

2/3 c potato starch – Not potato flour

1/3 c tapioca flour

Note: the crust and crumb recipe are out of Annalise Roberts cookbook, Gluten Free Baking Classics, Second Edition. Adaptation and filling recipe are mine.