Keema with Lettuce Curry

Lately I have been enjoying some wonderful meals centered around Indian curry. Sometimes chicken, sometimes lamb or beef. Keema means ground meat. I used this great recipe my sister Margie gave me for a ground beef or lamb curry with lettuce. Yes, that sounds odd, and honestly it took me quite a while before I made it. Well, it was just delicious. I have made this favorite recipe many times over the years. Unfortunately, the recipe was lost a few years ago and I finally replicated it fairly well using some curry recipes and my memories of the ingredients and the flavors I wanted to achieve. I couldn’t find any recipe for a beef/lamb curry with lettuce so I started with one that used peas as a major flavor and used ground meat and modified it to re-create my keema curry.  I love this made with lamb but I have used ground chuck in the past with a yummy curry resulting.

Curry is not that hard to cook; saute, dump, stir, simmer…but it generally has a lot of spices. I use these spices a lot making different curries. I know it seems like a ton of ingredients but please don’t throw “curry powder” in this in lieu of the spices I named. That is just not going to work as curry powder has a single somewhat flat note to it. All these spices as well as the ginger and garlic work together to create a symphony of amazing and delightful flavors. You can cut back on the ginger and/or garlic to make it more mild or strong. If you want it mild leave out the red pepper flakes.

I have successfully substituted tender shredded cabbage for the lettuce and I believe shredded romaine would also work. Possibly escarole would be successful too.

I didn’t take any cooking pictures; was not thinking about my blog. Next time I make it I will try to get some shots and add them to this post. Ground meat curries are not that pretty looking but the flavor was all there.

keema and lettuce curry

Keema and Lettuce Curry

Ingredients

1 tbsp. mild olive oil

½ tsp. cumin seed

3 cardamom pods

1 small cinnamon stick or 1/2 tsp. ground cinnamon

1 large yellow or red onion, diced (1 to 1.5 cups)

4 cloves garlic, minced

½ inch to ¾ inch of fresh ginger shredded or minced

½ tsp. red pepper flakes or a red chili pepper chopped up finely

1 bay leaf

1 ½ sp. ground coriander

½ tsp. ground cumin

¾ tsp. ground turmeric

Skimpy ¼ tsp. ground nutmeg (I am debating whether I want this in or not!)

½ tsp. garam masala (mixture of ground spices like cinnamon/cumin/chili powder/cloves) If I don’t have any on hand i make a quick version using these named spices)

1 lb. ground lamb or beef

1 14 oz can diced tomatoes or 2-3 diced fresh tomatoes

¾ of a head of iceberg lettuce sliced thinly; maybe 2-3 cups worth

1 to 1.5 cups water

2 Tbsp. plain yogurt

Salt and pepper to taste


Instructions:  Let meat rest until it has warmed to room temp. while you chop and measure. I put the whole spices in one small cup and the ground spices in a second small glass cup.

Heat the oil in a large frying pan.  Any oil you like will work other than EVOL.  Add the dish of whole spices and let them heat until things crackle a bit.  Add the onions and cook until they are soft and starting to caramelize a touch. Add the ground spices as well as the fresh ginger and garlic. Stir for a minute. Add the ground meat; I push it down so the spices and onions are pushed up around the meat; giving the meat the majority of the pan surface to brown on.  Stir to brown the meat well. This may take 5-9 minutes.

Add the tomatoes and cook for 5 minutes. Add the sliced lettuce and stir well. Add 1 cup water, cover and cook about 40 minutes. Can cook longer; up to 60 minutes if you like. Stir it every ten minutes and add more water if needed. It should not be dry. Stir in the yogurt, add salt and pepper to taste.  Let stand five minutes before serving.  Remove the cinnamon stick. I try to pick out the cardamon pods as biting into one of them can be a bit overwhelming.

I serve mine over rice; brown rice is my preference for this curry.  I made some sautéed green beans and asparagus spears with black mustard seeds and cumin seeds; a great combination I stumbled upon. Enjoy!

My inspiration recipe was from my fancy pantry. They used peas not lettuce as the main veggie. I added and subtracted ingredients to re-create my beloved keema and lettuce curry.


Chilly Day Bean Soup

Another cold winter day!  It’s time for another hearty one pot meal.  This one is my multi-bean soup with Italian sausage.  I’m doing a half recipe this time for those who don’t want a giant pot of bean soup! I started with half a 1 lb. 4 oz bag of 15 bean mix   If you have celiac most 16 or 15 bean mixtures for soups contain barley which we  cannot eat.  I found Hurts’s HamBeens 15 Bean Soup mix at Giant grocery store that was marked gf.  I did not use the seasoning packet that came with it.  Same brand I used last time.

My soup has Italian sausage, but you can leave that out if you want a vegetarian version. I personally love sausage in a bean stew. Gives you lots of meaty flavor and a healthy dose of protein. I am guessing you could use other things like smoky ham chunks or maybe a ham hock?

I enjoyed a hot bowl of this pottage with a slice of toasted multigrain sourdough gf bread.  It made a full meal without anything else being necessary.   A fresh crunchy salad would go well if you want to round your dining experience out with some greens!

Multi Bean Soup with Sausage (approx. 4 servings)

Soak half of a 1 pound 4 oz (typical bag size) of dried mixed beans in filtered water to cover.  Soak it for an hour or try the overnight treatment, which is what I did.  Bring to a boil and let stand an hour or just let stand in the cold water overnight.  Be sure to drain them well and rinse with sink sprayer before returning the swollen legumes to the carefully rinsed out  pot.  Cover with fresh filtered water and add a bay leaf.  Cook 2 hours, pour in more water as needed and stir so it doesn’t stick or burn, cook another hour until the beans are nearly tender.  It is hard to say when beans get done, depends on a number of factors, taste often to check for tenderness. And stir that pot! As they approach that almost done spot start the rest of the dish, get everything chopped up and ready to toss in when the beans have reached the two-hour mark.

Chop into dice:

2 carrots

1 medium to large onion

Mince: 1 big garlic clove

Add the veggies to the pot, stir and cook 10 minutes. Stir occasionally. Add water if needed.  I like the soup thick, but it can’t be solid so add water.

As that cooks, start the sausage.  Sauté 3 Italian sausage links: brown in a frying pan with a touch of olive oil until top and bottom are browned and sausage is mostly done. Let cool a bit and slice into rounds or chunks, set aside.

Add the following to the soup:

½ a 14 ounce can of diced tomatoes

1/8 or less tsp. red pepper flakes

1/4 tsp. dried oregano

Sprinkle dried basil

1/8 tsp smoked paprika

½ bunch of kale leaves cut into big shreds; I cut off the bigger stems as they can be tough.

1 tsp sea salt

Some fresh ground black pepper

Cook ten minutes, add more water if it gets too thick. Stir occasionally.  Taste and add more spice if you think the soup needs more. Add the sliced sausage and cook five – ten minutes more.  A total cooking time could be from 2.5-3 hours, depending on your beans.  If they have been sitting in the pantry for many months they take longer to cook to a tender texture.

Taste and add more salt/pepper as you see necessary.  Let stand 5-10 minutes before ladling out.  Now that is comfort food that is good for you too!

Revised from a recipe originally posted February 2015

Turkey Pot Pie For Dinner

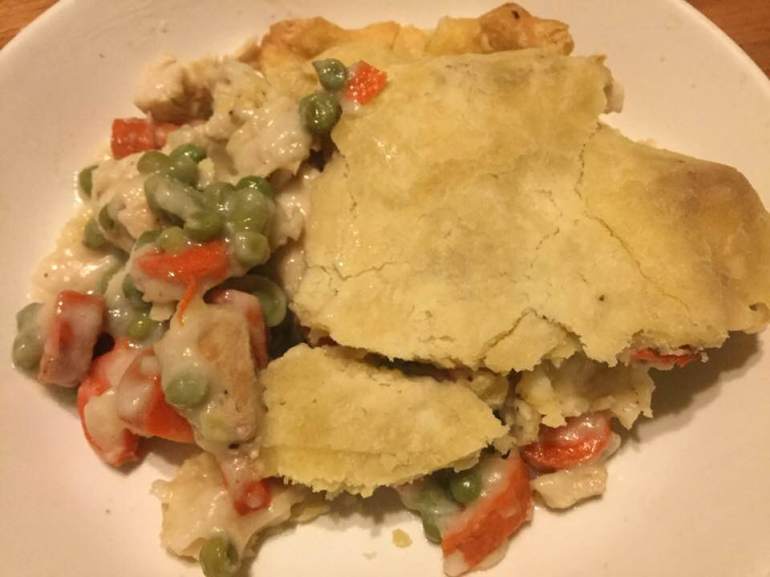
If you have any leftover turkey still lurking in the fridge this is an excellent way to use it up. You will need two cups of turkey to make this rib sticking entrée; turkey pot pie.  My version tracks pretty close to that you can find in a 1970’s Betty Crocker Cookbook.  Gluten free though…cause I must. You can toss it together in about 30 minutes and it bakes in 35 more. Your tummy will thank me. I put some celery seeds in the pie crust for extra flavor.  I generally make it with just a top crust which is less calories. If you want the full deal; double the crust ingredients and make a bottom crust too. Your creation will be a delicious and substantial meal for sure!

Angie’s Turkey Pot Pie

Crust:

1 c plus 2 Tbsp. brown rice flour mix (at bottom of recipe)

2 Tbsp. sweet rice flour

½ tsp xanthan gum

¼ tsp salt

6 Tbsp. cold butter cut into 12 chunks

1 large egg

2 tsp fresh orange or lemon juice

Directions: Mix dry ingredients in bowl of stand electric mixer.  Add butter and mix until crumbly and resembling coarse meal.  Add egg and juice.  Mix until it comes together into big chunks.  Shape into a ball with your hands. Put it on a crust sized piece of wax paper (14 x 14 inches more or less), flatten the crust ball some; put on top of it another piece of wax paper and chill it all in your fridge 15-20 minutes.

Pie filling

1/3 cup butter: I used ¼ cup plus some canola oil to reach 1/3 cup

1/3 cup white rice flour (or another gf flour)

½ cup finely chopped onion

½ tsp. sea salt

¼ tsp. black pepper, freshly ground

1¾ cup good quality gluten free chicken broth

2/3 cup whole or two percent milk

2 cups diced cooked turkey

4 large carrots, diced

¾ cup frozen peas (or a ten ounce bag of frozen carrots and peas)

½ to 1  tsp. celery seeds (optional)

Heat butter/oil in large frying pan, add onion, cook 5-7 minutes until soft and translucent. While it cooks, cook the diced carrots for 4-5 minutes in a ¼ cup of water in a saucepan, lid on. Then turn off the heat, uncover it and throw in peas, set aside.

Add flour, salt and pepper to the fry pan with the butter and onions, cook 2-3 minutes, stir often. Add broth (I held back about 2 tbsp. to make sure it wasn’t watery) and while it heats keep stirring. Add the milk when the mixture is hot but not boiling, Stir well until it boils and then let it boil one minute, still stirring.  Add the turkey and then the drained carrots and peas, Stir well. Add rest of broth if needed.

Heat the oven to 425 degrees.

Roll out the pie crust thick; just big enough to cover the top of your 9 inch pie pan [about 11 inches] (I always use a glass pan but I am sure you can use a metal one). I like to roll it just 2/3 of the way out and then sprinkle with about ½ -1 tsp. celery seeds. Roll it the rest of the way and the seeds will be embedded in the crust. I like the subtle flavor they add, a touch of really old fashioned tastiness my mom would approve of!

Pour the turkey mixture into the pie pan and top with the crust. Make sure no crust hangs down; trim to look nice. If you want to go whole hog double the crust recipe and roll half so you can put a bottom crust in before you pour in the filling. Top with your celery seed crust, seal to bottom crust (if you used one) and do cut a few gashes for venting… place pie on a pie drip catcher.  My pie pan is always very full and that pie drip pan is wonderful for keeping the filling from dripping on my oven.

Bake 30-35 minutes until crust is light brown and the pie is bubbly.

Let the pie cool five minutes before serving.

All you need is a salad and you have a wonderful balanced meal. Enjoy!

turkey pot pie on plate


Brown Rice Flour Mix  (same as King Arthur basic blend)
2 c brown rice flour

2/3 c potato starch

1/3 c tapioca flour

The crust is from Annalise Roberts’ great cookbook: Gluten-Free Baking Classics.

Chicken and Dumplings, GF of Course!

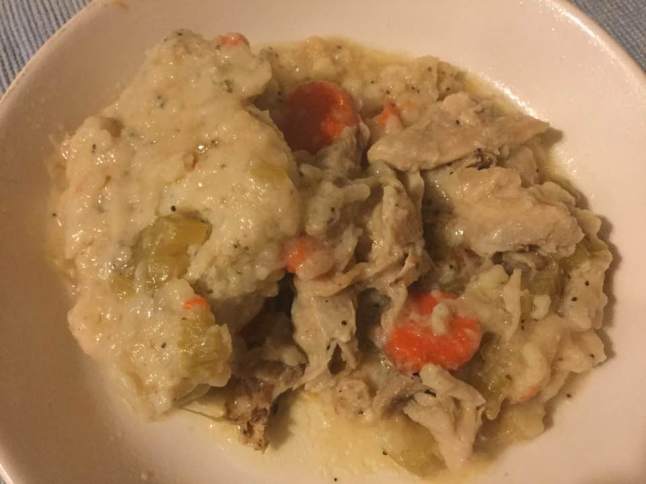
We all have times when we long for home cooking, stressful days that wear us down.  This is fairly quick to make and incredibly soothing. It is gluten free,  of course and reminds me of my old recipe for chicken fricassee with herbed dumplings. Creamy,  flavorful and totally satisfying. My IP makes it so easy to put together in less than an hour.   This recipe made 5 meals out of four chicken thighs so it is an inexpensive dish to serve.                 

Chicken with Dumplings

4 medium chicken thighs

2 Tbsp. butter

Kosher salt

¼ cup gluten free flour; I used King Arthur basic blend

2 celery stalks chopped

2 carrots in coins

1 onion chopped

2 cups gf chicken broth

¼ cup whole milk

1 Tbsp. cornstarch

Dumplings

1 ¾ cup brown rice flour mix

1 tsp. xanthan gum

1 Tbsp. sugar

3 tsp. baking powder

1/3 cup canola oil

2 eggs lightly beaten

¾-1 cup 2 percent milk

For herbal version; add 1 Tbsp. poppy seeds, 1 tsp. celery seeds, 1-2 tsp. dried parsley to dry ingredients.

Directions

Heat Instant Pot on sauté mode, high. Place flour, ½ tsp. salt and ¼ tsp fresh ground pepper on some wax paper, blend up and roll the chicken in it to coat evenly, shake off excess. Add butter to IP, melt it and then add chicken thighs. Sauté for 4 minutes, flip and cook 3-4 more minutes. Remove from pot, set aside. Add the celery, onions, and carrots to the pot, cook for 3 minutes. Add back the chicken and the broth. And more salt if desired. Secure lid Cook on manual pressure for 12 minutes.  Let release naturally for 5 minutes. Remove chicken from pot.  Pull/cut apart into bite sized pieces, removing the bones, discard all skin and any odd bits like cartilage.

While the chicken is cooking prepare the dumplings.  Mix the dry ingredients, in a separate bowl mix the wet ingredients. After the chicken is shredded, pour the wet into the dry ingredients, hold back a bit as you stir it together, do not over mix. Add the rest of the milk if it looks dry; it should be fairly thick/goopy and the xanthan gum will thicken it even more as it stands.  After the release add the ¼ cup milk to the broth and veggies, stir well. In a small bowl mix the cornstarch with ¼ cup hot broth. Add back to the pot and stir. Put pot on sauté, add back the cut up chicken. Use a big spoon to glop in heaping spoonfuls of the dumpling mix all over the top of the broth. Spread them out evenly. Put on cover loosely, I used my glass slow cooker lid so I could watch them steam.  Cook 18-27 minutes; until they double in size, rise to the surface and the tops are not wet or under cooked looking. Serve in shallow wide soup bowls.  Should serve 5 unless you are piggies; then serves four!

chicken and herb dumplings

Notes; I combined two recipes; one from “The Instant Pot Electric Pressure Cooker Cookbook” by Laurel Randolph and one from Carrie S. Forbes “Everything Gluten-Free Slow Cooker Cookbook”.  I used my usual  brown rice mix; King Arthur’s basic blend.  I had trouble getting my IP to sauté on low so I toggled back and forth from slow cooker to sauté to keep things bubbling but not boiling.  Hopefully next time I will get the low setting to work.  There will definitely be a next time.  This was a satisfying old-fashioned entree that I loved every bite of.  Try it with the herbs, they really add a lot of flavor. Enjoy!

PS: if you want to cook this in a slow cooker; do the chicken for 6-8 hours on low and  thirty minutes before serving add the dumplings, do not open lid until the 30 minutes is done.

Spicy Chicken Tenders

There are a lot of commercial food items that I don’t get to eat anymore, specifically most fast food being a major no no.  I miss crispy chicken like I used to enjoy at Wendy’s.  When I saw this recipe referenced on facebook I immediately went to the site, read the recipe and decided I had to try it.  I had some chicken breast tenders and all the ingredients except the gf Bisquick.  I looked on Glutenfreeonashoestring and lucky me; she has a recipe for making your own gf Bisquick; it is attached to a recipe for mini breakfast pancake bite muffins. I had the flours needed; white rice, potato starch and tapioca flour plus the add ins of baking powder, baking soda, salt, and sugar.  Easy peasy to put a double batch together; I will keep it in my freezer in a Ziplock freezer bag; sure have been wanting some of that Bisquick!

I lowered the hot sauce to half, ditto for the cayenne powder as I was pretty sure I didn’t want it so spicy; do as you wish. It was simple to do; mix the spices with the Bisquick, mix the hot sauce with the water, dip the chicken in the spices, then the hot water and back in the spiced flour and fry. The second time I made this I used a non stick stainless steel pan and 1/4 inch canola oil.  It was almost like deep frying but not quite.

I didn’t eat it as a sandwich the first time; had two juicy tenders with a baked potato and some summer squash.  It was very tasty and not too spicy for me.  I had it in a gf bun for a meal, complete with lettuce, tomato and mayo, and it was wonderful. You can also cut the chicken up into chunks, pound them briefly and you have lovely fingers that are somewhat smaller, great for kids. Fried chicken tenders are not something I would eat every week but it sure was yummy! I think this recipe is well worth trying even if you just buy some gf Bisquick.

Gluten-Free Spicy Chicken Sandwich (like Wendy’s)


2-3 Tbsp. Frank’s Red Hot Sauce  (the second time I made this I used another red hot sauce so it doesn’t have to be Franks to turn out great)

1/2 c Water

1/2 c Gluten-Free Bisquick

1 Tsp. Sea Salt

1-2 Tsp. Cayenne Pepper (use 1/2 tsp. if you want it close to mild)

1/8 Tsp. Fine Ground Pepper

1/4 Tsp. Paprika

1/4 Tsp. Garlic Powder

1 lb. Chicken Breast tenders – pound them a bit if they are very fat; you want it ½ inch or thinner.

Mix together the Gluten-Free Bisquick, Salt, Cayenne Pepper, Pepper, Paprika and Garlic Powder in a low bowl.  I used a wide soup bowl.

In a separate cereal bowl mix together Frank’s Red Hot Sauce and water. In a  high-sided sauté pan heat 1 cup of canola oil – it should come up about 1/2 inch the side of the pan depending on the size of your pan. I started it on medium heat and put in a candy thermometer to regulate the temperature; I got it pretty hot; 350 degrees before putting in the chicken.  Or use my frying pan method I described above; less oil for that and no thermometer needed. Take one chicken breast tender at a time and dredge it in the GF Bisquick mixture, then roll it in the hot sauce/water mixture and then put it back in the Bisquick mixture and roll it to coat.  This can get messy; try to keep one hand dry and one for the water/hot sauce part. I slid one into the hot oil and then a second one. Cook chicken for about 5 minutes, until they are golden brown and no longer pink in the center (I used a meat thermometer just to make sure).

Remove from the oil and drain on paper towels to blot any excess oil. If you have the oil hot enough they shouldn’t be greasy. If you want a sandwich, serve on a gf bun and top with mayonnaise, tomato and an additional piece of lettuce.

Go ahead, indulge in this delicious chicken and I promise you it will be a hit with your family!

Adapted from creativecookinggf.wordpress.com, February 2011.

Reblogged from a post in August 2015. Minor changes.