Artisan Bread and Gluten Free…Yes!

Ever in search of the elusive tasty gluten free bread…. I saw a fb post that promised just that.  So I couldn’t resist the temptation.  I tested out the recipe.  Made the flour mix, yeap ANOTHER gf flour mix… OMG! I must have a dozen mixes stored in my house between freezer and cupboards.  This time, I told myself,will be different, this will be the best freaking gf bread I have ever made. Will it be worth the effort…I hope… Hope springs eternal in the breasts of all celiacs for bread that we can enjoy, bread without giant holes in it or that crumbles to an unholy mess when made into a sandwich.

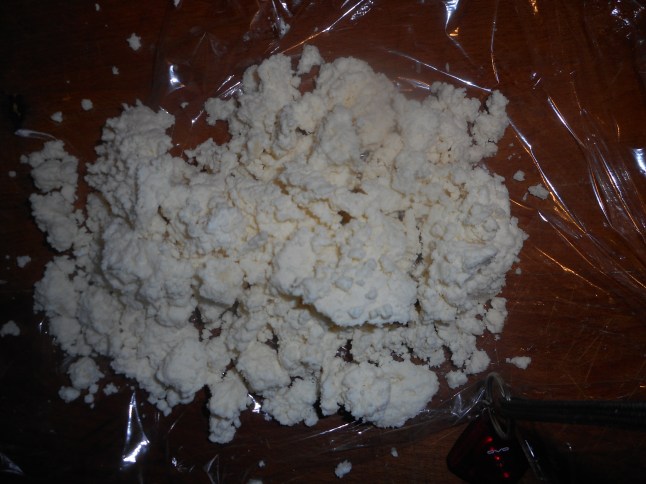
Okay, one giant jar of flour mix later and one batch of sticky dough whipped up.  You keep the dough in the fridge and use a big chunk of it when you want bread.  I only made a half batch.  There is just me here and the dough needs to be used up in 5 days. Ten if you make it egg free but I read a lot of comments on how the egg whites are very important to the texture of this bread.  So egg whites in, tick tick my bread baking clock is running down….

The flour mix isn’t all that different from my favorite mix, has some sorghum flour which is the new darling around gf circles for making great texture and flavor in gf baking. It also has the xanthan gum already in it.  The big jar is still ¾ full after my mixing efforts.

I had made the dough mixture up Saturday but upon reading comments that it was best eaten within 2 days and that the refrigerator time contributed to a sourdough taste, I delayed baking a test loaf until Sunday.

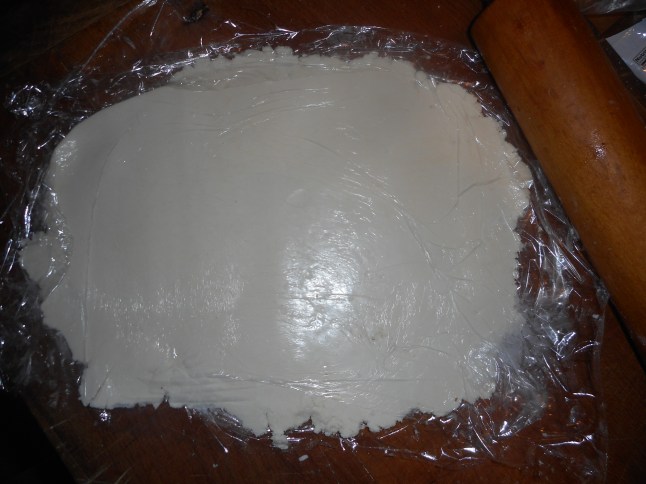
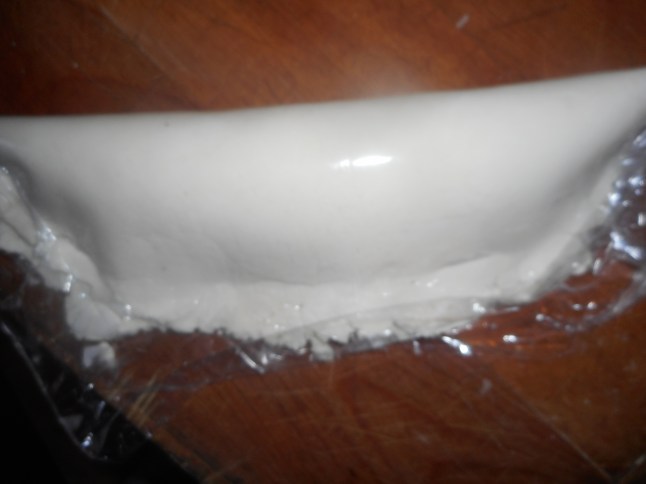
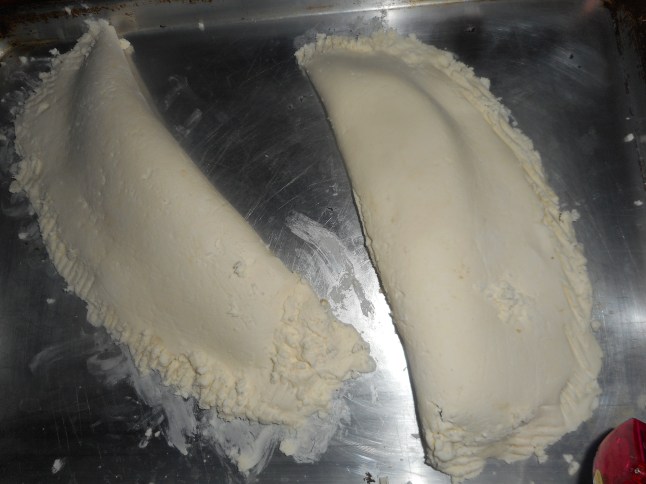
Laid down a piece of parchment paper after Sunday lunch and scooped up half my squishy dough. Wet my hands and carefully formed it into a round small loaf.  It seemed a tad flat.  But I let it rise the required hour; added maybe 15 more minutes. You use a bread stone to bake the bread on; slide it in right on it’s parchment paper. Paper gets brown but doesn’t burn…hopefully anyway!

pretzels 003

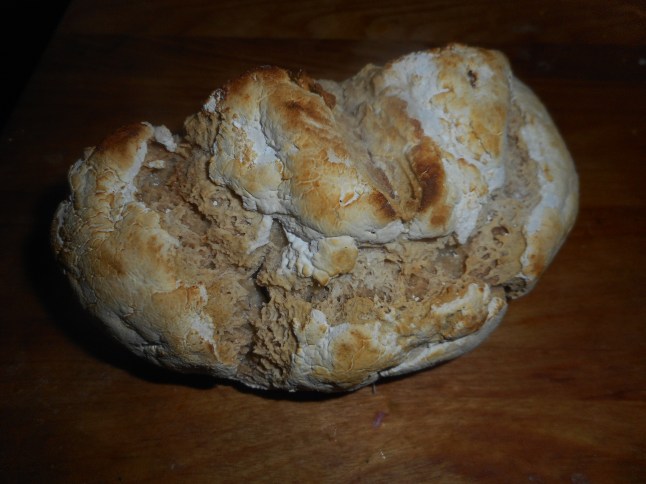
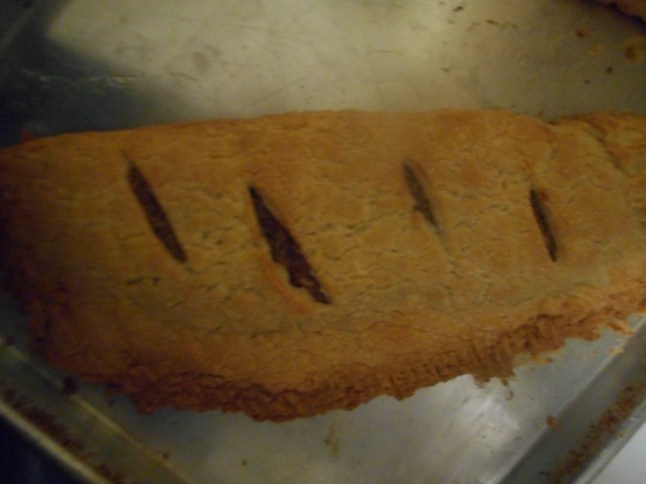
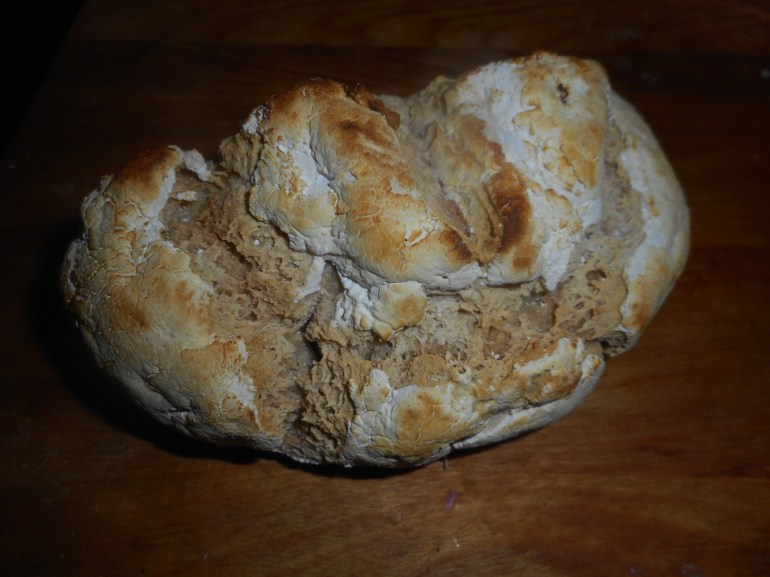
Baked okay; not as high a rise as I might wish.  I let it cool a long while per the directions.  Took it with me to my mom’s assisted living.  We had it with the lentil stew I made earlier this past storm weekend. She adored the bread! It has a good outside crunch, close moist texture. Great artisan look and taste.  Score!

pretzels 004

Here is the recipe; way too long for me to post. http://www.artisanbreadinfive.com/2014/11/03/master-recipe-from-gluten-free-abin5

Debating buying the cookbook…..maybe as there are a lot of other great recipes in it.

Anyway; if you miss that chew and flavor of artisan breads; this recipe is for you.  I have one more loaf to make; waiting until Thursday; I want to see if it gets like sourdough. Hoping!

Clarifications…FYI…

Just a few brief comments about my blog posts to clear up some issues.  Sometimes people ask if I have even made the recipe I just posted.  For the record: I never ever post recipes unless I have made them myself.  Also, I don’t post stuff that doesn’t taste good.  I do not post recipes I myself would never make again.  I don’t say it is yummy unless it is.  cranberry tartlets 001

Secondly: The pictures I post are almost always shots I have taken myself; they are pretty amateur so I doubt anyone will believe I got them anywhere but from my own camera! I do use pictures of food products or boxed gf products I find on line; better than pictures I could take of the stuff.

chickpea soup, salad, bread 017

Next, I do cook/bake the vast majority of the recipes I post over and over again.  I just made a batch of my granola the end of last week and I made homemade instant oatmeal this weekend.  The pie crust recipes I post are the two I use constantly in my own kitchen. Those muffins I post about often, I make muffins on a regular basis; about every three weeks.  I made my chickpea pasta soup this weekend; a post from last winter. To be honest I often cook right off my own blogged recipes; quick and easy to find them and my blog has all my changes to the dishes so I can best replicate tasty foods.

apple muffins 001

Finally, I never post stuff I don’t enjoy eating or that is crazy complicated.  I don’t post stuff made of bizarre ingredients, yes some things may be a bit unusual but I avoid ingredients I can’t find easily in my small town; either in the grocery store or the health food store. I want my food to be accessible: tasty, affordable and easy to replicate. Foods you would be happy to serve to company or just eat yourself when you crave homemade soup. I live to post yummy food for you to make.  I really do!

Lemon Velvet Pie…Heavenly Treat

I hereby declare 2016 the Year of the Pie.  I plan to post a pie recipe every single week.  Well, maybe some of them will be tarts, galettes, tartlets and rustic tarts but all in the pie clan!  Since I want to eat less sugary desserts I am going to step away from cakes and turn to something my family all adores.  Pie.  It’s time to make more pies.  Full of fruit pies, nut tarts, citrus chiffon pies, jam tarts, and chocolate pies of all sorts.  Pie and more pie.  Sounds delightful doesn’t it?

My first entry is something out of my Farm Journal’s Best Ever Pie Cookbook published in 1981.  My dear sister Margie gave it to me a long time ago and I have baked a number of sweet pie treats out of it. This is a lemon pie but unlike any I have ever made.  It is called a lemon velvet pie.  I think of it as a puffy lightly lemon cloud of a treat.  Impressive and delicious. My guy is already bugging me to make it again for him and I just made it yesterday! Actually he saw the recipe and asked me to make it so I did.  It has a lot of elements to it but no step is that difficult to conquer. It might strike you as the offspring of the union of a chiffon pie and lemon meringue pie!  Anyway, it is melt in your mouth and delicate especially if you make it with Meyer lemon as I did.

Per my New Year’s promise I did cut the sugar down quite a bit.  This filling is naturally gluten free.  My wheat eating friends can use a regular pie shell to make this treat.  I am betting it might be also great with my cookie/tart pie crust. This pie will be the talk of your next gathering if you whip it up!

———–

Here are some impromptu shots as I made this pie: the crust, yeap I see those cracks! No matter…covered up by the pie filling. And yes; the top layer refused to totally spread out for me.  Next time I might warm it a tad so it spreads smoothly. But it is one tasty pie!lemon velvet pie 005

lemon velvet pie 007lemon velvet pie 009lemon velvet pie 012lemon velvet pie 013lemon velvet pie 014

Lemon Velvet Pie

2/3 cup of sugar (can add another 1/3 cup if you like it sweet)

6 tbsp. corn starch

½ tsp. salt

1 ½ cups cold water

2 eggs separated

2 tbsp. butter

1 tsp. lemon zest, grated fresh

1/3 cup fresh lemon juice

1 tsp. vanilla extract

1 tbsp. (1 packet) unflavored gelatin

¼ cup cold water

1 cup light cream

A baked 9 inch pie shell

1 cup heavy cream, whipped with 2-3 tbsp. powdered sugar and 1/2 tsp. vanilla

Directions; bake the pie crust and let cool. See any of my past pie blog posts for a crust recipe.  I bake it about 20-25 minutes until it is light brown.

Combine sugar, cornstarch and salt in 1 ½ to 2 qt saucepan, stir in water, cook over medium heat until it thickens and mounds when dropped from a spoon; stirring constantly. Might take 3-5 minutes.  Stir a couple of spoons of it into the two stirred up egg yolks. Add right back into pan and stir well, cook 2 minutes on low stirring constantly. Remove from heat, add butter, stir, add the zest, lemon juice and vanilla, stir well. Remove one cup of filling and set aside.

Soften gelatin in the cold water for 5 minutes.  Add to the remaining hot filling in pan, stir to dissolve it.  Gradually stir in light cream, cool slightly to firm a bit.

Beat egg whites until firm and glossy, using electric mixer at high speed.  Fold into the pan of cooling filling.  I used a rubber spoonula. Pour mixture into baked pie shell, Refrigerate 15 minutes.  Top with the remaining cup of plain filling you set aside.  It will be thick; I put small spoonfuls all over the top.  Chill in fridge at least 2 hours to set the pie.

Whip the cream, add some powdered sugar and vanilla to sweeten lightly and serve slices with big dollops of cream on top.

Kringle for Dessert or a Snack


What is a kringle? I will give you a clue….comes from Denmark.  Give up? Or did you just google it!  It is a large pastry stuffed with fruit or nut filling. It is very buttery and simply delightful. Back in my wheat flour days I made it often and it was yeast raised.  It is so buttery that once I was taking a kringle to my mom’s for dessert and my dear friend Lois was holding the platter; it went sliding and was on the floor in a heartbeat.  Luckily the floor had just been cleaned and we picked it up, none the wiser!  We love to laugh about it now but gosh things could have gone bad if it had fallen on a grimy surface… Moral; hold onto your kringle! coffee cake 020

This version which I have made a couple times uses just baking powder.  It was created by Bette Hagman, a pioneer in the gluten free cookbook industry.  From her “More from the Gluten-Free Gourmet” cookbook originally published in 1993. Don’t make it if you want something really healthy as it is rich and crisp, almost like shortbread.  But, if you are looking for a treat for company it is a nice choice; can slice it into about six to eight servings and no one will complain it is gluten free, or even know!

I prefer the canned Solo almond filling but I have made it with their fruit fillings as well; cherry comes to mind as tasty.  Actually I got my original recipe off of a Solo filling can back. Just check the can to be sure it is labeled GF.  If you are vegan use margarine but I prefer butter. I would not suggest any other substitutions, especially of the sour cream.  It makes 2 and I have one in my freezer, instant fancy dessert for sometime in the next month or so.

coffee cake 010coffee cake 007coffee cake 008coffee cake 009coffee cake 011coffee cake 019

We gobbled it up and I totally forgot to take a picture of it iced or sliced! Next time.

Danish Kringle

Ingredients

‘1 ½ cups white rice flour

½ cup tapioca flour

1 tsp. baking powder

1 tsp. xanthan gum

1 cup butter or margarine, melted

½ cup ricotta cheese

½ cup sour cream

1 can Solo pie/pastry filling

Icing

½ cup confectioner’s sugar

  • 1 ½ tbsp milk

————

Directions: In a mixing bowl or stand mixer bowl stir together the dry ingredients, Stir in the butter, then the ricotta and sour cream. It will be very lumpy and wet.  Put plastic wrap on the bowl and chill for 2 plus hours.

Preheat your oven to 400 degrees.

Divide the dough in half.  Lay a long strip of plastic wrap and dump the dough half on it.  Cover with another piece of plastic wrap.  Roll it out to a rectangle about 10 x 16.  I kept moving bits in to fill gaps to make it more rectangular. Peel off the top plastic.  Lay a long line of the filling down the middle of the long way.  Use half the can.  Lift one side of the under plastic and roll it over the filling.  Gently press down the dough to seal in the filling.  Use the under plastic to gently roll the big pastry onto an ungreased baking sheet; I used a big one with low sides for more even heat.  Repeat this process with the other half of dough and rest of canned filling.  Slash the top of the pastry in about 4-5 places to allow the filling to peep out.   Bake for 35 to 40 minutes until light brown.

Mix the icing; I did it right in my measuring cup.  Drizzle on while pastry is still hot/pretty warm.

Notes: watch it closely while it bakes; mine was done a bit faster than I expected; edges got somewhat brown, still very tasty. So watch yours closely in the last few minutes. And hold onto that gem as it is very slidy on a platter!

Apple Sour Cream Cinnamon Cake

I am no longer a fan of the usual custom of the big fluffy iced birthday cake.  I have sure had some bad cake luck over the years, even when I COULD bake with regular flour!  So, I had a birthday cake to make one weekend, and I went a different direction. I made a cinnamon walnut apple cake.  Used that recipe before, and now I wonder why it took so long to make it again.  Addictively flavored with cinnamon and chopped walnuts. The thin layer of apples adds moisture and a delicate touch of apple. Yumm!

It is from my favorite cookbook by Annalise Roberts, Gluten Free Baking Classics.  To be honest it is more of a coffee cake but oh what a sweet and luscious treat it is; I swear you could feed it to anyone, and they would enjoy it. That cookbook is chock full of delicious recipes. I highly recommend it. My copy is much worn and floured! Might be time for a new copy!

Easy mixing up of dry ingredients, beat the eggs and sugar with electric mixer and combine all.  Layer it up with thin slivers of raw apple and the nut/sugar mix.  In all it has about a half cup less sugar than most birthday cakes and if you frost the cake, you are adding a lot more calories than my simple glaze.  The cake is fine without glaze, but I felt it added a lovely finish and great complexity to the flavors of this treat.

I didn’t take many pictures; my fingers were sticky with dough, and I really had to just put the cake together; my assistant was only 4 years old and he was more important to me than taking pictures when I made this the other day. Next time I will take shots as I put it together and add them to this posting.

coffee cake 049

coffee cake 077

Sour Cream Coffee Cake

½ cup chopped walnuts

2 tsp. cinnamon

1 ½ cups sugar, divided

1 medium apple; peeled, cored and cut in 8 wedges and each in 8 slices.

2 cups brown rice flour mix

1 ½ tsp. baking powder

1 tsp. baking soda

¾ tsp. xanthan gum

½ tsp. salt

2 large eggs, room temp

2 tsp. vanilla extract

1 cup sour cream, room temp

1/3 cup canola oil

Directions: Preheat oven to 350 degrees. Put rack in center of oven.  Spray a 9-inch tube pan with removable bottom with cooking spray.

Mix walnuts, cinnamon and half cup of the sugar in a small bowl.

Whisk rest of dry ingredients in a small bowl.

Beat eggs in the large bowl of an electric mixer until well blended; 2-3 minutes.  Add the rest of the sugar one tbsp. at a time beating well until creamy colored and fluffy. Add vanilla, sour cream, oil and flour mixture and then beat at low speed for 30 seconds, medium low if your mixer has a very low speed, should be well blended. Spread half that batter in the pan, top with apple bits and half the nut/sugar mix.  Spread rest of batter on top evenly; I plop small bits trying not to get too much in any one area. Cover with rest of sugar/walnut mixture. Don’t worry if it doesn’t seem even; it will rise and form into a cohesive cake.

Bake 50 minutes (Do NOT open until 45 min) until cake tester comes out clean.  Cool in pan on a cake rack for 20 minutes.  Cut down with a thin bread knife around the outside and the center tube and remove from pan; cool completely before slicing underneath to release the cake from the tube.

I made a simple glaze to drizzle over the top; 1 cup confectioner’s sugar, 1 tsp. vanilla extract, 2-3 tbsp. cream or milk.  Add the vanilla and 2 tbsp of milk; add more milk to thin it to the consistency that will allow you to drizzle from a spoon onto the cake.  Slice with a bread knife for perfect serving of this yummy treat.

Brown Rice Flour Mix base mix
2 c brown rice flour

2/3 c potato starch

1/3 c tapioca flour